利用引用计数实现线程安全的无锁栈

简介

前文我们通过风险指针的方式实现了无锁栈,但是也提出了一些弊端,比如每次pop都要从风险数组中选择一个空闲的节点作为标记。其次删除节点前要遍历风险数组对比节点是否被风险指针所指涉,如果被风险指针指涉则需放入待删列表。最后pop结束时也要回收待删列表中的节点,还要依次将待删列表中的节点和风险数组对比,如果未被风险指针指涉则需删除,否则跳过。

但是这种方式多次遍历风险数组,会有性能损耗,我们提出一种新的解决方式,利用引用计数实现无锁并发的栈。

引用计数

在C++并发编程一书中提出了两个计数,一个外部计数,一个内部计数,二者加起来就是有效的引用计数,很多读者对此费解,为何不用一个引用计数维护呢?那本文就是带着大家如何一步一步去实现并说明单引用计数的不可行性。

那我们先定义一个栈结构,以及它的内部节点结构

1
2
3
4
5
6
7
8
9
10
11
12
13
14
15
16
17
18
19
20
21
22
23
24
25
26
27
28
template<typename T>
class single_ref_stack {
public:
single_ref_stack():head(nullptr) {

}

~single_ref_stack() {
//循环出栈
while (pop());
}

private:
struct ref_node {
//1 数据域智能指针
std::shared_ptr<T> _data;
//2 引用计数
std::atomic<int> _ref_count;
//3 下一个节点
ref_node* _next;
ref_node(T const& data_) : _data(std::make_shared<T>(data_)),
_ref_count(1), _next(nullptr) {}
};

//头部节点
std::atomic<ref_node*> head;
};

1 single_ref_stack为我们定义的栈结构。内部包含一个head节点,head节点为一个ref_node*类型的原子变量。

2 single_ref_stack的构造函数将head设置为nullptr,析构函数循环pop直到栈为空为止。pop我们之后再实现。

3 定义ref_node结构作为每个栈存储的元素。内部包含_data表示数据域, int类型的原子变量表示引用计数。_next表示下一个节点指针。
ref_node的构造函数接收一个T类型的通用数据类型,利用这个参数构造自己的数据域。

接下来我们实现push操作

1
2
3
4
5
void push(T const& data) {
auto new_node = new ref_node(data);
new_node->next = head.load();
while (!head.compare_exchange_weak(new_node->next, new_node));
}

push 操作很简单,创建一个ref_node类型的指针对象new_node,将new_nodenext指针指向现在的头节点,然后不断地重试(防止其他线程修改head后导致head变化不一致),直到将head更新为new_node.

接下来我们实现pop

1
2
3
4
5
6
7
8
9
10
11
12
13
14
15
16
17
18
19
20
21
22
23
24
25
26
27
28
29
30
31
32
33
34
35
36
37
std::shared_ptr<T> pop() {
ref_node* old_head = head.load();
for (;;) {
if (!old_head) {
return std::shared_ptr<T>();
}
//1 只要执行pop就对引用计数+1
++(old_head->_ref_count);
//2 比较head和old_head想等则交换否则说明head已经被其他线程更新
if (head.compare_exchange_strong(old_head, old_head->_next)) {
auto cur_count = old_head->_ref_count.load();
auto new_count;
//3 循环重试保证引用计数安全更新
do {
//4 减去本线程增加的1次和初始的1次
new_count = cur_count - 2;
} while (!old_head->_ref_count.compare_exchange_weak(cur_count, new_count));

//返回头部数据
std::shared_ptr<T> res;
//5 交换数据
res.swap(old_head->_data);
//6
if (old_head->_ref_count == 0) {
delete old_head;
}

return res;
}
else {
//7
if (old_head->_ref_count.fetch_sub(1) == 1) {
delete old_head;
}
}
}
}

1 上面的代码我们先判断old_head是否为空,如果为空则说明栈为空。

2 然后代码1处 对引用计数+1, 因为是原子变量所以可以保证线程安全。

3 然后代码2处 比较head和old_head是否相等,如果相等则将head更新为old_head的next指向的数据。
简而言之就是将head更新为新的栈顶元素。因为存在多个线程并发执行2处代码的情况,导致只有一个线程交换成功,交换成功的线程就承担起返回数据的任务。

并且在4处减少2个引用计数(减去初始的1个加上自己pop开始增加的那一个),并且在3处循环重试更新引用计数。在6处判断引用计数如果变为0则删除指针。

交换失败的线程是抢占失败的线程,则执行7处代码需减少1次引用计数(因为该线程进入pop时已经增加了1次引用计数)。fetch_sub会将原子变量的数值减1,然后返回减少之前的数值。所以我们判断如果之前的数值为1则说明该线程是最后引用此指针的线程,可以将指针删除。

我们观察上述pop函数,存在严重漏洞

如果线程1和线程2都准备执行1处代码,但是线程2抢先执行,并且更新引用计数_ref_count变为0,则执行删除old_head的操作,此时线程1刚好执行1处代码,引发崩溃。

引发崩溃的原因我们知道了就是old_head被删除了,那我们要做的就是将引用计数提出来,不放在指针里,和指针解耦。

我们将原来的节点结构拆成两个

1
2
3
4
5
6
7
8
9
10
11
12
13
14
15
16
17
18
struct node {
//1 数据域智能指针
std::shared_ptr<T> _data;
//2 下一个节点
ref_node _next;
node(T const& data_) : _data(std::make_shared<T>(data_)) {}

};

struct ref_node {
// 引用计数
std::atomic<int> _ref_count;

node* _node_ptr;
ref_node( T const & data_):_node_ptr(new node(data_)), _ref_count(1){}

ref_node():_node_ptr(nullptr),_ref_count(0){}
};

ref_node表示栈存储的节点结构,包括引用计数和节点的指针。而node为实际的节点结构,包括节点的数据域以及下一个节点的地址。

那我们的single_ref_stack结构管理的head是指针类型好还是副本类型好呢?

我们可以假设head存储的是指针类型

1
2
//头部节点
std::atomic<ref_node*> head;

那么pop逻辑就要改为

1
2
3
4
5
6
7
8
9
10
11
12
13
14
15
16
17
18
19
20
21
22
23
24
25
26
27
28
29
30
31
32
33
34
35
36
37
38
39
40
41
42
43
44
std::shared_ptr<T> pop() {
//0 处
ref_node* old_head = head.load();
for (;;) {
//1 只要执行pop就对引用计数+1并更新到head中
ref_node* new_head;
do {
new_head = old_head;
//7 处
new_head->_ref_count += 1;
} while (!head.compare_exchange_weak(old_head, new_head));
//4
old_head = new_head;

auto* node_ptr = old_head->_node_ptr;
if (node_ptr == nullptr) {
return std::shared_ptr<T>();
}

//2 比较head和old_head想等则交换否则说明head已经被其他线程更新
if (head.compare_exchange_strong(old_head, node_ptr->_next)) {

//要返回的值
std::shared_ptr<T> res;
//交换智能指针
//5 处
res.swap(node_ptr->_data);

//6 增加的数量
int increase_count = old_head->_ref_count.fetch_sub(2);

//3 处判断仅有当前线程持有指针则删除
if (increase_count == 2) {
delete node_ptr;
}

return res;
}else {
if (old_head->_ref_count.fetch_sub(1) == 1) {
delete node_ptr;
}
}
}
}

解释一下上面的逻辑:

在1处head调用比较交换和old_head做比较,比较分为两个方面,一个是引用计数一个是node*的值。

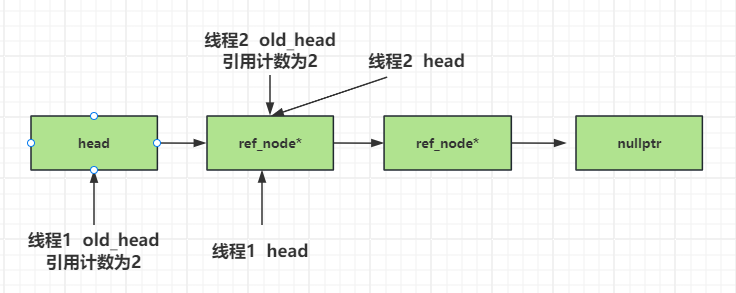
那我们假设线程1和线程2依次通过了比较交换逻辑(假设线程1先于线程2),那么假设线程1在4处看到的old_head的引用计数为2,线程2在4处看到old_head的引用计数为3.

而head最后被更新的引用计数为3.所以在2处的判断逻辑里,线程2会进入if的逻辑,线程1会进入else的逻辑,最后会有一个线程回收node_ptr节点,这么看来是正常的。

但是我们仔细分析,看上面的代码有很大漏洞

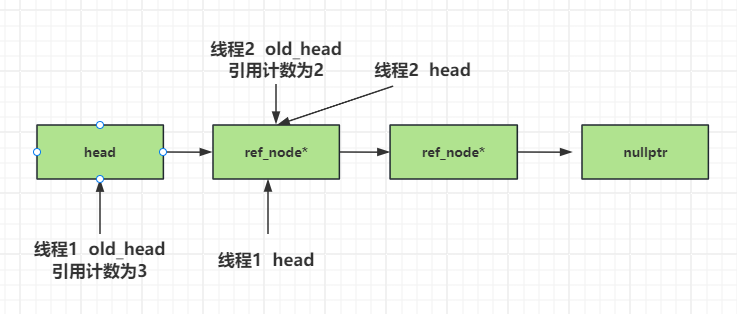
1 假设线程1比线程2先执行,线程1在2处执行比较交换后head会被更新为新的值。线程2执行比较交换操作会失败,则进入else处理, old_head会被更新为新的head值, 此时old_head的引用计数为1则会被线程2误删,因为线程2此时读到的old_head正是新的head指向的数据。而且没有弹出和修改head的值。这样其他线程pop头部元素时会崩溃。

https://cdn.llfc.club/1703215490981.jpg

2 线程1和线程2都执行完0处代码,二者读取的old_head值相同。假设线程1比线程2先执行,线程2因未抢占到cpu的时间片停顿在1处,线程1按次序依次执行最后执行到3处将node_ptr删除。而且现在的head已经指向了新的栈顶元素即old_head的下一个元素。此时线程2抢占到时间片,执行1处代码又将old_head更新为head当前值了,只不过引用计数加了1变为2,但是指向的是下一个节点,所以这种情况下进入仍会进入if条件,对新的old_head节点删除。这种情况倒是正常。

https://cdn.llfc.club/1703215559019.jpg

3 还是假设线程1和线程2都执行完0处代码,线程1抢先执行完5处。准备执行6处时,线程2抢占CPU执行了7处代码,尽管会被while比较old_head和head不同而重试,进而更新old_head。但是线程2的do逻辑中第一次的old_head和线程1的old_head指向的是同一个,线程2修改了old_head中的引用计数,导致线程1执行6处代码时不会进入if逻辑。又因为线程2在2处之后while会不断重试,线程2的head已经和old_head指向不同了,导致线程2也不会回收old_head内部节点指向的数据,导致内存泄漏。

https://cdn.llfc.club/1703215758466.jpg

这就告诉我们当我们设计pop逻辑的时候尽量不要存储指针,存储指针意味着存在多个线程操作同一块内存的情况。

所以我们得出以下结论

1 head的类型修改为ref_node类型而不是指针。

2 现有的引用保留,我们用其表示增加的引用计数,该引用计数可以用原子类型,也可以不用原子类型。为简化和节省效率我们用普通int类型。

3 新增一个表示减少的引用计数,因为这个表示减少的引用计数要在多个线程中同步,并且要保证安全性,那我们将其放入node类里, 因为node类的指针被存储在栈的节点中,所以可以达到多个线程修改这个减少的引用计数的效果。

4 一个节点能否被回收取决于整体的引用计数是否为0。

改进引用节点

按照上面的推论,我们新增_dec_count表示减少的引用计数,放在node结构里。

1
2
3
4
5
6
7
8
9
10
11
12
13
14
15
16
17
18
19
20
21
struct ref_node;
struct node {
//1 数据域智能指针
std::shared_ptr<T> _data;
//2 下一个节点
ref_node _next;
node(T const& data_) : _data(std::make_shared<T>(data_)) {}

//减少的数量
std::atomic<int> _dec_count;
};

struct ref_node {
// 引用计数
int _ref_count;

node* _node_ptr;
ref_node( T const & data_):_node_ptr(new node(data_)), _ref_count(1){}

ref_node():_node_ptr(nullptr),_ref_count(0){}
};

然后将栈中的head结构变为ref_node类型的原子变量。

1
2
//头部节点
std::atomic<ref_node> head;

我们重新实现push

1
2
3
4
5
void push(T const& data) {
auto new_node = ref_node(data);
new_node._node_ptr->_next = head.load();
while (!head.compare_exchange_weak(new_node._node_ptr->_next, new_node));
}

我们重新实现pop

1
2
3
4
5
6
7
8
9
10
11
12
13
14
15
16
17
18
19
20
21
22
23
24
25
26
27
28
29
30
31
32
33
34
35
36
37
38
39
40
41
42
43
std::shared_ptr<T> pop() {
ref_node old_head = head.load();
for (;;) {
//1 只要执行pop就对引用计数+1并更新到head中
ref_node new_head;

//2
do {
new_head = old_head;
new_head._ref_count += 1;
} while (!head.compare_exchange_weak(old_head, new_head));

old_head = new_head;
//3
auto* node_ptr = old_head._node_ptr;
if (node_ptr == nullptr) {
return std::shared_ptr<T>();
}

//4 比较head和old_head相等则交换否则说明head已经被其他线程更新
if (head.compare_exchange_strong(old_head, node_ptr->_next)) {

//要返回的值
std::shared_ptr<T> res;
//交换智能指针
res.swap(node_ptr->_data);

//5 增加的数量
int increase_count = old_head._ref_count - 2;
//6
if (node_ptr->_dec_count.fetch_add(increase_count) == -increase_count) {
delete node_ptr;
}

return res;
}else {
//7
if (node_ptr->_dec_count.fetch_sub(1) == 1) {
delete node_ptr;
}
}
}
}

1 多个线程并发pop如果有线程在2处重试,可能时head和old_head的引用计数不同或者node的地址不同,不过无论如何我们的head采用的是副本存储,所以重试失败增加的引用计数不会影响到其他线程。

2 在代码3处我们将old_head的node地址取出来,留作node_ptr,这样我们以后可以对node_ptr内部的引用计数做减少,因为多个线程操作node_ptr指向的数据,所以引用计数是原子变量,并且多个线程是可见的。

3 在4处进行判断,由于我们的head存储的是ref_node类型,所以多个线程看到的old_head的值可能不一样,但我们能保证仅有一个线程进入if逻辑,进入的线程就是old_head和head匹配的那个,我们定义了res用来返回数据。在5处对增加的引用计数减2操作,获取除了自己以外并行操作这个old_head的线程数。然后我们说过增加引用计数和减少引用计数相加为0就说明可以删除节点。那我们在6处利用fetch_add操作返回操作之前的值,让fetch_add增加increase_count,并且fetch_add返回增加之前_dec_count的值,如果这个值是负的increase_count即表示当前仅有该线程操作这个old_head节点,即可删除。

为了让大家了解这个过程我们假设线程1和线程2都执行到4处之前,线程2没抢占到cpu暂停,而线程1抢占并且执行了4处的交换进入if条件,而此时线程2抢占cpu继续执行else逻辑,将_dec_count减少1,原来的_dec_count为0,减少后变为-1,fetch_sub返回之前的值为0不满足if条件所以线程2不会删除node_ptr。此时线程1继续抢占cpu执行到5处_ref_count为3,increse_count为1,_dec_count为-1,_dec_count进行fetch_add之后变为0,但是fetch_add返回的时相加之前的值即为-1,而increase_count恰好为1,所以线程1回收这个node_ptr。

测试和验证

为了测试安全性,效率就不测了,这个无锁的栈后期还要完善,目前我们只要测试安全性即可。

我们启动三个线程t1,t2,t3,t1用来向栈中压入元素,t2和t3用来从栈中弹出元素。

1
2
3
4
5
6
7
8
9
10
11
12
13
14
15
16
17
18
19
20
21
22
23
24
25
26
27
28
29
30
31
32
33
34
35
36
37
38
39
40
41
42
43
44
45
46
47
void TestSingleRefStack() {
single_ref_stack<int> single_ref_stack;
std::set<int> rmv_set;
std::mutex set_mtx;

std::thread t1([&]() {
for (int i = 0; i < 20000; i++) {
single_ref_stack.push(i);
std::cout << "push data " << i << " success!" << std::endl;
std::this_thread::sleep_for(std::chrono::milliseconds(5));
}
});

std::thread t2([&]() {
for (int i = 0; i < 10000;) {
auto head = single_ref_stack.pop();
if (!head) {
std::this_thread::sleep_for(std::chrono::milliseconds(10));
continue;
}
std::lock_guard<std::mutex> lock(set_mtx);
rmv_set.insert(*head);
std::cout << "pop data " << *head << " success!" << std::endl;
i++;
}
});

std::thread t3([&]() {
for (int i = 0; i < 10000;) {
auto head = single_ref_stack.pop();
if (!head) {
std::this_thread::sleep_for(std::chrono::milliseconds(10));
continue;
}
std::lock_guard<std::mutex> lock(set_mtx);
rmv_set.insert(*head);
std::cout << "pop data " << *head << " success!" << std::endl;
i++;
}
});

t1.join();
t2.join();
t3.join();

assert(rmv_set.size() == 20000);
}

上面的代码中t1负责压入两万个元素,t2和t3分别从栈中弹出元素
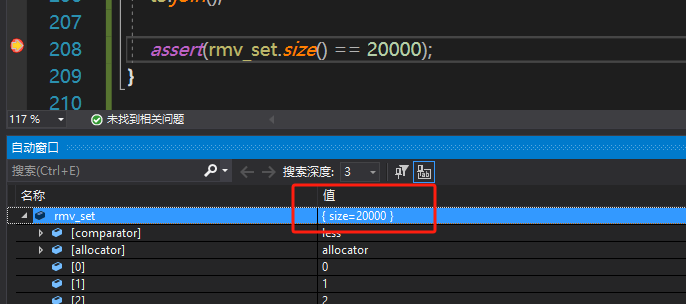
我们在assert处打个断点,可以看到集合大小确实为两万个,而且不存在重复元素,不存在缺失的元素。

https://cdn.llfc.club/1703226074849.jpg

总结

源码链接:
https://gitee.com/secondtonone1/boostasio-learn/tree/master/concurrent/day17-LockFreeStack

视频链接:
https://space.bilibili.com/271469206/channel/collectiondetail?sid=1623290