恋恋风辰的个人博客


  • Home

  • Archives

  • Categories

  • Tags

  • Search

零基础C++(23) 智能指针

Posted on 2024-12-06 | In 零基础C++

1. 引言

C++ 引入智能指针的主要目的是为了自动化内存管理,减少手动 new 和 delete 带来的复杂性和错误。智能指针通过 RAII(资源获取即初始化)机制,在对象生命周期结束时自动释放资源,从而有效防止内存泄漏和资源管理错误。

2. 原生指针 vs 智能指针

原生指针

原生指针是 C++ 最基本的指针类型,允许程序员直接管理内存。然而,原生指针存在以下问题:

  • 内存泄漏:未释放动态分配的内存。
  • 悬挂指针:指针指向已释放或未初始化的内存。
  • 双重释放:多次释放同一内存区域。

智能指针的优势

智能指针通过封装原生指针,自动管理内存,解决上述问题。主要优势包括:

  • 自动销毁:在智能指针生命周期结束时自动释放资源。
  • 引用计数:共享智能指针能够跟踪引用数量,确保资源在最后一个引用结束时释放。
  • 避免内存泄漏:通过 RAII 机制自动管理资源生命周期。
  • 类型安全:提供更严格的类型检查,减少错误。

3. std::unique_ptr

3.1 定义与用法

std::unique_ptr 是一种独占所有权的智能指针,任何时刻只能有一个 unique_ptr 实例拥有对某个对象的所有权。不能被拷贝,只能被移动。

主要特性:

  • 独占所有权:确保资源在一个所有者下。
  • 轻量级:没有引用计数,开销小。
  • 自动释放:在指针销毁时自动释放资源。

3.2 构造函数与赋值

unique_ptr 提供多种构造函数和赋值操作,以支持不同的使用场景。

  • 默认构造函数:创建一个空的 unique_ptr。
  • 指针构造函数:接受一个裸指针,拥有其所有权。
  • 移动构造函数:将一个 unique_ptr 的所有权转移到另一个 unique_ptr。
  • 移动赋值操作符:将一个 unique_ptr 的所有权转移到另一个 unique_ptr。

3.3 移动语义

由于 unique_ptr 不能被拷贝,必须通过移动语义转移所有权。这保证了资源的独占性。

3.4 代码案例

1
2
3
4
5
6
7
8
9
10
11
12
13
14
15
16
17
18
19
20
21
22
23
24
25
26
27
28
29
30
31
32
33
34
35
36
37
38
39
40
41
42
#include <iostream>
#include <memory>

class Test {
public:
Test(int val) : value(val) {
std::cout << "Test Constructor: " << value << std::endl;
}
~Test() {
std::cout << "Test Destructor: " << value << std::endl;
}
void show() const {
std::cout << "Value: " << value << std::endl;
}

private:
int value;
};

int main() {
// 创建一个 unique_ptr
std::unique_ptr<Test> ptr1(new Test(100));
ptr1->show();

// 使用 make_unique(C++14 引入)
auto ptr2 = std::make_unique<Test>(200);
ptr2->show();

// 移动 unique_ptr
std::unique_ptr<Test> ptr3 = std::move(ptr1);
if (!ptr1) {
std::cout << "ptr1 is now nullptr after move." << std::endl;
}
ptr3->show();

// 重置 unique_ptr
ptr2.reset(new Test(300));
ptr2->show();

// unique_ptr 自动释放资源
return 0;
}

输出:

1
2
3
4
5
6
7
8
9
10
11
Test Constructor: 100
Value: 100
Test Constructor: 200
Value: 200
ptr1 is now nullptr after move.
Value: 100
Test Destructor: 100
Test Constructor: 300
Value: 300
Test Destructor: 300
Test Destructor: 200

解析:

  • ptr1 拥有 Test(100),ptr2 拥有 Test(200)。
  • 通过 std::move 将 ptr1 的所有权转移到 ptr3,ptr1 变为空。
  • ptr2.reset(new Test(300)) 释放了原有的 Test(200),并拥有新的 Test(300)。
  • 程序结束时,ptr3 和 ptr2 自动释放各自拥有的资源。

4. std::shared_ptr

4.1 定义与用法

std::shared_ptr 是一种共享所有权的智能指针,允许多个 shared_ptr 实例共享对同一个对象的所有权。通过引用计数机制,管理资源的生命周期。

主要特性:

  • 共享所有权:多个 shared_ptr 可以指向同一个对象。
  • 引用计数:跟踪有多少 shared_ptr 实例指向同一对象。
  • 自动释放:当引用计数为0时,自动释放资源。

4.2 引用计数与控制块

shared_ptr 背后依赖一个控制块(Control Block),用于存储引用计数和指向实际对象的指针。控制块的主要内容包括:

  • 强引用计数(use_count):表示有多少个 shared_ptr 指向对象。
  • 弱引用计数(weak_count):表示有多少个 weak_ptr 指向对象(不增加强引用计数)。

4.3 构造函数与赋值

shared_ptr 提供多种构造函数和赋值操作,以支持不同的使用场景。

  • 默认构造函数:创建一个空的 shared_ptr。
  • 指针构造函数:接受一个裸指针,拥有其所有权。
  • 拷贝构造函数:增加引用计数,共享对象所有权。
  • 移动构造函数:转移所有权,源 shared_ptr 变为空。
  • 拷贝赋值操作符:释放当前资源,增加引用计数,指向新对象。
  • 移动赋值操作符:释放当前资源,转移所有权,源 shared_ptr 变为空。

4.4 代码案例

1
2
3
4
5
6
7
8
9
10
11
12
13
14
15
16
17
18
19
20
21
22
23
24
25
26
27
28
29
30
31
32
33
34
35
36
37
38
39
40
41
42
43
44
45
46
47
48
49
50
51
#include <iostream>
#include <memory>

class Test {
public:
Test(int val) : value(val) {
std::cout << "Test Constructor: " << value << std::endl;
}
~Test() {
std::cout << "Test Destructor: " << value << std::endl;
}
void show() const {
std::cout << "Value: " << value << std::endl;
}

private:
int value;
};

int main() {
// 创建一个 shared_ptr
std::shared_ptr<Test> sp1(new Test(100));
std::cout << "sp1 use_count: " << sp1.use_count() << std::endl;
sp1->show();

// 通过拷贝构造共享所有权
std::shared_ptr<Test> sp2 = sp1;
std::cout << "After sp2 = sp1:" << std::endl;
std::cout << "sp1 use_count: " << sp1.use_count() << std::endl;
std::cout << "sp2 use_count: " << sp2.use_count() << std::endl;

// 通过拷贝赋值共享所有权
std::shared_ptr<Test> sp3;
sp3 = sp2;
std::cout << "After sp3 = sp2:" << std::endl;
std::cout << "sp1 use_count: " << sp1.use_count() << std::endl;
std::cout << "sp2 use_count: " << sp2.use_count() << std::endl;
std::cout << "sp3 use_count: " << sp3.use_count() << std::endl;

// 重置 shared_ptr
sp2.reset(new Test(200));
std::cout << "After sp2.reset(new Test(200)):" << std::endl;
std::cout << "sp1 use_count: " << sp1.use_count() << std::endl;
std::cout << "sp2 use_count: " << sp2.use_count() << std::endl;
std::cout << "sp3 use_count: " << sp3.use_count() << std::endl;
sp2->show();

// 自动释放资源
std::cout << "Exiting main..." << std::endl;
return 0;
}

输出:

1
2
3
4
5
6
7
8
9
10
11
12
13
14
15
16
17
18
19
Test Constructor: 100
sp1 use_count: 1
Value: 100
After sp2 = sp1:
sp1 use_count: 2
sp2 use_count: 2
After sp3 = sp2:
sp1 use_count: 3
sp2 use_count: 3
sp3 use_count: 3
Test Constructor: 200
After sp2.reset(new Test(200)):
sp1 use_count: 2
sp2 use_count: 1
sp3 use_count: 2
Value: 200
Exiting main...
Test Destructor: 200
Test Destructor: 100

解析:

  • 创建 sp1,引用计数为1。

  • 拷贝构造 sp2,引用计数增加到2。

  • 拷贝赋值 sp3,引用计数增加到3。

  • ```
    sp2.reset(new Test(200))

    1
    2
    3
    4
    5
    6
    7
    8
    9
    10
    11
    12
    13
    14
    15
    16
    17
    18
    19
    20
    21
    22
    23
    24
    25
    26
    27
    28
    29
    30
    31
    32
    33
    34
    35
    36
    37
    38
    39
    40
    41
    42
    43
    44
    45
    46
    47
    48
    49
    50
    51
    52
    53
    54
    55
    56
    57
    58
    59
    60
    61
    62
    63
    64
    65
    66
    67
    68
    69
    70
    71
    72
    73
    74
    75
    76
    77
    78
    79
    80
    81
    82
    83

    :

    - 原 `Test(100)` 的引用计数减少到2。
    - 分配新的 `Test(200)`,`sp2` 拥有它,引用计数为1。

    - 程序结束时:

    - `sp1` 和 `sp3` 释放 `Test(100)`,引用计数降到0,资源被销毁。
    - `sp2` 释放 `Test(200)`,引用计数为0,资源被销毁。


    ## 5. `std::weak_ptr`


    ### 5.1 定义与用法


    `std::weak_ptr` 是一种不拥有对象所有权的智能指针,用于观察但不影响对象的生命周期。主要用于解决 `shared_ptr` 之间的循环引用问题。


    **主要特性**:


    - **非拥有所有权**:不增加引用计数。
    - **可从 `shared_ptr` 生成**:通过 `std::weak_ptr` 可以访问 `shared_ptr` 管理的对象。
    - **避免循环引用**:适用于双向关联或观察者模式。


    ### 5.2 避免循环引用


    在存在双向关联(如父子关系)时,使用多个 `shared_ptr` 可能导致循环引用,导致内存泄漏。此时,可以使用 `weak_ptr` 来打破循环。


    ### 5.3 代码案例


    #### 场景:双向关联导致循环引用


    ```cpp
    #include <iostream>
    #include <memory>

    class B; // 前向声明

    class A {
    public:
    std::shared_ptr<B> ptrB;

    A() { std::cout << "A Constructor" << std::endl; }
    ~A() { std::cout << "A Destructor" << std::endl; }
    };

    class B {
    public:
    std::shared_ptr<A> ptrA;

    B() { std::cout << "B Constructor" << std::endl; }
    ~B() { std::cout << "B Destructor" << std::endl; }
    };

    int main() {
    {
    std::shared_ptr<A> a = std::make_shared<A>();
    std::shared_ptr<B> b = std::make_shared<B>();
    a->ptrB = b;
    b->ptrA = a;
    }
    std::cout << "Exiting main..." << std::endl;
    return 0;
    }

输出:

1
2
3
4
5
A Constructor
B Constructor
Exiting main...
A Destructor
B Destructor

问题:

虽然 a 和 b 离开作用域,但 A Destructor 和 B Destructor 并未被调用,因为 a 和 b 相互引用,引用计数无法降到0,导致内存泄漏。

解决方案:使用 weak_ptr

改用 weak_ptr 其中一方(如 B 的 ptrA),打破循环引用。

1
2
3
4
5
6
7
8
9
10
11
12
13
14
15
16
17
18
19
20
21
22
23
24
25
26
27
28
29
30
31
#include <iostream>
#include <memory>

class B; // 前向声明

class A {
public:
std::shared_ptr<B> ptrB;

A() { std::cout << "A Constructor" << std::endl; }
~A() { std::cout << "A Destructor" << std::endl; }
};

class B {
public:
std::weak_ptr<A> ptrA; // 使用 weak_ptr

B() { std::cout << "B Constructor" << std::endl; }
~B() { std::cout << "B Destructor" << std::endl; }
};

int main() {
{
std::shared_ptr<A> a = std::make_shared<A>();
std::shared_ptr<B> b = std::make_shared<B>();
a->ptrB = b;
b->ptrA = a;
}
std::cout << "Exiting main..." << std::endl;
return 0;
}

输出:

1
2
3
4
5
A Constructor
B Constructor
A Destructor
B Destructor
Exiting main...

解析:

  • B 使用 weak_ptr 指向 A,不增加引用计数。
  • a 和 b 离开作用域,引用计数降为0,资源被正确释放。
  • 防止了循环引用,避免了内存泄漏。

5.4 访问 weak_ptr 指向的对象

weak_ptr 不能直接访问对象,需要通过 lock() 方法转换为 shared_ptr,并检查对象是否仍然存在。

1
2
3
4
5
6
7
8
9
10
11
12
13
14
15
16
17
18
19
20
21
22
23
#include <iostream>
#include <memory>

int main() {
std::shared_ptr<int> sp = std::make_shared<int>(42);
std::weak_ptr<int> wp = sp;

if (auto locked = wp.lock()) { // 尝试获取 shared_ptr
std::cout << "Value: " << *locked << std::endl;
} else {
std::cout << "Object no longer exists." << std::endl;
}

sp.reset(); // 释放资源

if (auto locked = wp.lock()) { // 再次尝试获取 shared_ptr
std::cout << "Value: " << *locked << std::endl;
} else {
std::cout << "Object no longer exists." << std::endl;
}

return 0;
}

输出:

1
2
Value: 42
Object no longer exists.

解析:

  • wp.lock() 返回一个 shared_ptr,如果对象依然存在,则有效。
  • sp.reset() 释放资源后,wp.lock() 无法获取有效的 shared_ptr。

6. 自定义删除器

6.1 用例与实现

有时,默认的 delete 操作不适用于所有资源管理场景。此时,可以使用自定义删除器来指定资源释放的方式。例如,管理文件句柄、网络资源或自定义清理逻辑。

6.2 代码案例

用例:管理 FILE* 资源

1
2
3
4
5
6
7
8
9
10
11
12
13
14
15
16
17
18
19
20
21
22
23
24
25
26
#include <iostream>
#include <memory>
#include <cstdio>

struct FileDeleter {
void operator()(FILE* fp) const {
if (fp) {
std::cout << "Closing file." << std::endl;
fclose(fp);
}
}
};

int main() {
{
std::shared_ptr<FILE> filePtr(fopen("example.txt", "w"), FileDeleter());
if (filePtr) {
std::cout << "File opened successfully." << std::endl;
// 使用 filePtr 进行文件操作
fprintf(filePtr.get(), "Hello, World!\n");
}
} // 自动关闭文件

std::cout << "Exiting main..." << std::endl;
return 0;
}

输出:

1
2
3
File opened successfully.
Closing file.
Exiting main...

解析:

  • 自定义删除器 FileDeleter 用于在 shared_ptr 被销毁时关闭文件。
  • 使用 filePtr.get() 获取原生 FILE* 指针进行文件操作。
  • 离开作用域时,自动调用 FileDeleter 关闭文件。

6.3 使用 Lambda 表达式作为删除器

C++11 允许使用 lambda 表达式作为删除器,简化代码。

1
2
3
4
5
6
7
8
9
10
11
12
13
14
15
16
17
18
19
20
21
22
23
#include <iostream>
#include <memory>
#include <cstdio>

int main() {
{
auto fileDeleter = [](FILE* fp) {
if (fp) {
std::cout << "Closing file via lambda." << std::endl;
fclose(fp);
}
};

std::unique_ptr<FILE, decltype(fileDeleter)> filePtr(fopen("example.txt", "w"), fileDeleter);
if (filePtr) {
std::cout << "File opened successfully." << std::endl;
fprintf(filePtr.get(), "Hello, Lambda!\n");
}
} // 自动关闭文件

std::cout << "Exiting main..." << std::endl;
return 0;
}

输出:

1
2
3
File opened successfully.
Closing file via lambda.
Exiting main...

解析:

  • 使用 std::unique_ptr 搭配 lambda 删除器管理 FILE*。
  • 提供了更灵活和简洁的删除器实现。

7. 最佳实践与常见陷阱

7.1 选择合适的智能指针

  • **std::unique_ptr**:
    • 用于明确的独占所有权场景。
    • 适用于资源的单一管理者或需要所有权转移的情况。
    • 更轻量,性能更优。
  • **std::shared_ptr**:
    • 用于共享所有权的场景。
    • 需要多个指针共同管理同一资源时使用。
    • 引用计数带来一定的性能开销。
  • **std::weak_ptr**:
    • 用于观察不拥有资源的场景。
    • 适用于需要避免循环引用或只需临时访问资源的情况。

7.2 避免循环引用

在使用 shared_ptr 时,特别是在对象间存在双向引用时,容易导致循环引用,内存泄漏。使用 weak_ptr 打破循环引用。

7.3 使用 make_shared 与 make_unique

优先使用 make_shared 和 make_unique 来创建智能指针,避免直接使用 new,提高效率和异常安全性。

1
2
auto sp = std::make_shared<Test>(100);
auto up = std::make_unique<Test>(200);

7.4 不要混用原生指针与智能指针

避免在智能指针管理的对象上同时使用原生指针进行管理,防止重复释放或不安全访问。

7.5 理解智能指针的所有权语义

深入理解不同智能指针的所有权规则,避免误用导致资源管理错误。

8. 总结

智能指针是 C++ 中强大的资源管理工具,通过封装原生指针,提供自动化的内存管理,极大地减少了内存泄漏和资源管理错误。std::unique_ptr、std::shared_ptr 和 std::weak_ptr 各有其应用场景,理解它们的差异和使用方法对于编写安全、高效的 C++ 代码至关重要。此外,通过实现自己的智能指针(如 SimpleSharedPtr),可以更深入地理解智能指针的工作原理,为高级 C++ 编程打下坚实基础。

零基础C++(24) 可调用对象function类

Posted on 2024-12-06 | In 零基础C++

引言

C++ 提供了多种方式来表示和操作可调用对象,包括传统的函数指针、仿函数(Functors)、Lambda表达式、std::function 和 std::bind 等。这些工具极大地增强了C++的灵活性和表达能力,尤其在处理回调、事件驱动编程和函数式编程时表现尤为出色。

函数指针

函数指针是C++中最基本的可调用对象之一,用于指向普通函数和静态成员函数。

定义与使用

函数指针的定义涉及到函数的返回类型和参数列表。例如,定义一个指向返回 int 且接受两个 int 参数的函数指针:

1
2
3
4
5
6
7
8
9
10
11
12
13
14
15
16
17
18
// 定义函数指针类型
int (*funcPtr)(int, int);

// 定义一个普通函数
int add(int a, int b) {
return a + b;
}

int main() {
// 给函数指针赋值
funcPtr = &add;

// 调用函数
int result = funcPtr(3, 4);
std::cout << "结果: " << result << std::endl; // 输出: 结果: 7

return 0;
}

优点与局限性

优点:

  • 简单直观,适用于简单的回调函数。

局限性:

  • 不能捕获上下文(如lambda中的闭包)。
  • 语法相对复杂,尤其是指针的声明和使用。

仿函数(Functors)

仿函数(Functors),又称函数对象(Function Objects),是在C++中重载了 operator() 的类或结构体实例。仿函数不仅可以像普通函数一样被调用,还能携带状态,提供更大的灵活性和功能性。

定义与使用

仿函数是通过定义一个类或结构体,并重载其调用运算符 operator() 来实现的。

1
2
3
4
5
6
7
8
9
10
11
12
13
14
15
16
17
18
19
20
21
22
#include <iostream>

// 定义一个仿函数类
struct Adder {
int to_add;

// 构造函数
Adder(int value) : to_add(value) {}

// 重载()运算符
int operator()(int x) const {
return x + to_add;
}
};

int main() {
Adder add5(5); // 创建一个添加5的仿函数

std::cout << "10 + 5 = " << add5(10) << std::endl; // 输出: 10 + 5 = 15

return 0;
}

特点

  1. 携带状态: 仿函数可以拥有内部状态,通过成员变量存储数据,使其在调用时具备上下文信息。
  2. 灵活性高: 可以根据需要添加更多的成员函数和变量,扩展功能。
  3. 性能优化: 编译器可以对仿函数进行优化,例如内联展开,提高执行效率。

高级示例

仿函数不仅可以执行简单的计算,还可以进行复杂的操作。例如,实现一个可变的仿函数,用于累加多个值。

1
2
3
4
5
6
7
8
9
10
11
12
13
14
15
16
17
18
19
20
21
22
23
24
25
#include <iostream>

// 可变累加器仿函数
struct Accumulator {
int sum;

Accumulator() : sum(0) {}

// 重载()运算符
void operator()(int x) {
sum += x;
}
};

int main() {
Accumulator acc;

acc(10);
acc(20);
acc(30);

std::cout << "总和: " << acc.sum << std::endl; // 输出: 总和: 60

return 0;
}

使用仿函数的标准库算法

许多标准库算法可以接受仿函数作为参数,使得算法的行为更加灵活和可定制。

1
2
3
4
5
6
7
8
9
10
11
12
13
14
15
16
17
18
19
20
21
22
23
24
25
26
27
28
29
30
#include <iostream>
#include <vector>
#include <algorithm>

// 仿函数:判断一个数是否大于某个阈值
struct IsGreaterThan {
int threshold;

IsGreaterThan(int t) : threshold(t) {}

bool operator()(int x) const {
return x > threshold;
}
};

int main() {
std::vector<int> numbers = {1, 5, 10, 15, 20};

// 使用仿函数进行筛选
IsGreaterThan greaterThan10(10);
auto it = std::find_if(numbers.begin(), numbers.end(), greaterThan10);

if(it != numbers.end()) {
std::cout << "第一个大于10的数是: " << *it << std::endl; // 输出: 第一个大于10的数是: 15
} else {
std::cout << "没有找到大于10的数。" << std::endl;
}

return 0;
}

仿函数与模板

仿函数与模板相结合,可以实现高度通用和可复用的代码。例如,编写一个通用的比较仿函数。

1
2
3
4
5
6
7
8
9
10
11
12
13
14
15
16
17
18
19
20
21
22
23
24
25
26
#include <iostream>
#include <vector>
#include <algorithm>

// 通用比较仿函数
template <typename T>
struct Compare {
bool operator()(const T& a, const T& b) const {
return a < b;
}
};

int main() {
std::vector<int> numbers = {5, 2, 8, 1, 9};

// 使用仿函数进行排序
std::sort(numbers.begin(), numbers.end(), Compare<int>());

std::cout << "排序后的数字: ";
for(auto num : numbers) {
std::cout << num << " "; // 输出: 1 2 5 8 9
}
std::cout << std::endl;

return 0;
}

仿函数的优势

  • 可扩展性: 能够根据需要添加更多功能和状态。
  • 与Lambda的互补性: 在需要携带复杂状态或多次调用时,仿函数比Lambda更适合。
  • 类型安全: 仿函数是具体的类型,可以在编译期进行类型检查。

何时使用仿函数

  • 需要携带状态时: 当回调函数需要维护内部状态时,仿函数是理想选择。
  • 复杂操作: 当简单的函数指针或Lambda难以表达复杂逻辑时。
  • 性能关键场景: 由于仿函数可以被编译器优化,适用于性能敏感的代码。

Lambda表达式

Lambda表达式是C++11引入的一种轻量级函数对象,允许在代码中定义匿名函数。它们可以捕获周围的变量,具有更强的表达能力。

基本语法

1
2
3
[captures](parameters) -> return_type {
// 函数体
}
  • captures: 捕获外部变量的方式,可以是值捕获、引用捕获或者混合捕获。
  • parameters: 参数列表。
  • return_type: 返回类型,可以省略,编译器会自动推导。
  • 函数体: 实际执行的代码。

示例

1
2
3
4
5
6
7
8
9
10
11
12
13
14
15
16
17
18
19
20
21
#include <iostream>
#include <vector>
#include <algorithm>

int main() {
int threshold = 5;
std::vector<int> numbers = {1, 6, 3, 8, 2, 7};

// 使用lambda表达式进行过滤
numbers.erase(std::remove_if(numbers.begin(), numbers.end(),
[threshold](int n) -> bool {
return n < threshold;
}), numbers.end());

// 输出结果
for(auto n : numbers) {
std::cout << n << " "; // 输出: 6 8 7
}

return 0;
}

捕获方式

  1. 值捕获 ([=]): 捕获所有外部变量的副本。
  2. 引用捕获 ([&]): 捕获所有外部变量的引用。
  3. 混合捕获: 指定部分变量按值捕获,部分按引用捕获,如 [=, &var] 或 [&, var]。
  4. 无捕获 ([]): 不捕获任何外部变量。

可变Lambda

默认情况下,Lambda表达式是不可变的(const)。通过mutable关键字,可以允许修改捕获的变量副本。

1
2
3
4
5
6
7
8
9
10
11
12
13
14
15
16
17
#include <iostream>

int main() {
int count = 0;

auto increment = [count]() mutable {
count++;
std::cout << "Count inside Lambda: " << count << std::endl;
};

increment(); // 输出: Count inside Lambda: 1
increment(); // 输出: Count inside Lambda: 2

std::cout << "Count outside Lambda: " << count << std::endl; // 输出: Count outside Lambda: 0

return 0;
}

捕获成员函数和类变量

Lambda表达式可以捕获类的成员变量和成员函数,使其在类的上下文中更加灵活。

1
2
3
4
5
6
7
8
9
10
11
12
13
14
15
16
17
18
19
20
21
22
23
24
25
26
27
28
29
30
31
32
33
34
35
36
37
38
39
40
#include <iostream>
#include <vector>
#include <algorithm>

class Processor {
public:
Processor(int threshold) : threshold(threshold) {}

void process(std::vector<int>& data) {
std::cout << "处理前数据: ";
for(auto num : data) std::cout << num << " ";
std::cout << std::endl;

// 使用Lambda表达式进行过滤
data.erase(std::remove_if(data.begin(), data.end(),
[this](int n) -> bool {
return n < threshold;
}), data.end());

std::cout << "处理后数据: ";
for(auto num : data) std::cout << num << " ";
std::cout << std::endl;
}

private:
int threshold;
};

int main() {
std::vector<int> numbers = {1, 6, 3, 8, 2, 7};
Processor proc(5);
proc.process(numbers);
/*
输出:
处理前数据: 1 6 3 8 2 7
处理后数据: 6 8 7
*/

return 0;
}

Lambda与标准库算法

Lambda表达式与标准库算法紧密结合,提供了更简洁和直观的代码书写方式。

1
2
3
4
5
6
7
8
9
10
11
12
13
14
15
16
17
18
19
20
21
#include <iostream>
#include <vector>
#include <algorithm>

int main() {
std::vector<int> numbers = {4, 2, 5, 1, 3};

// 使用Lambda表达式进行排序
std::sort(numbers.begin(), numbers.end(),
[](int a, int b) -> bool {
return a < b;
});

std::cout << "排序后的数字: ";
for(auto num : numbers) {
std::cout << num << " "; // 输出: 1 2 3 4 5
}
std::cout << std::endl;

return 0;
}

Lambda表达式的优势

  • 简洁性: 代码更加紧凑,易于理解。
  • 灵活性: 能够捕获外部变量,适应更多场景。
  • 性能优化: 编译器可以对Lambda进行优化,如内联展开。
  • 与标准库的良好集成: 与STL算法无缝结合,简化代码逻辑。

std::function 对象

std::function 是C++11提供的一个通用的可调用包装器,能够封装任何可调用对象,包括普通函数、Lambda表达式、函数对象以及绑定表达式。它实现了类型擦除,使得不同类型的可调用对象可以通过统一的接口进行操作。

定义与使用

1
2
3
4
5
6
7
8
9
10
11
12
13
14
15
16
17
18
19
20
21
22
23
24
25
26
27
28
29
30
31
32
33
#include <iostream>
#include <functional>

// 普通函数
int add(int a, int b) {
return a + b;
}

// 函数对象
struct Multiply {
int operator()(int a, int b) const {
return a * b;
}
};

int main() {
// 封装普通函数
std::function<int(int, int)> func1 = add;
std::cout << "Add: " << func1(3, 4) << std::endl; // 输出: Add: 7

// 封装Lambda表达式
std::function<int(int, int)> func2 = [](int a, int b) -> int {
return a - b;
};
std::cout << "Subtract: " << func2(10, 4) << std::endl; // 输出: Subtract: 6

// 封装函数对象
Multiply multiply;
std::function<int(int, int)> func3 = multiply;
std::cout << "Multiply: " << func3(3, 4) << std::endl; // 输出: Multiply: 12

return 0;
}

特点

  • 类型擦除: 可以存储任何符合签名的可调用对象。
  • 灵活性: 支持动态改变存储的可调用对象。
  • 性能开销: 相比于直接使用函数指针或Lambda,std::function 可能带来一定的性能开销,尤其是在频繁调用时。

用法场景

  • 回调函数的传递。
  • 事件处理系统。
  • 策略模式的实现。

示例:回调机制

1
2
3
4
5
6
7
8
9
10
11
12
13
14
15
16
17
18
19
20
21
22
23
24
25
26
27
28
29
#include <iostream>
#include <functional>

// 定义回调类型
using Callback = std::function<void(int)>;

// 触发事件的函数
void triggerEvent(Callback cb, int value) {
// 事件发生,调用回调
cb(value);
}

int main() {
// 使用Lambda作为回调
triggerEvent([](int x) {
std::cout << "事件触发,值为: " << x << std::endl;
}, 42); // 输出: 事件触发,值为: 42

// 使用仿函数作为回调
struct Printer {
void operator()(int x) const {
std::cout << "Printer打印值: " << x << std::endl;
}
} printer;

triggerEvent(printer, 100); // 输出: Printer打印值: 100

return 0;
}

存储和调用不同类型的可调用对象

std::function 可以在容器中存储各种不同类型的可调用对象,只要它们符合指定的签名。

1
2
3
4
5
6
7
8
9
10
11
12
13
14
15
16
17
18
19
20
21
22
23
24
25
26
27
28
29
30
#include <iostream>
#include <functional>
#include <vector>

int add(int a, int b) {
return a + b;
}

struct Multiply {
int operator()(int a, int b) const {
return a * b;
}
};

int main() {
std::vector<std::function<int(int, int)>> operations;

// 添加不同类型的可调用对象
operations.emplace_back(add); // 普通函数
operations.emplace_back(Multiply()); // 仿函数
operations.emplace_back([](int a, int b) -> int { return a - b; }); // Lambda

// 执行所有操作
for(auto& op : operations) {
std::cout << op(10, 5) << " "; // 输出: 15 50 5
}
std::cout << std::endl;

return 0;
}

std::bind 操作

std::bind 是C++11中提供的一个函数适配器,用于绑定函数或可调用对象的部分参数,生成一个新的可调用对象。它允许提前固定某些参数,简化函数调用或适应接口需求。

基本用法

1
2
3
4
5
6
7
8
9
10
11
12
13
14
15
16
#include <iostream>
#include <functional>

// 普通函数
int add(int a, int b) {
return a + b;
}

int main() {
// 绑定第一个参数为10,生成新的函数对象
auto add10 = std::bind(add, 10, std::placeholders::_1);

std::cout << "10 + 5 = " << add10(5) << std::endl; // 输出: 10 + 5 = 15

return 0;
}

占位符 (std::placeholders)

std::bind 使用占位符来表示未绑定的参数,这些占位符决定了在生成的新函数对象中如何传递参数。

常用的占位符包括:

  • std::placeholders::_1
  • std::placeholders::_2
  • std::placeholders::_3
  • 等等,根据需要传递的参数数量。

示例

1
2
3
4
5
6
7
8
9
10
11
12
13
14
15
16
17
18
19
20
21
22
23
24
25
26
27
28
29
30
31
32
#include <iostream>
#include <functional>

void display(const std::string& msg, int count) {
for(int i = 0; i < count; ++i) {
std::cout << msg << std::endl;
}
}

int main() {
// 绑定消息为"Hello",生成新的函数对象,只需要传递次数
auto sayHello = std::bind(display, "Hello", std::placeholders::_1);

sayHello(3);
/*
输出:
Hello
Hello
Hello
*/

// 绑定次数为2,生成新的函数对象,只需要传递消息
auto sayTwice = std::bind(display, std::placeholders::_1, 2);
sayTwice("Hi");
/*
输出:
Hi
Hi
*/

return 0;
}

与Lambda表达式的对比

std::bind 曾在C++11中广泛使用,但随着Lambda表达式的普及,很多情况下Lambda更为直观和高效。不过,在某些复杂的参数绑定场景下,std::bind 依然有其独特优势。

使用 std::bind:

1
2
3
4
5
6
7
8
9
10
11
12
13
14
15
#include <iostream>
#include <functional>

int multiply(int a, int b) {
return a * b;
}

int main() {
// 绑定第一个参数为2,生成新的函数对象
auto multiplyBy2 = std::bind(multiply, 2, std::placeholders::_1);

std::cout << "2 * 5 = " << multiplyBy2(5) << std::endl; // 输出: 2 * 5 = 10

return 0;
}

使用 Lambda 表达式:

1
2
3
4
5
6
7
8
9
10
11
12
13
14
15
16
17
#include <iostream>
#include <functional>

int multiply(int a, int b) {
return a * b;
}

int main() {
// 使用Lambda表达式绑定第一个参数为2
auto multiplyBy2 = [](int b) -> int {
return multiply(2, b);
};

std::cout << "2 * 5 = " << multiplyBy2(5) << std::endl; // 输出: 2 * 5 = 10

return 0;
}

总结:

  • 可读性: Lambda表达式通常更具可读性,语法更直观。
  • 灵活性: Lambda更易于捕获和使用外部变量。
  • 性能: Lambda通常比std::bind更高效,因为std::bind可能引入额外的间接层。

绑定类的成员函数

在C++中,成员函数与普通函数不同,因为它们需要一个对象实例来调用。使用 std::bind 或Lambda表达式,可以方便地绑定类的成员函数,生成可调用对象。

使用 std::bind 绑定成员函数

1
2
3
4
5
6
7
8
9
10
11
12
13
14
15
16
17
18
19
20
#include <iostream>
#include <functional>

class Calculator {
public:
int multiply(int a, int b) const {
return a * b;
}
};

int main() {
Calculator calc;

// 绑定成员函数multiply,固定第一个参数为5
auto multiplyBy5 = std::bind(&Calculator::multiply, &calc, 5, std::placeholders::_1);

std::cout << "5 * 3 = " << multiplyBy5(3) << std::endl; // 输出: 5 * 3 = 15

return 0;
}

使用Lambda表达式绑定成员函数

1
2
3
4
5
6
7
8
9
10
11
12
13
14
15
16
17
18
19
20
21
22
#include <iostream>
#include <functional>

class Greeter {
public:
void greet(const std::string& name) const {
std::cout << "Hello, " << name << "!" << std::endl;
}
};

int main() {
Greeter greeter;

// 使用Lambda表达式绑定成员函数
auto greetFunc = [&greeter](const std::string& name) {
greeter.greet(name);
};

greetFunc("Alice"); // 输出: Hello, Alice!

return 0;
}

绑定静态成员函数

静态成员函数不依赖于类的实例,可以像普通函数一样使用 std::bind 和 std::function。

1
2
3
4
5
6
7
8
9
10
11
12
13
14
15
16
17
18
#include <iostream>
#include <functional>

class Logger {
public:
static void log(const std::string& message) {
std::cout << "Log: " << message << std::endl;
}
};

int main() {
// 使用std::bind绑定静态成员函数
auto logFunc = std::bind(&Logger::log, std::placeholders::_1);

logFunc("This is a static log message."); // 输出: Log: This is a static log message.

return 0;
}

绑定带有返回值的成员函数

1
2
3
4
5
6
7
8
9
10
11
12
13
14
15
16
17
18
19
20
21
22
23
24
#include <iostream>
#include <functional>

class Math {
public:
double power(double base, double exponent) const {
double result = 1.0;
for(int i = 0; i < static_cast<int>(exponent); ++i) {
result *= base;
}
return result;
}
};

int main() {
Math mathObj;

// 绑定成员函数power,固定基数为2
auto powerOf2 = std::bind(&Math::power, &mathObj, 2.0, std::placeholders::_1);

std::cout << "2^3 = " << powerOf2(3) << std::endl; // 输出: 2^3 = 8

return 0;
}

注意事项

  • 对象生命周期: 绑定成员函数时,确保对象在可调用对象使用期间依然存在,以避免悬空指针问题。
  • 指针与引用: 可以通过指针或引用传递对象实例给 std::bind 或Lambda表达式。
  • 捕获方式: 在使用Lambda表达式时,选择合适的捕获方式(值捕获或引用捕获)以确保对象的正确访问。

C++ 可调用对象的总结

C++ 提供了多种方式来定义和操作可调用对象,每种方式有其独特的特点和适用场景。

可调用对象 描述 示例用法
函数指针 指向普通函数或静态成员函数的指针 int (*func)(int) = &funcName;
仿函数(Functors) 重载了 operator() 的类实例,可以携带状态 struct Foo { void operator()(); };
Lambda表达式 定义在表达式中的匿名函数,支持捕获上下文变量 [capture](params) { /* code */ }
std::function 通用的可调用对象包装器,能够封装任何符合签名的可调用对象 std::function<void(int)> func;
std::bind 绑定函数或可调用对象的部分参数,生成新的可调用对象 auto newFunc = std::bind(func, _1);

选择建议

  • 简单回调: 使用函数指针或Lambda表达式。
  • 需要携带状态或更复杂逻辑: 使用Lambda表达式或仿函数(Functors)。
  • 接口要求 std::function: 使用 std::function,不过要注意可能的性能开销。
  • 参数预绑定: 使用 std::bind,但在现代C++中,许多情况下Lambda表达式能达到相同效果且更直观。

完整示例代码

以下是一个综合示例,展示了函数指针、仿函数(Functors)、Lambda表达式、std::function、std::bind 以及绑定类成员函数的使用。

1
2
3
4
5
6
7
8
9
10
11
12
13
14
15
16
17
18
19
20
21
22
23
24
25
26
27
28
29
30
31
32
33
34
35
36
37
38
39
40
41
42
43
44
45
46
47
48
49
50
51
52
53
54
55
56
57
58
59
60
61
62
63
64
65
66
67
68
69
70
71
72
73
74
75
76
77
78
79
80
81
82
83
84
85
86
87
88
89
90
91
92
93
94
95
96
97
98
99
100
101
102
103
104
105
106
107
108
109
110
#include <iostream>
#include <functional>
#include <vector>
#include <algorithm>

// 1. 普通函数
int add(int a, int b) {
return a + b;
}

// 2. 仿函数(Functors)
struct Multiply {
int operator()(int a, int b) const {
return a * b;
}
};

// 3. Lambda表达式
auto subtract = [](int a, int b) -> int {
return a - b;
};

// 4. 类定义
class Calculator {
public:
int subtract(int a, int b) const {
return a - b;
}

void displayOperation(const std::string& op, int result) const {
std::cout << op << "结果: " << result << std::endl;
}
};

// 5. 静态成员函数
class Logger {
public:
static void log(const std::string& message) {
std::cout << "Log: " << message << std::endl;
}
};

int main() {
// 1. 函数指针
int (*funcPtr)(int, int) = &add;
std::cout << "Add (Function Pointer): " << funcPtr(10, 5) << std::endl; // 输出: 15

// 2. 仿函数(Functors)
Multiply multiply;
std::cout << "Multiply (Functors): " << multiply(10, 5) << std::endl; // 输出: 50

// 3. Lambda表达式
std::cout << "Subtract (Lambda): " << subtract(10, 5) << std::endl; // 输出: 5

// 4. std::function 封装不同可调用对象
std::function<int(int, int)> funcAdd = add;
std::function<int(int, int)> funcSubtract = subtract;
std::function<int(int, int)> funcMultiply = multiply;

std::cout << "Add (std::function): " << funcAdd(20, 10) << std::endl; // 输出: 30
std::cout << "Subtract (std::function): " << funcSubtract(20, 4) << std::endl; // 输出: 16
std::cout << "Multiply (std::function): " << funcMultiply(4, 5) << std::endl; // 输出: 20

// 5. std::bind 绑定部分参数
auto add5 = std::bind(add, 5, std::placeholders::_1);
std::cout << "5 + 10 = " << add5(10) << std::endl; // 输出: 15

auto multiplyBy2 = std::bind(multiply, 2, std::placeholders::_1);
std::cout << "2 * 10 = " << multiplyBy2(10) << std::endl; // 输出: 20

// 6. 绑定类成员函数
Calculator calc;

// 使用 std::bind 绑定成员函数 subtract
auto boundSubtract = std::bind(&Calculator::subtract, &calc, 15, 5);
std::cout << "15 - 5 = " << boundSubtract() << std::endl; // 输出: 10

// 使用 std::bind 绑定成员函数 displayOperation
auto displayAdd = std::bind(&Calculator::displayOperation, &calc, "Add", std::placeholders::_1);
auto displayResult = funcAdd;
int addResult = displayResult(7, 8); // 15
displayAdd(addResult); // 输出: Add结果: 15

// 7. 绑定静态成员函数
auto logFunc = std::bind(&Logger::log, std::placeholders::_1);
logFunc("This is a static log message."); // 输出: Log: This is a static log message.

// 8. 使用 std::function 存储混合可调用对象
std::vector<std::function<void()>> operations;

// 添加不同的操作到容器
operations.emplace_back([&]() { std::cout << "Lambda Operation" << std::endl; });
operations.emplace_back(std::bind(&Calculator::displayOperation, &calc, "Multiply", 30));
operations.emplace_back([&]() { std::cout << "Add5(10): " << add5(10) << std::endl; });
operations.emplace_back([&]() { Logger::log("Lambda-based log message."); });

// 执行所有操作
for(auto& op : operations) {
op();
}
/*
输出:
Lambda Operation
Multiply结果: 30
Add5(10): 15
Log: Lambda-based log message.
*/

return 0;
}

解释:

  1. 函数指针: 定义并使用了指向 add 函数的函数指针 funcPtr。
  2. 仿函数(Functors): 定义了 Multiply 结构体,并使用其实例 multiply 进行乘法运算。
  3. Lambda表达式: 定义了一个用于减法的Lambda subtract。
  4. std::function: 封装了不同类型的可调用对象,包括普通函数、Lambda和仿函数。
  5. std::bind: 绑定 add 和 multiply 函数的部分参数,生成新的可调用对象 add5 和 multiplyBy2。
  6. 绑定类成员函数: 使用 std::bind 绑定 Calculator 类的成员函数 subtract 和 displayOperation。
  7. 绑定静态成员函数: 使用 std::bind 绑定 Logger 类的静态成员函数 log。
  8. 混合可调用对象容器: 使用 std::function 和 std::vector 存储并执行不同类型的可调用对象,包括Lambda、绑定成员函数和静态成员函数。

小结

通过本教案,学生应能够理解并运用C++中的各种可调用对象,包括传统的函数指针、仿函数(Functors)、Lambda表达式、std::function 和 std::bind 等。掌握这些工具不仅有助于编写更灵活和可维护的代码,还为进一步学习函数式编程和设计模式奠定了坚实的基础。在实际编程中,合理选择和组合这些可调用对象,可以大大提升代码的效率和表达力。

零基础C++(22) 内存管理

Posted on 2024-12-05 | In 零基础C++

内存管理简介

详细技术视频请看我的主页

C++教程视频

C++ 提供了多种内存管理方式,包括传统的 C 风格的 malloc 和 free,以及 C++ 专用的 new 和 delete。

理解这些内存管理方法对于编写高效、安全的 C++ 程序至关重要。

本文将详细介绍这些内存管理方法,包含基本用法、复杂操作(如 realloc),并配以实际案例和代码示例。

内存管理基础

在 C++ 程序中,内存主要分为以下几个区域:

  • 栈(Stack):自动管理内存,存储局部变量和函数调用信息。内存分配和释放速度快,但空间有限。
  • 堆(Heap):手动管理内存,用于动态分配内存。内存分配和释放由程序员控制,灵活但易出错(如内存泄漏、悬挂指针)。
  • 全局/静态区(Data/BSS Segment):存储全局变量和静态变量。

了解栈和堆的区别,以及如何有效地在堆上分配和管理内存,是编写高效且安全的 C++ 程序的基础。

C 风格内存管理

malloc 函数

malloc(memory allocation)用于在堆上分配指定字节数的内存。其原型如下:

1
2
3
#include <cstdlib>

void* malloc(size_t size);
  • 参数:size - 要分配的内存字节数。
  • 返回值:指向分配内存的指针,如果分配失败则返回 nullptr。

free 函数

free 用于释放之前由 malloc、calloc 或 realloc 分配的内存。其原型如下:

1
void free(void* ptr);
  • 参数:ptr - 要释放的内存指针。

示例代码

1
2
3
4
5
6
7
8
9
10
11
12
13
14
15
16
17
18
#include <iostream>
#include <cstdlib> // 包含 malloc 和 free

int main() {
// 分配一个整数的内存
int* p = (int*)malloc(sizeof(int));
if (p == nullptr) {
std::cerr << "Memory allocation failed" << std::endl;
return 1;
}

*p = 42;
std::cout << "Value: " << *p << std::endl;

// 释放内存
free(p);
return 0;
}

注意事项

  • 类型转换:malloc 返回 void*,需要显式转换为所需类型的指针。
  • 初始化:malloc 分配的内存未初始化,内容不确定。
  • 释放对应性:由 malloc 分配的内存必须使用 free 释放,避免使用 delete。

C++ 内存管理

C++ 提供了更高层次的内存管理操作符:new 和 delete,它们不仅分配和释放内存,还调用构造函数和析构函数,提供类型安全。

new 操作符

用于在堆上分配对象,并调用其构造函数。

单个对象

1
Type* ptr = new Type(parameters);
  • 例子:
1
2
3
4
5
6
7
8
9
10
11
12
13
14
15
16
17
18
19
#include <iostream>

class MyClass {
public:
MyClass(int val) : value(val) {
std::cout << "Constructor called with value: " << value << std::endl;
}
~MyClass() {
std::cout << "Destructor called for value: " << value << std::endl;
}
int value;
};

int main() {
MyClass* obj = new MyClass(10);
std::cout << "Object value: " << obj->value << std::endl;
delete obj; // 调用析构函数并释放内存
return 0;
}

输出:

1
2
3
Constructor called with value: 10
Object value: 10
Destructor called for value: 10

数组

1
Type* array = new Type[size];
  • 例子:
1
2
3
4
5
6
7
8
9
10
11
12
13
#include <iostream>

int main() {
int* arr = new int[5]; // 分配5个整数
for (int i = 0; i < 5; ++i) {
arr[i] = i * 10;
}
for (int i = 0; i < 5; ++i) {
std::cout << "arr[" << i << "] = " << arr[i] << std::endl;
}
delete[] arr; // 释放数组内存
return 0;
}

输出:

1
2
3
4
5
arr[0] = 0
arr[1] = 10
arr[2] = 20
arr[3] = 30
arr[4] = 40

delete 操作符

用于释放由 new 分配的内存,并调用析构函数。

释放单个对象

1
delete ptr;

释放数组

1
delete[] ptr;

区别于 malloc 和 free

  • 类型安全:new 返回正确类型的指针,免去了强制类型转换。
  • 构造/析构:new 和 delete 自动调用构造函数和析构函数。
  • 异常处理:在分配失败时,new 默认抛出 std::bad_alloc 异常,而 malloc 返回 nullptr。

异常安全的 new

可以通过 nothrow 参数防止 new 抛出异常,改为返回 nullptr。

1
2
3
4
5
6
7
8
9
10
11
12
13
14
#include <iostream>
#include <new> // 包含 std::nothrow

int main() {
int* p = new(std::nothrow) int;
if (p == nullptr) {
std::cerr << "Memory allocation failed" << std::endl;
return 1;
}
*p = 100;
std::cout << "Value: " << *p << std::endl;
delete p;
return 0;
}

总结和对比

了解 malloc/free 与 new/delete 的区别,有助于在编写 C++ 程序时正确选择内存管理方法。

特性 malloc/free new/delete
类型安全 需要显式类型转换 自动类型转换,无需显式转换
构造/析构函数 不调用对象的构造/析构函数 调用对象的构造/析构函数
返回值 void*,需要转换为目标类型 返回目标类型指针,类型安全
错误处理 分配失败返回 nullptr 分配失败抛出 std::bad_alloc 异常
多态行为 无 支持多态,通过虚函数正确调用析构函数
内存分配与释放对应性 必须使用 free 释放由 malloc 分配的内存 必须使用 delete 释放由 new 分配的内存

示例对比

使用 malloc 和 free

1
2
3
4
5
6
7
8
9
10
11
12
13
14
15
16
17
18
19
20
21
22
23
24
25
26
27
28
29
30
#include <iostream>
#include <cstdlib>

class MyClass {
public:
MyClass(int val) : value(val) { std::cout << "Constructor called" << std::endl; }
~MyClass() { std::cout << "Destructor called" << std::endl; }
int value;
};

int main() {
// 使用 malloc 分配内存
MyClass* obj = (MyClass*)malloc(sizeof(MyClass));
if (obj == nullptr) {
std::cerr << "malloc failed" << std::endl;
return 1;
}

// 手动调用构造函数(不推荐)
new(obj) MyClass(20); // 通过“定位 new”调用构造函数

std::cout << "Value: " << obj->value << std::endl;

// 手动调用析构函数
obj->~MyClass();

// 释放内存
free(obj);
return 0;
}

注意:使用 malloc 分配 C++ 对象时,需要手动调用构造函数和析构函数,这非常不便且易出错。因此,推荐使用 new 和 delete。

使用 new 和 delete

1
2
3
4
5
6
7
8
9
10
11
12
13
14
15
16
17
18
#include <iostream>

class MyClass {
public:
MyClass(int val) : value(val) { std::cout << "Constructor called" << std::endl; }
~MyClass() { std::cout << "Destructor called" << std::endl; }
int value;
};

int main() {
// 使用 new 分配内存并调用构造函数
MyClass* obj = new MyClass(30);
std::cout << "Value: " << obj->value << std::endl;

// 使用 delete 释放内存并调用析构函数
delete obj;
return 0;
}

输出:

1
2
3
Constructor called
Value: 30
Destructor called

兼容性

  • C++ 类型特性:new 和 delete 支持 C++ 的类型特性,包括构造函数、析构函数、多态等。
  • C 兼容性:在需要兼容 C 代码或通过 C 接口分配内存时,仍可能需要使用 malloc 和 free。

高级内存管理

使用 realloc 进行内存重分配

realloc 用于调整之前分配的内存块大小。这在动态数组等数据结构中非常有用。

原型

1
2
3
#include <cstdlib>

void* realloc(void* ptr, size_t new_size);
  • 参数

    :

    • ptr:指向之前分配的内存块。
    • new_size:新的内存大小(以字节为单位)。
  • 返回值:指向重新分配后的内存块的新指针。如果重新分配失败,返回 nullptr,原内存块保持不变。

示例代码

1
2
3
4
5
6
7
8
9
10
11
12
13
14
15
16
17
18
19
20
21
22
23
24
25
26
27
28
29
30
31
32
33
34
35
36
37
38
39
40
41
42
43
44
45
46
47
#include <iostream>
#include <cstdlib>
#include <cstring> // 包含 memcpy

int main() {
// 初始分配 3 个整数
int* arr = (int*)malloc(3 * sizeof(int));
if (arr == nullptr) {
std::cerr << "Initial malloc failed" << std::endl;
return 1;
}

// 初始化数组
for (int i = 0; i < 3; ++i) {
arr[i] = i + 1;
}

std::cout << "Initial array: ";
for (int i = 0; i < 3; ++i) {
std::cout << arr[i] << " ";
}
std::cout << std::endl;

// 重新分配为 5 个整数
int* temp = (int*)realloc(arr, 5 * sizeof(int));
if (temp == nullptr) {
std::cerr << "Realloc failed" << std::endl;
free(arr); // 释放原内存
return 1;
}
arr = temp;

// 初始化新元素
for (int i = 3; i < 5; ++i) {
arr[i] = (i + 1) * 10;
}

std::cout << "Reallocated array: ";
for (int i = 0; i < 5; ++i) {
std::cout << arr[i] << " ";
}
std::cout << std::endl;

// 释放内存
free(arr);
return 0;
}

输出:

1
2
Initial array: 1 2 3 
Reallocated array: 1 2 3 40 50

动态数组管理

使用 malloc 和 realloc 来手动管理动态数组可以实现可变大小的数组,但需要处理内存分配、释放和数据复制。

封装动态数组

1
2
3
4
5
6
7
8
9
10
11
12
13
14
15
16
17
18
19
20
21
22
23
24
25
26
27
28
29
30
31
32
33
34
35
36
37
38
39
40
41
42
43
44
45
46
47
48
49
50
51
52
53
54
55
56
57
58
59
60
61
62
63
64
65
66
67
68
69
70
#include <iostream>
#include <cstdlib>
#include <cstring>

class DynamicArray {
public:
DynamicArray(size_t initial_size = 1)
: size(initial_size), data((int*)malloc(size * sizeof(int))) {
if (data == nullptr) {
throw std::bad_alloc();
}
}

~DynamicArray() {
free(data);
}

void resize(size_t new_size) {
int* temp = (int*)realloc(data, new_size * sizeof(int));
if (temp == nullptr) {
throw std::bad_alloc();
}
data = temp;
size = new_size;
}

int& operator[](size_t index) {
return data[index];
}

size_t getSize() const { return size; }

private:
size_t size;
int* data;
};

int main() {
try {
DynamicArray arr(3);
// 初始化
for (size_t i = 0; i < arr.getSize(); ++i) {
arr[i] = i + 1;
}

std::cout << "Initial array: ";
for (size_t i = 0; i < arr.getSize(); ++i) {
std::cout << arr[i] << " ";
}
std::cout << std::endl;

// 调整大小
arr.resize(5);
arr[3] = 40;
arr[4] = 50;

std::cout << "Resized array: ";
for (size_t i = 0; i < arr.getSize(); ++i) {
std::cout << arr[i] << " ";
}
std::cout << std::endl;

}
catch (const std::bad_alloc& e) {
std::cerr << "Memory allocation error: " << e.what() << std::endl;
return 1;
}

return 0;
}

输出:

1
2
Initial array: 1 2 3 
Resized array: 1 2 3 40 50

注意:这种方式需要手动管理内存和数组大小,且缺乏类型安全性和自动化。推荐使用 C++ 标准容器如 std::vector 来代替。

实际案例

案例一:动态数组实现

实现一个简单的动态数组类,支持添加元素、访问元素和自动扩展。

代码示例

1
2
3
4
5
6
7
8
9
10
11
12
13
14
15
16
17
18
19
20
21
22
23
24
25
26
27
28
29
30
31
32
33
34
35
36
37
38
39
40
41
42
43
44
45
46
47
48
49
50
51
52
53
54
55
56
57
58
59
60
61
62
63
64
65
66
67
68
69
70
71
72
#include <iostream>
#include <cstdlib>
#include <stdexcept>

class DynamicArray {
public:
DynamicArray()
: capacity(2), size(0), data((int*)malloc(capacity * sizeof(int))) {
if (data == nullptr) {
throw std::bad_alloc();
}
}

~DynamicArray() {
free(data);
}

void add(int value) {
if (size == capacity) {
resize(capacity * 2);
}
data[size++] = value;
}

int get(size_t index) const {
if (index >= size) {
throw std::out_of_range("Index out of range");
}
return data[index];
}

size_t getSize() const { return size; }

private:
void resize(size_t new_capacity) {
int* temp = (int*)realloc(data, new_capacity * sizeof(int));
if (temp == nullptr) {
throw std::bad_alloc();
}
data = temp;
capacity = new_capacity;
}

size_t capacity;
size_t size;
int* data;
};

int main() {
try {
DynamicArray arr;
arr.add(10);
arr.add(20);
arr.add(30); // 触发扩展

std::cout << "Dynamic Array Contents:" << std::endl;
for (size_t i = 0; i < arr.getSize(); ++i) {
std::cout << arr.get(i) << " ";
}
std::cout << std::endl;
}
catch (const std::bad_alloc& e) {
std::cerr << "Memory allocation error: " << e.what() << std::endl;
return 1;
}
catch (const std::out_of_range& e) {
std::cerr << "Array access error: " << e.what() << std::endl;
return 1;
}

return 0;
}

输出:

1
2
Dynamic Array Contents:
10 20 30

案例二:自定义内存管理器

实现一个简单的内存池,用于高效分配和释放固定大小的对象。

代码示例

1
2
3
4
5
6
7
8
9
10
11
12
13
14
15
16
17
18
19
20
21
22
23
24
25
26
27
28
29
30
31
32
33
34
35
36
37
38
39
40
41
42
43
44
45
46
47
48
49
50
51
52
53
54
55
56
57
58
59
60
61
62
63
64
65
66
67
68
69
70
71
72
73
74
75
76
77
78
79
80
81
82
83
84
85
#include <iostream>
#include <cstdlib>
#include <stack>

class MemoryPool {
public:
MemoryPool(size_t objectSize, size_t poolSize)
: objSize(objectSize), totalSize(poolSize), pool((char*)malloc(objectSize * poolSize)) {
if (pool == nullptr) {
throw std::bad_alloc();
}
// 初始化 free list
for (size_t i = 0; i < poolSize; ++i) {
freeList.push(pool + i * objectSize);
}
}

~MemoryPool() {
free(pool);
}

void* allocate() {
if (freeList.empty()) {
throw std::bad_alloc();
}
void* ptr = freeList.top();
freeList.pop();
return ptr;
}

void deallocate(void* ptr) {
freeList.push((char*)ptr);
}

private:
size_t objSize;
size_t totalSize;
char* pool;
std::stack<void*> freeList;
};

class MyClass {
public:
MyClass(int val) : value(val) {
std::cout << "MyClass constructor: " << value << std::endl;
}
~MyClass() {
std::cout << "MyClass destructor: " << value << std::endl;
}
int value;
};

int main() {
try {
// 创建一个能容纳 3 个 MyClass 对象的内存池
MemoryPool pool(sizeof(MyClass), 3);

// 分配对象内存
void* mem1 = pool.allocate();
void* mem2 = pool.allocate();

// 使用“定位 new”构造对象
MyClass* obj1 = new(mem1) MyClass(100);
MyClass* obj2 = new(mem2) MyClass(200);

// 使用对象
std::cout << "obj1 value: " << obj1->value << std::endl;
std::cout << "obj2 value: " << obj2->value << std::endl;

// 显式调用析构函数
obj1->~MyClass();
obj2->~MyClass();

// 释放内存
pool.deallocate(mem1);
pool.deallocate(mem2);

}
catch (const std::bad_alloc& e) {
std::cerr << "Memory pool allocation error: " << e.what() << std::endl;
return 1;
}

return 0;
}

输出:

1
2
3
4
5
6
MyClass constructor: 100
MyClass constructor: 200
obj1 value: 100
obj2 value: 200
MyClass destructor: 100
MyClass destructor: 200

说明:

  • MemoryPool 管理固定大小的内存块,避免频繁调用 malloc 和 free。
  • 使用“定位 new”在预分配的内存上构造对象。
  • 需要手动调用析构函数和将内存返回给内存池。

注意:这种方法适用于大量小对象的高效管理,但需要确保正确使用构造和析构函数。

避免内存泄漏

内存泄漏是指程序分配的内存未被释放,导致内存被浪费,甚至耗尽。避免内存泄漏的策略包括:

  • **确保每个 new 有对应的 delete**。
  • 使用 RAII 和智能指针:自动管理资源,避免手动管理内存。
  • 工具辅助:使用工具如 Valgrind 检测内存泄漏。

示例:内存泄漏

1
2
3
4
5
6
7
#include <iostream>

int main() {
int* p = new int(10);
// 忘记 delete p; 导致内存泄漏
return 0;
}

解决方法:

1
2
3
4
5
6
7
8
#include <iostream>

int main() {
int* p = new int(10);
// 正确释放内存
delete p;
return 0;
}

RAII(资源获取即初始化)

RAII 是 C++ 中的一种编程惯用法,通过对象的生命周期管理资源,确保资源在对象构造时获取,析构时释放,避免泄漏。

示例:RAII 实现类似于shared_ptr智能指针

std::shared_ptr 是 C++ 标准库中功能强大的智能指针之一,提供了共享所有权的能力,使得多个指针可以共同管理同一个动态分配的对象。通过引用计数机制,shared_ptr 确保了对象在最后一个指针被销毁时自动释放,极大地简化了内存管理,防止了内存泄漏和悬挂指针问题。

SimpleSharedPtr 的基本概念

SimpleSharedPtr 是一个简化版的 shared_ptr 实现,旨在帮助理解其核心机制。其基本功能包括:

  • 共享所有权:多个 SimpleSharedPtr 实例可以指向同一个对象,共享对该对象的所有权。
  • 自动管理生命周期:当最后一个 SimpleSharedPtr 被销毁或指向其他对象时,管理的对象被自动释放。
  • 引用计数:内部维护一个引用计数,记录有多少个 SimpleSharedPtr 实例指向同一个对象。

引用计数控制块的设计

为了实现引用计数机制,SimpleSharedPtr 需要一个控制块(Control Block),它包含:

  • 引用计数(ref_count):记录有多少个 SimpleSharedPtr 指向同一个对象。
  • 指向对象的指针(ptr):指向实际管理的对象。

控制块通常与被管理对象一起被分配,但为了简化实现,本示例将它们独立管理。

1
2
3
4
5
6
struct ControlBlock {
int ref_count; // 引用计数
// 可以扩展为包含自定义删除器等

ControlBlock() : ref_count(1) {}
};

SimpleSharedPtr 的实现

类结构

SimpleSharedPtr 是一个模板类,模板参数 T 表示它所管理的对象类型。

1
2
3
4
5
6
7
8
9
template <typename T>
class SimpleSharedPtr {
private:
T* ptr; // 指向管理的对象
ControlBlock* control; // 指向控制块

public:
// 构造函数、析构函数、拷贝与移动操作、操作符重载等
};

构造函数与析构函数

  • 默认构造函数:初始化指针和控制块为空。
  • 参数化构造函数:接受一个裸指针,初始化控制块,并引用计数为1。
  • 析构函数:减少引用计数,若引用计数为0,则释放对象和控制块。
1
2
3
4
5
6
7
8
9
10
11
12
13
14
15
16
// 默认构造函数
SimpleSharedPtr() : ptr(nullptr), control(nullptr) {}

// 参数化构造函数
explicit SimpleSharedPtr(T* p) : ptr(p) {
if (p) {
control = new ControlBlock();
} else {
control = nullptr;
}
}

// 析构函数
~SimpleSharedPtr() {
release();
}

**辅助函数 release**:

1
2
3
4
5
6
7
8
9
10
11
12
private:
void release() {
if (control) {
control->ref_count--;
if (control->ref_count == 0) {
delete ptr;
delete control;
}
}
ptr = nullptr;
control = nullptr;
}

拷贝构造与拷贝赋值

拷贝构造函数和拷贝赋值操作符允许多个 SimpleSharedPtr 实例共享同一个对象,共享相同的控制块。

1
2
3
4
5
6
7
8
9
10
11
12
13
14
15
16
17
18
19
20
21
22
// 拷贝构造函数
SimpleSharedPtr(const SimpleSharedPtr& other) : ptr(other.ptr), control(other.control) {
if (control) {
control->ref_count++;
}
}

// 拷贝赋值操作符
SimpleSharedPtr& operator=(const SimpleSharedPtr& other) {
if (this != &other) {
// 释放当前资源
release();

// 复制新的资源和控制块
ptr = other.ptr;
control = other.control;
if (control) {
control->ref_count++;
}
}
return *this;
}

移动构造与移动赋值

移动语义允许资源所有权从一个 SimpleSharedPtr 转移到另一个,而不增加引用计数。

1
2
3
4
5
6
7
8
9
10
11
12
13
14
15
16
17
18
19
20
21
22
// 移动构造函数
SimpleSharedPtr(SimpleSharedPtr&& other) noexcept : ptr(other.ptr), control(other.control) {
other.ptr = nullptr;
other.control = nullptr;
}

// 移动赋值操作符
SimpleSharedPtr& operator=(SimpleSharedPtr&& other) noexcept {
if (this != &other) {
// 释放当前资源
release();

// 接管 `other` 的资源
ptr = other.ptr;
control = other.control;

// 置 `other` 为空
other.ptr = nullptr;
other.control = nullptr;
}
return *this;
}

操作符重载

重载 * 和 -> 操作符,以便像使用原生指针一样使用 SimpleSharedPtr。

1
2
3
4
5
6
7
8
9
// 解引用操作符
T& operator*() const {
return *ptr;
}

// 箭头操作符
T* operator->() const {
return ptr;
}

其他成员函数

  • **use_count**:返回当前引用计数。
  • **get**:返回裸指针。
  • **reset**:重置指针,指向新对象或 nullptr。
1
2
3
4
5
6
7
8
9
10
11
12
13
14
15
16
17
18
19
20
21
22
23
// 获取引用计数
int use_count() const {
return control ? control->ref_count : 0;
}

// 获取裸指针
T* get() const {
return ptr;
}

// 重置指针
void reset(T* p = nullptr) {
// 释放当前资源
release();

// 指向新资源
ptr = p;
if (p) {
control = new ControlBlock();
} else {
control = nullptr;
}
}

完整代码示例

以下是 SimpleSharedPtr 的完整实现及其使用示例。

1
2
3
4
5
6
7
8
9
10
11
12
13
14
15
16
17
18
19
20
21
22
23
24
25
26
27
28
29
30
31
32
33
34
35
36
37
38
39
40
41
42
43
44
45
46
47
48
49
50
51
52
53
54
55
56
57
58
59
60
61
62
63
64
65
66
67
68
69
70
71
72
73
74
75
76
77
78
79
80
81
82
83
84
85
86
87
88
89
90
91
92
93
94
95
96
97
98
99
100
101
102
103
104
105
106
107
108
109
110
111
112
113
114
115
116
117
118
119
120
121
122
123
124
125
126
127
128
129
130
131
132
133
134
135
136
137
138
139
140
141
142
143
144
145
146
147
148
149
150
151
152
153
154
155
156
157
158
159
160
161
162
163
164
165
166
167
168
169
170
171
172
173
174
175
176
177
178
179
#include <iostream>

// 控制块结构
struct ControlBlock {
int ref_count;

ControlBlock() : ref_count(1) {}
};

// 简化版的 shared_ptr 实现
template <typename T>
class SimpleSharedPtr {
private:
T* ptr; // 指向管理的对象
ControlBlock* control; // 指向控制块

// 释放当前资源
void release() {
if (control) {
control->ref_count--;
std::cout << "Decremented ref_count to " << control->ref_count << std::endl;
if (control->ref_count == 0) {
delete ptr;
delete control;
std::cout << "Resource and ControlBlock destroyed." << std::endl;
}
}
ptr = nullptr;
control = nullptr;
}

public:
// 默认构造函数
SimpleSharedPtr() : ptr(nullptr), control(nullptr) {
std::cout << "Default constructed SimpleSharedPtr (nullptr)." << std::endl;
}

// 参数化构造函数
explicit SimpleSharedPtr(T* p) : ptr(p) {
if (p) {
control = new ControlBlock();
std::cout << "Constructed SimpleSharedPtr, ref_count = " << control->ref_count << std::endl;
} else {
control = nullptr;
}
}

// 拷贝构造函数
SimpleSharedPtr(const SimpleSharedPtr& other) : ptr(other.ptr), control(other.control) {
if (control) {
control->ref_count++;
std::cout << "Copied SimpleSharedPtr, ref_count = " << control->ref_count << std::endl;
}
}

// 拷贝赋值操作符
SimpleSharedPtr& operator=(const SimpleSharedPtr& other) {
if (this != &other) {
release();
ptr = other.ptr;
control = other.control;
if (control) {
control->ref_count++;
std::cout << "Assigned SimpleSharedPtr, ref_count = " << control->ref_count << std::endl;
}
}
return *this;
}

// 移动构造函数
SimpleSharedPtr(SimpleSharedPtr&& other) noexcept : ptr(other.ptr), control(other.control) {
other.ptr = nullptr;
other.control = nullptr;
std::cout << "Moved SimpleSharedPtr." << std::endl;
}

// 移动赋值操作符
SimpleSharedPtr& operator=(SimpleSharedPtr&& other) noexcept {
if (this != &other) {
release();
ptr = other.ptr;
control = other.control;
other.ptr = nullptr;
other.control = nullptr;
std::cout << "Move-assigned SimpleSharedPtr." << std::endl;
}
return *this;
}

// 析构函数
~SimpleSharedPtr() {
release();
}

// 解引用操作符
T& operator*() const {
return *ptr;
}

// 箭头操作符
T* operator->() const {
return ptr;
}

// 获取引用计数
int use_count() const {
return control ? control->ref_count : 0;
}

// 获取裸指针
T* get() const {
return ptr;
}

// 重置指针
void reset(T* p = nullptr) {
release();
ptr = p;
if (p) {
control = new ControlBlock();
std::cout << "Reset SimpleSharedPtr, ref_count = " << control->ref_count << std::endl;
} else {
control = nullptr;
}
}
};

// 测试类
class Test {
public:
Test(int val) : value(val) {
std::cout << "Test Constructor: " << value << std::endl;
}
~Test() {
std::cout << "Test Destructor: " << value << std::endl;
}
void show() const {
std::cout << "Value: " << value << std::endl;
}

private:
int value;
};

int main() {
std::cout << "Creating default constructed shared_ptr..." << std::endl;
SimpleSharedPtr<Test> ptr1; // 默认构造
std::cout << "ptr1 use_count: " << ptr1.use_count() << std::endl;

std::cout << "\nCreating shared_ptr with resource..." << std::endl;
SimpleSharedPtr<Test> ptr2(new Test(100)); // 非默认构造
std::cout << "ptr2 use_count: " << ptr2.use_count() << std::endl;
ptr2->show();

std::cout << "\nCopying ptr2 to ptr3..." << std::endl;
SimpleSharedPtr<Test> ptr3 = ptr2; // 拷贝构造
std::cout << "ptr2 use_count: " << ptr2.use_count() << std::endl;
std::cout << "ptr3 use_count: " << ptr3.use_count() << std::endl;
ptr3->show();

std::cout << "\nAssigning ptr3 to ptr1..." << std::endl;
ptr1 = ptr3; // 拷贝赋值
std::cout << "ptr1 use_count: " << ptr1.use_count() << std::endl;
std::cout << "ptr2 use_count: " << ptr2.use_count() << std::endl;
std::cout << "ptr3 use_count: " << ptr3.use_count() << std::endl;

std::cout << "\nResetting ptr2..." << std::endl;
ptr2.reset(new Test(200)); // 重新指向新的对象
std::cout << "ptr2 use_count: " << ptr2.use_count() << std::endl;
ptr2->show();
std::cout << "ptr1 use_count: " << ptr1.use_count() << std::endl;
std::cout << "ptr3 use_count: " << ptr3.use_count() << std::endl;

std::cout << "\nExiting scope..." << std::endl;
} // ptr2, ptr1, ptr3 离开作用域

std::cout << "End of main." << std::endl;
return 0;
}

SimpleUniquePtr 的实现

std::unique_ptr 是一种独占所有权的智能指针,确保在任意时刻,只有一个 unique_ptr 实例指向特定资源。它不支持拷贝操作,只支持移动操作。

基本结构

首先,定义一个模板类 SimpleUniquePtr,它持有一个指向资源的裸指针:

1
2
3
4
5
6
7
8
9
10
template <typename T>
class SimpleUniquePtr {
private:
T* ptr; // 指向管理对象的裸指针

public:
// 构造函数、析构函数、删除拷贝构造与拷贝赋值
// 实现移动构造与移动赋值
// 重载操作符
};

构造函数与析构函数

  • 默认构造函数:初始化指针为空。
  • 参数化构造函数:接受一个指向资源的裸指针。
  • 析构函数:当 SimpleUniquePtr 被销毁时,释放所管理的资源。
1
2
3
4
5
6
7
8
9
10
// 默认构造函数
SimpleUniquePtr() : ptr(nullptr) {}

// 参数化构造函数
explicit SimpleUniquePtr(T* p) : ptr(p) {}

// 析构函数
~SimpleUniquePtr() {
delete ptr;
}

删除拷贝构造与拷贝赋值

为了确保唯一性,禁止拷贝构造和拷贝赋值:

1
2
3
4
5
// 删除拷贝构造
SimpleUniquePtr(const SimpleUniquePtr&) = delete;

// 删除拷贝赋值
SimpleUniquePtr& operator=(const SimpleUniquePtr&) = delete;

移动语义

支持移动构造和移动赋值,以转移所有权:

1
2
3
4
5
6
7
8
9
10
11
12
13
14
// 移动构造
SimpleUniquePtr(SimpleUniquePtr&& other) noexcept : ptr(other.ptr) {
other.ptr = nullptr;
}

// 移动赋值
SimpleUniquePtr& operator=(SimpleUniquePtr&& other) noexcept {
if (this != &other) {
delete ptr; // 释放当前资源
ptr = other.ptr; // 转移所有权
other.ptr = nullptr;
}
return *this;
}

操作符重载

重载 * 和 -> 操作符,以模拟指针的行为:

1
2
3
4
5
6
7
8
9
10
11
12
13
14
15
16
17
18
19
20
21
22
23
24
25
26
27
// 解引用操作符
T& operator*() const {
return *ptr;
}

// 箭头操作符
T* operator->() const {
return ptr;
}

// 获取裸指针
T* get() const {
return ptr;
}

// 释放所有权,返回裸指针并设为 nullptr
T* release() {
T* temp = ptr;
ptr = nullptr;
return temp;
}

// 重新设定指针
void reset(T* p = nullptr) {
delete ptr;
ptr = p;
}

示例代码

以下示例展示了如何使用 SimpleUniquePtr:

1
2
3
4
5
6
7
8
9
10
11
12
13
14
15
16
17
18
19
20
21
22
23
24
25
26
27
28
29
30
31
32
33
34
35
36
37
38
39
40
41
42
43
44
45
46
47
48
49
50
51
52
53
54
55
56
57
58
59
60
61
62
63
64
65
66
67
68
69
70
71
72
73
74
75
76
77
78
79
80
81
82
83
84
85
86
87
88
89
90
91
92
93
94
95
96
97
98
99
100
101
102
103
104
105
106
107
108
109
110
111
112
113
114
115
116
117
#include <iostream>

// SimpleUniquePtr 实现
template <typename T>
class SimpleUniquePtr {
private:
T* ptr;

public:
// 默认构造函数
SimpleUniquePtr() : ptr(nullptr) {}

// 参数化构造函数
explicit SimpleUniquePtr(T* p) : ptr(p) {}

// 析构函数
~SimpleUniquePtr() {
delete ptr;
}

// 删除拷贝构造和拷贝赋值
SimpleUniquePtr(const SimpleUniquePtr&) = delete;
SimpleUniquePtr& operator=(const SimpleUniquePtr&) = delete;

// 移动构造
SimpleUniquePtr(SimpleUniquePtr&& other) noexcept : ptr(other.ptr) {
other.ptr = nullptr;
}

// 移动赋值
SimpleUniquePtr& operator=(SimpleUniquePtr&& other) noexcept {
if (this != &other) {
delete ptr;
ptr = other.ptr;
other.ptr = nullptr;
}
return *this;
}

// 解引用操作符
T& operator*() const {
return *ptr;
}

// 箭头操作符
T* operator->() const {
return ptr;
}

// 获取裸指针
T* get() const {
return ptr;
}

// 释放所有权
T* release() {
T* temp = ptr;
ptr = nullptr;
return temp;
}

// 重新设定指针
void reset(T* p = nullptr) {
delete ptr;
ptr = p;
}
};

// 测试类
class Test {
public:
Test(int val) : value(val) {
std::cout << "Test Constructor: " << value << std::endl;
}
~Test() {
std::cout << "Test Destructor: " << value << std::endl;
}
void show() const {
std::cout << "Value: " << value << std::endl;
}

private:
int value;
};

int main() {
// 创建一个 SimpleUniquePtr
SimpleUniquePtr<Test> ptr1(new Test(1));
ptr1->show();
(*ptr1).show();

// 移动所有权到 ptr2
SimpleUniquePtr<Test> ptr2 = std::move(ptr1);
if (ptr1.get() == nullptr) {
std::cout << "ptr1 is now nullptr after move." << std::endl;
}
ptr2->show();

// 释放所有权
Test* rawPtr = ptr2.release();
if (ptr2.get() == nullptr) {
std::cout << "ptr2 is now nullptr after release." << std::endl;
}
rawPtr->show();
delete rawPtr; // 手动删除

// 使用 reset
ptr2.reset(new Test(2));
ptr2->show();

ptr2.reset(); // 自动删除
if (ptr2.get() == nullptr) {
std::cout << "ptr2 is now nullptr after reset." << std::endl;
}

return 0;
}

输出:

1
2
3
4
5
6
7
8
9
10
11
12
Test Constructor: 1
Value: 1
Value: 1
ptr1 is now nullptr after move.
Value: 1
ptr2 is now nullptr after release.
Value: 1
Test Destructor: 1
Test Constructor: 2
Value: 2
Test Destructor: 2
ptr2 is now nullptr after reset.

解释:

  • 创建 ptr1 并指向一个 Test 对象。
  • 使用 std::move 将所有权转移到 ptr2,ptr1 变为 nullptr。
  • 使用 release() 释放 ptr2 的所有权,获取裸指针后需要手动 delete。
  • 使用 reset() 重新指向一个新的 Test 对象,自动释放之前的资源。

总结

本文详细介绍了 C++ 中的内存管理方法,包括基础的 malloc 和 free,以及更现代的 C++ 风格的 new 和 delete。通过对比两者的特点,强调了 new 和 delete 在 C++ 中的优势,如类型安全、自动调用构造和析构函数等。

高级内存管理部分探讨了如何使用 realloc 进行内存重分配,并通过实际案例展示了如何实现动态数组和自定义内存管理器。最后,介绍了最佳实践,强调避免内存泄漏的重要性,以及 RAII 和智能指针对内存管理的帮助。

聊天项目(31) 单线程文件传输

Posted on 2024-11-24 | In C++聊天项目

设计思路

文件传输必须满足以下几个条件:

  • 限制文件大小(不超过4G)
  • 长连接传输(效率高,支持大文件)
  • 客户端和服务器都知道传输进度,以保证支持断点续传(后续实现)
  • 先实现服务器单线程处理版本,在实现多线程处理版本

如遇问题可添加我的微信

img

也可以去我得哔哩哔哩主页查看项目视频详细讲解

B站主页 https://space.bilibili.com/271469206

客户端

客户端还是采用聊天项目客户端封装的TcpClient, 只是修改了发送逻辑

1
2
3
4
5
6
7
8
9
10
11
12
13
14
15
16
17
18
19
20
21
22
23
24
25
26
27
28
29
//发送数据槽函数
void TcpClient::slot_send_msg(quint16 id, QByteArray body)
{
//如果连接异常则直接返回
if(_socket->state() != QAbstractSocket::ConnectedState){
emit sig_net_error(QString("断开连接无法发送"));
return;
}

//获取body的长度
quint32 bodyLength = body.size();

//创建字节数组
QByteArray data;
//绑定字节数组
QDataStream stream(&data, QIODevice::WriteOnly);
//设置大端模式
stream.setByteOrder(QDataStream::BigEndian);
//写入ID
stream << id;
//写入长度
stream << bodyLength;
//写入包体
data.append(body);

//发送消息
_socket->write(data);
}

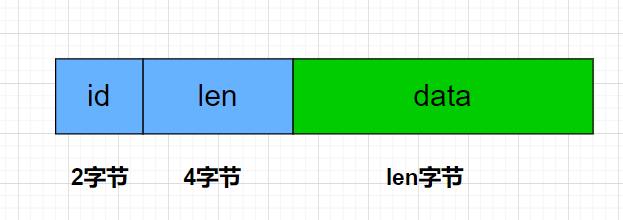
这里着重叙述以下,发送的格式是id + bodyLength + 文件流数据

其中id 为2字节,bodyLength为4字节,之后就是传输的文件流

https://cdn.llfc.club/1732450428990.jpg

slot_send_msg是槽函数,和 sig_send_msg信号连接

1
2
//连接 发送数据信号和槽函数
connect(this, &TcpClient::sig_send_msg, this, &TcpClient::slot_send_msg);

客户端在发送数据的时候调用

1
2
3
4
5
void TcpClient::sendMsg(quint16 id,QByteArray data)
{
//发送信号,统一交给槽函数处理,这么做的好处是多线程安全
emit sig_send_msg(id, data);
}

客户端在打开文件对话框后选择文件,接下来,点击发送会将文件切分成固定大小的报文发送

1
2
3
4
5
6
7
8
9
10
11
12
13
14
15
16
17
18
19
20
21
22
23
24
25
26
27
28
29
30
31
32
33
34
35
36
37
38
39
40
41
42
43
44
45
46
47
48
49
50
51
52
53
54
55
56
57
58
59
60
61
62
63
64
65
66
67
68
69
70
void MainWindow::on_uploadBtn_clicked()
{
ui->uploadBtn->setEnabled(false);
// 打开文件
QFile file(_file_name);
if (!file.open(QIODevice::ReadOnly)) {
qWarning() << "Could not open file:" << file.errorString();
return;
}

// 保存当前文件指针位置
qint64 originalPos = file.pos();
QCryptographicHash hash(QCryptographicHash::Md5);
if (!hash.addData(&file)) {
qWarning() << "Failed to read data from file:" << _file_name;
return ;
}

_file_md5 = hash.result().toHex(); // 返回十六进制字符串

// 读取文件内容并发送
QByteArray buffer;
int seq = 0;

QFileInfo fileInfo(_file_name); // 创建 QFileInfo 对象

QString fileName = fileInfo.fileName(); // 获取文件名
qDebug() << "文件名是:" << fileName; // 输出文件名
int total_size = fileInfo.size();
int last_seq = 0;
if(total_size % MAX_FILE_LEN){
last_seq = (total_size/MAX_FILE_LEN)+1;
}else{
last_seq = total_size/MAX_FILE_LEN;
}

// 恢复文件指针到原来的位置
file.seek(originalPos);

while (!file.atEnd()) {
//每次读取2048字节发送
buffer = file.read(MAX_FILE_LEN);
QJsonObject jsonObj;
// 将文件内容转换为 Base64 编码(可选)
QString base64Data = buffer.toBase64();
//qDebug() << "send data is " << base64Data;
++seq;
jsonObj["md5"] = _file_md5;
jsonObj["name"] = fileName;
jsonObj["seq"] = seq;
jsonObj["trans_size"] = buffer.size() + (seq-1)*MAX_FILE_LEN;
jsonObj["total_size"] = total_size;
if(buffer.size() < MAX_FILE_LEN){
jsonObj["last"] = 1;
}else{
jsonObj["last"] = 0;
}

jsonObj["data"]= base64Data;
jsonObj["last_seq"] = last_seq;
QJsonDocument doc(jsonObj);
auto send_data = doc.toJson();
TcpClient::Inst().sendMsg(ID_UPLOAD_FILE_REQ, send_data);
//startDelay(500);
}

//关闭文件
file.close();

}

发送时数据字段分别为:

  • 文件md5 : 以后用来做断点续传校验

  • name : 文件名

  • seq: 报文序列号,类似于TCP序列号,自己定义的,服务器根据这个序列号组合数据写入文件。

  • trans_size: 当前已经传输的大小

  • total_size: 传输文件的总大小。

客户端需要接受服务器返回的消息更新进度条

1
2
3
4
5
6
7
8
9
10
11
12
//接受服务器发送的信息
void TcpClient::slot_ready_read()
{
//读取所有数据
QByteArray data = _socket->readAll();

//将数据缓存起来
_buffer.append(data);

//处理收到的数据
processData();
}

处理消息更新进度条

1
2
3
4
5
6
7
8
9
10
11
12
13
14
15
16
17
18
19
20
21
22
23
24
25
26
27
28
29
30
31
32
33
34
35
36
37
38
39
40
41
42
void TcpClient::processData()
{
while(_buffer.size() >= TCP_HEAD_LEN){
//先取出八字节头部
auto head_byte = _buffer.left(TCP_HEAD_LEN);
QDataStream stream(head_byte);
//设置为大端模式
stream.setByteOrder(QDataStream::BigEndian);
//读取ID
quint16 msg_id;
stream >> msg_id;
//读取长度
quint32 body_length;
stream >> body_length;
if(_buffer.size() >= TCP_HEAD_LEN+body_length){
//完整的消息体已经接受
QByteArray body = _buffer.mid(TCP_HEAD_LEN,body_length);
//去掉完整的消息包
_buffer = _buffer.mid(TCP_HEAD_LEN+body_length);
// 解析服务器发过来的消息
QJsonDocument jsonDoc = QJsonDocument::fromJson(body);
if(jsonDoc.isNull()){
qDebug() << "Failed to create JSON doc.";
this->_socket->close();
return;
}

if(!jsonDoc.isObject()){
qDebug() << "JSON is not an object.";
this->_socket->close();
return;
}
//qDebug() << "receive data is " << body;
// 获取 JSON 对象
QJsonObject jsonObject = jsonDoc.object();
emit sig_logic_process(msg_id, jsonObject);
}else{
//消息未完全接受,所以中断
break;
}
}
}

单线程逻辑服务器

我们先讲解单线程处理收包逻辑的服务器,以后再给大家将多线程的。

服务器要配合客户端,对报文头部大小做修改

1
2
3
4
5
6
7
8
9
10
//头部总长度
#define HEAD_TOTAL_LEN 6
//头部id长度
#define HEAD_ID_LEN 2
//头部数据长度
#define HEAD_DATA_LEN 4
// 接受队列最大个数
#define MAX_RECVQUE 2000000
// 发送队列最大个数
#define MAX_SENDQUE 2000000

其余逻辑和我们在网络编程中讲的IocontextPool模型服务器一样

服务器收到报文头后调用LogicSystem来处理

1
2
3
4
5
6
7
8
9
10
11
12
13
14
15
16
17
18
19
20
21
22
23
24
25
26
27
28
29
30
31
32
33
34
void CSession::AsyncReadBody(int total_len)
{
auto self = shared_from_this();
asyncReadFull(total_len, [self, this, total_len](const boost::system::error_code& ec, std::size_t bytes_transfered) {
try {
if (ec) {
std::cout << "handle read failed, error is " << ec.what() << endl;
Close();
_server->ClearSession(_session_id);
return;
}

if (bytes_transfered < total_len) {
std::cout << "read length not match, read [" << bytes_transfered << "] , total ["
<< total_len<<"]" << endl;
Close();
_server->ClearSession(_session_id);
return;
}

memcpy(_recv_msg_node->_data , _data , bytes_transfered);
_recv_msg_node->_cur_len += bytes_transfered;
_recv_msg_node->_data[_recv_msg_node->_total_len] = '\0';
cout << "receive data is " << _recv_msg_node->_data << endl;
//此处将消息投递到逻辑队列中
LogicSystem::GetInstance()->PostMsgToQue(make_shared<LogicNode>(shared_from_this(), _recv_msg_node));
//继续监听头部接受事件
AsyncReadHead(HEAD_TOTAL_LEN);
}
catch (std::exception& e) {
std::cout << "Exception code is " << e.what() << endl;
}
});
}

我们知道LogicSystem会将消息投递到队列里,然后单线程处理, 服务器LogicSystem注册上传逻辑

1
2
3
4
5
6
7
8
9
10
11
12
13
14
15
16
17
18
19
20
21
22
23
24
25
26
27
28
29
30
31
32
33
34
35
36
37
38
39
40
41
42
43
44
45
46
47
48
49
50
51
52
53
54
55
56
57
58
59
60
61
62
63
64
65
66
67
68
69
70
71
72
73
74
75
76
void LogicSystem::RegisterCallBacks() {
_fun_callbacks[ID_TEST_MSG_REQ] = [this](shared_ptr<CSession> session, const short& msg_id,
const string& msg_data) {
Json::Reader reader;
Json::Value root;
reader.parse(msg_data, root);
auto data = root["data"].asString();
std::cout << "recv test data is " << data << std::endl;

Json::Value rtvalue;
Defer defer([this, &rtvalue, session]() {
std::string return_str = rtvalue.toStyledString();
session->Send(return_str, ID_TEST_MSG_RSP);
});

rtvalue["error"] = ErrorCodes::Success;
rtvalue["data"] = data;
};

_fun_callbacks[ID_UPLOAD_FILE_REQ] = [this](shared_ptr<CSession> session, const short& msg_id,
const string& msg_data) {
Json::Reader reader;
Json::Value root;
reader.parse(msg_data, root);
auto data = root["data"].asString();
//std::cout << "recv file data is " << data << std::endl;

Json::Value rtvalue;
Defer defer([this, &rtvalue, session]() {
std::string return_str = rtvalue.toStyledString();
session->Send(return_str, ID_UPLOAD_FILE_RSP);
});

// 解码
std::string decoded = base64_decode(data);

auto seq = root["seq"].asInt();
auto name = root["name"].asString();
auto total_size = root["total_size"].asInt();
auto trans_size = root["trans_size"].asInt();
auto file_path = ConfigMgr::Inst().GetFileOutPath();
auto file_path_str = (file_path / name).string();
std::cout << "file_path_str is " << file_path_str << std::endl;
std::ofstream outfile;
//第一个包
if (seq == 1) {
// 打开文件,如果存在则清空,不存在则创建
outfile.open(file_path_str, std::ios::binary | std::ios::trunc);
}
else {
// 保存为文件
outfile.open(file_path_str, std::ios::binary | std::ios::app);
}


if (!outfile) {
std::cerr << "无法打开文件进行写入。" << std::endl;
return 1;
}

outfile.write(decoded.data(), decoded.size());
if (!outfile) {
std::cerr << "写入文件失败。" << std::endl;
return 1;
}

outfile.close();
std::cout << "文件已成功保存为: " << name << std::endl;

rtvalue["error"] = ErrorCodes::Success;
rtvalue["total_size"] = total_size;
rtvalue["seq"] = seq;
rtvalue["name"] = name;
rtvalue["trans_size"] = trans_size;
};
}

收到上传消息后写入文件。

多线程逻辑服务器

多线程逻辑服务器主要是为了缓解单线程接受数据造成的瓶颈,因为单线程接收数据,就会影响其他线程接收数据,所以考虑引入线程池处理收到的数据。

在多线程编程中我们讲过划分多线程设计的几种思路:

  1. 按照任务划分,将不同的任务投递给不同的线程
  2. 按照线程数轮询处理
  3. 按照递归的方式划分

很明显我们不是做二分查找之类的算法处理,所以不会采用第三种。

现在考虑第二种,如果客户端发送一个很大的文件,客户端将文件切分为几个小份发送,服务器通过iocontext池接受数据, 将接受的数据投递到线程池。

我们知道线程池处理任务是不分先后顺序的,只要投递到队列中的都会被无序取出处理。

https://cdn.llfc.club/1732945106584.jpg

会造成数据包处理的乱序,当然可以最后交给一个线程去组合,统一写入文件,这么做的一个弊端就是如果文件很大,那就要等待完全重组完成才能组合为一个统一的包,如果文件很大,这个时间就会很长,当然也可以暂时缓存这些数据,每次收到后排序组合,比较麻烦。

所以这里推荐按照任务划分。

按照任务划分就是按照不同的客户端做区分,一个客户端传输的数据按照文件名字的hash值划分给不同的线程单独处理,也就是一个线程专门处理对应的hash值的任务,这样既能保证有序,又能保证其他线程可以处理其他任务,也有概率会命中hash同样的值投递给一个队列,但也扩充了并发能力。

https://cdn.llfc.club/1732948742965.jpg

因为我们之前的逻辑处理也是单线程,所以考虑在逻辑层这里做一下解耦合,因为这个服务只是用来处理数据接受,不涉及多个连接互相访问。所以可以讲logic线程扩充为多个,按照sessionid将不同的逻辑分配给不同的线程处理。

https://cdn.llfc.club/1732952125218.jpg

多线程处理逻辑

将LogicSystem中添加多个LogicWorker用来处理逻辑

1
2
3
4
5
6
7
8
9
10
11
typedef  function<void(shared_ptr<CSession>, const short &msg_id, const string &msg_data)> FunCallBack;
class LogicSystem:public Singleton<LogicSystem>
{
friend class Singleton<LogicSystem>;
public:
~LogicSystem();
void PostMsgToQue(shared_ptr < LogicNode> msg, int index);
private:
LogicSystem();
std::vector<std::shared_ptr<LogicWorker> > _workers;
};

实现投递逻辑

1
2
3
4
5
6
7
8
9
10
11
12
13
LogicSystem::LogicSystem(){
for (int i = 0; i < LOGIC_WORKER_COUNT; i++) {
_workers.push_back(std::make_shared<LogicWorker>());
}
}

LogicSystem::~LogicSystem(){

}

void LogicSystem::PostMsgToQue(shared_ptr < LogicNode> msg, int index) {
_workers[index]->PostTask(msg);
}

每一个LogicWorker都包含一个线程,这样LogicWorker可以在独立的线程里处理任务

1
2
3
4
5
6
7
8
9
10
11
12
13
14
15
16
class LogicWorker
{
public:
LogicWorker();
~LogicWorker();
void PostTask(std::shared_ptr<LogicNode> task);
void RegisterCallBacks();
private:
void task_callback(std::shared_ptr<LogicNode>);
std::thread _work_thread;
std::queue<std::shared_ptr<LogicNode>> _task_que;
std::atomic<bool> _b_stop;
std::mutex _mtx;
std::condition_variable _cv;
std::unordered_map<short, FunCallBack> _fun_callbacks;
};

LogicWorker启动一个线程处理任务

1
2
3
4
5
6
7
8
9
10
11
12
13
14
15
16
17
18
19
20
21
22
23
24
25
26
27
28
29
30
31
32

LogicWorker::LogicWorker():_b_stop(false)
{
RegisterCallBacks();

_work_thread = std::thread([this]() {
while (!_b_stop) {
std::unique_lock<std::mutex> lock(_mtx);
_cv.wait(lock, [this]() {
if(_b_stop) {
return true;
}

if (_task_que.empty()) {
return false;
}

return true;

});

if (_b_stop) {
return;
}

auto task = _task_que.front();
task_callback(task);
_task_que.pop();
}
});

}

当然要提前注册好任务

1
2
3
4
5
6
7
8
9
10
11
12
13
14
15
16
17
18
19
20
21
22
23
24
25
26
27
28
29
30
31
32
33
34
35
36
37
38
39
40
41
42
43
44
45
46
47
48
49
50
51
52
53
54
55
56
57
void LogicWorker::RegisterCallBacks()
{
_fun_callbacks[ID_TEST_MSG_REQ] = [this](shared_ptr<CSession> session, const short& msg_id,
const string& msg_data) {
Json::Reader reader;
Json::Value root;
reader.parse(msg_data, root);
auto data = root["data"].asString();
std::cout << "recv test data is " << data << std::endl;

Json::Value rtvalue;
Defer defer([this, &rtvalue, session]() {
std::string return_str = rtvalue.toStyledString();
session->Send(return_str, ID_TEST_MSG_RSP);
});

rtvalue["error"] = ErrorCodes::Success;
rtvalue["data"] = data;
};

_fun_callbacks[ID_UPLOAD_FILE_REQ] = [this](shared_ptr<CSession> session, const short& msg_id,
const string& msg_data) {
Json::Reader reader;
Json::Value root;
reader.parse(msg_data, root);
auto seq = root["seq"].asInt();
auto name = root["name"].asString();
auto total_size = root["total_size"].asInt();
auto trans_size = root["trans_size"].asInt();
auto last = root["last"].asInt();
auto file_data = root["data"].asString();
Json::Value rtvalue;
Defer defer([this, &rtvalue, session]() {
std::string return_str = rtvalue.toStyledString();
session->Send(return_str, ID_UPLOAD_FILE_RSP);
});

// 使用 std::hash 对字符串进行哈希
std::hash<std::string> hash_fn;
size_t hash_value = hash_fn(name); // 生成哈希值
int index = hash_value % FILE_WORKER_COUNT;
std::cout << "Hash value: " << hash_value << std::endl;

FileSystem::GetInstance()->PostMsgToQue(
std::make_shared<FileTask>(session, name, seq, total_size,
trans_size, last, file_data),
index
);

rtvalue["error"] = ErrorCodes::Success;
rtvalue["total_size"] = total_size;
rtvalue["seq"] = seq;
rtvalue["name"] = name;
rtvalue["trans_size"] = trans_size;
rtvalue["last"] = last;
};
}

处理逻辑

1
2
3
4
5
6
7
8
9
10
void LogicWorker::task_callback(std::shared_ptr<LogicNode> task)
{
cout << "recv_msg id is " << task->_recvnode->_msg_id << endl;
auto call_back_iter = _fun_callbacks.find(task->_recvnode->_msg_id);
if (call_back_iter == _fun_callbacks.end()) {
return;
}
call_back_iter->second(task->_session, task->_recvnode->_msg_id,
std::string(task->_recvnode->_data, task->_recvnode->_cur_len));
}

比如对于文件上传,ID_UPLOAD_FILE_REQ就调用对应的回调,在回调函数里我们再次将要处理的任务封装好投递到文件系统

1
2
3
4
5
FileSystem::GetInstance()->PostMsgToQue(
std::make_shared<FileTask>(session, name, seq, total_size,
trans_size, last, file_data),
index
);

文件系统和逻辑系统类似,包含一堆FileWorker

1
2
3
4
5
6
7
8
9
10
class FileSystem :public Singleton<FileSystem>
{
friend class Singleton<FileSystem>;
public:
~FileSystem();
void PostMsgToQue(shared_ptr <FileTask> msg, int index);
private:
FileSystem();
std::vector<std::shared_ptr<FileWorker>> _file_workers;
};

实现投递逻辑

1
2
3
4
5
6
7
8
9
10
11
12
13
14
15
16
FileSystem::~FileSystem()
{

}

void FileSystem::PostMsgToQue(shared_ptr<FileTask> msg, int index)
{
_file_workers[index]->PostTask(msg);
}

FileSystem::FileSystem()
{
for (int i = 0; i < FILE_WORKER_COUNT; i++) {
_file_workers.push_back(std::make_shared<FileWorker>());
}
}

定义文件任务

1
2
3
4
5
6
7
8
9
10
11
12
13
14
15
16
17
18
class CSession;
struct FileTask {
FileTask(std::shared_ptr<CSession> session, std::string name,
int seq, int total_size, int trans_size, int last,
std::string file_data) :_session(session),
_seq(seq),_name(name),_total_size(total_size),
_trans_size(trans_size),_last(last),_file_data(file_data)
{}
~FileTask(){}
std::shared_ptr<CSession> _session;

int _seq ;
std::string _name ;
int _total_size ;
int _trans_size ;
int _last ;
std::string _file_data;
};

实现文件工作者

1
2
3
4
5
6
7
8
9
10
11
12
13
14
class FileWorker
{
public:
FileWorker();
~FileWorker();
void PostTask(std::shared_ptr<FileTask> task);
private:
void task_callback(std::shared_ptr<FileTask>);
std::thread _work_thread;
std::queue<std::shared_ptr<FileTask>> _task_que;
std::atomic<bool> _b_stop;
std::mutex _mtx;
std::condition_variable _cv;
};

构造函数启动线程

1
2
3
4
5
6
7
8
9
10
11
12
13
14
15
16
17
18
19
20
21
22
23
24
25
26
27
28
FileWorker::FileWorker():_b_stop(false)
{
_work_thread = std::thread([this]() {
while (!_b_stop) {
std::unique_lock<std::mutex> lock(_mtx);
_cv.wait(lock, [this]() {
if (_b_stop) {
return true;
}

if (_task_que.empty()) {
return false;
}

return true;
});

if (_b_stop) {
break;
}

auto task = _task_que.front();
_task_que.pop();
task_callback(task);
}

});
}

析构需等待线程

1
2
3
4
5
6
FileWorker::~FileWorker()
{
_b_stop = true;
_cv.notify_one();
_work_thread.join();
}

投递任务

1
2
3
4
5
6
7
8
9
void FileWorker::PostTask(std::shared_ptr<FileTask> task)
{
{
std::lock_guard<std::mutex> lock(_mtx);
_task_que.push(task);
}

_cv.notify_one();
}

因为线程会触发回调函数保存文件,所以我们实现回调函数

1
2
3
4
5
6
7
8
9
10
11
12
13
14
15
16
17
18
19
20
21
22
23
24
25
26
27
28
29
30
31
32
33
34
35
36
37
38
39
void FileWorker::task_callback(std::shared_ptr<FileTask> task)
{

// 解码
std::string decoded = base64_decode(task->_file_data);

auto file_path = ConfigMgr::Inst().GetFileOutPath();
auto file_path_str = (file_path / task->_name).string();
auto last = task->_last;
//std::cout << "file_path_str is " << file_path_str << std::endl;
std::ofstream outfile;
//第一个包
if (task->_seq == 1) {
// 打开文件,如果存在则清空,不存在则创建
outfile.open(file_path_str, std::ios::binary | std::ios::trunc);
}
else {
// 保存为文件
outfile.open(file_path_str, std::ios::binary | std::ios::app);
}


if (!outfile) {
std::cerr << "无法打开文件进行写入。" << std::endl;
return ;
}

outfile.write(decoded.data(), decoded.size());
if (!outfile) {
std::cerr << "写入文件失败。" << std::endl;
return ;
}

outfile.close();
if (last) {
std::cout << "文件已成功保存为: " << task->_name << std::endl;
}

}

测试效果

https://cdn.llfc.club/1732955339237.jpg

源码链接

https://gitee.com/secondtonone1/boostasio-learn/tree/master/network/day26-multithread-res-server

零基础C++(21) 类相关面试题

Posted on 2024-11-23 | In 零基础C++

详细技术视频请看我的主页

C++教程视频

什么是默认构造

默认构造就是不带参数的构造函数,如果我们不实现任何构造函数,系统会为我们生成一个默认的构造函数

比如下面

1
2
3
4
5
6
7
8
#include <thread>
class JoiningThread {
public:
int GetIndex() const { return _i; }
private:
std::thread _t;
int _i;
};

所以我们可以直接使用默认构造函数构造一个对象,并且打印成员_i

1
2
3
//测试默认合成
JoiningThread jt;
std::cout << "member _i is " << jt.GetIndex() << std::endl;

输出

1
member _i is -1284874240

可以看到默认构造函数并不会帮我们初始化类成员变量。

什么是有参构造

有参构造就是传递参数的构造函数,可以根据参数构造对象

1
2
3
4
5
6
7
8
9
#include <thread>
class JoiningThread {
public:
JoiningThread(int i) : _i{i} {}
int GetIndex() const { return _i; }
private:
std::thread _t;
int _i;
};

我们可以通过如下方式构造

1
2
JoiningThread jt(1);
std::cout << "member _i is " << jt.GetIndex() << std::endl;

当我们执行程序,会输出

1
member _i is 1

但如果这样构造会产生问题

1
2
JoiningThread jt;
std::cout << "member _i is " << jt.GetIndex() << std::endl;

注意

如果我们实现了参数构造而不实现无参构造,系统将不会为我们实现默认构造,导致无法使用默认构造生成对象。

所以稳妥一点,我们基本都会实现无参构造

1
2
3
4
5
6
7
8
9
10
#include <thread>
class JoiningThread {
public:
JoiningThread() :_i(0){}
JoiningThread(int i) : _i{i} {}
int GetIndex() const { return _i; }
private:
std::thread _t;
int _i;
};

拷贝构造函数是什么

回答要点:

  • 定义:拷贝构造函数用于创建一个对象,该对象是通过复制另一个同类型对象来初始化的。

  • 调用时机

    :

    • 使用现有对象初始化新对象。
    • 按值传递对象作为函数参数。
    • 按值返回对象。
  • 默认拷贝构造函数:成员逐个拷贝。

示例:

1
2
3
4
5
6
class MyClass {
public:
MyClass(const MyClass& other) { // 拷贝构造函数
// 复制代码
}
};

是否会默认生成拷贝构造

在 C++ 中,如果你没有为一个类显式定义拷贝构造函数,编译器会自动生成一个默认的拷贝构造函数。这个默认拷贝构造函数会按成员的逐个拷贝(member-wise copy)方式来复制对象的每个成员变量。

默认拷贝构造函数的行为

  1. 逐个拷贝:默认拷贝构造函数会逐个拷贝所有的非静态成员变量。
  2. 指针成员:如果类中有指针成员,默认拷贝构造函数只会拷贝指针的值(地址),而不会拷贝指针所指向的对象。这可能会导致多个对象指向同一块内存,进而引发问题(如双重释放、内存泄漏等)。
  3. **const 和引用成员**:如果类中有 const 成员或引用成员,编译器不会生成默认的拷贝构造函数,因为这些成员不能被复制。
  4. 类中包含不可拷贝对象时,无法合成默认拷贝构造函数

拷贝构造是否必须实现

当一个类A中有成员变量是另一个类类型B的时候,有时候拷贝构造会失效。

比如一个类JoiningThread中有成员变量std::thread,std::thread没有构造函数,所以A类的拷贝构造无法合成,需要显示编写。

比如我们这样调用

1
2
3
JoiningThread jt(1);
JoiningThread jt2(jt);
std::cout << "member _i is " << jt.GetIndex() << std::endl;

上面代码报错

1
error: use of deleted function 'std::thread::thread(const std::thread&)'

所以我们要显示实现拷贝构造,指定一个拷贝规则

1
JoiningThread(const JoiningThread & other): _i(other._i){}

什么是浅拷贝和深拷贝

类在拷贝构造或者拷贝赋值的时候,将被拷贝的类中的成员值拷贝到目的类,如果被拷贝的类中包含指针成员,只是简单的拷贝指针的值。

同样析构也要显示编写,等待线程完成。

除此之外我们可以自己实现拷贝构造,进而实现浅拷贝和深拷贝的不同效果

https://cdn.llfc.club/1731294878994.jpg

https://cdn.llfc.club/1731295328032.jpg-llfc

构造顺序和析构顺序

类A中包含成员变量是类B的类型,如果是先调用A的构造还是B的构造呢?

如果析构的时候是A先析构还是B先析构呢?

1
2
3
4
5
6
7
8
9
10
11
12
13
14
15
16
17
18
19
20
21
class InnerB {
public:
InnerB() {
std::cout << "InnerB()" << std::endl;
}

~InnerB(){
std::cout << "~InnerB()" << std::endl;
}
};

class WrapperC {
public:
WrapperC(){
std::cout << "WrapperC()" << std::endl;
}
~WrapperC(){
std::cout << "~WrapperC()" << std::endl;
}
InnerB _inner;
};

执行结果,先调用B的构造,在调用C的构造。

析构时,先析构C再析构B

1
2
3
4
InnerB()
WrapperC()
~WrapperC()
~InnerB()

类默认构造是否必须实现

如果类中有继承关系或者其他类型的成员,默认构造函数是很有必要实现的。

系统提供的合成的默认构造函数不会对成员做初始化操作。

比如我们之后要学到的继承

1
2
3
4
5
6
7
8
9
class DerivedA: public BaseA {
public:
DerivedA(std::string name,std::string num) :
BaseA(name), _num(num) {
std::cout << "DerivedA()" << std::endl;
}
private:
std::string _num;
};

调用

1
DerivedA a("zack","1001");

this 指针的特性和用途

  1. 指向当前对象:

    • this 指针是一个隐式参数,指向调用成员函数的对象。通过 this,你可以访问当前对象的属性和方法。
  2. 区分成员变量和参数:

    • 在构造函数或成员函数中,参数名和成员变量可能同名。使用

      1
      this

      可以明确指代成员变量。例如:

      1
      2
      3
      4
      5
      6
      7
      8
      class MyClass {
      private:
      int value;
      public:
      MyClass(int value) {
      this->value = value; // 使用 this 指针区分成员变量和参数
      }
      };
  3. 返回当前对象:

    • ```
      this
      1
      2
      3
      4
      5
      6
      7
      8
      9
      10
      11
      12
      13
      14
      15
      16
      17
      18


      可以用于返回当前对象的引用,以支持链式调用。例如:

      ```cpp
      class MyClass {
      private:
      int value;
      public:
      MyClass& setValue(int value) {
      this->value = value;
      return *this; // 返回当前对象的引用
      }
      };

      MyClass obj;
      obj.setValue(10).setValue(20); // 链式调用
  4. 在 const 成员函数中的使用:

    • 在 const 成员函数中,this 的类型为 const MyClass*,这意味着你不能通过 this 修改成员变量。这有助于确保对象的状态不被改变。
  5. 在静态成员函数中的不可用性:

    • 静态成员函数没有 this 指针,因为它们不属于任何特定对象,而是属于类本身。因此,静态成员函数不能访问非静态成员变量和成员函数。

示例代码

以下是一个简单的示例,展示了 this 指针的用法:

1
2
3
4
5
6
7
8
9
10
11
12
13
14
15
16
17
18
19
20
21
22
23
24
25
26
27
28
29
30
31
32
#include <iostream>

class MyClass {
private:
int value;

public:
// 构造函数
MyClass(int value) {
this->value = value; // 使用 this 指针区分成员变量和参数
}

// 成员函数
MyClass& setValue(int value) {
this->value = value; // 使用 this 指针
return *this; // 返回当前对象的引用
}

// 输出值
void printValue() const {
std::cout << "Value: " << this->value << std::endl; // 使用 this 指针
}
};

int main() {
MyClass obj(10);
obj.printValue(); // 输出: Value: 10

obj.setValue(20).printValue(); // 链式调用,输出: Value: 20

return 0;
}

delete和default

C++11用法:

delete可以删除指定的构造函数。

default可以指定某个构造函数为系统默认合成。

1
2
3
4
5
6
7
8
9
10
class DefaultClass {
public:
DefaultClass() = default;
~DefaultClass() = default;
DefaultClass(const DefaultClass &) = delete;
DefaultClass &operator=(const DefaultClass &) = delete;
friend std::ostream& operator << (std::ostream &out, const DefaultClass &defaultClass);
private:
int _num ;
};

主函数中调用

1
2
DefaultClass b;
std::cout << b << std::endl;

输出num是一个随机数

1
DefaultClass num is 331

什么是移动构造函数?与拷贝构造函数有何不同?

回答要点:

  • 定义:移动构造函数用于通过“移动”资源来初始化对象,而不是复制资源。

  • 语法:使用右值引用作为参数 (MyClass(MyClass&& other)).

  • 优势

    :

    • 性能更高,避免不必要的深拷贝。
    • 适用于临时对象。
  • 区别

    :

    • 拷贝构造函数复制资源,移动构造函数转移资源所有权。

示例:

1
2
3
4
5
6
class MyClass {
public:
MyClass(MyClass&& other) noexcept { // 移动构造函数
// 移动资源
}
};

默认构造函数和用户定义的构造函数有什么区别?

回答要点:

  • 默认构造函数

    :

    • 无参数的构造函数。
    • 如果没有用户定义的构造函数,编译器会自动生成一个默认构造函数。
  • 用户定义的构造函数

    :

    • 开发者自定义的构造函数,可以有参数。
    • 一旦定义了任何构造函数,编译器不会再生成默认构造函数,除非显式声明。

示例:

1
2
3
4
5
6
7
8
9
10
class MyClass {
public:
MyClass() { // 默认构造函数
// 初始化代码
}

MyClass(int x) { // 有参数的构造函数
// 初始化代码
}
};

什么是初始化列表?为什么在构造函数中使用它?

回答要点:

  • 定义:初始化列表是在构造函数的参数列表之后,函数体之前,用于初始化成员变量的语法。

  • 优点

    :

    • 提高性能,特别是对于常量成员或引用成员。
    • 必须用于初始化常量成员、引用成员以及基类。
    • 避免对象先默认构造再赋值,减少不必要的操作。

示例:

1
2
3
4
5
6
7
8
class MyClass {
int x;
const int y;
public:
MyClass(int a, int b) : x(a), y(b) { // 初始化列表
// 其他初始化代码
}
};

什么是虚析构函数?为什么需要它?

回答要点:

  • 定义:在基类中将析构函数声明为virtual,以确保通过基类指针删除派生类对象时,能正确调用派生类的析构函数。

  • 用途

    :

    • 防止内存泄漏。
    • 确保派生类的资源被正确释放。
  • 不使用虚析构函数的风险

    :

    • 仅调用基类析构函数,导致派生类资源未释放。

示例:

如果BaseA的析构不写成虚析构,则主函数开辟子类对象赋值给基类指针,以后delete基类指针的时候会发现没有析构子类

1
2
3
4
5
6
7
8
9
10
11
12
13
14
15
16
17
18
19
20
21
22
23
24
25
26
27
28
class BaseA{
public:
BaseA(std::string name):_name(name){
std::cout << "BaseA()" << std::endl;
}

~BaseA(){
std::cout << "~BaseA()" << std::endl;
}

private:
std::string _name;
};

class DerivedA: public BaseA {
public:
DerivedA(std::string name,std::string num) :
BaseA(name), _num(num) {
std::cout << "DerivedA()" << std::endl;
}

~DerivedA(){
std::cout << "~DerivedA()" << std::endl;
}
private:
std::string _num;
};

主函数回收内存

1
2
BaseA* base = new DerivedA("zack","1002");
delete base;

会看到只调用了基类BaseA的析构函数。

当BaseA的析构改为虚析构的时候,才会回收子类DerivedA

1
2
3
4
5
6
7
8
9
10
11
12
13
class BaseA{
public:
BaseA(std::string name):_name(name){
std::cout << "BaseA()" << std::endl;
}

virtual ~BaseA(){
std::cout << "~BaseA()" << std::endl;
}

private:
std::string _name;
};

什么是委托构造函数?它是如何工作的?(C++11引入的特性)

回答要点:

  • 定义:一个构造函数可以调用同一类中的另一个构造函数,从而委托初始化任务。

  • 优点

    :

    • 避免代码重复,提升代码可维护性。
  • 语法:使用构造函数初始化列表中的类名和参数。

示例:

1
2
3
4
5
6
7
8
class MyClass {
int x;
int y;
public:
MyClass() : MyClass(0, 0) { } // 委托构造函数

MyClass(int a, int b) : x(a), y(b) { }
};

什么是析构函数的顺序?

回答要点:

  • 成员变量的析构顺序:按照声明的逆序析构。
  • 继承关系的析构顺序:先析构派生类的成员和资源,再析构基类。
  • 全局/静态对象:按照创建的逆序析构。

示例说明:

1
2
3
4
5
6
7
8
9
10
11
12
13
14
class Base {
public:
~Base() { cout << "Base析构\n"; }
};

class Derived : public Base {
public:
~Derived() { cout << "Derived析构\n"; }
};

int main() {
Derived obj;
// 当obj被销毁时,首先调用Derived的析构函数,然后调用Base的析构函数。
}

输出:

1
2
Derived析构
Base析构

如何防止对象被复制?

回答要点:

  • C++11及以上:使用delete关键字显式删除拷贝构造函数和拷贝赋值运算符。
  • C++11之前:将拷贝构造函数和拷贝赋值运算符声明为私有且不实现。

示例(C++11及以上):

1
2
3
4
5
6
class NonCopyable {
public:
NonCopyable() = default;
NonCopyable(const NonCopyable&) = delete; // 禁止拷贝构造
NonCopyable& operator=(const NonCopyable&) = delete; // 禁止拷贝赋值
};

构造函数中抛出异常会发生什么?

回答要点:

  • 对象未完全构造:如果构造函数中抛出异常,析构函数不会被调用,因为对象尚未完全构造。
  • 资源泄漏风险:如果在构造函数中分配了资源,需使用RAII(资源获取即初始化)类或智能指针来确保资源被正确释放。
  • 异常安全:确保在构造函数抛出异常时,任何已经初始化的成员都会被正确析构。

示例:

1
2
3
4
5
6
7
8
9
10
class MyClass {
std::vector<int> data;
public:
MyClass() {
data.reserve(100);
if (/* some condition */) {
throw std::runtime_error("构造函数异常");
}
}
};

解释RAII及其与构造函数、析构函数的关系

回答要点:

  • RAII(资源获取即初始化)

    :

    • 编程范式,通过对象的生命周期管理资源。
    • 资源在对象构造时获取,在对象析构时释放。
  • 关系

    :

    • 构造函数负责获取资源。
    • 析构函数负责释放资源。
  • 优点

    :

    • 自动管理资源,防止内存泄漏。
    • 异常安全,确保资源在异常发生时被释放。

示例:

1
2
3
4
5
6
7
8
9
10
11
12
13
14
class FileHandler {
FILE* file;
public:
FileHandler(const char* filename) {
file = fopen(filename, "r");
if (!file) throw std::runtime_error("打开文件失败");
}
~FileHandler() {
if (file) fclose(file);
}
// 禁止拷贝和移动
FileHandler(const FileHandler&) = delete;
FileHandler& operator=(const FileHandler&) = delete;
};

解释什么是赋值运算符重载?与拷贝构造函数有何不同?

回答要点:

  • 赋值运算符重载:通过重载operator=,定义对象之间的赋值行为。

  • 区别与拷贝构造函数

    :

    • 拷贝构造函数用于初始化新对象。
    • 赋值运算符用于将一个已存在的对象赋值给另一个已存在的对象。
  • 常规实现

    :

    • 检查自赋值。
    • 释放已有资源。
    • 复制资源。
    • 返回*this。

示例:

1
2
3
4
5
6
7
8
9
10
class MyClass {
int* data;
public:
MyClass& operator=(const MyClass& other) { // 赋值运算符重载
if (this == &other) return *this; // 自赋值检查
delete data; // 释放已有资源
data = new int(*other.data); // 复制资源
return *this;
}
};

解释静态成员变量在构造和析构中的处理

回答要点:

  • 静态成员变量

    :

    • 属于类本身,而非任何对象实例。
    • 在程序开始时初始化,在程序结束时析构。
  • 构造顺序

    :

    • 单例模式中,静态成员在第一次使用时构造。
  • 析构顺序

    :

    • 按逆序构造顺序析构,确保依赖关系被正确处理。

示例:

1
2
3
4
5
6
7
8
class MyClass {
public:
static MyClass instance;
MyClass() { cout << "构造\n"; }
~MyClass() { cout << "析构\n"; }
};
//放在cpp中
MyClass MyClass::instance; // 静态成员变量定义

输出:

1
2
构造
析构

虚函数原理

包含虚函数的类构成

参考我得另一篇文章,https://llfc.club/category?catid=225RaiVNI8pFDD5L4m807g7ZwmF#!aid/2CmcOeP6BZMbtNiglPTkbmnpb73

虚继承与菱形继承问题

1
2
3
4
5
6
7
8
9
10
11
12
13
14
15
16
17
18
19
20
21
22
23
24
25
26
27
28
29
30
31
32
33
34
35
36
37
38
#include <iostream>
#include <string>

// 基类 Device
class Device {
public:
std::string brand;

Device(const std::string& brand_) : brand(brand_) {}

void showBrand() const {
std::cout << "Brand: " << brand << std::endl;
}
};

// 派生类 Laptop,虚继承 Device
class Laptop : virtual public Device {
public:
Laptop(const std::string& brand_) : Device(brand_) {}
};

// 派生类 Tablet,虚继承 Device
class Tablet : virtual public Device {
public:
Tablet(const std::string& brand_) : Device(brand_) {}
};

// 派生类 Convertible
class Convertible : public Laptop, public Tablet {
public:
Convertible(const std::string& brand_) : Device(brand_), Laptop(brand_), Tablet(brand_) {}
};

int main() {
Convertible c("TechBrand");
c.showBrand();
return 0;
}

输出:

1
Brand: TechBrand

解析:

  • 在无虚继承的情况下,Convertible 类将拥有两份 Device 的成员变量,这会导致二义性问题。
  • 通过使用虚继承(virtual public),确保 Convertible 类只有一份 Device 的成员。
  • 在 Convertible 的构造函数中,需要明确调用基类 Device 的构造函数,避免二义性。
  • 在 main 函数中,创建一个 Convertible 对象,并调用 showBrand() 函数,正确显示品牌名称。

注意事项:

  • 菱形继承(多重继承导致的重复基类)可以通过虚继承来解决,确保共享同一份基类成员。
  • 虚继承会增加一定的开销,需根据具体需求权衡使用。

协变返回类型

概念定义

  • 在 C++ 中,协变返回类型(Covariant Return Types)是一个与函数重写(Override)相关的概念。当一个派生类重写基类的虚函数时,协变返回类型允许派生类的函数返回一个从基类函数返回类型派生而来的类型。
1
2
3
4
5
6
7
8
9
10
11
12
13
14
15
16
17
18
19
20
21
22
23
24
25
26
27
28
29
30
31
32
33
34
35
36
#include <iostream>

// 基类
class Base {
public:
virtual Base* clone() const {
std::cout << "Base cloned." << std::endl;
return new Base(*this);
}

virtual ~Base() {}
};

// 派生类
class Derived : public Base {
public:
Derived* clone() const override { // 协变返回类型
std::cout << "Derived cloned." << std::endl;
return new Derived(*this);
}
};

int main() {
Base* b = new Base();
Base* d = new Derived();

Base* bClone = b->clone(); // 输出: Base cloned.
Base* dClone = d->clone(); // 输出: Derived cloned.

delete b;
delete d;
delete bClone;
delete dClone;

return 0;
}

输出:

1
2
Base cloned.
Derived cloned.

解析:

  • 基类 Base 定义了一个虚函数 clone(),返回 Base* 类型的指针。

  • 派生类 Derived 重写了 clone() 函数,返回类型为 Derived*,这是一种协变返回类型。

  • 在

    1
    main

    函数中,通过基类指针调用

    1
    clone()

    函数:

    • 对于 Base 对象,调用 Base::clone()。
    • 对于 Derived 对象,由于虚函数机制,调用 Derived::clone()。
  • 协变返回类型允许派生类的重写函数返回更具体的类型,增强类型安全性和代码可读性。

注意事项:

  • 协变返回类型必须满足派生类返回类型是基类返回类型的派生类。
  • 编译器会检查协变返回类型的正确性,确保类型安全。

零基础C++(20) 继承和多态

Posted on 2024-11-23 | In 零基础C++

1. 类继承(Class Inheritance)

1.1 概述

类继承 是面向对象编程(OOP)中的一个核心概念,允许一个类(派生类)从另一个类(基类)继承属性和行为。通过继承,派生类可以重用基类的代码,并根据需要添加新的成员或重写现有成员。

1.2 语法

1
2
3
4
5
6
7
8
9
10
11
12
13
class Base {
public:
void baseFunction();
protected:
int protectedMember;
private:
int privateMember;
};

class Derived : public Base { // 公有继承
public:
void derivedFunction();
};

1.3 代码示例

1
2
3
4
5
6
7
8
9
10
11
12
13
14
15
16
17
18
19
20
21
22
23
24
25
26
27
28
29
30
31
32
33
34
35
36
37
38
39
#include <iostream>

// 基类
class Animal {
public:
void eat() const {
std::cout << "Animal eats." << std::endl;
}

protected:
int age;
};

// 派生类
class Dog : public Animal {
public:
void bark() const {
std::cout << "Dog barks." << std::endl;
}

void setAge(int a) {
age = a; // 访问受保护成员
}

int getAge() const {
return age;
}
};

int main() {
Dog myDog;
myDog.eat(); // 继承自Animal
myDog.bark(); // Dog特有

myDog.setAge(5);
std::cout << "Dog's age: " << myDog.getAge() << std::endl;

return 0;
}

1.4 执行结果

1
2
3
Animal eats.
Dog barks.
Dog's age: 5

2. 虚函数(Virtual Functions)

2.1 概述

虚函数 允许派生类重新定义基类中的函数,以实现多态性。在运行时,根据对象的实际类型调用相应的函数版本。

2.2 语法

1
2
3
4
class Base {
public:
virtual void display();
};

2.3 代码示例

1
2
3
4
5
6
7
8
9
10
11
12
13
14
15
16
17
18
19
20
21
22
23
24
25
26
27
28
29
30
31
32
33
34
35
36
37
38
39
40
#include <iostream>

class Shape {
public:
virtual void draw() const { // 虚函数
std::cout << "Drawing a shape." << std::endl;
}

virtual ~Shape() {} // 虚析构函数
};

class Circle : public Shape {
public:
void draw() const override { // 重写虚函数
std::cout << "Drawing a circle." << std::endl;
}
};

class Square : public Shape {
public:
void draw() const override { // 重写虚函数
std::cout << "Drawing a square." << std::endl;
}
};

void render(const Shape& shape) {
shape.draw(); // 动态绑定,根据实际对象类型调用对应的draw()
}

int main() {
Circle c;
Square s;
Shape genericShape;

render(c); // 输出: Drawing a circle.
render(s); // 输出: Drawing a square.
render(genericShape); // 输出: Drawing a shape.

return 0;
}

2.4 执行结果

1
2
3
Drawing a circle.
Drawing a square.
Drawing a shape.

3. 纯虚类与抽象基类(Pure Virtual Classes and Abstract Base Classes)

3.1 概述

纯虚函数 是在基类中声明但不提供实现的虚函数。包含至少一个纯虚函数的类称为 抽象基类(Abstract Base Class,ABC)。抽象基类不能被实例化,要求派生类必须实现所有纯虚函数才能被实例化。

3.2 语法

1
2
3
4
5
class Base {
public:
virtual void pureVirtualFunction() = 0; // 纯虚函数
virtual void printm() = 0;
};

3.3 代码示例

1
2
3
4
5
6
7
8
9
10
11
12
13
14
15
16
17
18
19
20
21
22
23
24
25
26
27
28
29
30
31
32
33
34
35
36
37
38
39
40
41
#include <iostream>

// 抽象基类
class Vehicle {
public:
virtual void startEngine() = 0; // 纯虚函数

virtual ~Vehicle() {} // 虚析构函数
};

class Car : public Vehicle {
public:
void startEngine() override {
std::cout << "Car engine started." << std::endl;
}
};

class Motorcycle : public Vehicle {
public:
void startEngine() override {
std::cout << "Motorcycle engine started." << std::endl;
}
};

int main() {
// Vehicle v; // 错误: 不能实例化抽象类

Car car;
Motorcycle bike;

car.startEngine(); // 输出: Car engine started.
bike.startEngine(); // 输出: Motorcycle engine started.

Vehicle* v1 = &car;
Vehicle* v2 = &bike;

v1->startEngine(); // 动态绑定,输出: Car engine started.
v2->startEngine(); // 动态绑定,输出: Motorcycle engine started.

return 0;
}

3.4 执行结果

1
2
3
4
Car engine started.
Motorcycle engine started.
Car engine started.
Motorcycle engine started.

4. 继承后的访问控制(Access Control in Inheritance)

4.1 概述

继承时的 访问控制 决定了基类成员在派生类中的可访问性。继承方式主要有三种:public、protected 和 private。它们影响继承成员的访问级别。

4.2 语法与影响

  • 公有继承(public inheritance):
    • 基类的 public 成员在派生类中保持 public。
    • 基类的 protected 成员在派生类中保持 protected。
    • 基类的 private 成员在派生类中不可访问。
  • 保护继承(protected inheritance):
    • 基类的 public 和 protected 成员在派生类中都变为 protected。
  • 私有继承(private inheritance):
    • 基类的 public 和 protected 成员在派生类中都变为 private。

4.3 代码示例

1
2
3
4
5
6
7
8
9
10
11
12
13
14
15
16
17
18
19
20
21
22
23
24
25
26
27
28
29
30
31
32
33
34
35
36
37
38
39
40
41
42
43
44
45
46
47
48
49
50
#include <iostream>

class Base {
public:
int publicMember;
protected:
int protectedMember;
private:
int privateMember;
};

class PublicDerived : public Base {
public:
void accessMembers() {
publicMember = 1; // 可访问
protectedMember = 2; // 可访问
// privateMember = 3; // 错误:privateMember 在派生类中不可访问
}
};

class ProtectedDerived : protected Base {
public:
void accessMembers() {
publicMember = 1; // 转为 protected
protectedMember = 2; // 转为 protected
// privateMember = 3; // 错误
}
};

class PrivateDerived : private Base {
public:
void accessMembers() {
publicMember = 1; // 转为 private
protectedMember = 2; // 转为 private
// privateMember = 3; // 错误
}
};

int main() {
PublicDerived pubDer;
pubDer.publicMember = 10; // 可访问

// ProtectedDerived protDer;
// protDer.publicMember = 10; // 错误:publicMember 在 ProtectedDerived 中为 protected

// PrivateDerived privDer;
// privDer.publicMember = 10; // 错误:publicMember 在 PrivateDerived 中为 private

return 0;
}

5. 继承中类的作用域(Scope of Classes in Inheritance)

5.1 概述

在继承关系中,类的作用域决定了成员名称的可见性和访问方式。派生类可以访问基类的成员,根据访问控制的不同,还可能需要使用 作用域解析符 来访问隐藏的成员。

5.2 代码示例

1
2
3
4
5
6
7
8
9
10
11
12
13
14
15
16
17
18
19
20
21
22
23
24
25
26
27
28
29
30
31
32
33
34
35
36
37
38
39
40
#include <iostream>

class Base {
public:
void display() const {
std::cout << "Display from Base" << std::endl;
}

virtual void show() const {
std::cout << "Show from Base" << std::endl;
}
};

class Derived : public Base {
public:
void display() const { // 隐藏基类的 display
std::cout << "Display from Derived" << std::endl;
}

void callBaseDisplay() const {
Base::display(); // 使用作用域解析符调用基类的 display
}

void show() const { // 重写 show, show 是虚函数可实现多态
std::cout << "Show from Derived" << std::endl;
}
};

int main() {
Derived d;
d.display(); // 调用 Derived::display
d.callBaseDisplay(); // 调用 Base::display
d.show(); // 调用 Derived::show

Base* bPtr = &d;
bPtr->display(); // 调用 Base::display,因为 display 不是虚函数
bPtr->show(); // show 是虚函数,调用 Derived::show;否则调用 Base::show

return 0;
}

5.3 执行结果

1
2
3
4
5
Display from Derived
Display from Base
Show from Derived
Display from Base
Show from Base // show 是虚函数则输出: Show from Derived

6. 构造函数与拷贝控制(Constructors and Copy Control in Inheritance)

6.1 概述

在继承体系中,类的构造函数和拷贝控制函数(拷贝构造函数、拷贝赋值运算符、析构函数)的调用顺序和行为需要注意。基类的构造函数在派生类之前调用,析构函数则在派生类之后调用。

6.2 构造函数的调用顺序

  1. 基类的 默认构造函数 首先被调用,除非派生类在初始化列表中显式调用其他基类构造函数。
  2. 派生类的成员按照声明顺序被构造。
  3. 派生类的构造函数体被执行。

6.3 代码示例

1
2
3
4
5
6
7
8
9
10
11
12
13
14
15
16
17
18
19
20
21
22
23
24
25
26
27
28
29
30
31
32
33
34
35
36
37
38
39
40
41
42
43
44
45
46
47
48
49
50
51
52
53
54
55
56
57
58
59
60
61
62
63
64
65
66
67
68
69
70
71
72
73
74
75
76
77
78
79
80
#include <iostream>
#include <string>

class Base {
public:
Base() {
std::cout << "Base default constructor" << std::endl;
}

Base(const std::string& name) : name_(name) {
std::cout << "Base parameterized constructor: " << name_ << std::endl;
}

Base(const Base& other) : name_(other.name_) {
std::cout << "Base copy constructor" << std::endl;
}

Base& operator=(const Base& other) {
std::cout << "Base copy assignment" << std::endl;
if (this != &other) {
name_ = other.name_;
}
return *this;
}

virtual ~Base() {
std::cout << "Base destructor" << std::endl;
}

protected:
std::string name_;
};

class Derived : public Base {
public:
Derived() : Base("Default Derived") {
std::cout << "Derived default constructor" << std::endl;
}

Derived(const std::string& name, int value) : Base(name), value_(value) {
std::cout << "Derived parameterized constructor: " << value_ << std::endl;
}

Derived(const Derived& other) : Base(other), value_(other.value_) {
std::cout << "Derived copy constructor" << std::endl;
}

Derived& operator=(const Derived& other) {
std::cout << "Derived copy assignment" << std::endl;
if (this != &other) {
Base::operator=(other);
value_ = other.value_;
}
return *this;
}

~Derived() override {
std::cout << "Derived destructor" << std::endl;
}

private:
int value_;
};

int main() {
std::cout << "Creating d1:" << std::endl;
Derived d1;

std::cout << "\nCreating d2:" << std::endl;
Derived d2("Custom Derived", 42);

std::cout << "\nCopy constructing d3 from d2:" << std::endl;
Derived d3 = d2;

std::cout << "\nAssigning d1 = d2:" << std::endl;
d1 = d2;

std::cout << "\nExiting main..." << std::endl;
return 0;
}

6.4 执行结果

1
2
3
4
5
6
7
8
9
10
11
12
13
14
15
16
17
18
19
20
21
22
23
Creating d1:
Base parameterized constructor: Default Derived
Derived default constructor

Creating d2:
Base parameterized constructor: Custom Derived
Derived parameterized constructor: 42

Copy constructing d3 from d2:
Base copy constructor
Derived copy constructor

Assigning d1 = d2:
Derived copy assignment
Base copy assignment

Exiting main...
Derived destructor
Base destructor
Derived destructor
Base destructor
Derived destructor
Base destructor

7. 容器与继承(Containers and Inheritance)

7.1 概述

C++ 容器(如 std::vector、std::list 等) 通常存储对象的副本,而非指向对象的指针。因此,当与继承结合使用时,可能导致 切片(Object Slicing) 问题,即仅存储基类部分,丢失派生类特有的信息。为了实现多态性,推荐使用指针或智能指针存储对象。

7.2 切片问题示例

1
2
3
4
5
6
7
8
9
10
11
12
13
14
15
16
17
18
19
20
21
22
23
#include <iostream>
#include <vector>

class Base {
public:
virtual void show() const { std::cout << "Base show" << std::endl; }
virtual ~Base() {}
};

class Derived : public Base {
public:
void show() const override { std::cout << "Derived show" << std::endl; }
};

int main() {
std::vector<Base> vec;
Derived d;
vec.push_back(d); // 切片发生,派生类特有部分被丢弃

vec[0].show(); // 输出: Base show

return 0;
}

7.3 使用指针避免切片

1
2
3
4
5
6
7
8
9
10
11
12
13
14
15
16
17
18
19
20
21
22
23
#include <iostream>
#include <vector>
#include <memory>

class Base {
public:
virtual void show() const { std::cout << "Base show" << std::endl; }
virtual ~Base() {}
};

class Derived : public Base {
public:
void show() const override { std::cout << "Derived show" << std::endl; }
};

int main() {
std::vector<std::unique_ptr<Base>> vec;
vec.emplace_back(std::make_unique<Derived>());

vec[0]->show(); // 输出: Derived show

return 0;
}

7.5 智能指针选择

  • **std::unique_ptr**:
    • 独占所有权,不可复制,只能移动。
    • 适用于明确的单一所有权场景。
  • **std::shared_ptr**:
    • 共享所有权,可以被多个指针共享和引用计数。
    • 适用于需要多个所有者的场景。

练习题目

1. 简单继承与成员访问

题目:

定义一个基类 Person,包含以下成员:

  • 私有成员变量:name(字符串类型),age(整数类型)

  • 公共成员函数

    :

    • 构造函数:接受姓名和年龄作为参数并初始化成员变量
    • displayInfo():打印姓名和年龄

然后,定义一个派生类 Student,继承自 Person,并添加以下内容:

  • 私有成员变量:studentID(字符串类型)

  • 公共成员函数

    :

    • 构造函数:接受姓名、年龄和学号作为参数,并调用基类构造函数初始化姓名和年龄
    • 重写 displayInfo():除了显示姓名和年龄外,还显示学号

要求:

  • 在 main 函数中,创建一个 Student 对象,并调用 displayInfo() 函数展示信息。

示例输出:

1
2
3
Name: Alice
Age: 20
Student ID: S12345

2. 虚函数重写与多态性

题目:

定义一个基类 Shape,包含以下内容:

  • 公共成员函数

    :

    • 虚函数 draw():在基类中实现,输出 “Drawing a generic shape.”

然后,定义两个派生类 Circle 和 Rectangle,分别重写 draw() 函数,实现各自的输出:

  • Circle 的 draw() 输出:”Drawing a circle.”
  • Rectangle 的 draw() 输出:”Drawing a rectangle.”

要求:

  • 在 main 函数中,创建一个 Shape 类型的指针数组,包含不同类型的 Shape 对象(Circle 和 Rectangle)。
  • 遍历数组,调用每个对象的 draw() 函数,验证多态性的实现。

示例输出:

1
2
3
Drawing a circle.
Drawing a rectangle.
Drawing a generic shape.

3. 函数重载与隐藏

题目:

定义一个基类 Calculator,包含以下公共成员函数:

  • int add(int a, int b):返回两个整数的和
  • double add(double a, double b):返回两个浮点数的和

然后,定义一个派生类 AdvancedCalculator,继承自 Calculator,并添加以下成员函数:

  • int add(int a, int b, int c):返回三个整数的和

要求:

  • 在

    1
    main

    函数中,创建一个

    1
    AdvancedCalculator

    对象,分别调用以下函数,并观察输出:

    • add(2, 3)
    • add(2.5, 3.5)
    • add(1, 2, 3)

注意:

  • 观察派生类中新增的 add 函数是否影响基类中的同名函数。

示例输出:

1
2
3
5
6
6

4. 抽象类与纯虚函数

题目:

定义一个抽象基类 Animal,包含以下内容:

  • 公共纯虚函数

    :

    • void makeSound() const:纯虚函数,用于发出动物的叫声

然后,定义两个派生类 Dog 和 Cat,分别实现 makeSound() 函数:

  • Dog 的 makeSound() 输出:”Woof!”
  • Cat 的 makeSound() 输出:”Meow!”

要求:

  • 在 main 函数中,创建 Dog 和 Cat 对象的基类指针,并调用 makeSound() 函数,展示多态性。

示例输出:

1
2
Woof!
Meow!

5. 构造函数与析构函数的继承

题目:

定义一个基类 Vehicle,包含以下内容:

  • 公共成员函数

    :

    • 构造函数:输出 “Vehicle constructed.”
    • 析构函数:输出 “Vehicle destructed.”

然后,定义一个派生类 Car,继承自 Vehicle,并添加以下内容:

  • 公共成员函数

    :

    • 构造函数:输出 “Car constructed.”
    • 析构函数:输出 “Car destructed.”

要求:

  • 在 main 函数中,创建一个 Car 对象,并观察构造和析构的调用顺序。

示例输出:

1
2
3
4
Vehicle constructed.
Car constructed.
Car destructed.
Vehicle destructed.

零基础C++(19) 类基础用法

Posted on 2024-11-09 | In 零基础C++

1. 类与对象简介

1.1 什么是类和对象

  • 类(Class)是C++中创建用户自定义类型的一种方式,它将数据(成员变量)和操作数据的函数(成员函数)封装在一起。
  • 对象(Object)是类的实例化,拥有类定义的所有属性和行为。
  • 类更像是汽车图纸,对象更像是造出来的汽车。

1.2 类的作用

  • 封装(Encapsulation):将数据和操作数据的代码绑定在一起,保护数据不被外界直接访问。
  • 抽象(Abstraction):通过类定义抽象出具有共同特性的对象,提高代码的可重用性和可维护性。
  • 继承(Inheritance)和多态(Polymorphism):实现代码的复用与动态绑定。

2. 类的定义

2.1 基本语法

1
2
3
4
5
6
7
8
class ClassName {
public:
// 公有成员
private:
// 私有成员
protected:
// 受保护成员
};

2.2 示例

创建一个表示学生的类:

1
2
3
4
5
6
7
8
9
10
11
12
13
14
15
16
17
18
19
#include <string>

class Student {
public:
// 公有构造函数
Student(const std::string& name, int age);

// 公有成员函数
void setName(const std::string& name);
std::string getName() const;

void setAge(int age);
int getAge() const;

private:
// 私有成员变量
std::string name_;
int age_;
};

3. 成员变量与成员函数

3.1 成员变量

  • 成员变量(Member Variables):用于存储对象的状态信息。
  • 命名约定:常用下划线结尾(例如 name_)表示成员变量,避免与局部变量混淆。

3.2 成员函数

  • 成员函数(Member Functions):定义对象的行为,可以访问和修改成员变量。
  • 常成员函数(Const Member Functions):保证函数不会修改对象的状态。

3.3 示例实现

1
2
3
4
5
6
7
8
9
10
11
12
13
14
15
16
17
18
19
20
21
22
// Student.cpp
#include "Student.h"

Student::Student(const std::string& name, int age)
: name_(name), age_(age) {}

void Student::setName(const std::string& name) {
name_ = name;
}

std::string Student::getName() const {
return name_;
}

void Student::setAge(int age) {
if (age > 0)
age_ = age;
}

int Student::getAge() const {
return age_;
}

4. 访问控制

4.1 访问修饰符

  • public:公有成员,可以被所有代码访问。
  • private:私有成员,仅能被类的成员函数和友元访问。
  • protected:受保护成员,仅能被类的成员函数、友元和派生类访问。

4.2 例子

1
2
3
4
5
6
7
8
9
10
11
class Sample {
public:
void publicFunction();

private:
int privateVar_;
void privateFunction();

protected:
int protectedVar_;
};

5. 构造函数与析构函数

5.1 构造函数

  • 默认构造函数:没有参数的构造函数。
  • 参数化构造函数:接受参数以初始化对象。
  • 拷贝构造函数:用一个对象初始化另一个对象。
  • 移动构造函数(C++11):从临时对象“移动”资源。

5.2 析构函数

  • 析构函数(Destructor):在对象生命周期结束时调用,用于释放资源。

5.3 示例

1
2
3
4
5
6
7
8
9
10
11
12
13
14
15
16
17
18
19
20
21
22
23
24
25
26
27
28
29
30
31
32
33
#include <iostream>

class Example {
public:
// 默认构造函数
Example() : data_(0) {
std::cout << "Default constructor called.\n";
}

// 参数化构造函数
Example(int data) : data_(data) {
std::cout << "Parameterized constructor called with data = " << data_ << ".\n";
}

// 拷贝构造函数
Example(const Example& other) : data_(other.data_) {
std::cout << "Copy constructor called.\n";
}

// 移动构造函数
Example(Example&& other) noexcept : data_(other.data_) {
other.data_ = 0;
std::cout << "Move constructor called.\n";
}

// 析构函数
~Example() {
std::cout << "Destructor called for data = " << data_ << ".\n";
}

private:
int data_;
};

5.4 使用示例

1
2
3
4
5
6
7
int main() {
Example ex1; // 调用默认构造函数
Example ex2(42); // 调用参数化构造函数
Example ex3 = ex2; // 调用拷贝构造函数
Example ex4 = std::move(ex2); // 调用移动构造函数
return 0;
}

输出示例:

1
2
3
4
5
6
7
Default constructor called.
Parameterized constructor called with data = 42.
Copy constructor called.
Move constructor called.
Destructor called for data = 0.
Destructor called for data = 42.

5.5 拷贝构造是否必须实现

当一个类A中有成员变量是另一个类类型B的时候,有时候拷贝构造会失效。比如一个类A中有成员变量std::thread,std::thread没有构造函数,所以A类的拷贝构造无法合成,需要显示编写。

同样析构也要显示编写,等待线程完成。

除此之外我们可以自己实现拷贝构造,进而实现浅拷贝和深拷贝的不同效果

https://cdn.llfc.club/1731294878994.jpg

https://cdn.llfc.club/1731295328032.jpg-llfc

5.6 构造顺序和析构顺序

类A中包含成员变量是类B的类型,如果是先调用A的构造还是B的构造呢?

如果析构的时候是A先析构还是B先析构呢?

5.7 类默认构造是否必须实现

如果类中有继承关系或者其他类型的成员,默认构造函数是很有必要实现的。

系统提供的合成的默认构造函数不会对成员做初始化操作。

5.8 this 指针的特性和用途

  1. 指向当前对象:

    • this 指针是一个隐式参数,指向调用成员函数的对象。通过 this,你可以访问当前对象的属性和方法。
  2. 区分成员变量和参数:

    • 在构造函数或成员函数中,参数名和成员变量可能同名。使用

      1
      this

      可以明确指代成员变量。例如:

      1
      2
      3
      4
      5
      6
      7
      8
      class MyClass {
      private:
      int value;
      public:
      MyClass(int value) {
      this->value = value; // 使用 this 指针区分成员变量和参数
      }
      };
  3. 返回当前对象:

    • ```
      this
      1
      2
      3
      4
      5
      6
      7
      8
      9
      10
      11
      12
      13
      14
      15
      16
      17
      18


      可以用于返回当前对象的引用,以支持链式调用。例如:

      ```cpp
      class MyClass {
      private:
      int value;
      public:
      MyClass& setValue(int value) {
      this->value = value;
      return *this; // 返回当前对象的引用
      }
      };

      MyClass obj;
      obj.setValue(10).setValue(20); // 链式调用
  4. 在 const 成员函数中的使用:

    • 在 const 成员函数中,this 的类型为 const MyClass*,这意味着你不能通过 this 修改成员变量。这有助于确保对象的状态不被改变。
  5. 在静态成员函数中的不可用性:

    • 静态成员函数没有 this 指针,因为它们不属于任何特定对象,而是属于类本身。因此,静态成员函数不能访问非静态成员变量和成员函数。

示例代码

以下是一个简单的示例,展示了 this 指针的用法:

1
2
3
4
5
6
7
8
9
10
11
12
13
14
15
16
17
18
19
20
21
22
23
24
25
26
27
28
29
30
31
32
#include <iostream>

class MyClass {
private:
int value;

public:
// 构造函数
MyClass(int value) {
this->value = value; // 使用 this 指针区分成员变量和参数
}

// 成员函数
MyClass& setValue(int value) {
this->value = value; // 使用 this 指针
return *this; // 返回当前对象的引用
}

// 输出值
void printValue() const {
std::cout << "Value: " << this->value << std::endl; // 使用 this 指针
}
};

int main() {
MyClass obj(10);
obj.printValue(); // 输出: Value: 10

obj.setValue(20).printValue(); // 链式调用,输出: Value: 20

return 0;
}

5.9 delete和default

C++11用法:

delete可以删除指定的构造函数。

default可以指定某个构造函数为系统默认合成。

6. 拷贝控制

拷贝构造函数与拷贝赋值运算符

6.1 拷贝构造函数

  • 定义:用于创建一个新对象,并复制现有对象的成员。
  • 语法:ClassName(const ClassName& other);

6.2 拷贝赋值运算符

  • 定义:用于将一个已有对象的值赋给另一个已有对象。
  • 语法:ClassName& operator=(const ClassName& other);

6.3 示例

1
2
3
4
5
6
7
8
9
10
11
12
13
14
15
16
17
18
19
20
21
22
23
24
25
26
27
28
29
30
31
32
33
34
35
36
37
38
39
40
41
42
43
44
45
46
47
48
49
50
51
52
53
54
#include <iostream>
#include <cstring>

class MyString {
public:
// 构造函数
MyString(const char* str = nullptr) {
if (str) {
size_ = std::strlen(str);
data_ = new char[size_ + 1];
std::strcpy(data_, str);
} else {
size_ = 0;
data_ = new char[1];
data_[0] = '\0';
}
std::cout << "Constructor called.\n";
}

// 拷贝构造函数
MyString(const MyString& other) : size_(other.size_) {
data_ = new char[size_ + 1];
std::strcpy(data_, other.data_);
std::cout << "Copy constructor called.\n";
}

// 拷贝赋值运算符
MyString& operator=(const MyString& other) {
std::cout << "Copy assignment operator called.\n";
if (this == &other)
return *this; // 自赋值检查

delete[] data_; // 释放现有资源

size_ = other.size_;
data_ = new char[size_ + 1];
std::strcpy(data_, other.data_);
return *this;
}

// 析构函数
~MyString() {
delete[] data_;
std::cout << "Destructor called.\n";
}

void print() const {
std::cout << data_ << "\n";
}

private:
char* data_;
std::size_t size_;
};

6.4 使用示例

1
2
3
4
5
6
7
8
9
10
11
int main() {
MyString s1("Hello");
MyString s2 = s1; // 调用拷贝构造函数
MyString s3;
s3 = s1; // 调用拷贝赋值运算符

s1.print();
s2.print();
s3.print();
return 0;
}

输出示例:

1
2
3
4
5
6
7
8
9
10
Constructor called.
Copy constructor called.
Constructor called.
Copy assignment operator called.
Hello
Hello
Hello
Destructor called.
Destructor called.
Destructor called.

7. 移动语义

7.1 什么是移动语义

  • 移动语义(Move Semantics):允许资源的所有权从一个对象转移到另一个对象,避免不必要的拷贝,提高性能。

7.2 移动构造函数与移动赋值运算符

  • 移动构造函数:ClassName(ClassName&& other) noexcept;
  • 移动赋值运算符:ClassName& operator=(ClassName&& other) noexcept;

7.3 示例

1
2
3
4
5
6
7
8
9
10
11
12
13
14
15
16
17
18
19
20
21
22
23
24
25
26
27
28
29
30
31
32
33
34
35
36
37
38
39
40
41
42
43
44
45
46
47
48
49
50
51
52
53
54
55
56
57
58
59
60
61
#include <iostream>
#include <utility>

class MoveExample {
public:
// 构造函数
MoveExample(int size) : size_(size), data_(new int[size]) {
std::cout << "Constructor called.\n";
}

// 拷贝构造函数
MoveExample(const MoveExample& other) : size_(other.size_), data_(new int[other.size_]) {
std::copy(other.data_, other.data_ + size_, data_);
std::cout << "Copy constructor called.\n";
}

// 移动构造函数
MoveExample(MoveExample&& other) noexcept : size_(other.size_), data_(other.data_) {
other.size_ = 0;
other.data_ = nullptr;
std::cout << "Move constructor called.\n";
}

// 拷贝赋值运算符
MoveExample& operator=(const MoveExample& other) {
std::cout << "Copy assignment operator called.\n";
if (this == &other)
return *this;

delete[] data_;
size_ = other.size_;
data_ = new int[size_];
std::copy(other.data_, other.data_ + size_, data_);
return *this;
}

// 移动赋值运算符
MoveExample& operator=(MoveExample&& other) noexcept {
std::cout << "Move assignment operator called.\n";
if (this == &other)
return *this;

delete[] data_;
size_ = other.size_;
data_ = other.data_;

other.size_ = 0;
other.data_ = nullptr;
return *this;
}

// 析构函数
~MoveExample() {
delete[] data_;
std::cout << "Destructor called.\n";
}

private:
int size_;
int* data_;
};

7.4 使用示例

1
2
3
4
5
6
7
8
9
10
11
int main() {
MoveExample ex1(100); // Constructor
MoveExample ex2 = ex1; // Copy Constructor
MoveExample ex3 = MoveExample(200); // Move Constructor

MoveExample ex4(300);
ex4 = ex1; // Copy Assignment
ex4 = MoveExample(400); // Move Assignment

return 0;
}

输出示例:

1
2
3
4
5
6
7
8
9
10
11
12
13
Constructor called.
Copy constructor called.
Constructor called.
Move constructor called.
Destructor called.
Constructor called.
Copy assignment operator called.
Move constructor called.
Move assignment operator called.
Destructor called.
Destructor called.
Destructor called.
Destructor called.

8. 类的友元

8.1 什么是友元

  • 友元(Friend):可以访问类的私有和保护成员的非成员函数或另一个类。

8.2 类型

  • 友元函数:单个函数可以被声明为友元。
  • 友元类:整个类可以被声明为友元。

8.3 使用示例

1
2
3
4
5
6
7
8
9
10
11
12
13
14
15
16
17
18
19
20
#include <iostream>

class Box {
public:
Box(double length, double width, double height)
: length_(length), width_(width), height_(height) {}

// 声明友元函数
friend double calculateVolume(const Box& b);

private:
double length_;
double width_;
double height_;
};

// 友元函数定义
double calculateVolume(const Box& b) {
return b.length_ * b.width_ * b.height_;
}

8.4 使用友元类

1
2
3
4
5
6
7
8
9
10
11
12
13
14
15
16
17
18
class Rectangle {
public:
Rectangle(double width, double height) : width_(width), height_(height) {}

private:
double width_;
double height_;

// 声明友元类
friend class AreaCalculator;
};

class AreaCalculator {
public:
double calculateArea(const Rectangle& rect) {
return rect.width_ * rect.height_;
}
};

9. 运算符重载

9.1 什么是运算符重载

  • 运算符重载(Operator Overloading):允许对自定义类型使用C++运算符,如 +, -, << 等。

9.2 重载运算符的规则

  • 只能对已有运算符进行重载,不能创建新运算符。
  • 至少有一个操作数必须是用户定义的类型。
  • 不能改变运算符的优先级或结合性。

9.3 示例:重载 + 运算符

1
2
3
4
5
6
7
8
9
10
11
12
13
14
15
16
17
18
19
20
21
22
23
24
25
26
27
28
29
30
31
32
33
34
35
36
37
38
39
#include <iostream>
#include <string>

class Point {
public:
Point(double x, double y) : x_(x), y_(y) {}

// 成员函数重载 +
Point operator+(const Point& other) const {
return Point(x_ + other.x_, y_ + other.y_);
}

void print() const {
std::cout << "(" << x_ << ", " << y_ << ")\n";
}

private:
double x_;
double y_;
};

// 也可以使用友元函数重载 +

Point operator-(const Point& a, const Point& b) {
return Point(a.x_ - b.x_, a.y_ - b.y_);
}

int main() {
Point p1(1.5, 2.5);
Point p2(3.0, 4.0);

Point p3 = p1 + p2;
p3.print(); // 输出: (4.5, 6.5)

Point p4 = p2 - p1;
p4.print(); // 输出: (1.5, 1.5)

return 0;
}

9.4 示例:重载 << 运算符(输出流)

1
2
3
4
5
6
7
8
9
10
11
12
13
14
15
16
17
18
19
20
21
22
23
24
25
26
27
#include <iostream>
#include <string>

class Employee {
public:
Employee(const std::string& name, double salary)
: name_(name), salary_(salary) {}

// 声明友元函数以重载 <<
friend std::ostream& operator<<(std::ostream& os, const Employee& emp);

private:
std::string name_;
double salary_;
};

// 定义重载的 <<
std::ostream& operator<<(std::ostream& os, const Employee& emp) {
os << "Employee Name: " << emp.name_ << ", Salary: $" << emp.salary_;
return os;
}

int main() {
Employee emp("John Doe", 75000);
std::cout << emp << std::endl;
return 0;
}

输出示例:

1
Employee Name: John Doe, Salary: $75000

10. 练习示例

项目:实现自定义MyString类

目标:创建一个简单的MyString类,支持拷贝构造,默认构造,有参构造,支持输出和比较等。

1
2
3
4
5
6
7
8
9
10
11
12
13
14
15
16
17
18
19
20
21
22
23
24
25
26
27
28
29
30
31
32
33
34
35
36
37
38
39
40
41
42
43
44
45
46
47
48
49
50
51
52
53
54
55
56
57
58
59
60
61
62
63
64
65
66
67
68
69
70
71
72
73
74
75
76
77
78
79
80
81
82
83
84
#include <iostream>
#include <cstring>

class MyString {
private:
char* data; // 动态分配的字符数组
public:
// 默认构造函数
MyString() : data(nullptr) {}

// 有参构造函数
MyString(const char* str) {
if (str) {
data = new char[strlen(str) + 1]; // +1 for the null terminator
strcpy(data, str);
} else {
data = nullptr;
}
}

// 拷贝构造函数
MyString(const MyString& other) {
if (other.data) {
data = new char[strlen(other.data) + 1];
strcpy(data, other.data);
} else {
data = nullptr;
}
}

// 赋值运算符重载
MyString& operator=(const MyString& other) {
if (this != &other) {
delete[] data; // 释放原有内存
if (other.data) {
data = new char[strlen(other.data) + 1];
strcpy(data, other.data);
} else {
data = nullptr;
}
}
return *this;
}

// 比较运算符重载
bool operator==(const MyString& other) const {
if (data == nullptr && other.data == nullptr) return true;
if (data == nullptr || other.data == nullptr) return false;
return strcmp(data, other.data) == 0;
}

// 输出运算符重载
friend std::ostream& operator<<(std::ostream& os, const MyString& myStr) {
if (myStr.data) {
os << myStr.data;
}
return os;
}

// 析构函数
~MyString() {
delete[] data; // 释放动态分配的内存
}
};

int main() {
MyString str1("Hello, World!");
MyString str2 = str1; // 拷贝构造
MyString str3;

str3 = str1; // 赋值运算符重载

std::cout << "str1: " << str1 << std::endl;
std::cout << "str2: " << str2 << std::endl;
std::cout << "str3: " << str3 << std::endl;

if (str1 == str2) {
std::cout << "str1 and str2 are equal." << std::endl;
} else {
std::cout << "str1 and str2 are not equal." << std::endl;
}

return 0;
}

代码说明

  1. 私有成员:
    • char* data:指向动态分配的字符数组,用于存储字符串。
  2. 构造函数:
    • 默认构造函数:初始化 data 为 nullptr。
    • 有参构造函数:接收一个 const char* 类型的字符串,动态分配内存并复制字符串内容。
    • 拷贝构造函数:复制另一个 MyString 对象的内容,确保深拷贝。
  3. 赋值运算符重载:支持将一个 MyString 对象赋值给另一个,确保释放原有内存并进行深拷贝。
  4. 比较运算符重载:支持比较两个 MyString 对象是否相等。
  5. 输出运算符重载:支持直接使用 std::cout 输出 MyString 对象。
  6. 析构函数:释放动态分配的内存,防止内存泄漏。

使用示例

在 main 函数中,创建了几个 MyString 对象,演示了拷贝构造、赋值和比较的用法。

视频教程

关于C++的视频教程可参考我的主页

C++教程视频

零基础C++(18) 函数用法

Posted on 2024-11-03 | In 零基础C++

1. 函数简介

定义

函数是执行特定任务的代码块,可以被程序中的多个地方调用。使用函数可以增加代码的可重用性、可读性和可维护性。

功能

  • 封装:将特定功能封装在函数中,便于管理和修改。
  • 复用:同一段功能代码可以在程序中多次调用,减少代码重复。
  • 结构化:通过函数组织代码,提高程序的结构清晰度。

基本语法

1
2
3
return_type function_name(parameter_list) {
// function body
}

示例:

1
2
3
4
5
6
7
8
9
10
11
12
13
14
15
#include <iostream>

// 函数声明
int add(int a, int b);

int main() {
int result = add(5, 3);
std::cout << "5 + 3 = " << result << std::endl;
return 0;
}

// 函数定义
int add(int a, int b) {
return a + b;
}

输出:

1
5 + 3 = 8

2. 函数的声明与定义

函数声明(Function Declaration)

告诉编译器函数的名称、返回类型和参数类型,但不包含函数体。通常放在头文件中或在使用函数前进行声明。

语法:

1
return_type function_name(parameter_list);

示例:

1
int multiply(int a, int b); // 函数声明

函数定义(Function Definition)

提供函数的具体实现,包括函数体。函数定义可以在源文件中或与声明一起在头文件中出现(推荐仅声明在头文件中)。

语法:

1
2
3
return_type function_name(parameter_list) {
// function body
}

示例:

1
2
3
int multiply(int a, int b) { // 函数定义
return a * b;
}

函数分离编译

  • 声明:放在头文件(如 multiply.h)。
  • 定义:放在源文件(如 multiply.cpp)。

multiply.h:

1
2
3
4
5
6
#ifndef MULTIPLY_H
#define MULTIPLY_H

int multiply(int a, int b);

#endif

multiply.cpp:

1
2
3
4
5
#include "multiply.h"

int multiply(int a, int b) {
return a * b;
}

main.cpp:

1
2
3
4
5
6
7
8
#include <iostream>
#include "multiply.h"

int main() {
int result = multiply(4, 6);
std::cout << "4 * 6 = " << result << std::endl;
return 0;
}

编译命令(假设使用g++):

1
g++ main.cpp multiply.cpp -o program

输出:

1
4 * 6 = 24

3. 函数调用

基本调用

通过函数名称和必要的参数来调用函数。

示例:

1
2
3
4
5
6
7
8
9
10
#include <iostream>

void greet() {
std::cout << "Hello, World!" << std::endl;
}

int main() {
greet(); // 调用函数
return 0;
}

输出:

1
Hello, World!

多次调用

同一函数可以在程序中被调用多次。

示例:

1
2
3
4
5
6
7
8
9
10
11
12
#include <iostream>

void sayHello() {
std::cout << "Hello!" << std::endl;
}

int main() {
sayHello();
sayHello();
sayHello();
return 0;
}

输出:

1
2
3
Hello!
Hello!
Hello!

4. 参数传递机制

C++中函数参数的传递方式主要有以下三种:

  1. 传值调用(Pass by Value)
  2. 传引用调用(Pass by Reference)
  3. 传指针调用(Pass by Pointer)

传值调用

定义:函数接收参数的副本,函数内对参数的修改不会影响原始数据。

语法:

1
2
3
void function_name(int a) {
a = 10; // 只修改副本
}

示例:

1
2
3
4
5
6
7
8
9
10
11
12
13
#include <iostream>

void changeValue(int num) {
num = 100;
std::cout << "Inside function: " << num << std::endl;
}

int main() {
int value = 50;
changeValue(value);
std::cout << "Outside function: " << value << std::endl;
return 0;
}

输出:

1
2
Inside function: 100
Outside function: 50

解释:changeValue函数修改的是num的副本,原始变量value保持不变。

传引用调用

定义:函数接收参数的引用,函数内对参数的修改会影响原始数据。

语法:

1
2
3
void function_name(int &a) {
a = 10; // 修改原始数据
}

示例:

1
2
3
4
5
6
7
8
9
10
11
12
13
#include <iostream>

void changeValue(int &num) {
num = 100;
std::cout << "Inside function: " << num << std::endl;
}

int main() {
int value = 50;
changeValue(value);
std::cout << "Outside function: " << value << std::endl;
return 0;
}

输出:

1
2
Inside function: 100
Outside function: 100

解释:changeValue函数通过引用修改了原始变量value的值。

传指针调用

定义:函数接收指向参数的指针,函数内通过指针可以修改原始数据。

语法:

1
2
3
void function_name(int *a) {
*a = 10; // 修改原始数据
}

示例:

1
2
3
4
5
6
7
8
9
10
11
12
13
#include <iostream>

void changeValue(int *num) {
*num = 100;
std::cout << "Inside function: " << *num << std::endl;
}

int main() {
int value = 50;
changeValue(&value);
std::cout << "Outside function: " << value << std::endl;
return 0;
}

输出:

1
2
Inside function: 100
Outside function: 100

解释:changeValue函数通过指针修改了原始变量value的值。

选择合适的传递方式

  • 传值调用:适用于不需要修改原始数据且数据量较小的情况。
  • 传引用调用:适用于需要修改原始数据或传递大型数据结构以提高效率。
  • 传指针调用:类似传引用调用,但更灵活,可用于传递nullptr或指向动态分配的内存。

5. 返回值

函数可以通过return语句将结果返回给调用者。返回值的类型可以是基本数据类型、引用、指针、对象等。

5.1 返回基本数据类型

示例:

1
2
3
4
5
6
7
8
9
10
11
#include <iostream>

int add(int a, int b) {
return a + b;
}

int main() {
int sum = add(3, 4);
std::cout << "Sum: " << sum << std::endl;
return 0;
}

输出:

1
Sum: 7

5.2 返回引用

注意:返回引用需要确保引用的对象在返回后依然有效(避免悬垂引用)。

示例:

1
2
3
4
5
6
7
8
9
10
11
12
13
14
15
16
17
18
#include <iostream>

int& getMax(int &a, int &b) {
if(a > b)
return a;
else
return b;
}

int main() {
int x = 10;
int y = 20;
int &max = getMax(x, y);
std::cout << "Max: " << max << std::endl;
max = 30; // 修改引用
std::cout << "After modification, y: " << y << std::endl;
return 0;
}

输出:

1
2
Max: 20
After modification, y: 30

解释:getMax函数返回较大的变量的引用,修改max实际上修改了y。

5.3 返回指针

示例:

1
2
3
4
5
6
7
8
9
10
11
12
13
14
15
16
17
18
#include <iostream>

int* allocateArray(int size) {
int* arr = new int[size];
for(int i = 0; i < size; ++i)
arr[i] = i * 2;
return arr;
}

int main() {
int size = 5;
int* myArray = allocateArray(size);
for(int i = 0; i < size; ++i)
std::cout << myArray[i] << " ";
std::cout << std::endl;
delete[] myArray; // 释放内存
return 0;
}

输出:

1
0 2 4 6 8 

解释:allocateArray函数动态分配一个数组并返回指向数组的指针。调用者需负责释放内存。

5.4 返回对象

示例:

1
2
3
4
5
6
7
8
9
10
11
12
13
14
15
16
17
18
19
20
21
#include <iostream>
#include <string>

class Person {
public:
std::string name;
int age;

Person(std::string n, int a) : name(n), age(a) {}
};

Person createPerson(std::string name, int age) {
Person p(name, age);
return p; // 返回对象
}

int main() {
Person person = createPerson("Alice", 25);
std::cout << "Name: " << person.name << ", Age: " << person.age << std::endl;
return 0;
}

输出:

1
Name: Alice, Age: 25

解释:createPerson函数返回一个Person对象。现代编译器通过返回值优化(RVO)减少对象拷贝,提高效率。


6. 函数重载

定义

函数重载允许在同一个作用域内定义多个名称相同但参数列表不同的函数。编译器通过参数列表的不同来区分调用哪个函数。

规则

  • 函数名相同。
  • 参数列表(类型、数量或顺序)不同。
  • 返回类型不参与重载的区分。

示例

1
2
3
4
5
6
7
8
9
10
11
12
13
14
15
16
17
18
19
20
21
22
#include <iostream>

// 重载函数:不同参数数量
int add(int a, int b) {
return a + b;
}

int add(int a, int b, int c) {
return a + b + c;
}

// 重载函数:不同参数类型
double add(double a, double b) {
return a + b;
}

int main() {
std::cout << "add(2, 3) = " << add(2, 3) << std::endl;
std::cout << "add(2, 3, 4) = " << add(2, 3, 4) << std::endl;
std::cout << "add(2.5, 3.5) = " << add(2.5, 3.5) << std::endl;
return 0;
}

输出:

1
2
3
add(2, 3) = 5
add(2, 3, 4) = 9
add(2.5, 3.5) = 6

注意事项

  • 仅返回类型不同的重载是非法的。
  • 默认参数可能会与重载产生冲突,使用时需谨慎。

非法示例:

1
2
3
4
5
6
7
double add(int a, int b) {
return a + b + 0.0;
}

// 冲突重载,仅返回类型不同
// 会导致编译错误
// double add(int a, int b);

7. 默认参数

定义

函数参数可以指定默认值,调用函数时可以省略这些参数,默认值将被使用。

规则

  • 默认参数从右到左设置,不能部分设置。
  • 函数声明和定义中默认参数只需在声明中指定。

示例

1
2
3
4
5
6
7
8
9
10
11
12
13
14
15
16
17
18
#include <iostream>

// 函数声明时指定默认参数
void displayInfo(std::string name, int age = 18, std::string city = "Unknown");

int main() {
displayInfo("Bob", 25, "New York"); // 全部参数传递
displayInfo("Charlie", 30); // 省略city
displayInfo("Diana"); // 省略age和city
return 0;
}

// 函数定义
void displayInfo(std::string name, int age, std::string city) {
std::cout << "Name: " << name
<< ", Age: " << age
<< ", City: " << city << std::endl;
}

输出:

1
2
3
Name: Bob, Age: 25, City: New York
Name: Charlie, Age: 30, City: Unknown
Name: Diana, Age: 18, City: Unknown

注意事项

  • 默认参数必须从右端开始,不能跳过中间参数。
  • 如果同时使用默认参数和重载,可能会产生歧义,需谨慎设计。

8. 内联函数

定义

内联函数通过在函数前加inline关键字,建议编译器将函数代码嵌入到调用处,减少函数调用的开销。

使用场景

适用于函数体积小、调用频繁的函数,如访问器(getter)和修改器(setter)等。

示例

1
2
3
4
5
6
7
8
9
10
11
#include <iostream>

// 内联函数
inline int square(int x) {
return x * x;
}

int main() {
std::cout << "Square of 5: " << square(5) << std::endl;
return 0;
}

输出:

1
Square of 5: 25

优点

  • 减少函数调用的开销(如栈操作)。
  • 可能提高程序性能。

缺点

  • 使得代码体积增大,可能影响缓存性能。
  • 编译器可能忽略内联请求,特别是对于复杂函数。

注意事项

  • 编译器对inline关键字的处理是建议性质,最终是否内联由编译器决定。
  • 过度使用内联函数可能导致代码膨胀。

9. 递归函数

定义

递归函数是指在函数体内调用自身的函数。递归通常用于解决可以分解为相似子问题的问题,如阶乘、斐波那契数列、树的遍历等。

基本结构

递归函数通常包含两个部分:

  1. 基准情形(Base Case):直接返回结果,避免无限递归。
  2. 递归情形(Recursive Case):将问题分解为更小的子问题并调用自身。

示例:计算阶乘

1
2
3
4
5
6
7
8
9
10
11
12
13
14
15
16
17
18
19
20
#include <iostream>

// 递归函数计算阶乘
long long factorial(int n) {
if(n < 0)
return -1; // 错误情况
if(n == 0 || n == 1)
return 1; // 基准情形
return n * factorial(n - 1); // 递归情形
}

int main() {
int number = 5;
long long result = factorial(number);
if(result != -1)
std::cout << number << "! = " << result << std::endl;
else
std::cout << "Invalid input!" << std::endl;
return 0;
}

输出:

1
5! = 120

示例:斐波那契数列

1
2
3
4
5
6
7
8
9
10
11
12
13
14
15
16
#include <iostream>

// 递归函数计算斐波那契数
int fibonacci(int n) {
if(n <= 0)
return 0;
if(n == 1)
return 1;
return fibonacci(n - 1) + fibonacci(n - 2);
}

int main() {
int term = 10;
std::cout << "Fibonacci(" << term << ") = " << fibonacci(term) << std::endl;
return 0;
}

输出:

1
Fibonacci(10) = 55

注意事项

  • 基准情形:必须正确设置,避免无限递归导致栈溢出(Stack Overflow)。
  • 效率问题:一些递归实现可能效率低下(如斐波那契数列),可以通过“记忆化”或改用迭代方法优化。
  • 堆栈深度:递归深度过大可能导致栈溢出,需避免深度递归。

递归优化:尾递归

尾递归是指递归调用在函数的最后一步,可以被编译器优化为循环,减少堆栈消耗。

示例:尾递归阶乘

1
2
3
4
5
6
7
8
9
10
11
12
13
14
15
16
17
18
19
#include <iostream>

// 辅助函数,用于尾递归
long long factorialHelper(int n, long long accumulator) {
if(n == 0)
return accumulator;
return factorialHelper(n - 1, n * accumulator);
}

// 尾递归函数
long long factorial(int n) {
return factorialHelper(n, 1);
}

int main() {
int number = 5;
std::cout << number << "! = " << factorial(number) << std::endl;
return 0;
}

输出:

1
5! = 120

解释:factorialHelper函数的递归调用是函数的最后一步,编译器可以将其优化为迭代,减少堆栈消耗。


10. Lambda表达式

定义

Lambda表达式是C++11引入的匿名函数,便于在需要函数对象的地方快速定义和使用函数。它允许定义内联的、小型的可调用对象,无需单独定义函数。

语法

1
2
3
[ capture_list ] ( parameter_list ) -> return_type {
// function body
}

示例

1
2
3
4
5
6
7
8
9
10
11
12
13
14
15
16
17
18
19
20
21
22
#include <iostream>
#include <vector>
#include <algorithm>

int main() {
std::vector<int> numbers = {1, 2, 3, 4, 5};

// 使用Lambda表达式打印每个元素
std::for_each(numbers.begin(), numbers.end(), [](int x) {
std::cout << x << " ";
});
std::cout << std::endl;

// 使用Lambda表达式计算总和
int sum = 0;
std::for_each(numbers.begin(), numbers.end(), [&sum](int x) {
sum += x;
});
std::cout << "Sum: " << sum << std::endl;

return 0;
}

输出:

1
2
1 2 3 4 5 
Sum: 15

组件说明

  1. 捕获列表(Capture List):指定如何访问外部变量。
    • [ ]:不捕获任何外部变量。
    • [&]:按引用捕获所有外部变量。
    • [=]:按值捕获所有外部变量。
    • [x, &y]:按值捕获x,按引用捕获y。
  2. 参数列表(Parameter List):类似普通函数的参数列表,可以省略类型(C++14及以上支持自动类型推断)。
  3. 返回类型(Return Type):可指定返回类型,也可省略,编译器自动推断。
  4. 函数体(Function Body):Lambda的具体实现。

高级示例:捕获并排序

1
2
3
4
5
6
7
8
9
10
11
12
13
14
15
16
17
18
19
#include <iostream>
#include <vector>
#include <algorithm>

int main() {
std::vector<int> data = {5, 2, 9, 1, 5, 6};

// 按降序排序,使用Lambda表达式
std::sort(data.begin(), data.end(), [](int a, int b) -> bool {
return a > b;
});

std::cout << "Sorted data: ";
for(auto num : data)
std::cout << num << " ";
std::cout << std::endl;

return 0;
}

输出:

1
Sorted data: 9 6 5 5 2 1 

使用Lambda表达式与标准库

C++标准库中的许多算法(如std::for_each、std::sort、std::transform等)常用Lambda表达式作为参数,以实现自定义的操作。


11. 函数指针与回调函数

函数指针

定义:指向函数的指针变量,保存函数的地址,可以通过指针调用函数。

声明与使用

1
2
3
4
5
6
7
8
9
10
11
12
13
14
15
16
#include <iostream>

// 普通函数
void greet() {
std::cout << "Hello from greet!" << std::endl;
}

int main() {
// 定义函数指针
void (*funcPtr)() = greet;

// 通过指针调用函数
funcPtr();

return 0;
}

输出:

1
Hello from greet!

函数指针作为参数

示例:

1
2
3
4
5
6
7
8
9
10
11
12
13
14
15
16
#include <iostream>

// 高阶函数,接受函数指针作为参数
void execute(void (*func)()) {
func(); // 调用传入的函数
}

// 被调用的函数
void sayHi() {
std::cout << "Hi!" << std::endl;
}

int main() {
execute(sayHi);
return 0;
}

输出:

1
Hi!

回调函数

定义:通过函数指针传递的函数,通常用于在特定事件发生时执行自定义操作。

示例:基于函数指针的回调

1
2
3
4
5
6
7
8
9
10
11
12
13
14
15
16
17
18
19
20
21
#include <iostream>

// 回调类型定义
typedef void (*Callback)();

// 函数接收回调
void registerCallback(Callback cb) {
std::cout << "Before callback" << std::endl;
cb(); // 执行回调
std::cout << "After callback" << std::endl;
}

// 回调函数
void myCallback() {
std::cout << "Callback executed!" << std::endl;
}

int main() {
registerCallback(myCallback);
return 0;
}

输出:

1
2
3
Before callback
Callback executed!
After callback

与Lambda表达式结合

函数指针也可以指向Lambda表达式,但仅限于不捕获外部变量的Lambda。

示例:

1
2
3
4
5
6
7
8
9
10
11
12
13
14
15
16
17
18
#include <iostream>

// 回调类型定义
typedef void (*Callback)();

void executeCallback(Callback cb) {
cb();
}

int main() {
// 不捕获外部变量的Lambda
Callback cb = []() {
std::cout << "Lambda callback!" << std::endl;
};

executeCallback(cb);
return 0;
}

输出:

1
Lambda callback!

注意:捕获外部变量的Lambda无法转换为普通函数指针。


12. 总结与练习

课程总结

  • 函数的基本概念:了解函数的作用、基本结构及使用方法。
  • 函数声明与定义:掌握在头文件和源文件中分离声明与定义的方法。
  • 参数传递机制:理解传值、传引用和传指针的区别及应用场景。
  • 返回值:学习不同类型的返回值及其使用方法。
  • 函数重载:掌握函数名相同但参数不同的重载机制。
  • 默认参数:学习设定和使用函数的默认参数。
  • 内联函数:了解内联函数的概念、优缺点及使用场景。
  • 递归函数:理解递归的基本原理、编写方法及优化技巧。
  • Lambda表达式:掌握定义和使用Lambda表达式的方法,及其在标准库中的应用。
  • 函数指针与回调函数:了解函数指针的声明、使用以及如何实现回调机制。

13. 课后练习

1. 练习1

编写一个递归函数,计算斐波那契数列的第n项

问题描述

斐波那契数列是由0和1开始,后续的每一项都是前两项的和。数列如下:

1
0, 1, 1, 2, 3, 5, 8, 13, 21, 34, ...

编写一个递归函数 fibonacci,接受一个整数 n,返回斐波那契数列的第 n 项。假设 fibonacci(0) = 0,fibonacci(1) = 1。

答案代码

1
2
3
4
5
6
7
8
9
10
11
12
13
14
15
16
17
18
19
20
21
22
#include <iostream>

// 递归函数计算斐波那契数列的第n项
long long fibonacci(int n) {
if(n < 0) {
std::cerr << "Invalid input: n must be non-negative." << std::endl;
return -1; // 错误情况
}
if(n == 0)
return 0; // 基准情形1
if(n == 1)
return 1; // 基准情形2
return fibonacci(n - 1) + fibonacci(n - 2); // 递归调用
}

int main() {
int term = 10;
long long result = fibonacci(term);
if(result != -1)
std::cout << "Fibonacci(" << term << ") = " << result << std::endl;
return 0;
}

输出

1
Fibonacci(10) = 55

解释

  • 函数 fibonacci 定义了两个基准情形:n == 0 返回0,n == 1 返回1。
  • 对于 n > 1,函数递归调用自身计算 fibonacci(n - 1) 和 fibonacci(n - 2),并返回它们的和。
  • 在 main 函数中,计算并输出斐波那契数列的第10项,其值为55。

2. 练习2

使用Lambda表达式和std::sort对一个字符串数组按长度排序

问题描述

给定一个字符串数组,使用Lambda表达式和std::sort函数对数组中的字符串按照其长度进行排序。

答案

1
2
3
4
5
6
7
8
9
10
11
12
13
14
15
16
17
18
19
20
21
#include <iostream>
#include <vector>
#include <algorithm>
#include <string>

int main() {
std::vector<std::string> fruits = {"apple", "banana", "kiwi", "strawberry", "grape", "pineapple"};

// 使用Lambda表达式按照字符串长度进行排序
std::sort(fruits.begin(), fruits.end(), [](const std::string &a, const std::string &b) -> bool {
return a.length() < b.length();
});

// 输出排序后的结果
std::cout << "Fruits sorted by length:" << std::endl;
for(const auto &fruit : fruits)
std::cout << fruit << " ";
std::cout << std::endl;

return 0;
}

输出

1
2
Fruits sorted by length:
kiwi grape apple banana pineapple strawberry

解释

  • 定义了一个包含多个水果名称的字符串向量 fruits。
  • 使用 std::sort 对 fruits 进行排序,第三个参数是一个Lambda表达式,用于指定排序的规则。
  • Lambda表达式接收两个字符串 a 和 b,比较它们的长度,以实现按长度升序排序。
  • 排序完成后,输出排序后的水果名称,按长度从短到长排列。

3. 练习3

实现一个简易的事件系统,允许注册和触发回调函数

问题描述

构建一个简单的事件系统,允许用户注册多个回调函数(函数指针或Lambda表达式),并在特定事件触发时调用这些回调函数。

答案

1
2
3
4
5
6
7
8
9
10
11
12
13
14
15
16
17
18
19
20
21
22
23
24
25
26
27
28
29
30
31
32
33
34
35
36
37
38
39
40
41
42
43
44
45
46
47
48
49
50
51
52
53
#include <iostream>
#include <vector>
#include <functional>

// 定义带参数的回调函数类型
using Callback = std::function<void(int)>;

// 事件系统类
class EventSystem {
private:
std::vector<Callback> callbacks;

public:
// 注册回调函数
void registerCallback(const Callback &cb) {
callbacks.push_back(cb);
}

// 触发事件,传递参数给回调函数
void triggerEvent(int data) {
std::cout << "Event triggered with data = " << data << ". Executing callbacks..." << std::endl;
for(auto &cb : callbacks)
cb(data);
}
};

// 示例函数作为回调
void onEvent(int data) {
std::cout << "Function callback received data: " << data << std::endl;
}

int main() {
EventSystem eventSystem;

// 注册基于函数指针的回调
eventSystem.registerCallback(onEvent);

// 注册基于Lambda表达式的回调
eventSystem.registerCallback([](int x) {
std::cout << "Lambda callback received: " << x * 2 << std::endl;
});

// 注册带捕获的Lambda表达式的回调
int multiplier = 5;
eventSystem.registerCallback([multiplier](int x) {
std::cout << "Lambda with capture received: " << x * multiplier << std::endl;
});

// 触发事件,传递参数
eventSystem.triggerEvent(10);

return 0;
}

输出

1
2
3
4
Event triggered with data = 10. Executing callbacks...
Function callback received data: 10
Lambda callback received: 20
Lambda with capture received: 50

解释

  • 定义了一个带参数的回调函数类型 std::function<void(int)>,允许回调函数接受一个整数参数。
  • EventSystem 类的方法 triggerEvent 接受一个整数 data,并将其作为参数传递给每个回调函数。
  • 在 main 函数中,注册了三个带不同处理逻辑的回调函数,并在触发事件时传递参数 10。
  • 回调函数根据传入的 data 执行相应的操作,展示了回调函数的灵活性。

零基础C++(17) 语句和作用域

Posted on 2024-10-27 | In 零基础C++

1. 简单语句

1.1 表达式语句

描述:在 C++ 中,最常见的简单语句是表达式语句。它由一个表达式组成,并以分号结束。表达式语句可以包括函数调用、赋值操作、增减操作等。

示例代码:

1
2
3
4
5
6
7
8
#include <iostream>

int main() {
int a = 5; // 赋值表达式语句
a = a + 10; // 赋值表达式语句
std::cout << a; // 函数调用表达式语句
return 0; // return 表达式语句
}

讲解:

  • int a = 5; 初始化变量 a,这是一个赋值表达式语句。
  • a = a + 10; 更新变量 a 的值。
  • std::cout << a; 调用了输出流对象的 << 运算符函数。
  • return 0; 从 main 函数返回,结束程序。

1.2 声明语句

描述:声明语句用于声明变量、函数、类等标识符。

示例代码:

1
2
3
4
5
6
7
8
9
10
11
12
13
14
15
#include <iostream>

// 函数声明
int add(int x, int y);

int main() {
int result = add(3, 4); // 调用函数
std::cout << "Result: " << result;
return 0;
}

// 函数定义
int add(int x, int y) {
return x + y;
}

讲解:

  • int add(int x, int y); 是一个函数声明语句。
  • int result = add(3, 4); 在 main 中调用函数并声明变量。
  • int add(int x, int y) { ... } 是函数定义,提供了函数的实现。

2. 语句作用域

2.1 作用域的基本概念

描述:作用域定义了变量或其他标识符在程序中的可见范围。C++ 中主要有以下几种作用域:

  • **局部作用域 (Local Scope)**:在函数或代码块内部定义的变量,仅在其所在的块内可见。
  • **全局作用域 (Global Scope)**:在所有函数外部定义的变量,在整个文件中可见。
  • **命名空间作用域 (Namespace Scope)**:在命名空间内部定义的标识符。

2.2 代码示例

1
2
3
4
5
6
7
8
9
10
11
12
13
14
15
16
17
18
19
20
21
22
23
24
#include <iostream>

// 全局变量
int globalVar = 10;

void display() {
// 局部变量
int localVar = 5;
std::cout << "Inside display() - globalVar: " << globalVar << ", localVar: " << localVar << std::endl;
}

int main() {
std::cout << "In main() - globalVar: " << globalVar << std::endl;
// 局部变量
int mainVar = 20;
std::cout << "In main() - mainVar: " << mainVar << std::endl;

display();

// 尝试访问 display() 中的局部变量(将导致编译错误)
// std::cout << localVar; // 错误:未定义标识符

return 0;
}

预期输出:

1
2
3
In main() - globalVar: 10
In main() - mainVar: 20
Inside display() - globalVar: 10, localVar: 5

讲解:

  • globalVar 在所有函数中都可见。
  • mainVar 仅在 main 函数内部可见。
  • localVar 仅在 display 函数内部可见。
  • 尝试在 main 中访问 display 函数的 localVar 将导致编译错误,因为它不在作用域内。

2.3 代码块作用域

描述:通过使用花括号 {},可以创建新的代码块,从而定义局部作用域。

示例代码:

1
2
3
4
5
6
7
8
9
10
11
12
13
14
15
16
#include <iostream>

int main() {
int x = 10;
std::cout << "x before block: " << x << std::endl;

{
// 新的代码块
int x = 20; // 局部变量 x,隐藏外部的 x
std::cout << "x inside block: " << x << std::endl;
}

std::cout << "x after block: " << x << std::endl; // 访问外部的 x

return 0;
}

预期输出:

1
2
3
x before block: 10
x inside block: 20
x after block: 10

讲解:

  • 在内部代码块中重新声明了变量 x,该 x 只在代码块内有效,隐藏了外部的 x。
  • 离开代码块后,内部的 x 不再可见,外部的 x 依然有效。

3. 条件语句

C++ 提供了多种条件语句,用于根据不同的条件执行不同的代码块。

3.1 if 语句

描述:if 语句用于在条件为真时执行特定的代码块。

语法:

1
2
3
if (condition) {
// code to execute if condition is true
}

示例代码:

1
2
3
4
5
6
7
8
9
10
11
12
13
#include <iostream>

int main() {
int number;
std::cout << "Enter a number: ";
std::cin >> number;

if (number > 0) {
std::cout << "The number is positive." << std::endl;
}

return 0;
}

讲解:

  • 用户输入一个数字,如果 number 大于 0,则输出 “The number is positive.”。

3.2 if-else 语句

描述:if-else 语句在条件为假时执行另一个代码块。

语法:

1
2
3
4
5
if (condition) {
// code to execute if condition is true
} else {
// code to execute if condition is false
}

示例代码:

1
2
3
4
5
6
7
8
9
10
11
12
13
14
15
#include <iostream>

int main() {
int number;
std::cout << "Enter a number: ";
std::cin >> number;

if (number % 2 == 0) {
std::cout << number << " is even." << std::endl;
} else {
std::cout << number << " is odd." << std::endl;
}

return 0;
}

讲解:

  • 判断输入的数字是奇数还是偶数,并输出相应的结果。

3.3 else if 语句

描述:else if 允许在多重条件下执行不同的代码块。

语法:

1
2
3
4
5
6
7
if (condition1) {
// code if condition1 is true
} else if (condition2) {
// code if condition1 is false and condition2 is true
} else {
// code if both condition1 and condition2 are false
}

示例代码:

1
2
3
4
5
6
7
8
9
10
11
12
13
14
15
16
17
18
19
20
21
#include <iostream>

int main() {
int score;
std::cout << "Enter your score (0-100): ";
std::cin >> score;

if (score >= 90) {
std::cout << "Grade: A" << std::endl;
} else if (score >= 80) {
std::cout << "Grade: B" << std::endl;
} else if (score >= 70) {
std::cout << "Grade: C" << std::endl;
} else if (score >= 60) {
std::cout << "Grade: D" << std::endl;
} else {
std::cout << "Grade: F" << std::endl;
}

return 0;
}

讲解:

  • 根据分数范围判断并输出相应的等级。

3.4 switch 语句

描述:switch 语句根据变量的值选择执行的代码块,适用于离散的值。

语法:

1
2
3
4
5
6
7
8
9
10
11
switch (expression) {
case constant1:
// code
break;
case constant2:
// code
break;
// ...
default:
// code
}

示例代码:

1
2
3
4
5
6
7
8
9
10
11
12
13
14
15
16
17
18
19
20
21
22
23
24
25
26
27
28
29
#include <iostream>

int main() {
char grade;
std::cout << "Enter your grade (A, B, C, D, F): ";
std::cin >> grade;

switch (grade) {
case 'A':
std::cout << "Excellent!" << std::endl;
break;
case 'B':
std::cout << "Good!" << std::endl;
break;
case 'C':
std::cout << "Fair!" << std::endl;
break;
case 'D':
std::cout << "Poor!" << std::endl;
break;
case 'F':
std::cout << "Fail!" << std::endl;
break;
default:
std::cout << "Invalid grade." << std::endl;
}

return 0;
}

讲解:

  • 根据输入的字母等级输出相应的评价。
  • break 语句防止代码“掉入”下一个 case 中。

4. 迭代语句

C++ 提供了多种循环结构,用于重复执行代码块。

4.1 for 循环

描述:for 循环用于已知循环次数的情况,结构紧凑。

语法:

1
2
3
for (initialization; condition; increment) {
// code to execute
}

示例代码:

1
2
3
4
5
6
7
8
9
10
11
12
#include <iostream>

int main() {
std::cout << "Counting from 1 to 5:" << std::endl;

for (int i = 1; i <= 5; ++i) {
std::cout << i << " ";
}

std::cout << std::endl;
return 0;
}

预期输出:

1
2
Counting from 1 to 5:
1 2 3 4 5

讲解:

  • 初始化 int i = 1。
  • 条件 i <= 5 为真时执行循环体。
  • 每次循环后执行 ++i,增加 i 的值。
  • 最终输出 1 到 5。

4.2 while 循环

描述:while 循环在循环前判断条件,适合未知循环次数的情况。

语法:

1
2
3
while (condition) {
// code to execute
}

示例代码:

1
2
3
4
5
6
7
8
9
10
11
12
13
14
#include <iostream>

int main() {
int count = 1;
std::cout << "Counting from 1 to 5 using while loop:" << std::endl;

while (count <= 5) {
std::cout << count << " ";
++count;
}

std::cout << std::endl;
return 0;
}

预期输出:

1
2
Counting from 1 to 5 using while loop:
1 2 3 4 5

讲解:

  • 初始化 count = 1。
  • 条件 count <= 5 为真时执行循环体。
  • 每次循环后 ++count 增加 count 的值。

4.3 do-while 循环

描述:do-while 循环在循环后判断条件,保证至少执行一次循环体。

语法:

1
2
3
do {
// code to execute
} while (condition);

示例代码:

1
2
3
4
5
6
7
8
9
10
11
12
13
14
#include <iostream>

int main() {
int count = 1;
std::cout << "Counting from 1 to 5 using do-while loop:" << std::endl;

do {
std::cout << count << " ";
++count;
} while (count <= 5);

std::cout << std::endl;
return 0;
}

预期输出:

1
2
Counting from 1 to 5 using do-while loop:
1 2 3 4 5

讲解:

  • 无论条件是否为真,do 块中的代码至少执行一次。
  • 在本例中,count 从 1 开始,逐步增加到 5。

4.4 嵌套循环

描述:一个循环内部嵌套另一个循环,常用于多维数据结构的遍历。

示例代码:

1
2
3
4
5
6
7
8
9
10
11
#include <iostream>

int main() {
for (int i = 1; i <= 3; ++i) {
std::cout << "Outer loop iteration " << i << ":" << std::endl;
for (int j = 1; j <= 2; ++j) {
std::cout << " Inner loop iteration " << j << std::endl;
}
}
return 0;
}

预期输出:

1
2
3
4
5
6
7
8
9
Outer loop iteration 1:
Inner loop iteration 1
Inner loop iteration 2
Outer loop iteration 2:
Inner loop iteration 1
Inner loop iteration 2
Outer loop iteration 3:
Inner loop iteration 1
Inner loop iteration 2

讲解:

  • 外层 for 循环控制外层迭代次数。
  • 内层 for 循环在每次外层循环中执行,控制内层迭代次数。

5. 跳转语句

跳转语句用于改变程序的执行流。C++ 中主要有 break、continue、return 和 goto。

5.1 break 语句

描述:break 用于立即终止最近的循环或 switch 语句。

示例代码(在循环中使用 break):

1
2
3
4
5
6
7
8
9
10
11
12
#include <iostream>

int main() {
for (int i = 1; i <= 10; ++i) {
if (i == 5) {
break; // 结束循环
}
std::cout << i << " ";
}
std::cout << "\nLoop exited when i == 5." << std::endl;
return 0;
}

预期输出:

1
2
1 2 3 4 
Loop exited when i == 5.

讲解:

  • 当 i 达到 5 时,break 终止循环,停止进一步的迭代。

5.2 continue 语句

描述:continue 用于跳过当前的循环迭代,继续下一次循环。

示例代码:

1
2
3
4
5
6
7
8
9
10
11
12
13
#include <iostream>

int main() {
std::cout << "Even numbers between 1 and 10:" << std::endl;
for (int i = 1; i <= 10; ++i) {
if (i % 2 != 0) {
continue; // 跳过奇数
}
std::cout << i << " ";
}
std::cout << std::endl;
return 0;
}

预期输出:

1
2
Even numbers between 1 and 10:
2 4 6 8 10

讲解:

  • 当 i 是奇数时,continue 跳过本次循环,避免执行 std::cout 语句。
  • 仅输出偶数。

5.3 return 语句

描述:return 用于从函数中返回一个值或结束函数执行。

示例代码:

1
2
3
4
5
6
7
8
9
10
11
12
13
14
15
#include <iostream>

// 函数,返回两个数中的较大者
int max(int a, int b) {
if (a > b) {
return a; // 返回 a,退出函数
}
return b; // 返回 b,退出函数
}

int main() {
int x = 10, y = 20;
std::cout << "The maximum of " << x << " and " << y << " is " << max(x, y) << "." << std::endl;
return 0;
}

预期输出:

1
The maximum of 10 and 20 is 20.

讲解:

  • max 函数根据条件返回较大的数,并退出函数执行。

5.4 goto 语句

描述:goto 允许无条件跳转到程序中指定的标签。虽然 goto 有时能简化代码,但不推荐频繁使用,因为它会使程序流程难以理解和维护。

示例代码:

1
2
3
4
5
6
7
8
9
10
11
12
13
14
15
16
17
#include <iostream>

int main() {
int number;
std::cout << "Enter a positive number (negative to quit): ";
std::cin >> number;

if (number < 0) {
goto end; // 跳转到 end 标签,结束程序
}

std::cout << "You entered: " << number << std::endl;

end:
std::cout << "Program ended." << std::endl;
return 0;
}

预期输出(输入为负数):

1
2
Enter a positive number (negative to quit): -5
Program ended.

讲解:

  • 当输入负数时,goto end; 跳转到 end 标签,结束程序。
  • 尽管可以使用 goto,但建议使用更结构化的控制流,如循环和条件语句。

6. 异常处理语句

异常处理用于应对程序运行过程中可能出现的错误情况,确保程序的健壮性和可靠性。

6.1 try, catch, 和 throw 语句

描述:

  • try 块用于包含可能引发异常的代码。
  • throw 用于抛出异常。
  • catch 块用于捕获并处理异常。

基本语法:

1
2
3
4
5
6
7
8
try {
// code that may throw an exception
} catch (ExceptionType1 e1) {
// handler for ExceptionType1
} catch (ExceptionType2 e2) {
// handler for ExceptionType2
}
// ...

示例代码:

1
2
3
4
5
6
7
8
9
10
11
12
13
14
15
16
17
18
19
20
21
22
23
24
25
26
27
28
29
#include <iostream>
#include <stdexcept>

// 函数,计算除法
double divide(double numerator, double denominator) {
if (denominator == 0) {
throw std::invalid_argument("Denominator cannot be zero."); // 抛出异常
}
return numerator / denominator;
}

int main() {
double num, denom;

std::cout << "Enter numerator: ";
std::cin >> num;
std::cout << "Enter denominator: ";
std::cin >> denom;

try {
double result = divide(num, denom);
std::cout << "Result: " << result << std::endl;
} catch (std::invalid_argument &e) { // 捕获 std::invalid_argument 异常
std::cerr << "Error: " << e.what() << std::endl;
}

std::cout << "Program continues after try-catch." << std::endl;
return 0;
}

预期输出:

1
2
3
4
Enter numerator: 10
Enter denominator: 0
Error: Denominator cannot be zero.
Program continues after try-catch.

讲解:

  • divide 函数在分母为零时抛出 std::invalid_argument 异常。
  • try 块尝试执行 divide 函数。
  • 当异常发生时,执行对应的 catch 块,输出错误信息。
  • 程序在异常处理后继续执行,而不会异常终止。

6.2 多重 catch 块

描述:可以为 try 块指定多个 catch 块,以处理不同类型的异常。

示例代码:

1
2
3
4
5
6
7
8
9
10
11
12
13
14
15
16
17
18
19
20
21
22
23
24
25
26
#include <iostream>
#include <stdexcept>

int main() {
try {
// 模拟不同类型的异常
int choice;
std::cout << "Choose exception to throw (1: bad_alloc, 2: invalid_argument): ";
std::cin >> choice;

if (choice == 1) {
throw std::bad_alloc();
} else if (choice == 2) {
throw std::invalid_argument("Invalid argument provided.");
} else {
std::cout << "No exception thrown." << std::endl;
}
} catch (std::bad_alloc &e) { // 处理 bad_alloc 异常
std::cerr << "Caught std::bad_alloc: " << e.what() << std::endl;
} catch (std::invalid_argument &e) { // 处理 invalid_argument 异常
std::cerr << "Caught std::invalid_argument: " << e.what() << std::endl;
}

std::cout << "Program continues after try-catch." << std::endl;
return 0;
}

预期输出(选择 1):

1
2
3
Choose exception to throw (1: bad_alloc, 2: invalid_argument): 1
Caught std::bad_alloc: std::bad_alloc
Program continues after try-catch.

讲解:

  • 根据用户输入抛出不同类型的异常。
  • 对应的 catch 块分别处理不同的异常类型。
  • 如果未匹配的异常被抛出且没有对应的 catch 块,将导致程序终止(未在此示例中展示)。

6.3 throw 通常位置

描述:throw 语句可以在任何需要引发异常的位置使用,包括函数内部、嵌套调用中等。

示例代码:

1
2
3
4
5
6
7
8
9
10
11
12
13
14
15
16
17
18
19
20
21
22
23
24
25
26
27
#include <iostream>
#include <stdexcept>

// 函数,检查数组索引
int getElement(int arr[], int size, int index) {
if (index < 0 || index >= size) {
throw std::out_of_range("Index is out of range."); // 抛出异常
}
return arr[index];
}

int main() {
int myArray[5] = {10, 20, 30, 40, 50};
int index;

std::cout << "Enter array index (0-4): ";
std::cin >> index;

try {
int value = getElement(myArray, 5, index);
std::cout << "Element at index " << index << " is " << value << "." << std::endl;
} catch (std::out_of_range &e) {
std::cerr << "Error: " << e.what() << std::endl;
}

return 0;
}

预期输出(输入为 3):

1
2
Enter array index (0-4): 3
Element at index 3 is 40.

预期输出(输入为 5):

1
2
Enter array index (0-4): 5
Error: Index is out of range.

讲解:

  • getElement 函数检查索引是否有效,如果无效则抛出 std::out_of_range 异常。
  • main 函数中的 try 块调用 getElement,并在 catch 块中处理异常。

6.4 rethrow 异常

描述:可以在 catch 块中使用 throw 语句重新抛出捕获的异常,以便其他部分处理。

示例代码:

1
2
3
4
5
6
7
8
9
10
11
12
13
14
15
16
17
18
19
20
21
22
23
24
25
26
#include <iostream>
#include <stdexcept>

// 函数,抛出异常
void func1() {
throw std::runtime_error("Error in func1.");
}

// 函数,调用 func1 并重新抛出异常
void func2() {
try {
func1();
} catch (...) { // 捕获所有异常
std::cout << "func2() caught an exception and is rethrowing it." << std::endl;
throw; // 重新抛出当前异常
}
}

int main() {
try {
func2();
} catch (std::exception &e) { // 在 main 中捕获异常
std::cerr << "Main caught: " << e.what() << std::endl;
}
return 0;
}

预期输出:

1
2
func2() caught an exception and is rethrowing it.
Main caught: Error in func1.

讲解:

  • func1 抛出异常。
  • func2 调用 func1,捕获异常后重新抛出。
  • main 最终捕获并处理异常。

练习题

练习题 1:打印九九乘法表

题目描述

编写一个 C++ 程序,使用嵌套的 for 循环来打印标准的九九乘法表。输出的格式应整齐对齐,便于阅读。

要求

  1. 使用嵌套的 for 循环实现。
  2. 输出的乘法表应从 1×1 到 9×9。
  3. 每行输出一个数字的乘法结果,例如第 3 行包含 3×1=3 到 3×9=27。
  4. 确保输出格式整齐,便于阅读。

示例输出

1
2
3
4
5
6
7
8
9
1x1=1	1x2=2	1x3=3	1x4=4	1x5=5	1x6=6	1x7=7	1x8=8	1x9=9	
2x1=2 2x2=4 2x3=6 2x4=8 2x5=10 2x6=12 2x7=14 2x8=16 2x9=18
3x1=3 3x2=6 3x3=9 3x4=12 3x5=15 3x6=18 3x7=21 3x8=24 3x9=27
4x1=4 4x2=8 4x3=12 4x4=16 4x5=20 4x6=24 4x7=28 4x8=32 4x9=36
5x1=5 5x2=10 5x3=15 5x4=20 5x5=25 5x6=30 5x7=35 5x8=40 5x9=45
6x1=6 6x2=12 6x3=18 6x4=24 6x5=30 6x6=36 6x7=42 6x8=48 6x9=54
7x1=7 7x2=14 7x3=21 7x4=28 7x5=35 7x6=42 7x7=49 7x8=56 7x9=63
8x1=8 8x2=16 8x3=24 8x4=32 8x5=40 8x6=48 8x7=56 8x8=64 8x9=72
9x1=9 9x2=18 9x3=27 9x4=36 9x5=45 9x6=54 9x7=63 9x8=72 9x9=81

提示

  • 使用两个嵌套的 for 循环:外层循环控制行数(1 到 9),内层循环控制列数(1 到 9)。
  • 使用 \t 或者适当的空格来对齐输出结果。
  • 可以使用 std::cout 进行输出。

参考答案

1
2
3
4
5
6
7
8
9
10
11
12
13
#include <iostream>

int main() {
// 外层循环控制行数
for (int i = 1; i <= 9; ++i) {
// 内层循环控制列数
for (int j = 1; j <= 9; ++j) {
std::cout << i << "x" << j << "=" << i * j << "\t";
}
std::cout << std::endl; // 每行结束后换行
}
return 0;
}

练习题 2:实现冒泡排序

题目描述

编写一个 C++ 程序,使用 冒泡排序算法 对用户输入的一组整数进行排序。冒泡排序是一种简单的排序算法,通过重复交换相邻的未按顺序排列的元素,将最大或最小的元素“冒泡”到序列的一端。

要求

  1. 输入:用户输入一组整数,首先输入整数的数量 n,然后输入 n 个整数。
  2. 排序:使用冒泡排序算法对输入的整数进行升序排序。
  3. 输出:显示排序前和排序后的整数序列。
  4. 函数封装:将冒泡排序算法封装在一个独立的函数中,提高代码的模块化和可读性。

示例输入与输出

示例 1:

1
2
3
4
请输入整数的数量: 5
请输入 5 个整数,用空格分隔: 64 34 25 12 22
排序前的数组: 64 34 25 12 22
排序后的数组: 12 22 25 34 64

示例 2:

1
2
3
4
请输入整数的数量: 8
请输入 8 个整数,用空格分隔: 5 1 4 2 8 0 2 9
排序前的数组: 5 1 4 2 8 0 2 9
排序后的数组: 0 1 2 2 4 5 8 9

提示

  • 冒泡排序的基本思想:通过多次遍历数组,每次比较相邻的元素并交换顺序错误的元素。每一轮遍历后,最大的元素会被移动到数组的末端。
  • 优化:如果在某一轮遍历中没有发生任何交换,说明数组已经有序,可以提前终止排序过程。
  • 函数设计:可以设计一个 bubbleSort 函数接收数组及其大小作为参数,并对数组进行排序。

参考答案

1
2
3
4
5
6
7
8
9
10
11
12
13
14
15
16
17
18
19
20
21
22
23
24
25
26
27
28
29
30
31
32
33
34
35
36
37
38
39
40
41
42
43
44
45
46
47
48
49
50
51
52
53
54
55
56
57
58
59
60
61
62
63
64
65
66
67
#include <iostream>

// 冒泡排序函数
void bubbleSort(int arr[], int n) {
bool swapped;
// 外层循环控制总的遍历次数
for (int i = 0; i < n - 1; ++i) {
swapped = false;
// 内层循环进行相邻元素的比较和交换
for (int j = 0; j < n - i - 1; ++j) {
// 如果前一个元素大于后一个元素,则交换它们
if (arr[j] > arr[j + 1]) {
std::swap(arr[j], arr[j + 1]);
swapped = true;
}
}
// 如果在一轮遍历中没有进行任何交换,数组已经有序
if (!swapped) {
break;
}
}
}

// 打印数组函数
void printArray(int arr[], int n) {
for (int i = 0; i < n; ++i) {
std::cout << arr[i] << " ";
}
std::cout << std::endl;
}

int main() {
int n;

// 获取数组大小
std::cout << "请输入整数的数量: ";
std::cin >> n;

if (n <= 0) {
std::cerr << "错误:数组大小必须为正整数。" << std::endl;
return 1;
}

int *arr = new int[n];

// 获取数组元素
std::cout << "请输入 " << n << " 个整数,用空格分隔: ";
for (int i = 0; i < n; ++i) {
std::cin >> arr[i];
}

// 打印排序前的数组
std::cout << "排序前的数组: ";
printArray(arr, n);

// 执行冒泡排序
bubbleSort(arr, n);

// 打印排序后的数组
std::cout << "排序后的数组: ";
printArray(arr, n);

// 释放动态分配的内存
delete[] arr;

return 0;
}

代码解释

  1. **函数 bubbleSort**:

    • 参数:接收一个整数数组 arr 和数组的大小 n。

    • 逻辑

      :

      • 使用两层 for 循环实现冒泡排序。
      • 外层循环控制需要进行的遍历次数,总共需要 n-1 轮。
      • 内层循环进行相邻元素的比较和交换,每一轮内层循环会将当前未排序部分的最大元素移动到数组的末端。
      • 使用 swapped 标志位优化排序过程,如果一轮内层循环中没有发生任何交换,说明数组已经有序,提前终止排序。
    • 交换操作:使用 std::swap 函数交换两个元素的位置。

  2. **函数 printArray**:

    • 功能:遍历数组并打印每个元素,便于观察排序前后的结果。
  3. main 函数:

    • 步骤

      :

      1. 输入数组大小:提示用户输入要排序的整数数量 n。
      2. 输入数组元素:动态分配一个大小为 n 的整数数组,并从用户处获取 n 个整数的输入。
      3. 打印排序前的数组:调用 printArray 函数显示原始数组。
      4. 执行冒泡排序:调用 bubbleSort 函数对数组进行排序。
      5. 打印排序后的数组:再次调用 printArray 函数显示排序后的数组。
      6. 内存管理:使用 delete[] 释放动态分配的内存,避免内存泄漏。
  4. 错误处理:

    • 判断用户输入的数组大小 n 是否为正整数,否者输出错误信息并终止程序。

运行示例

1
2
3
4
请输入整数的数量: 5
请输入 5 个整数,用空格分隔: 64 34 25 12 22
排序前的数组: 64 34 25 12 22
排序后的数组: 12 22 25 34 64

练习题 3:生成斐波那契数列

题目描述

编写一个 C++ 程序,生成并显示斐波那契数列。程序应允许用户指定生成数列的长度,并使用 循环结构 或 递归方法 来生成斐波那契数。

斐波那契数列是一个由 0 和 1 开始,后续的每个数都是前两个数之和的数列。例如:0, 1, 1, 2, 3, 5, 8, 13, …

要求

  1. 输入:用户输入要生成的斐波那契数的数量 n。
  2. 生成:使用循环结构(如 for 或 while 循环)生成斐波那契数列。
  3. 输出:显示生成的斐波那契数列。
  4. 函数封装:将生成斐波那契数列的逻辑封装在一个独立的函数中。

示例输入与输出

示例 1:

1
2
3
请输入要生成的斐波那契数的数量: 10
斐波那契数列:
0 1 1 2 3 5 8 13 21 34

示例 2:

1
2
3
请输入要生成的斐波那契数的数量: 5
斐波那契数列:
0 1 1 2 3

提示

  • 斐波那契数列的定义

    :

    • 第 0 个斐波那契数是 0。
    • 第 1 个斐波那契数是 1。
    • 对于 n >= 2,第 n 个斐波那契数是第 n-1 个数和第 n-2 个数的和。
  • 实现方法

    :

    • 迭代法:使用循环结构依次计算斐波那契数。
    • 递归法(高级):使用递归函数实现,但效率较低,通常不推荐用于较大的 n。
  • 数据类型:根据 n 的范围选择合适的数据类型,unsigned long long 可以存储较大的斐波那契数。

参考答案(迭代法实现)

1
2
3
4
5
6
7
8
9
10
11
12
13
14
15
16
17
18
19
20
21
22
23
24
25
26
27
28
29
30
31
32
33
34
35
36
37
38
39
40
41
42
43
44
45
46
47
48
49
50
51
52
53
54
55
56
57
58
59
60
#include <iostream>
#include <vector>

// 生成斐波那契数列的函数(迭代法)
std::vector<unsigned long long> generateFibonacci(int n) {
std::vector<unsigned long long> fib;

if (n <= 0) {
// 返回空向量
return fib;
}

// 第一个斐波那契数
fib.push_back(0);

if (n == 1) {
return fib;
}

// 第二个斐波那契数
fib.push_back(1);

// 生成后续的斐波那契数
for (int i = 2; i < n; ++i) {
unsigned long long next = fib[i - 1] + fib[i - 2];
fib.push_back(next);
}

return fib;
}

// 打印斐波那契数列的函数
void printFibonacci(const std::vector<unsigned long long> &fib) {
for (size_t i = 0; i < fib.size(); ++i) {
std::cout << fib[i] << " ";
}
std::cout << std::endl;
}

int main() {
int n;

// 获取要生成的斐波那契数的数量
std::cout << "请输入要生成的斐波那契数的数量: ";
std::cin >> n;

if (n < 0) {
std::cerr << "错误:数量不能为负数。" << std::endl;
return 1;
}

// 生成斐波那契数列
std::vector<unsigned long long> fibonacci = generateFibonacci(n);

// 打印斐波那契数列
std::cout << "斐波那契数列:" << std::endl;
printFibonacci(fibonacci);

return 0;
}

代码解释

  1. **函数 generateFibonacci**:

    • 参数:接收一个整数 n,表示要生成的斐波那契数的数量。

    • 返回值:返回一个 std::vector<unsigned long long>,包含生成的斐波那契数列。

    • 逻辑

      :

      • 如果 n <= 0,返回一个空的向量。
      • 初始化斐波那契数列的前两个数:0 和 1。
      • 使用一个 for 循环,从第三个数开始,依次计算当前数为前两个数之和,并将其添加到向量中。
  2. **函数 printFibonacci**:

    • 参数:接收一个 const 引用的斐波那契数列向量。
    • 功能:遍历并打印斐波那契数列中的每个数,用空格分隔。
  3. main 函数:

    • 步骤

      :

      1. 输入数量:提示用户输入要生成的斐波那契数的数量 n。
      2. 输入验证:检查 n 是否为负数,若是则输出错误信息并终止程序。
      3. 生成数列:调用 generateFibonacci 函数生成斐波那契数列。
      4. 打印数列:调用 printFibonacci 函数显示生成的斐波那契数列。
  4. 数据类型选择:

    • 使用 unsigned long long 可以存储较大的斐波那契数,避免整数溢出。但需要注意,unsigned long long 的范围有限,对于非常大的 n,仍然会发生溢出。

运行示例

1
2
3
请输入要生成的斐波那契数的数量: 10
斐波那契数列:
0 1 1 2 3 5 8 13 21 34

递归实现参考代码(可选)

1
2
3
4
5
6
7
8
9
10
11
12
13
14
15
16
17
18
19
20
21
22
23
24
25
26
27
28
29
30
31
32
33
34
35
36
37
38
39
40
41
42
43
44
45
46
47
48
49
50
51
52
53
54
55
56
57
58
59
#include <iostream>
#include <vector>
#include <stdexcept>

// 递归函数,计算第 n 个斐波那契数
unsigned long long fibonacciRecursive(int n) {
if (n < 0) {
throw std::invalid_argument("n 不能为负数。");
}
if (n == 0) return 0;
if (n == 1) return 1;
return fibonacciRecursive(n - 1) + fibonacciRecursive(n - 2);
}

// 生成斐波那契数列的函数(递归实现)
std::vector<unsigned long long> generateFibonacciRecursive(int n) {
std::vector<unsigned long long> fib;

for (int i = 0; i < n; ++i) {
fib.push_back(fibonacciRecursive(i));
}

return fib;
}

// 打印斐波那契数列的函数
void printFibonacci(const std::vector<unsigned long long> &fib) {
for (size_t i = 0; i < fib.size(); ++i) {
std::cout << fib[i] << " ";
}
std::cout << std::endl;
}

int main() {
int n;

// 获取要生成的斐波那契数的数量
std::cout << "请输入要生成的斐波那契数的数量: ";
std::cin >> n;

if (n < 0) {
std::cerr << "错误:数量不能为负数。" << std::endl;
return 1;
}

try {
// 生成斐波那契数列(递归实现)
std::vector<unsigned long long> fibonacci = generateFibonacciRecursive(n);

// 打印斐波那契数列
std::cout << "斐波那契数列:" << std::endl;
printFibonacci(fibonacci);
}
catch (const std::invalid_argument &e) {
std::cerr << "错误:" << e.what() << std::endl;
}

return 0;
}

递归实现说明

  • 优点

    :

    • 代码简洁,符合斐波那契数列的数学定义。
  • 缺点

    :

    • 时间复杂度为指数级 O(2^n),对于较大的 n 会非常低效。
    • 递归深度过大可能导致栈溢出。
  • 使用场景:适合学习和理解递归概念,但在实际应用中需谨慎使用。

动态规划方法

动态规划通过存储已计算的值来避免重复计算,提高了效率。

1
2
3
4
5
6
7
8
9
10
11
12
13
14
15
16
17
18
19
20
21
22
23
24
25
26
27
28
29
30
#include <iostream>
#include <vector>

// 动态规划实现斐波那契数列
std::vector<int> fibonacci_dynamic(int n) {
std::vector<int> fib(n);
fib[0] = 0;
if (n > 1) {
fib[1] = 1;
}
for (int i = 2; i < n; ++i) {
fib[i] = fib[i - 1] + fib[i - 2];
}
return fib;
}

int main() {
int n;
std::cout << "请输入斐波那契数列的项数: ";
std::cin >> n;

std::vector<int> fib = fibonacci_dynamic(n);
std::cout << "斐波那契数列的前 " << n << " 项为: ";
for (int i = 0; i < n; ++i) {
std::cout << fib[i] << " ";
}
std::cout << std::endl;

return 0;
}

零基础C++(16) 常见运算符

Posted on 2024-10-26 | In 零基础C++

导言

运算符是编程语言中用于执行特定操作的符号或关键字。在C++中,运算符的使用广泛且多样,掌握运算符的使用对于编写高效、简洁的代码至关重要。本教案旨在全面介绍C++中的各种运算符,帮助学习者深入理解和灵活运用。

运算符概述

运算符(Operator) 是用来对变量进行操作的符号或函数。C++中的运算符可分为多种类型,每种运算符具有特定的功能和使用规则。运算符可以单目(仅操作一个操作数)、双目(操作两个操作数)、甚至三目(操作三个操作数)等。

运算符分类

C++中的运算符可以根据功能和使用方式分为以下几类:

1. 算术运算符

用于执行基本的数学计算。

运算符 描述 示例
+ 加法 a + b
- 减法 a - b
* 乘法 a * b
/ 除法 a / b
% 取模(求余数) a % b
++ 自增(前缀/后缀) ++a, a++
-- 自减(前缀/后缀) --a, a--

示例:

1
2
3
4
5
6
7
8
int a = 10, b = 3;
int sum = a + b; // 13
int diff = a - b; // 7
int prod = a * b; // 30
int div = a / b; // 3
int mod = a % b; // 1
a++; // a = 11
--b; // b = 2

2. 关系运算符

用于比较两个值之间的关系,返回布尔值(true 或 false)。

运算符 描述 示例
== 等于 a == b
!= 不等于 a != b
> 大于 a > b
< 小于 a < b
>= 大于或等于 a >= b
<= 小于或等于 a <= b

示例:

1
2
3
4
int a = 5, b = 10;
bool result1 = (a == b); // false
bool result2 = (a < b); // true
bool result3 = (a >= b); // false

3. 逻辑运算符

用于组合或反转布尔表达式,返回布尔值。

运算符 描述 示例
&& 逻辑与(AND) a && b
` `
! 逻辑非(NOT) !a

示例:

1
2
3
4
bool a = true, b = false;
bool result1 = a && b; // false
bool result2 = a || b; // true
bool result3 = !a; // false

4. 位运算符

用于按位操作整数类型的二进制位。

运算符 描述 示例
& 按位与 a & b
` ` 按位或
^ 按位异或(不等时为1) a ^ b
~ 按位取反 ~a
<< 左移 a << 2
>> 右移 a >> 2

示例:

1
2
3
4
5
6
7
8
int a = 5;  // 二进制:0101
int b = 3; // 二进制:0011
int andResult = a & b; // 1 (0001)
int orResult = a | b; // 7 (0111)
int xorResult = a ^ b; // 6 (0110)
int notResult = ~a; // -6 (补码)
int leftShift = a << 1; // 10 (1010)
int rightShift = a >> 1; // 2 (0010)

5. 赋值运算符

用于向变量赋值。

运算符 描述 示例
= 简单赋值 a = b
+= 加后赋值 a += b
-= 减后赋值 a -= b
*= 乘后赋值 a *= b
/= 除后赋值 a /= b
%= 取模后赋值 a %= b
&= 按位与后赋值 a &= b
` =` 按位或后赋值
^= 按位异或后赋值 a ^= b
<<= 左移后赋值 a <<= 2
>>= 右移后赋值 a >>= 2

示例:

1
2
3
4
5
int a = 5;
int b = 3;
a += b; // a = 8
a *= 2; // a = 16
a &= b; // a = 16 & 3 = 0

6. 复合赋值运算符

结合赋值与其他运算的运算符(如上表中所示的+=, -=, 等)。

示例:

1
2
int a = 10;
a += 5; // 等同于 a = a + 5; 结果 a = 15

7. 条件运算符

用于基于条件选择值。

运算符 描述 示例
?: 条件(三目)运算符 a ? b : c

示例:

1
2
int a = 10, b = 20, c;
c = (a > b) ? a : b; // c = 20

8. 递增和递减运算符

用于增加或减少变量的值,前缀和后缀形式。

运算符 描述 示例
++ 自增(前缀/后缀) ++a, a++
-- 自减(前缀/后缀) --a, a--

示例:

1
2
3
int a = 5;
int b = ++a; // a = 6, b = 6
int c = a--; // a = 5, c = 6

9. 指针运算符

用于操作指针。

运算符 描述 示例
* 间接访问(解引用) *ptr
& 取地址 &a
-> 成员访问(指向对象的指针) ptr->member
[] 数组下标访问 arr[2]

示例:

1
2
3
int a = 10;
int *ptr = &a;
int value = *ptr; // value = 10

10. 成员访问运算符

用于访问类或结构体的成员。

运算符 描述 示例
. 直接成员访问 object.member
-> 指向成员的指针访问 ptr->member
::* 指向成员的指针(成员指针操作符) Class::*ptr

示例:

1
2
3
4
5
6
7
8
9
struct Point {
int x;
int y;
};

Point p = {10, 20};
Point *ptr = &p;
int a = p.x; // 使用 . 运算符
int b = ptr->y; // 使用 -> 运算符

11. 其他运算符

运算符 描述 示例
sizeof 返回变量或类型所占字节数 sizeof(int)
?: 条件(三目)运算符 a ? b : c
, 逗号运算符 a = (b, c)
typeid 运行时类型信息运算符 typeid(a)
new 动态内存分配 int *ptr = new int;
delete 动态内存释放 delete ptr;

示例:

1
2
3
4
int a = 5;
int size = sizeof(a); // size = 4 (通常)
int b, c;
b = (a++, a + 2); // a = 6, b = 8

运算符优先级与结合性

运算符的优先级决定了在没有括号明确指定的情况下,哪一个运算符先被计算。结合性则决定了运算符在具有相同优先级时的计算顺序(从左到右或从右到左)。

优先级表

以下是C++运算符的优先级从高到低的简要概览:

优先级 运算符类别 运算符 结合性 备注
1 范围解析运算符 :: 左到右 用于访问命名空间或类的成员
2 后缀运算符 (), [], ., ->, ++(后置), --(后置) 左到右 包含函数调用、数组下标、成员访问
3 一元运算符 +, -, !, ~, ++(前置), --(前置), *(解引用), &(取地址), sizeof, typeid 右到左 适用于单个操作数的运算符
4 乘法运算符 *, /, % 左到右 乘法、除法和取模运算
5 加法运算符 +, - 左到右 加法和减法运算
6 移位运算符 <<, >> 左到右 位左移和位右移
7 关系运算符 <, <=, >, >= 左到右 比较运算符
8 相等运算符 ==, != 左到右 判断相等与不相等
9 位与运算符 & 左到右 按位与
10 位异或运算符 ^ 左到右 按位异或
11 位或运算符 ` ` 左到右
12 逻辑与运算符 && 左到右 逻辑与
13 逻辑或运算符 ` `
14 条件运算符 ?: 右到左 条件(三目)运算符
15 赋值运算符 =, +=, -=, *=, /=, %=, &=, ` =, ^=, <<=, >>=` 右到左
16 逗号运算符 , 左到右 逗号用于表达式中多个操作

表格说明

  • 优先级:数字越小,优先级越高。即优先级为1的运算符最先被计算。
  • 运算符类别:运算符的功能分类,帮助理解不同类型运算符的用途。
  • 运算符:具体的C++运算符符号。
  • 结合性:当表达式中出现多个相同优先级的运算符时,决定运算顺序的规则。左到右表示从左侧的操作数开始,右到左表示从右侧的操作数开始。
  • 备注:对运算符类别或特定运算符的简要说明。

运算符重载

运算符重载(Operator Overloading) 允许开发者为自定义类型(如类和结构体)定义或改变运算符的行为,使其表现得像内置类型一样。这提高了代码的可读性和可维护性。

运算符重载的规则

  1. 可重载运算符:几乎所有的运算符都可以被重载,但如 ::, ?:, sizeof 等运算符不能被重载。
  2. 至少一个操作数必须是用户定义类型:即至少有一个操作数是类、结构体或联合体类型。
  3. 运算符重载不改变运算符的优先级、结合性和操作数数量。

运算符重载的基本语法

运算符可以作为成员函数或友元函数进行重载。

成员函数重载示例:

1
2
3
4
5
6
7
8
9
10
11
class Complex {
public:
double real, imag;

Complex operator+(const Complex &c) {
Complex temp;
temp.real = real + c.real;
temp.imag = imag + c.imag;
return temp;
}
};

友元函数重载示例:

1
2
3
4
5
6
7
8
9
10
11
12
13
class Complex {
public:
double real, imag;

friend Complex operator+(const Complex &c1, const Complex &c2);
};

Complex operator+(const Complex &c1, const Complex &c2) {
Complex temp;
temp.real = c1.real + c2.real;
temp.imag = c1.imag + c2.imag;
return temp;
}

常见的重载运算符

  • 算术运算符:+, -, *, /, %
  • 关系运算符:==, !=, <, >, <=, >=
  • 逻辑运算符:&&, ||, !
  • 赋值运算符:=, +=, -=, *=, /=
  • 输入输出运算符:<<, >>
  • 索引运算符:[]
  • 函数调用运算符:()

示例:

1
2
3
4
5
6
7
8
9
10
11
12
13
14
15
16
17
18
19
20
21
22
23
24
25
26
27
28
29
30
#include <iostream>
using namespace std;

class Complex {
public:
double real, imag;

Complex(double r = 0, double i = 0) : real(r), imag(i) {}

// 重载 + 运算符
Complex operator+(const Complex &c) {
return Complex(real + c.real, imag + c.imag);
}

// 重载 << 运算符(作为友元函数)
friend ostream& operator<<(ostream &out, const Complex &c);
};

ostream& operator<<(ostream &out, const Complex &c) {
out << c.real << " + " << c.imag << "i";
return out;
}

int main() {
Complex c1(1.2, 3.4);
Complex c2(5.6, 7.8);
Complex c3 = c1 + c2;
cout << "c1 + c2 = " << c3 << endl; // 输出: c1 + c2 = 6.8 + 11.2i
return 0;
}

练习题

1 交换两个数

题目: 使用位运算符,交换两个整数变量的值而不使用第三个变量。

答案:

1
2
3
4
5
6
7
8
9
10
11
12
13
14
15
16
#include <iostream>
int main() {
int x = 15;
int y = 27;

std::cout << "Before swap: x = " << x << ", y = " << y << std::endl;

// 交换操作
x = x ^ y;
y = x ^ y;
x = x ^ y;

std::cout << "After swap: x = " << x << ", y = " << y << std::endl;

return 0;
}

预期输出:

1
2
Before swap: x = 15, y = 27
After swap: x = 27, y = 15

解析: 通过异或运算 ^ 完成变量值的交换,无需使用临时变量。

2 函数修改外部变量

题目: 编写一个函数,接受一个整数指针,使用解引用运算符修改其值为原值的平方。

答案:

1
2
3
4
5
6
7
8
9
10
11
12
#include <iostream>
void square(int* ptr) {
*ptr = (*ptr) * (*ptr);
}

int main() {
int num = 5;
std::cout << "Before: " << num << std::endl;
square(&num);
std::cout << "After: " << num << std::endl;
return 0;
}

预期输出:

1
2
Before: 5
After: 25

解析: 通过指针访问并修改原变量的值。

3 计算范围内所有元素的和

题目: 编写一个函数,接受 std::vector<int> 的迭代器范围,计算并返回范围内所有元素的和。

函数示例:

须实现如下函数,返回范围内元素求和的结果

1
int sumRange(std::vector<int>::iterator start, std::vector<int>::iterator end);

答案:

1
2
3
4
5
6
7
8
9
10
11
12
13
14
15
16
17
18
#include <iostream>
#include <vector>

int sumRange(std::vector<int>::iterator start, std::vector<int>::iterator end) {
int sum = 0;
while (start != end) {
sum += *start;
++start;
}
return sum;
}

int main() {
std::vector<int> numbers = {2, 4, 6, 8, 10};
int total = sumRange(numbers.begin(), numbers.end());
std::cout << "Sum: " << total << std::endl;
return 0;
}

预期输出:

1
Sum: 30

解析: 函数通过迭代器遍历范围,累加元素值。

<123…37>

370 posts
17 categories
21 tags
RSS
GitHub ZhiHu
© 2025 恋恋风辰 本站总访问量次 | 本站访客数人
Powered by Hexo
|
Theme — NexT.Muse v5.1.3