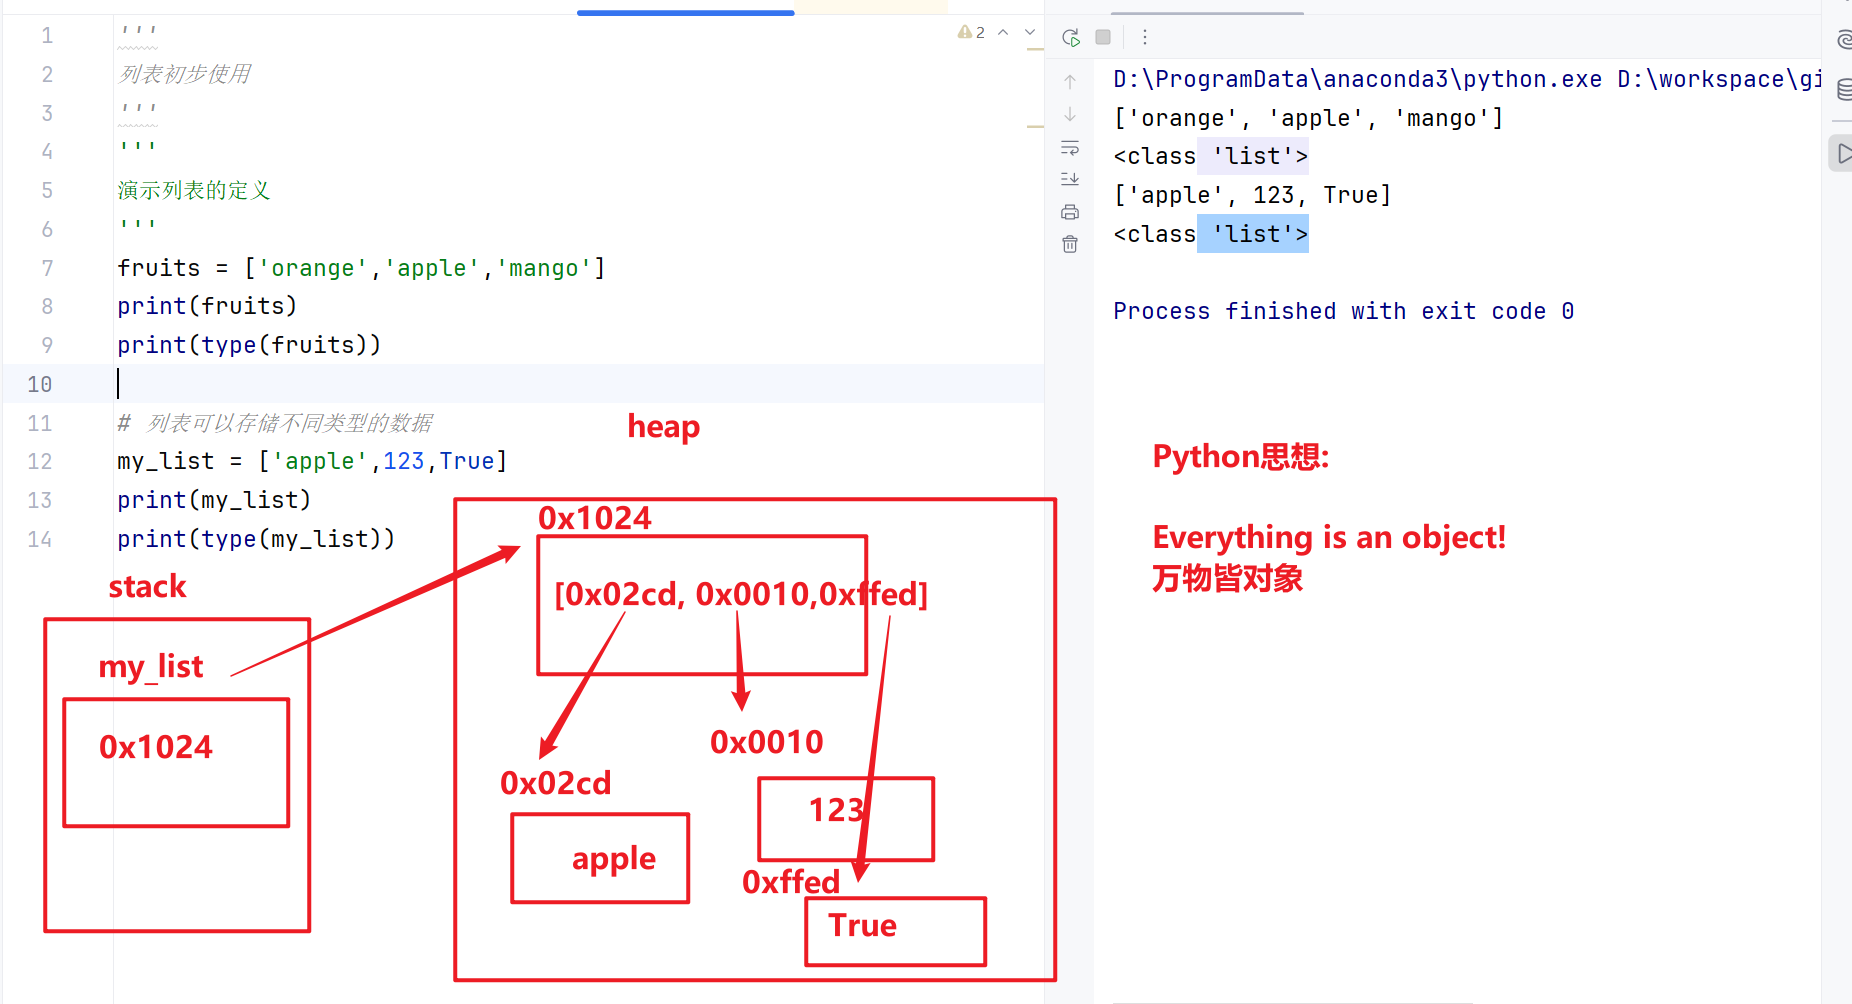
一、全局变量和局部变量
作用域
作用域就是代码生效的范围
在Python代码中,作用域分为两种情况:全局作用域 与 局部作用域
变量的作用域
全局作用域:在函数外面的作用域就是全局作用域
局部作用域:在函数内的作用域就是局部作用域
在全局作用域定义的变量 => 全局变量
在局部作用域定义的变量 => 局部变量
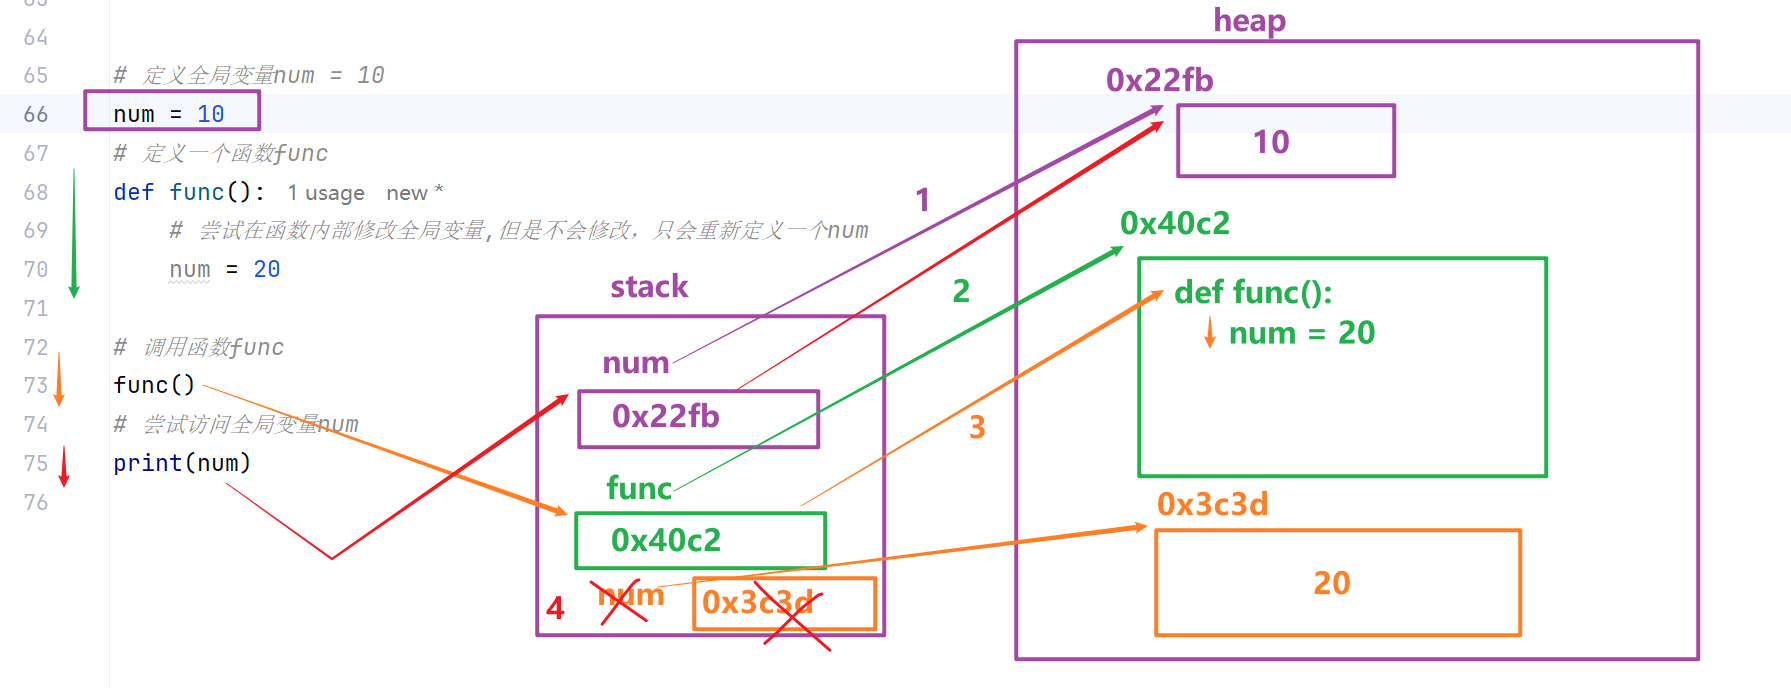
全局变量与局部变量的访问范围
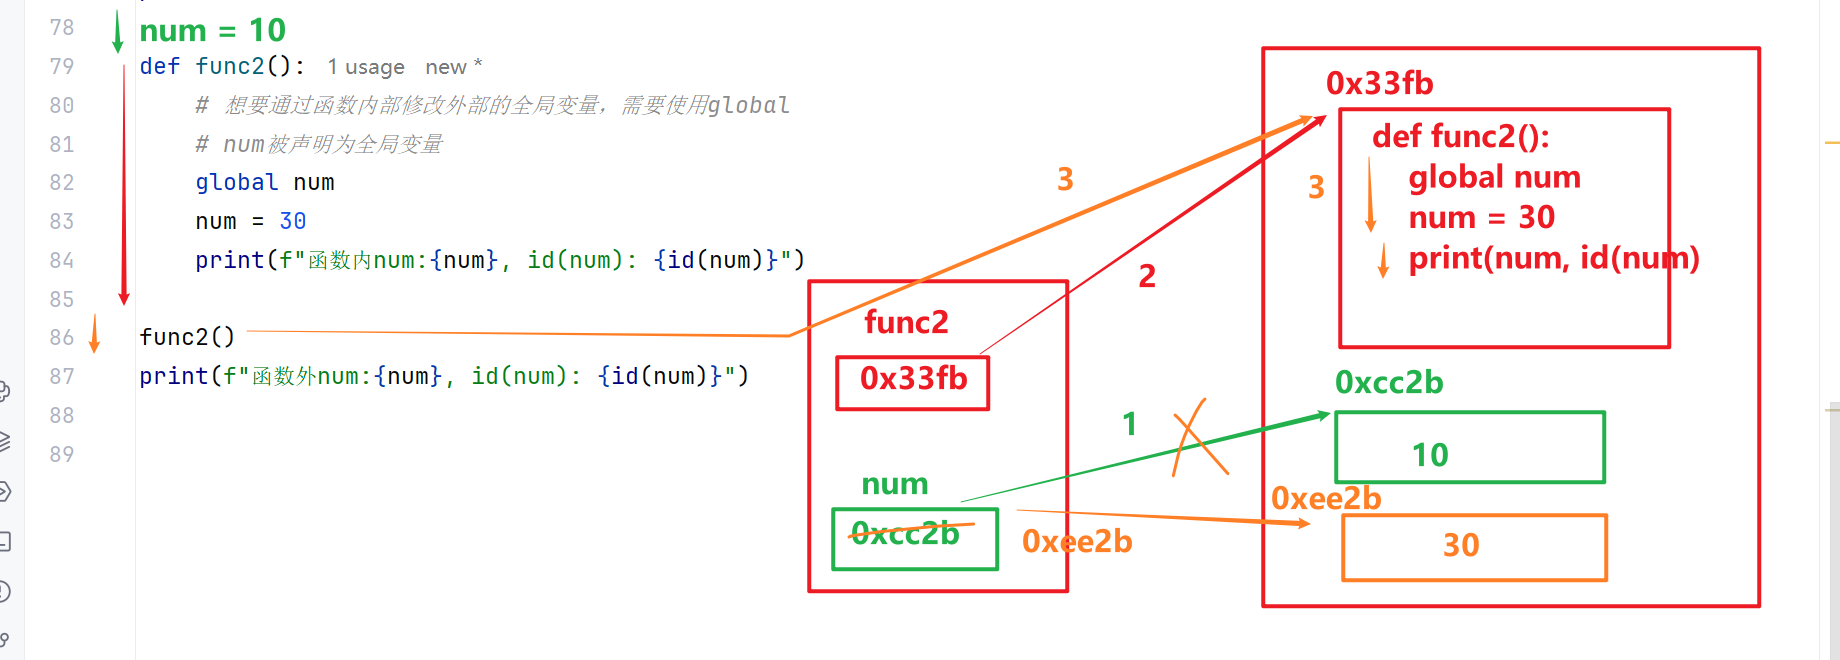
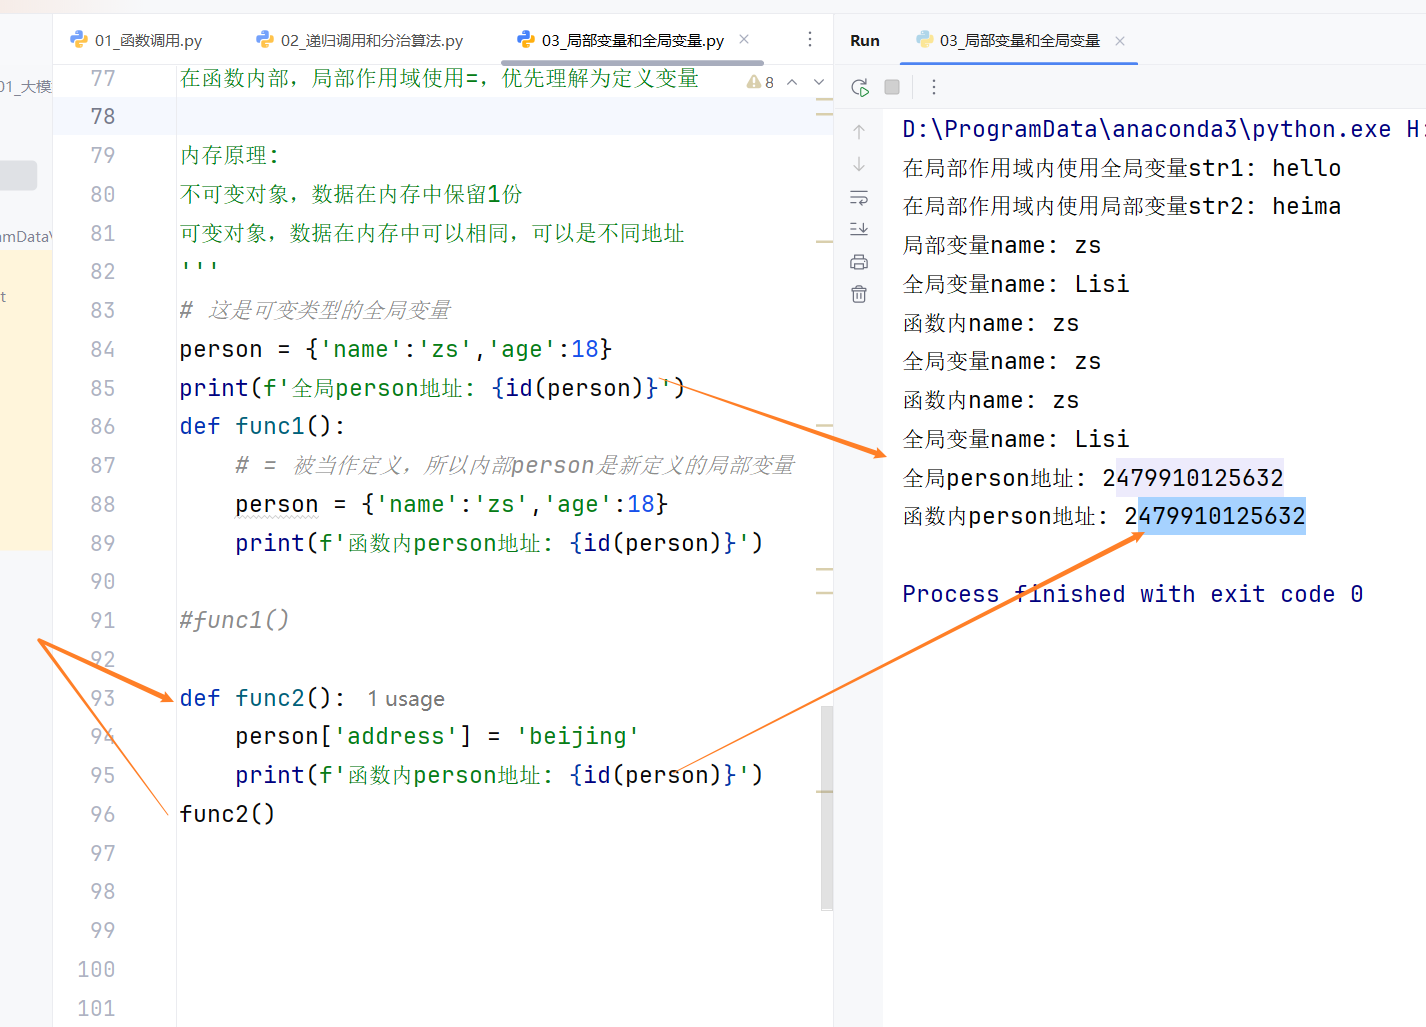
局部作用域可以访问全局变量,且可通过global修改全局变量
在函数局部作用域中,默认可以读取全局变量;如果需要修改全局变量,需要使用 global 关键字声明。
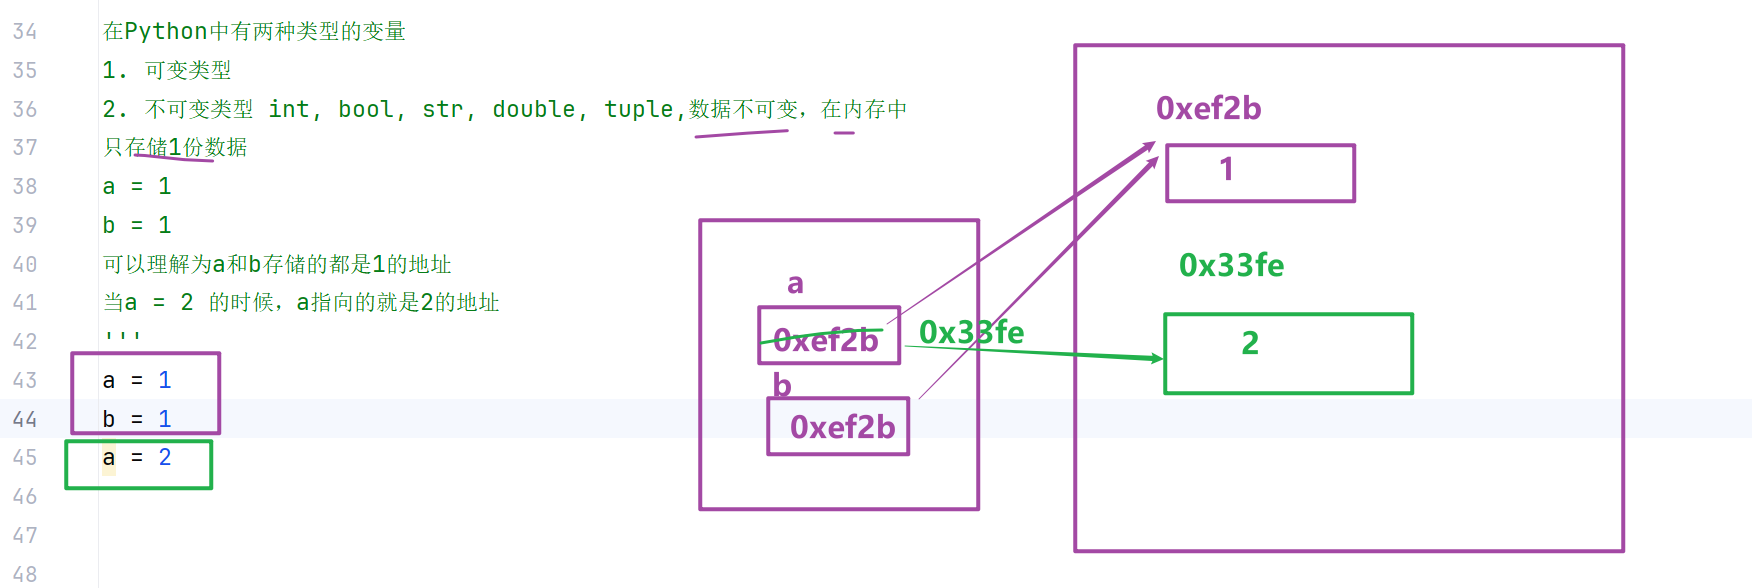
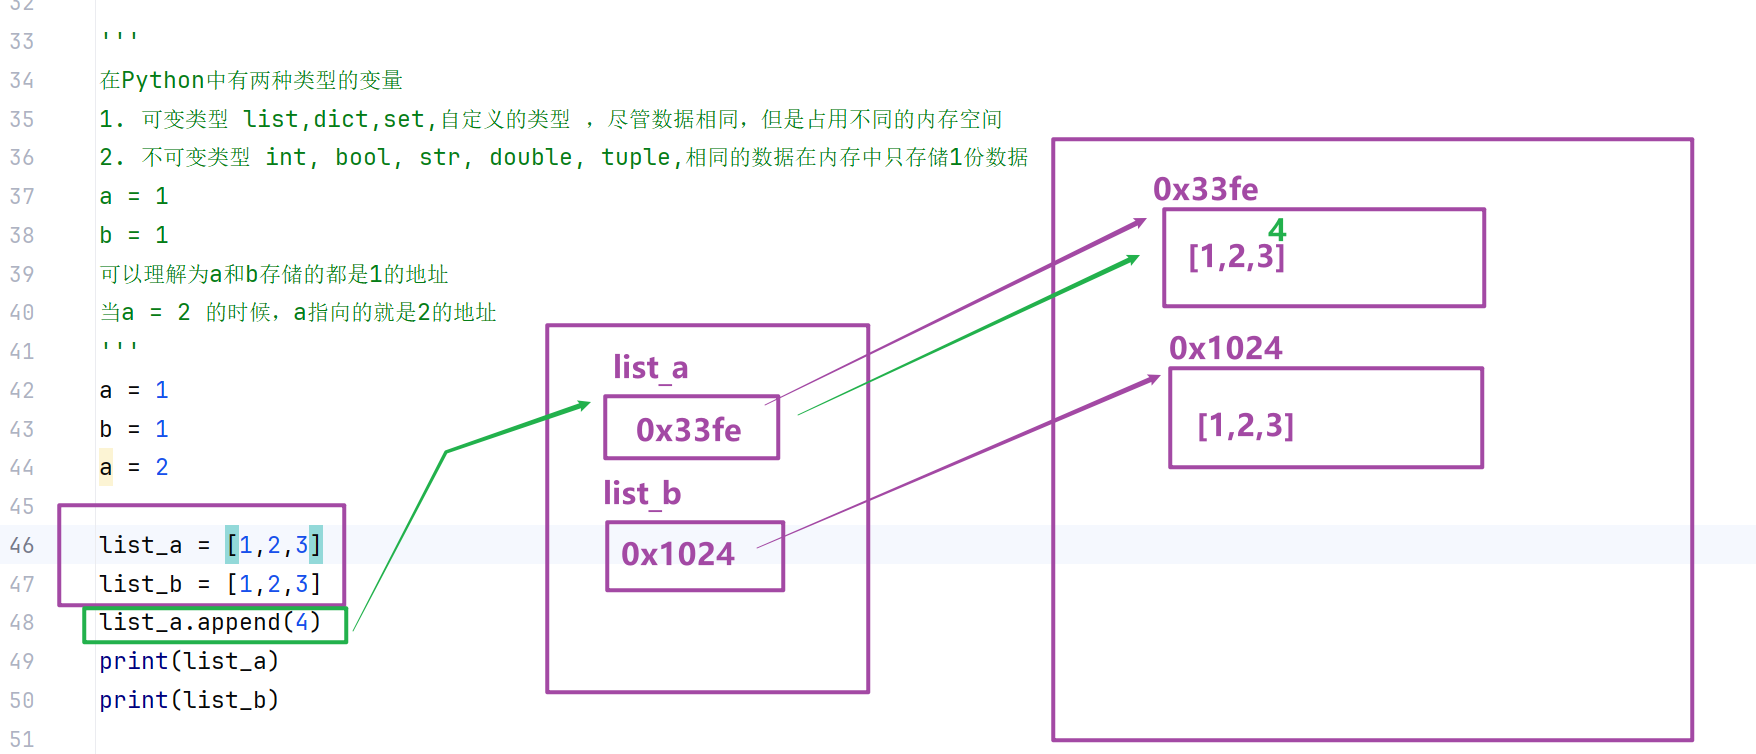
python中赋值操作可被解读成两种情况
num1 = 100
- 被当作赋值,修改原变量的值
- 被当作变量定义,定义一个新的变量
这就是python赋值的二义性
不像是C++
int num1 = 200; //这是定义
num1 = 500; //这是修改
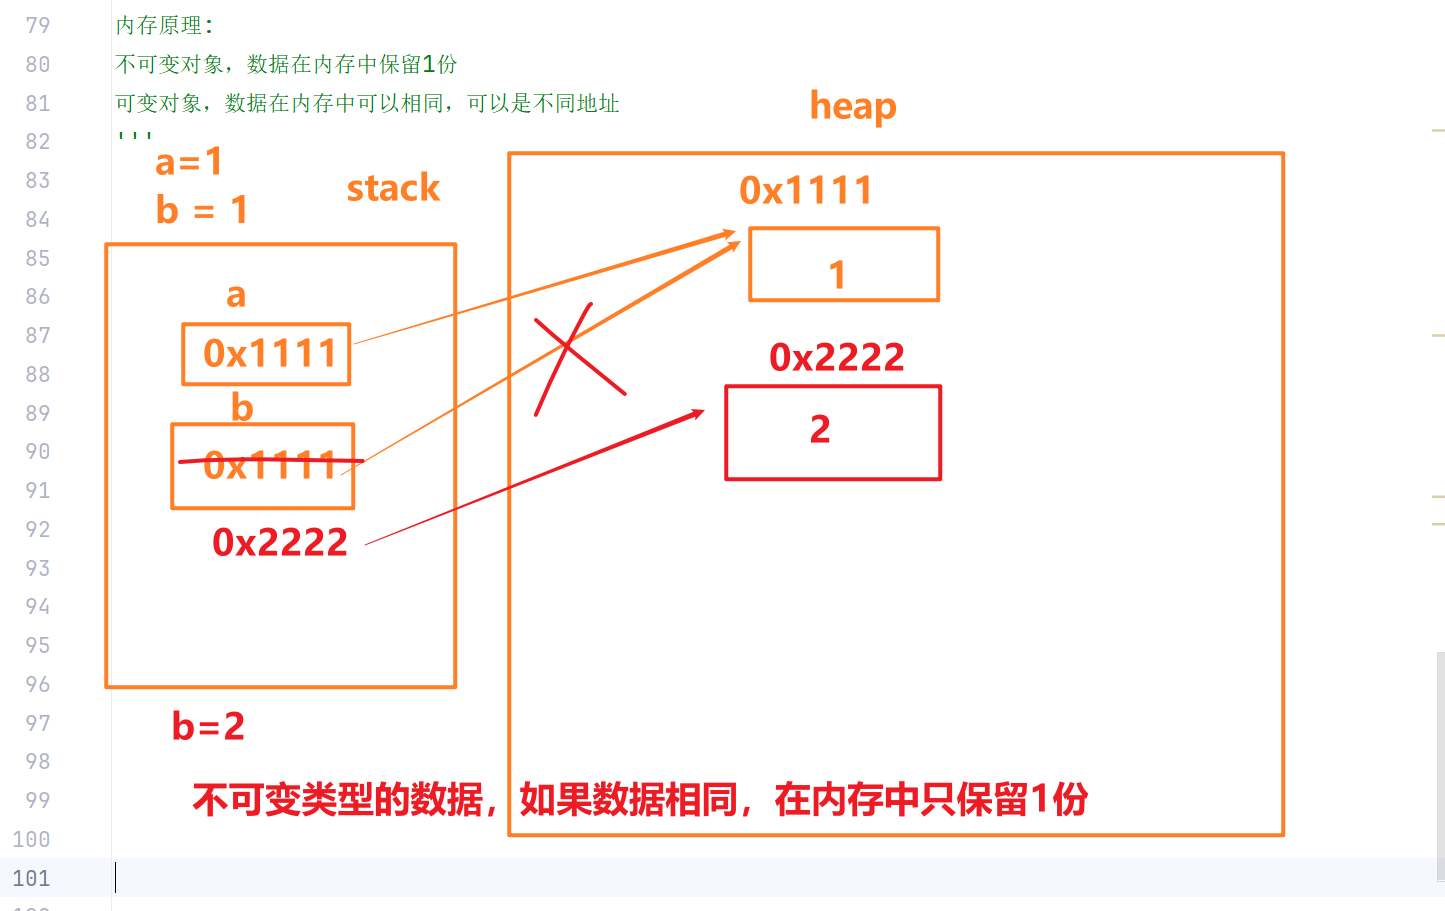
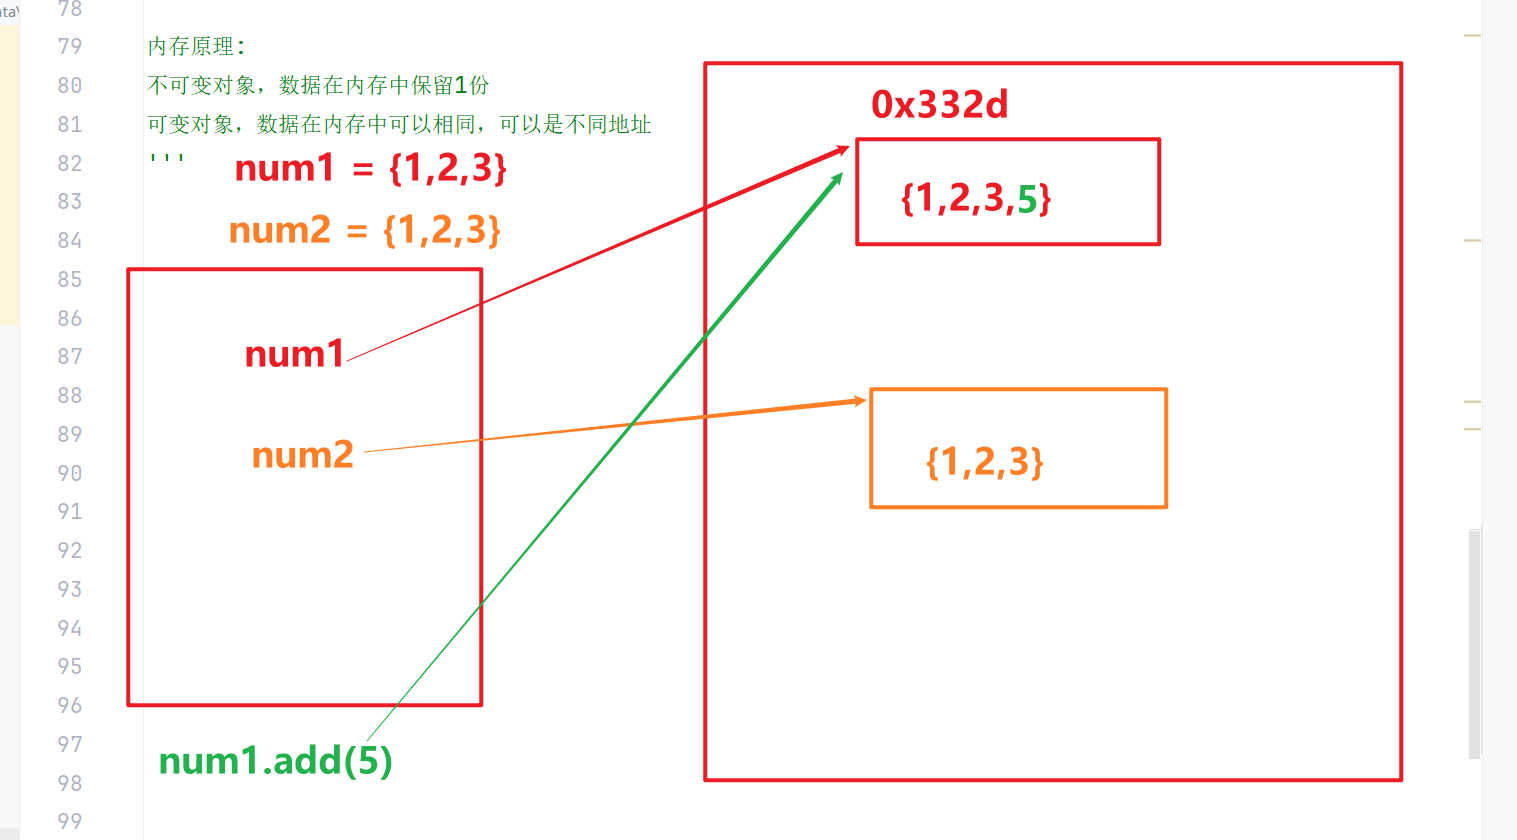
1 | ''' |
全局作用域无法访问局部变量
函数内部定义的局部变量,仅能在函数局部作用域中使用,函数执行结束后会被回收,全局作用域无法读取。
1 | ''' |
全局无法访问局部变量的底层原因
主要原因在于,在Python的底层存在“垃圾回收机制”,用于自动回收闲置内存空间,提升程序运行效率。函数执行结束后,函数内部定义的所有局部变量都会被系统自动回收释放,因此全局作用域无法访问已销毁的局部变量。
Python变量查找LEGB规则(核心底层)
Python访问变量时,会严格按照固定层级逐层查找,找不到则抛出 NameError,也是闭包、变量作用域的底层原理:
L(Local)局部作用域:当前函数内部变量
E(Enclosing)嵌套作用域:外层嵌套函数的局部变量(闭包专属层级)
G(Global)全局作用域:文件顶层定义的全局变量
B(Built-in)内置作用域:Python系统内置变量/函数(print、len等)
global 与 nonlocal 关键字对比
| 关键字 | 作用范围 | 使用场景 |
|---|---|---|
| global | 全局作用域(G层) | 函数内部修改全局变量,无法操作嵌套函数变量 |
| nonlocal | 嵌套局部作用域(E层) | 闭包内部修改外层函数变量,无法操作全局变量 |
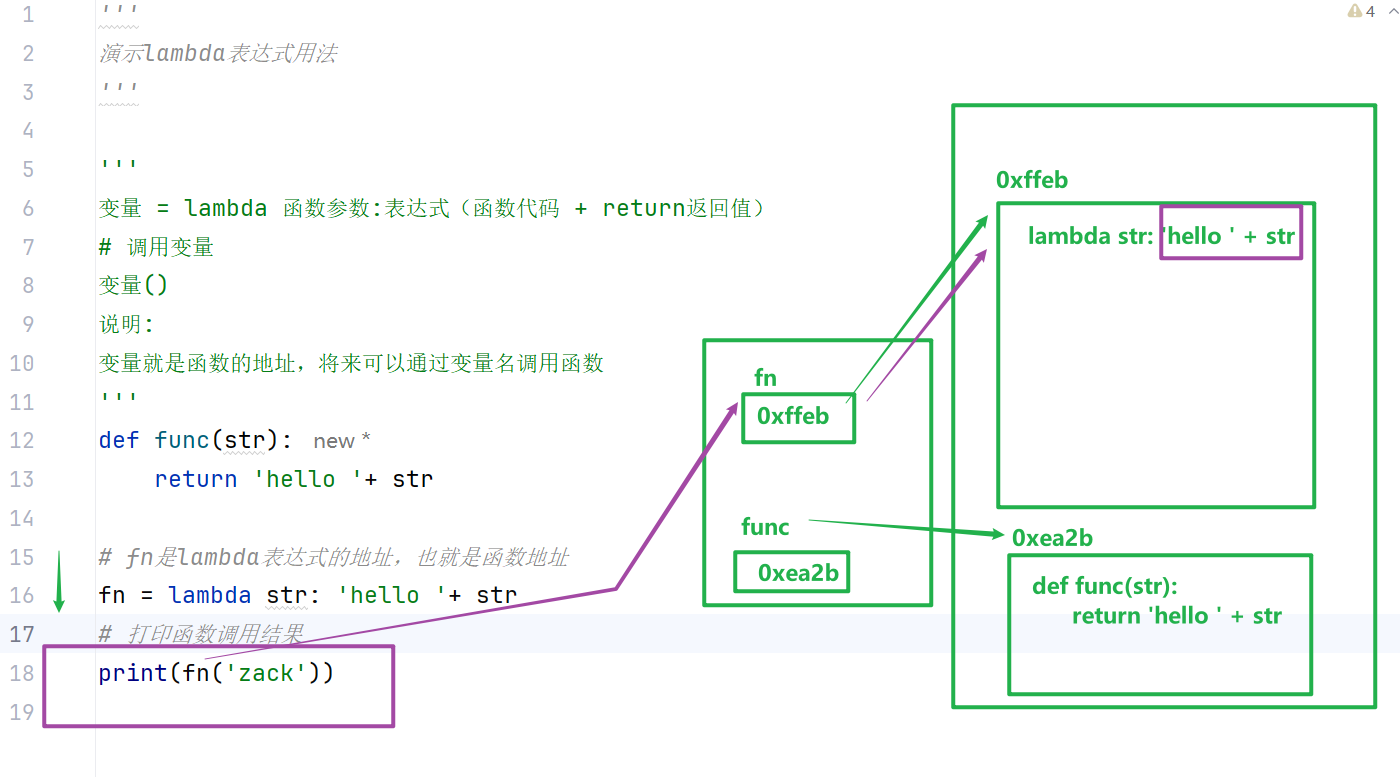
二、闭包
闭包定义
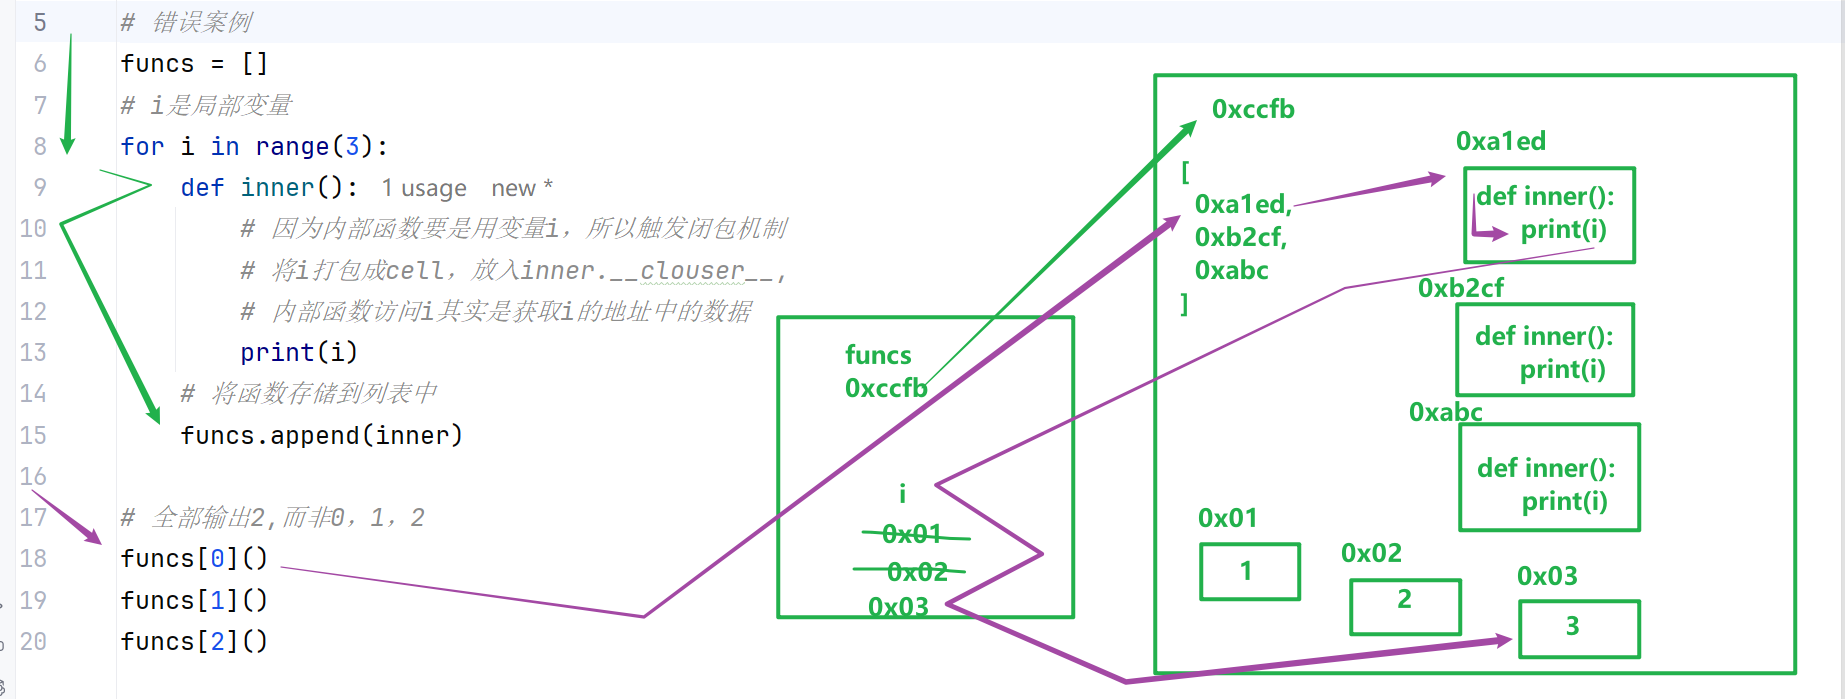
在函数嵌套的前提下,内部函数使用了外部函数的变量,并且外部函数返回了内部函数,这个引用外层变量的内部函数即为闭包。
闭包的构成条件(三步走)
有嵌套:存在外层函数和内层函数的嵌套结构
有引用:内层函数调用外层函数的局部变量/参数
有返回:外层函数将内层函数作为返回值返回
基础闭包代码演示
1 | ''' |

闭包核心作用
正常函数执行结束后,内部局部变量会被垃圾回收机制销毁。而闭包可以常驻外层函数的局部变量,实现全局作用域中间接访问、持续使用已结束函数的局部变量。
闭包注意事项
由于闭包会持续引用外部函数的变量,导致外层变量无法被垃圾回收,会长期占用内存,大量使用闭包可能造成内存资源消耗。(内存逃逸)
闭包中修改外层变量(nonlocal关键字)
变量赋值二义性问题
Python中 = 赋值存在二义性:左侧变量会被优先判定为本地局部变量。如果闭包内层函数直接修改外层变量,会因找不到本地变量报错,此时需要 nonlocal 声明外层变量。
标准修改案例
1 | ''' |
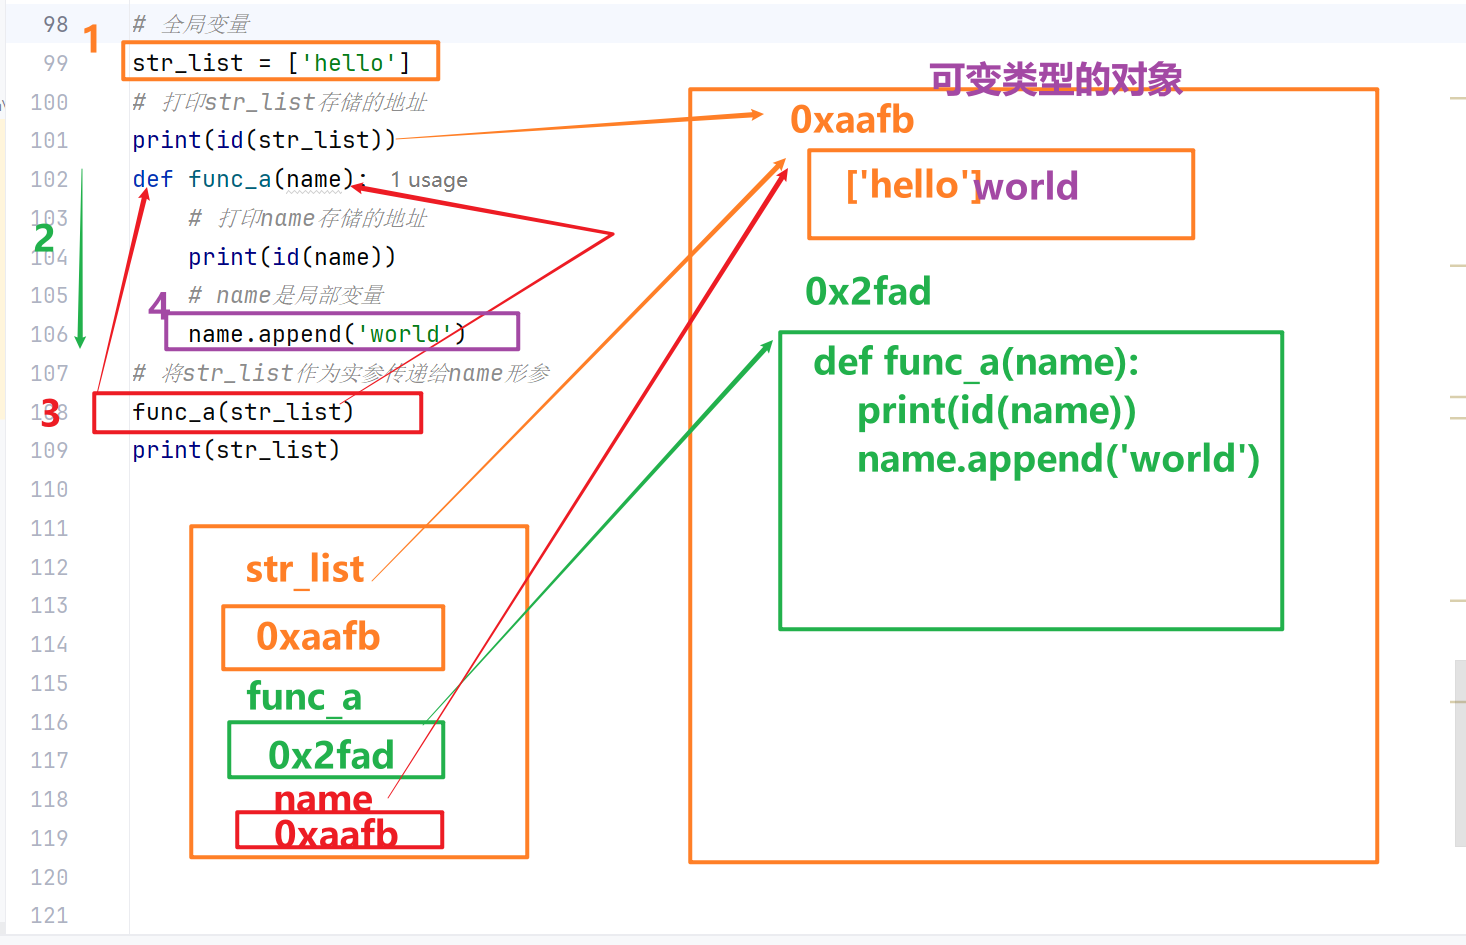
特殊规则:可变对象无需nonlocal
如果外层变量是列表、字典等可变对象,仅修改容器内部元素、不对变量整体重新赋值时,无需使用 nonlocal 关键字。
1 | def outer(): |
闭包进阶知识点
自由变量
闭包中被内层函数引用的外层变量,称为自由变量。闭包会将自由变量保存在函数内置属性中,阻止垃圾回收。可通过内置属性查看:
1 | def outer(): |
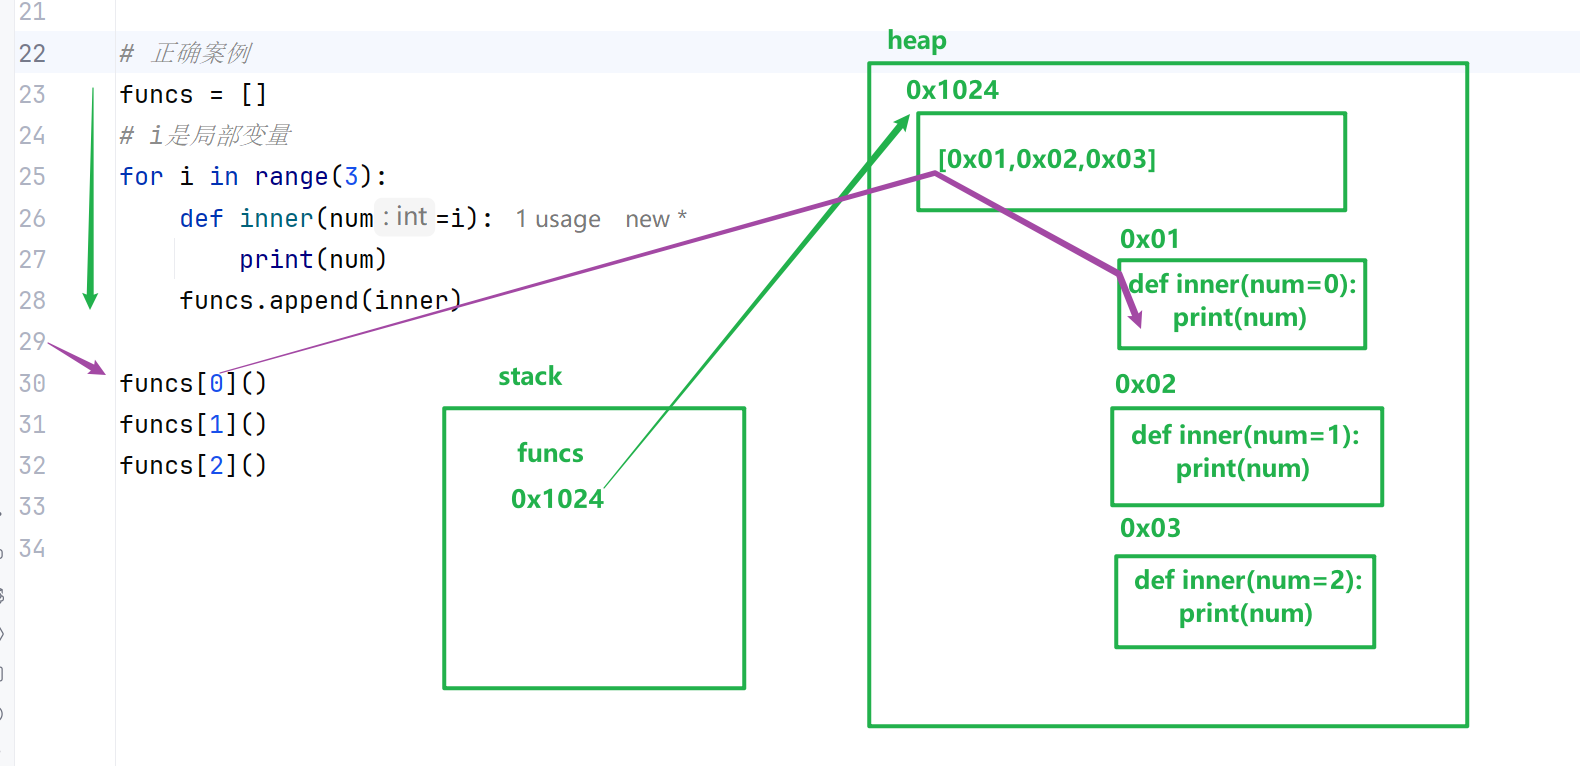
闭包经典陷阱:循环延迟绑定
循环批量生成闭包时,所有闭包会共用同一个外层变量,最终取值均为循环最后值,是高频面试坑点。
1 | ''' |
闭包内存释放
闭包会造成内存常驻,无需使用时可手动解除引用,释放内存:fn = None
闭包综合案例
1 | ''' |
三、装饰器入门与进阶
装饰器定义
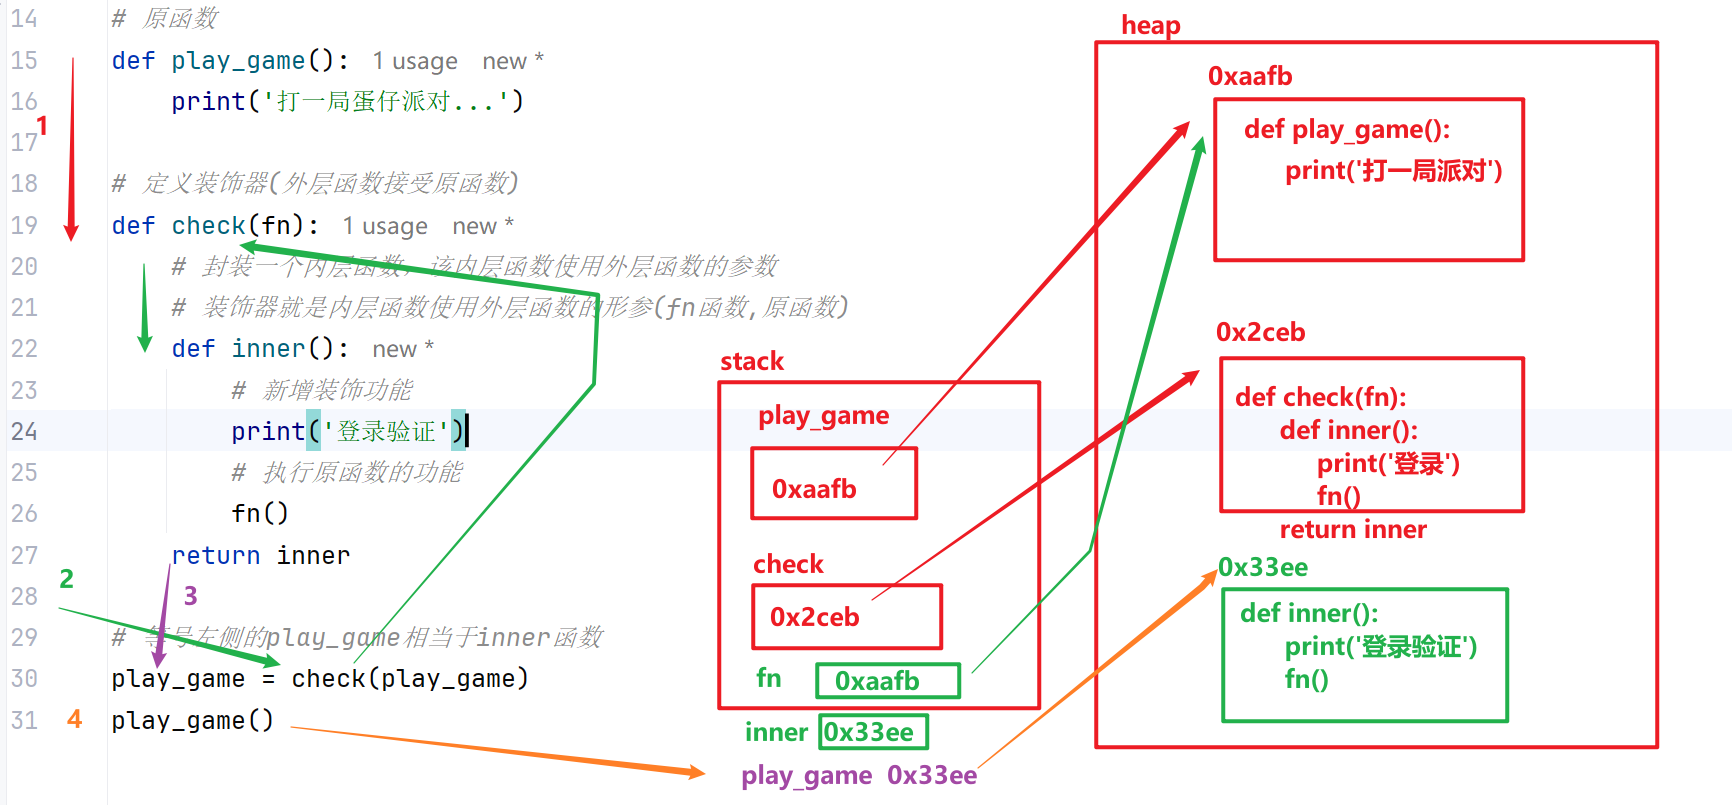
装饰器是特殊的闭包函数,核心作用:不修改原有函数源代码、不改变原有函数调用方式,动态为函数新增额外功能。
装饰器必备条件(闭包三条件):函数嵌套、内层引用外层参数(原函数)、外层返回内层函数。
基础装饰器(无语法糖)
1 | ''' |
语法糖装饰器(推荐写法)
@装饰器名 是Python提供的语法糖,等价于手动赋值装饰,代码更简洁。
1 | ''' |
各类场景装饰器实战
装饰有参数无返回值函数
1 | def print_info(func): |
装饰有返回值函数
1 | def print_info(func): |
装饰有参数有返回值函数
1 | def print_info(func): |
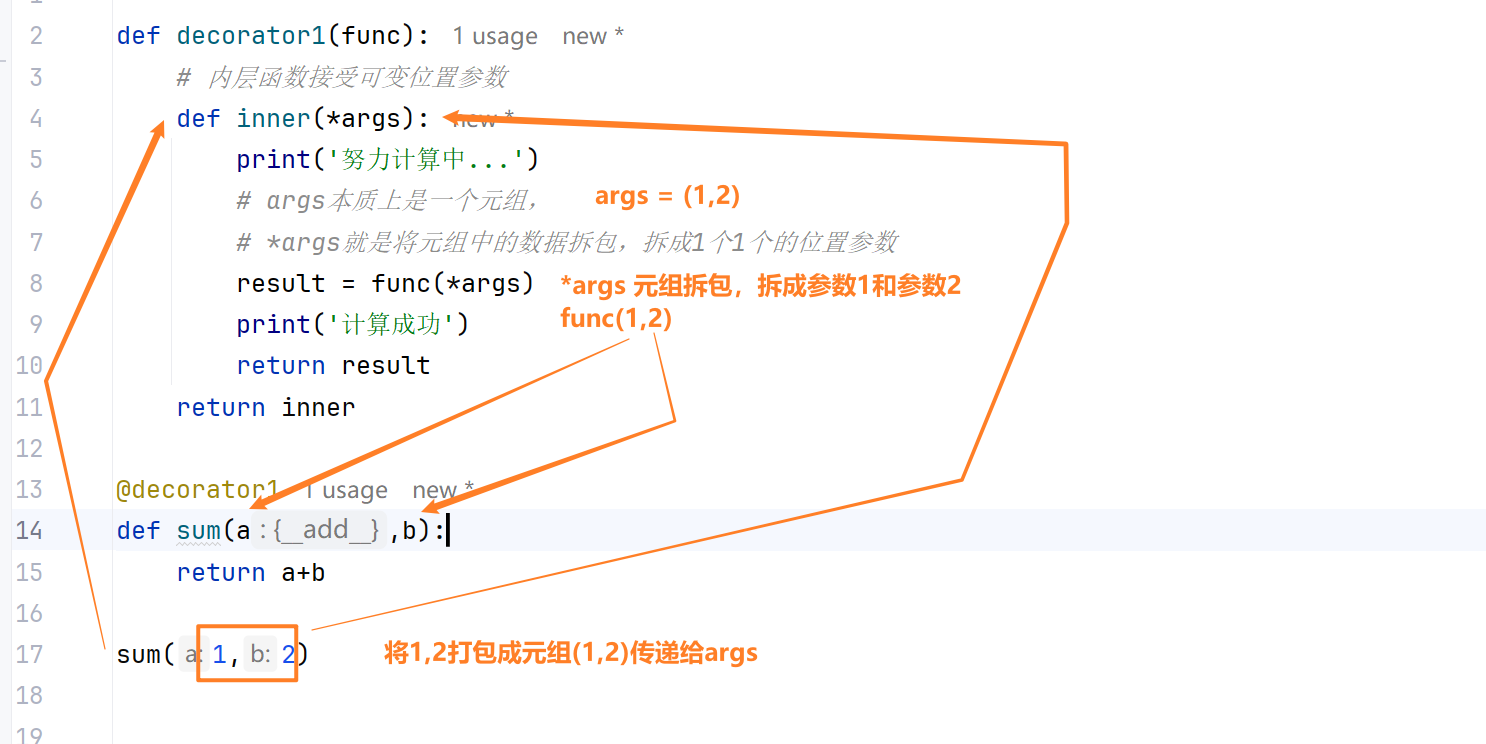
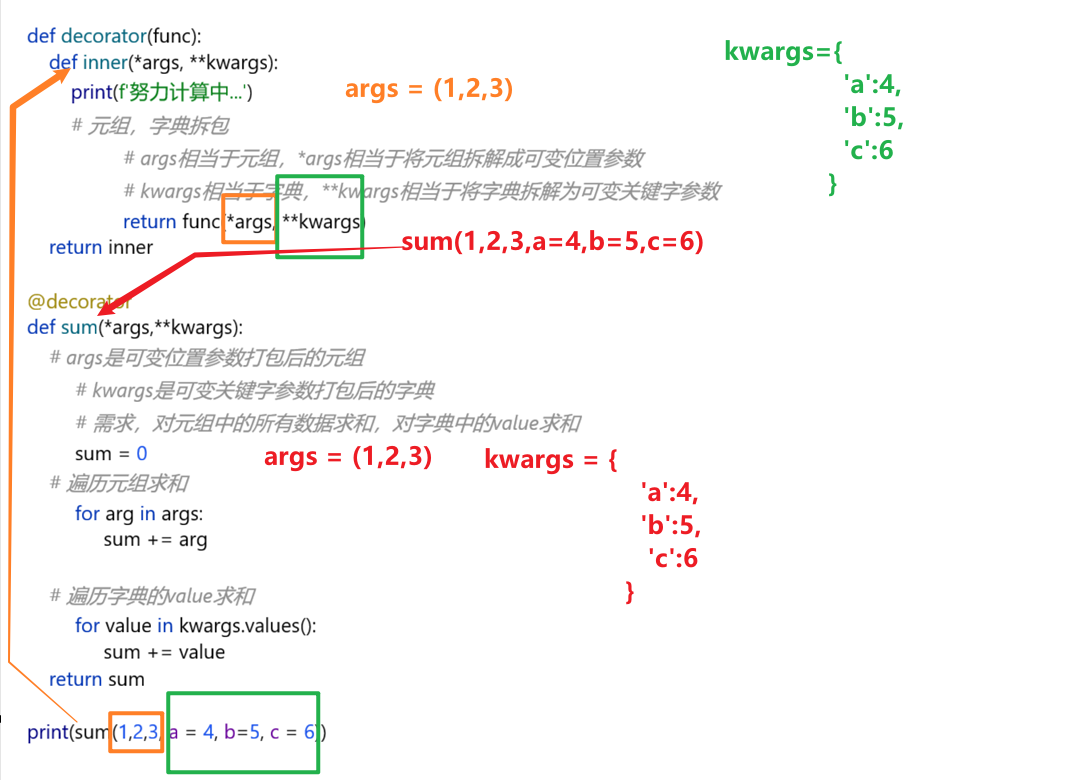
装饰可变参数函数(*args、**kwargs)
装饰可变位置参数的函数
1 |
|
装饰可变关键字参数的函数
1 |
|
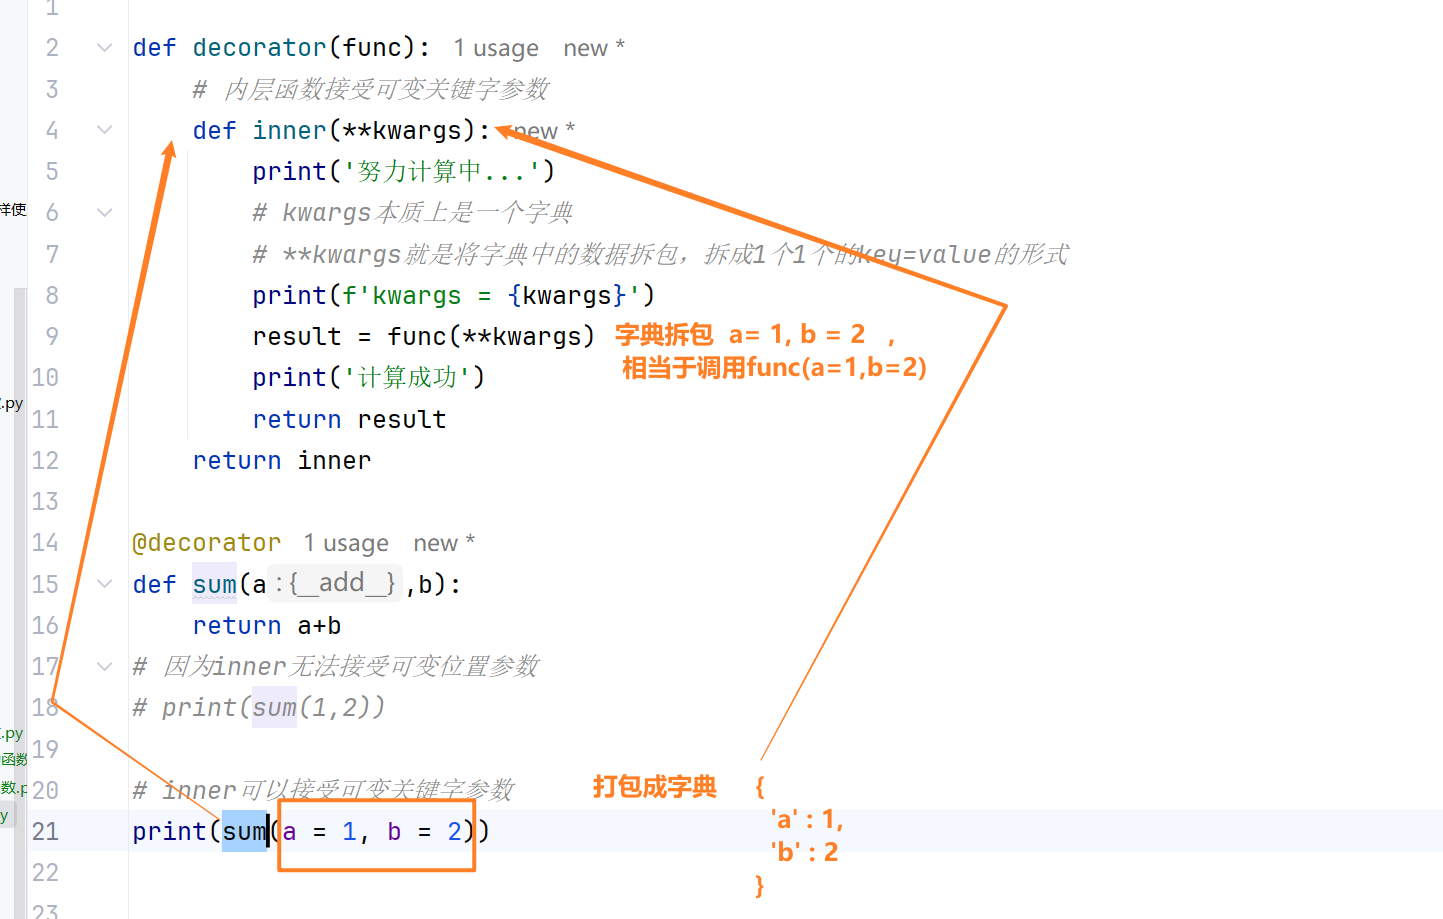
通过可变参数适配任意参数数量、任意参数类型的原函数,是通用装饰器核心写法。
1 | ''' |
多个装饰器装饰同一个函数
执行规则:从上到下装饰包裹,从下到上执行逻辑
1 | ''' |

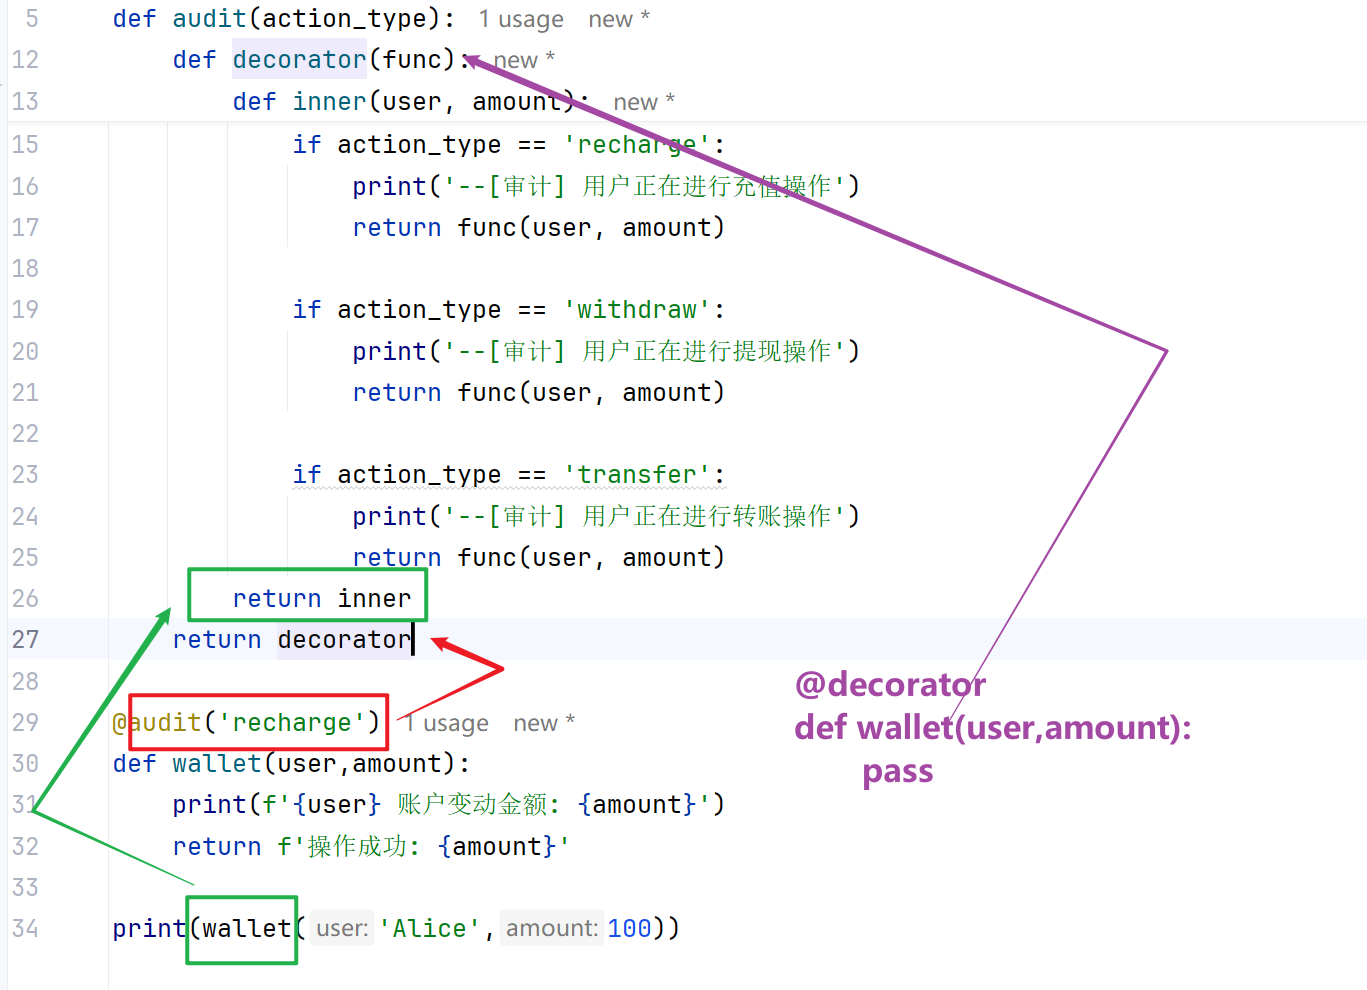
带参数装饰器(三层函数结构)
带参装饰器为三层函数结构:外层接收自定义参数、中层接收原函数、内层执行业务逻辑。
1 | ''' |
装饰器高阶进阶
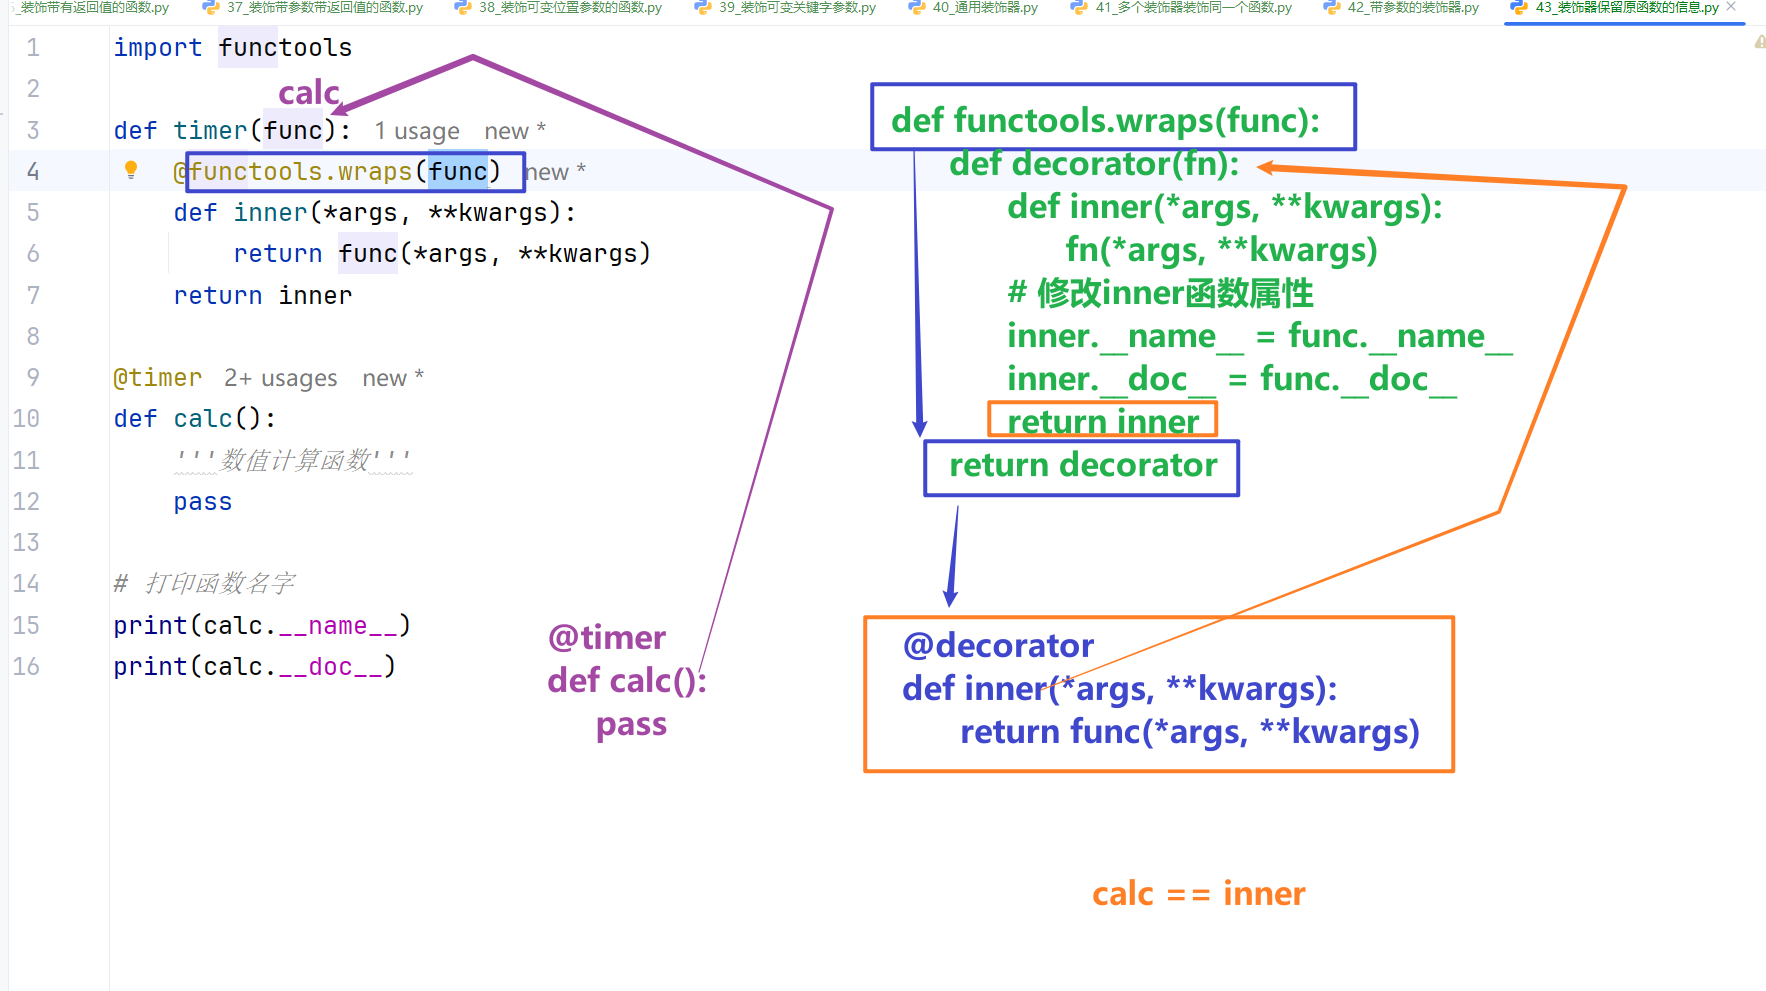
解决装饰器函数元信息丢失
函数被装饰后,默认会丢失原函数的函数名、文档注释等元信息,可通过 functools.wraps 修复,所有正式项目必须使用。
1 | import functools |
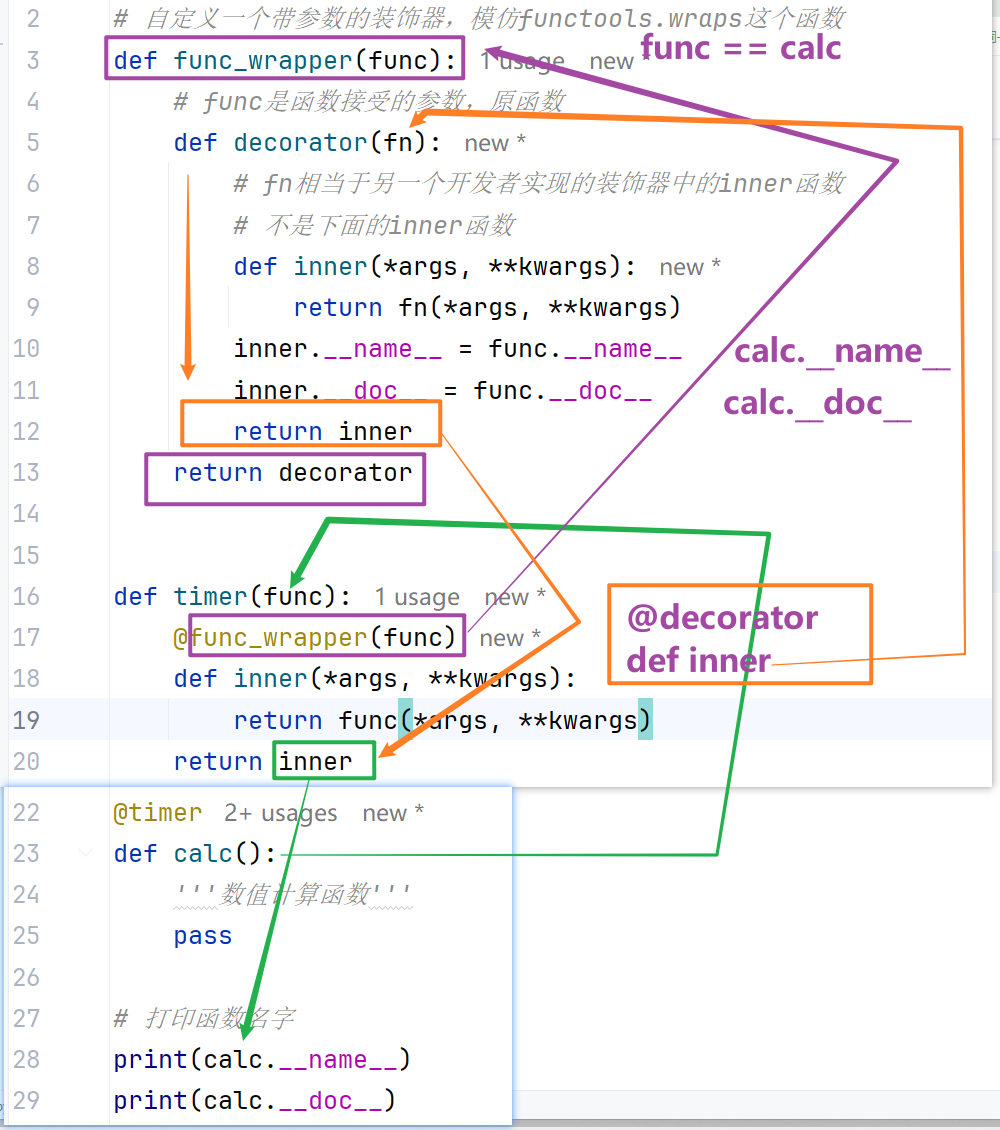
自定义func_wrapper
1 |
|
常用实战通用装饰器
耗时统计装饰器
1 | import time |
异常捕获装饰器
1 | import functools |
类装饰器拓展
通过类实现装饰器,依靠 __call__ 魔法方法让类实例可被调用,适用于复杂装饰场景。
1 | import functools |
四、课后实战练习
需求
实现三层嵌套的带参数装饰器 log_action,接收字符串参数 action_type(取值:查询、录入、移除、更新)。
功能要求:
函数执行前打印:
正在执行【xxx】数据操作兼容任意参数、任意返回值的函数(使用
*args、**kwargs)保留原函数返回结果,使用
functools.wraps修复函数元信息严格使用三层函数结构:外层收参数、中层收函数、内层执行业务
完整实现代码
1 | import functools |
预期输出
1 | 正在执行【查询】数据操作 |