需要js版本
js版本过高会导致调用hexo g 命令时出现问题。建议使用node.js 12以下版本,我用的是v12.18.3
历史版本下载可以参考如下链接
https://nodejs.org/en/download/releases/
如果想要管理多个版本的node,可以通过nvm管理,nvm下载和安装可以自行百度。
external_link 错误
我们可能会遇到如下问题,当我们执行hexo g 时
hexo版本更新报错:INFO Validating config WARN Deprecated config detected: “external_link“ with a Boolean
解决方案是
将原有的
1 | external_link: |
修改为
1 | external_link: |
执行hexo clean ,然后再次hexo g 生成文章。
遇到乱码
hexo s 运行后打开网页显示如下乱码
1 | {% extends '_layout.swig' %} {% import '_macro/post.swig' as post_template %} {% import '_macro/sidebar.swig' as sidebar_template %} {% block title %}{{ config.title }}{% if theme.index_with_subtitle and config.subtitle %} - {{config.subtitle }}{% endif %}{% endblock %} {% block page_class %} {% if is_home() %}page-home{% endif -%} {% endblock %} {% block content %} {% for post in page.posts %} {{ post_template.render(post, true) }} {% endfor %} {% include '_partials/pagination.swig' %} {% endblock %} {% block sidebar %} {{ sidebar_template.render(false) }} {% endblock %} |
则需要单独安装 hexo 的渲染包
1 | npm i hexo-renderer-swig |
因为hexo5.0之后render包不进入hexo主干代码里,需要单独安装。
安装好后执行hexo clean, 然后执行hexo g 生成代码,再次运行hexo s
打开网页查看可以正常显示。
hexo 发布问题
如果hexo d 遇到如下问题
1 | Error: Host key verification failed. |
此时需要在本机生成ssh key,将ssh key 配置到github或者gitee的ssh管理里,如果博客是挂在github上就将key写入github的ssh。
如果博客是挂在gitee上就将key写入gitee的ssh管理里。
详见我的另一篇文章https://www.limerence2017.com/2017/08/24/hexoblogs/
将hexo 和github 关联起来
还是编辑根目录下_config.yml文件
1 | deploy: |
安装该扩展主要是为了支持hexo d 命令。
接下来就是将Hexo部署到我们的Github仓库上:
命令行输入 hexo d 会自动将当前的博文生成html并且发布到github进行托管,在浏览器输入 secondtonone1.github.io (secondtonone1用户名替换为你自己的)即可浏览自己的博客了。这样就完成了github和hexo的关联部署。值得改进的地方是,每次调用hexo d 上传到github,都会提示输入github的用户名和密码,非常不方便
可以通过SSH keys的设置,达到不输入密码直接发布的目的。
SSH keys的配置
在Git 命令行输入如下命令:
1 | $ ssh-keygen -t rsa -C "secondtonone1@163.com" |
secondtonone1@163.com 替换为你的github邮件地址
Git显示:
1 | $ ssh-keygen -t rsa -C "secondtonone1@163.com" |
系统会要求你输入密码,这里设置的密码主要是在你提交Git时弹出密码认证,不想输入直接回车
1 | Enter passphrase (empty for no passphrase):<输入加密串> |
配置ssh和github仓库
找到id_rsa.pub 并复制文件内容
id_rsa.pub文件一般位于电脑用户配置文件夹下的一个.ssh文件下C:Users你的用户名.ssh
登录Github并添加密钥
进入github首页在右上角选择settings设置。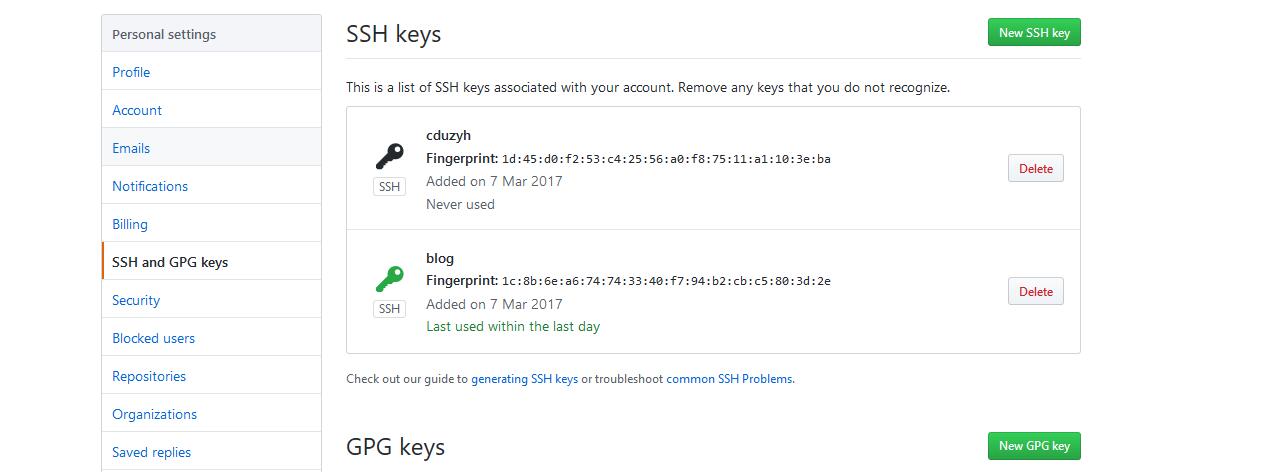
测试通过git bash链接到Git
链接Git
1 | $ ssh -T git@github.com |
提示如下:
1 | yes |
以后每次提交博文到github就不需要输入密码了,很方便。配置好后清除之前的记录,重新生成并提交,可以登录自己的github仓库地址(secondtonone1@163.com)查看博文了
1 | hexo clean |