Qt MVC结构之QItemDelegate介绍

QItemDelegate

当我们想重新实现一个代理时,可以子类化QItemDelegate。实现item编辑时特定的效果,比如在item编辑时我们设置一个QSpinBox返回。
创建一个QApplication项目,然后我们新增一个类,类名叫做spinboxdelegate。

1
2
3
4
5
6
7
8
9
10
11
12
13
14
15
class SpinBoxDelegate : public QItemDelegate
{
Q_OBJECT
public:
explicit SpinBoxDelegate(QObject * parent=0);
QWidget * createEditor(QWidget* parent, const QStyleOptionViewItem &option,
const QModelIndex &index) const override;

void setEditorData(QWidget *editor, const QModelIndex &index) const override;
void setModelData(QWidget *editor, QAbstractItemModel *model, const QModelIndex &index) const override;

void updateEditorGeometry(QWidget *editor,
const QStyleOptionViewItem &option,
const QModelIndex &index) const override;
};

SpinBoxDelegate类中声明了几个函数,这些函数在QItemDelegate继承而来,通过重写实现我们自己定义的代理功能。
createEditor函数是在item被双击后进入编辑状态时触发的,返回一个QWidget控件用来管理编辑。
setModelData是在item被修改后触发的,将改动的内容写入model中。
setEditorData是在item被双击进入编辑状态时,将model的内容写入editor中。
updateEditorGeometry是刷新editor的矩形区域,因为随着item变大或者拉伸,它的区域也要随之刷新。

具体实现

1 创建editor, 返回一个spinbox

1
2
3
4
5
6
7
QWidget * SpinBoxDelegate::createEditor(QWidget* parent,   const QStyleOptionViewItem &option,
const QModelIndex &index) const{
QSpinBox * editor = new QSpinBox(parent);
editor->setMinimum(0);
editor->setMaximum(100);
return editor;
}

2 在编辑状态时,将model的数据写入editor

1
2
3
4
5
void SpinBoxDelegate::setEditorData(QWidget *editor, const QModelIndex &index) const {
int value = index.model()->data(index, Qt::EditRole).toInt();
QSpinBox * spinBox = static_cast<QSpinBox*>(editor);
spinBox->setValue(value);
}

3 编辑完成时将editor的内容写入model

1
2
3
4
5
6
void SpinBoxDelegate::setModelData(QWidget *editor, QAbstractItemModel *model, const QModelIndex &index) const {
QSpinBox * spinBox = static_cast<QSpinBox*>(editor);
spinBox->interpretText();
int value = spinBox->value();
model->setData(index, value, Qt::EditRole);
}

4 刷新矩形区域

1
2
3
4
5
void SpinBoxDelegate::updateEditorGeometry(QWidget *editor,
const QStyleOptionViewItem &option,
const QModelIndex &index) const {
editor->setGeometry(option.rect);
}

接下来我们在MainWindow的构造函数里创建两个model和view,我们对其中的一个view使用我们自定义的delegate

1
2
3
4
5
6
7
8
9
10
11
12
13
14
15
16
17
18
19
20
21
22
23
24
25
26
27
28
29
30
31
32
33
MainWindow::MainWindow(QWidget *parent) :
QMainWindow(parent),
ui(new Ui::MainWindow)
{
ui->setupUi(this);

QStandardItemModel * model = new QStandardItemModel(7,4,this);
for(int row=0; row < 7; row++){
for(int column = 0; column < 4; column++){
QStandardItem * item = new QStandardItem(QString("%1").arg(row*4+column));
model->setItem(row, column, item);
}
}

QTableView* _table_view = new QTableView;
_table_view->setModel(model);
setCentralWidget(_table_view);
this->resize(800,800);

QTableView* _table_view2 = new QTableView;
SpinBoxDelegate * delegate = new SpinBoxDelegate(this);
QStandardItemModel * model2 = new QStandardItemModel(7,4,this);
for(int row=0; row < 7; row++){
for(int column = 0; column < 4; column++){
QStandardItem * item = new QStandardItem(QString("%1").arg(row*4+column));
model2->setItem(row, column, item);
}
}
_table_view2->setModel(model2);
_table_view2->setItemDelegate(delegate);
_table_view2->show();
_table_view2->resize(800,800);
}

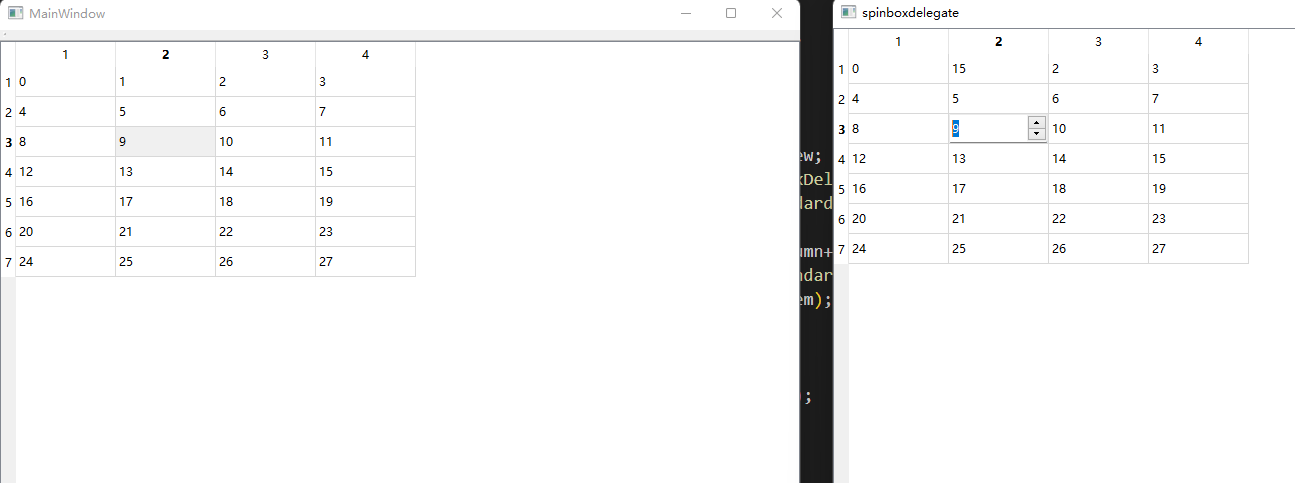
运行程序后,双击两个view的item,可以看到效果的不同
https://cdn.llfc.club/1671606628462.jpg

源码链接

源码链接
https://gitee.com/secondtonone1/qt-learning-notes