线程安全的链表

简介

前文介绍了如何基于锁实现线程安全的栈和队列结构,以及实现线程安全的查找表,但是我们上次的查找表是基于list实现的,对于锁的精度控制的不是很准确,提及了接下来会介绍精细控制的链表,用来替换查找表中的链表。这一节我们就介绍如何通过锁控制链表访问的精度。

链表

一个常见的链表应该是如下结构,有一个包含数据的数据域以及一个指向下一个节点的指针。

https://cdn.llfc.club/1701557385171.jpg

如果做一个支持多线程并发访问的链表,我们首先想到的是用一个互斥量控制整个链表,达到多线程访问时串行的效果。但是这么做精度不够,需要分化互斥量的功能。我们想到的一个办法就是每个节点都维护一个互斥量,这样能保证多个线程操作不同节点时加不同的锁,减少耦合性。

另外我们将head独立为一个虚节点,所谓虚节点就是不存储数据,只做头部标记。我们每次从头部插入只需要修将新的节点的next指针指向原来head的next指向的节点,再将head的next指针指向新的节点。

如下图

https://cdn.llfc.club/1701559209928.jpg

源码实现

我们先定义一个基本的链表节点

1
2
3
4
5
6
7
8
9
10
template<typname T>
struct node
{
std::mutex m;
std::shared_ptr<T> data;
std::unique_ptr<node> next;
node() :next(){}
node(T const& value) :
data(std::make_shared<T>(value)){}
};

1 data为智能指针,存储的是T类型的数据域。
2 next为一个unique类型的智能指针,存储的是下一个节点的地址。
3 m 为mutex,控制多线程访问的安全性。我们将mutex分别独立到各个节点中保证锁的精度问题。

接下来我们定义一个链表,初始状态包含一个head的头节点

1
2
3
4
5
6
7
8
9
10
11
12
13
14
15
16
17
18
19
20
21
22
23
24
25
26
27
28
template<typename T>
class threadsafe_list
{
struct node
{
std::mutex m;
std::shared_ptr<T> data;
std::unique_ptr<node> next;
node() :
next()
{}
node(T const& value) :
data(std::make_shared<T>(value))
{}
};

node head;
public:
threadsafe_list()
{}

~threadsafe_list()
{
}

threadsafe_list(threadsafe_list const& other) = delete;
threadsafe_list& operator=(threadsafe_list const& other) = delete;
}

我们将拷贝构造和拷贝赋值函数删除。然后链表中初始状态包含了一个头节点。
接下来我们实现析构函数,我们期望析构函数能够从头到尾的删除元素,所以先实现一个删除函数

1
2
3
4
5
6
7
8
9
10
11
12
13
14
15
16
17
18
19
20
21
22
template<typename Predicate>
void remove_if(Predicate p)
{
node* current = &head;
std::unique_lock<std::mutex> lk(head.m);
while (node* const next = current->next.get())
{
std::unique_lock<std::mutex> next_lk(next->m);
if (p(*next->data))
{
std::unique_ptr<node> old_next = std::move(current->next);
current->next = std::move(next->next);
next_lk.unlock();
}
else
{
lk.unlock();
current = next;
lk = std::move(next_lk);
}
}
}

上面的函数中,我们先取头部节点作为当前节点,然后将将当前节点加锁,只有当前节点加锁了才能访问其next指针。我们在获取next节点后也要对其加锁,这么做的好处就是保证无论是删除还是添加都从当前节点开始依次对其next节点加锁,既能保证互斥也能维护同一顺序防止死锁。

如果next节点的数据域满足谓词p的规则,则将next节点的移动赋值给old_next,随着局部作用域结束,old_next会被释放,也就达到了析构要删除节点的目的。
然后我们将next节点的next值(也就是要删除节点的下一个节点)赋值给当前节点的next指针,达到链接删除节点的下一个节点的目的。

但是我们要操作接下来的节点就需要继续锁住下一个节点,达到互斥控制的目的,锁住下个节点是通过while循环不断迭代实现的,通过next_lk达到了锁住下一个节点的目的。

如果下一个节点不满足我们p谓词函数的条件,则需要解锁当前节点,将下一个节点赋值给当前节点,并且将下一个节点的锁移动给当前节点。

如下图演示了current, next以及next->next节点之间的关系。

https://cdn.llfc.club/1701569562255%281%29.jpg

接下来我们实现析构函数

1
2
3
4
~threadsafe_list()
{
remove_if([](node const&) {return true; });
}

析构函数调用remove_if,p谓词就是一个lambda表达式,返回true。

头节点的插入工作也比较简答,将新节点的next指针赋值成头部节点的next指针指向的数据。然后将新节点赋值给头部节点的next指针即可.

1
2
3
4
5
6
7
void push_front(T const& value)
{
std::unique_ptr<node> new_node(new node(value));
std::lock_guard<std::mutex> lk(head.m);
new_node->next = std::move(head.next);
head.next = std::move(new_node);
}

但是大家要注意,插入和删除加锁的顺序要保持一致,都是从头到尾,这样能防止死锁,也能保持互斥。

假设原链表是这样的

https://cdn.llfc.club/1701570406738.jpg

调用push_front之后是这样的

https://cdn.llfc.club/1701570489799.jpg

接下来是根据谓词p查找对应的节点数据

1
2
3
4
5
6
7
8
9
10
11
12
13
14
15
16
17
18
template<typename Predicate>
std::shared_ptr<T> find_first_if(Predicate p)
{
node* current = &head;
std::unique_lock<std::mutex> lk(head.m);
while (node* const next = current->next.get())
{
std::unique_lock<std::mutex> next_lk(next->m);
lk.unlock();
if (p(*next->data))
{
return next->data;
}
current = next;
lk = std::move(next_lk);
}
return std::shared_ptr<T>();
}

find_first_if查找到第一个满足条件的节点就返回。查找的步骤也是先对当前节点加锁,判断当前节点的next节点是否为空,不为空则获取下一个节点为next,我们对next加锁,依次锁住当前节点和下一个节点,判断下一个节点是否满足谓词p,如果满足条件则返回next节点的数据即可,更新下一个节点为当前节点,下一个节点的锁next_lk更新给lk,以此锁住新的当前节点,再依次类推遍历直到找到满足条件的节点为止。

那么便利所有节点的接口就可以根据上述思路实现了

1
2
3
4
5
6
7
8
9
10
11
12
13
14
template<typename Function>
void for_each(Function f)
{
node* current = &head;
std::unique_lock<std::mutex> lk(head.m);
while (node* const next = current->next.get())
{
std::unique_lock<std::mutex> next_lk(next->m);
lk.unlock();
f(*next->data);
current = next;
lk = std::move(next_lk);
}
}

如果我们按照如下测试函数测试上面的接口,

1
2
3
4
5
6
7
8
9
10
11
12
13
14
15
16
17
18
19
20
21
22
23
24
25
26
27
28
29
30
31
32
33
34
35
36
37
38
39
40
41
std::set<int> removeSet;
void TestThreadSafeList()
{

threadsafe_list<MyClass> thread_safe_list;
std::thread t1([&]()
{
for(unsigned int i = 0; i < 100; i++)
{
MyClass mc(i);
thread_safe_list.push_front(mc);
}

});


std::thread t2([&]()
{
for (unsigned int i = 0; i < 100; )
{

auto find_res = thread_safe_list.find_first_if([&]( auto & mc)
{
return mc.GetData() == i;
});

if(find_res == nullptr)
{
std::this_thread::sleep_for(std::chrono::milliseconds(10));
continue;
}

removeSet.insert(i);
i++;
}
});

t1.join();
t2.join();

}

将删除的数据放入集合set,最后打印set会发现数据全都被删除了。

尾部插入

C++ 并发编程中提到了留给读者去实现尾部插入,我们实现尾部插入需要维护一个尾部节点,这个尾部节点我们初始的时候指向head,当插入元素后,尾部节点指向了最后一个节点的地址。

考虑有多个线程并发进行尾部插入,所以要让这些线程互斥,我们需要一个互斥量last_ptr_mtx保证线程穿行,last_node_ptr表示正在操作尾部节点,以此来让多个线程并发操作尾部节点时达到互斥。比如我们的代码可以实现如下

1
2
3
4
5
6
7
8
9
10
11
void push_back(T const& value) {
//防止于push_head同时进行
//并且保证头部或者删除节点更新last_node_ptr唯一, 所以同时加锁
std::unique_ptr<node_d> new_node(new node_d(value));
std::unique_lock<std::mutex> lk(last_node_ptr->m);
std::unique_lock<std::mutex> last_lk(last_ptr_mtx);
//原来的最后节点的下一个节点指向新生成的节点
last_node_ptr->next = std::move(new_node);
//将最后一个节点后移
last_node_ptr = last_node_ptr->next.get();
}

头部插入我们也作一些修改

1
2
3
4
5
6
7
8
9
10
11
12
void push_front(T const& value)
{
std::unique_ptr<node_d> new_node(new node_d(value));
std::lock_guard<std::mutex> lk(head.m);
new_node->next = std::move(head.next);
head.next = std::move(new_node);
//更新最后一个节点
if (head.next->next == nullptr) {
std::lock_guard<std::mutex> last_lk(last_ptr_mtx);
last_node_ptr = head.next.get();
}
}

push_front函数将新节点放入head节点的后边,如果head节点后面没有节点,此时插入新节点后,新的节点就变为尾部节点了。所以判断新插入节点的next为nullptr,那么这个节点就是最后节点,所以要对last_ptr_mtx加锁,更新last_node_ptr值。

我们考虑一下,如果一个线程push_back和另一个线程push_front是否会出现问题?其实两个线程资源竞争的时候仅在队列为空的时候,这时无论push_back还是push_front都会操作head节点,以及更新_last_node_ptr值,但是我们的顺序是先锁住前一个节点,再将当前节点更新为前一个节点的下一个节点。那么从这个角度来说,push_back和push_front不会有线程安全问题。

接下来实现删除操作

1
2
3
4
5
6
7
8
9
10
11
12
13
14
15
16
17
18
19
20
21
22
23
24
25
26
27
28
29
30
31
32
33
34
35
36
37
38
39
40
41
42
43
44
45
46
47
48
49
50
51
52
53
54
55
56
57
template<typename Predicate>
void remove_if(Predicate p)
{
node_d* current = &head;
std::unique_lock<std::mutex> lk(head.m);
while (node_d* const next = current->next.get())
{
std::unique_lock<std::mutex> next_lk(next->m);
if (p(*next->data))
{
std::unique_ptr<node_d> old_next = std::move(current->next);
current->next = std::move(next->next);
//判断删除的是否为最后一个节点
if (current->next == nullptr) {
std::lock_guard<std::mutex> last_lk(last_ptr_mtx);
last_node_ptr = &head;
}
next_lk.unlock();
}
else
{
lk.unlock();
current = next;
lk = std::move(next_lk);
}
}
}

template<typename Predicate>
bool remove_first(Predicate p)
{
node_d* current = &head;
std::unique_lock<std::mutex> lk(head.m);
while (node_d* const next = current->next.get())
{
std::unique_lock<std::mutex> next_lk(next->m);
if (p(*next->data))
{
std::unique_ptr<node_d> old_next = std::move(current->next);
current->next = std::move(next->next);
//判断删除的是否为最后一个节点
if (current->next == nullptr) {
std::lock_guard<std::mutex> last_lk(last_ptr_mtx);
last_node_ptr = &head;
}
next_lk.unlock();

return true;
}

lk.unlock();
current = next;
lk = std::move(next_lk);
}

return false;
}

删除的时候,如果将当前节点的下一个节点满足删除条件,则将其移动到old_next节点里。old_next会随着作用域结束析构。

然后将删除节点的下一个节点赋值给当前节点的next指针,这样就达到了当前节点的next指针指向了删除节点的下一个节点的目的,以此达到了删除效果。

我们思考删除操作和push_back是否会产生线程竞争,答案是会的,比如下面这种情况
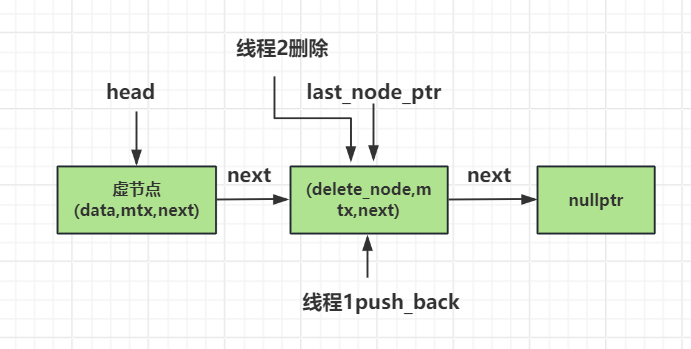
https://cdn.llfc.club/1701577481423.jpg

线程1想要push_back插入节点,他会用到last_node_ptr,也会更新last_node_ptr。

而线程2想要删除最后一个节点,会更新last_node_ptr的值。

尽管我们通过node内部的互斥量可以保证两个线程在同一时刻仅能有一个线程操作最后一个节点,或者删除或者添加。

但是,假设线程2先执行删除操作,节点更新并且更新last_node_ptr的值,而此时线程1因为之前无法抢占最后一个节点(last_node_ptr)自带的互斥量所以挂起,当线程2执行完后,线程1才开始继续执行,但是此时last_node_ptr已经变化了,而线程1可能还用的是旧的last_node_ptr的值,导致插入数据失败(很可能崩溃或者插入到一个分叉的链表)。

如果将push_back修改为先对last_ptr_mtx加锁,这样就能保证一个线程修改last_node_ptr会被另一个线程看到。比如下面这样

1
2
3
4
5
6
7
8
9
10
11
void push_back(T const& value) {
//防止于push_head同时进行
//并且保证头部或者删除节点更新last_node_ptr唯一, 所以同时加锁
std::unique_ptr<node_d> new_node(new node_d(value));
std::unique_lock<std::mutex> last_lk(last_ptr_mtx);
std::unique_lock<std::mutex> lk(last_node_ptr->m);
//原来的最后节点的下一个节点指向新生成的节点
last_node_ptr->next = std::move(new_node);
//将最后一个节点后移
last_node_ptr = last_node_ptr->next.get();
}

但是我们这样会发现删除的时候先对node加锁,再对last_ptr_mtx加锁,而push_back的时候先对last_ptr_mtx加锁,再对node加锁。会导致死锁!

所以我们将push_back修改为对node和last_ptr_mtx加锁,那么就能解决上面的问题。因为push_back必须要等到两个互斥量都竞争成功才操作,所以达到了删除和push_back串行的效果。

改进后的push_back是如下这个样子

1
2
3
4
5
6
7
8
9
10
11
12
void push_back(T const& value) {
//防止于push_head同时进行
//并且保证头部或者删除节点更新last_node_ptr唯一, 所以同时加锁
std::unique_ptr<node_d> new_node(new node_d(value));
std::lock(last_node_ptr->m, last_ptr_mtx);
std::unique_lock<std::mutex> lk(last_node_ptr->m, std::adopt_lock);
std::unique_lock<std::mutex> last_lk(last_ptr_mtx, std::adopt_lock);
//原来的最后节点的下一个节点指向新生成的节点
last_node_ptr->next = std::move(new_node);
//将最后一个节点后移
last_node_ptr = last_node_ptr->next.get();
}

我们可以实现如下函数测试,启动三个线程,
线程1执行push_front将0到20000放入链表。
线程2执行push_back将20000到40000的数据放入链表。
线程3执行删除操作,将数据从0到40000删除。
最后我们打印链表为空,验证准确性。

1
2
3
4
5
6
7
8
9
10
11
12
13
14
15
16
17
18
19
20
21
22
23
24
25
26
27
28
29
30
31
32
33
34
35
36
37
38
39
40
41
42
43
44
45
46
47
48
49
50
51
52
53
54
55
void MultiThreadPush()
{
double_push_list<MyClass> thread_safe_list;

std::thread t1([&]()
{
for (int i = 0; i < 20000; i++)
{
MyClass mc(i);
thread_safe_list.push_front(mc);
std::cout << "push front " << i << " success" << std::endl;
}
});

std::thread t2([&]()
{
for (int i = 20000; i < 40000; i++)
{
MyClass mc(i);
thread_safe_list.push_back(mc);
std::cout << "push back " << i << " success" << std::endl;
}
});

std::thread t3([&]()
{
for(int i = 0; i < 40000; )
{
bool rmv_res = thread_safe_list.remove_first([&](const MyClass& mc)
{
return mc.GetData() == i;
});

if(!rmv_res)
{
std::this_thread::sleep_for(std::chrono::milliseconds(10));
continue;
}

i++;
}
});

t1.join();
t2.join();
t3.join();

std::cout << "begin for each print...." << std::endl;
thread_safe_list.for_each([](const MyClass& mc)
{
std::cout << "for each print " << mc << std::endl;
});
std::cout << "end for each print...." << std::endl;
}

最后程序输出

1
2
3
4
5
6
7
8
push back 39995 success
push back 39996 success
push back 39997 success
push back 39998 success
push back 39999 success
begin for each print....
end for each print....
Hello World!

总结

本文介绍了多线程并发访问情况下线程安全的链表实现方式

源码链接:

https://gitee.com/secondtonone1/boostasio-learn/tree/master/concurrent/day16-threadsafelist

视频链接

https://space.bilibili.com/271469206/channel/collectiondetail?sid=1623290