邮箱验证服务联调
我们启动GateServer和VarifyServer
我们启动客户端,点击注册按钮进入注册界面,输入邮箱并且点击获取验证码
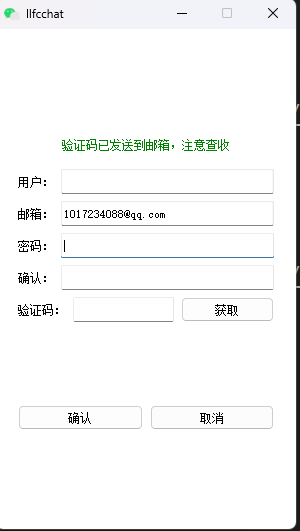
GateServer收到Client发送的请求后,会调用grpc 服务 访问VarifyServer,VarifyServer会随机生成验证码,并且调用邮箱模块发送邮件给指定邮箱。而且把发送的结果给GateServer,GateServer再将消息回传给客户端。
设置验证码过期
我们的验证码是要设置过期的,可以用redis管理过期的验证码自动删除,key为邮箱,value为验证码,过期时间为3min。
windows 安装redis服务
windows 版本下载地址:
https://github.com/tporadowski/redis/releases
下载速度慢可以去我的网盘
链接: https://pan.baidu.com/s/1v_foHZLvBeJQMePSGnp4Ow?pwd=yid3 提取码: yid3
下载完成后解压

修改redis.windows.conf, 并且修改端口
1 | port 6380 |
找到requirepass foobared,下面添加requirepass
1 |
|
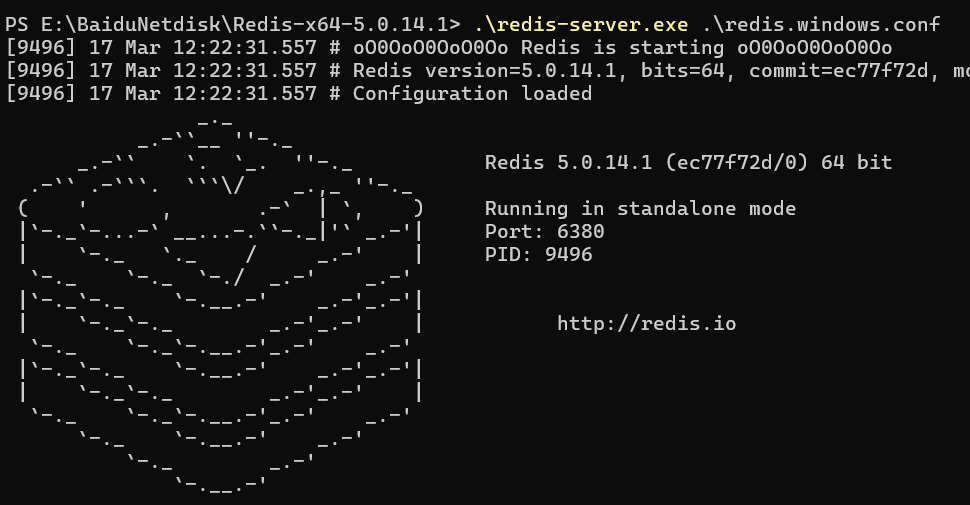
启动redis 服务器 .\redis-server.exe .\redis.windows.conf
启动客户端 .\redis-cli.exe -p 6380, 输入密码登录成功

Linux 安装redis服务
Linux安装容器后,直接用容器启动redis
1 | docker run -d --name llfc-redis -p 6380:6379 redis --requirepass "123456" |
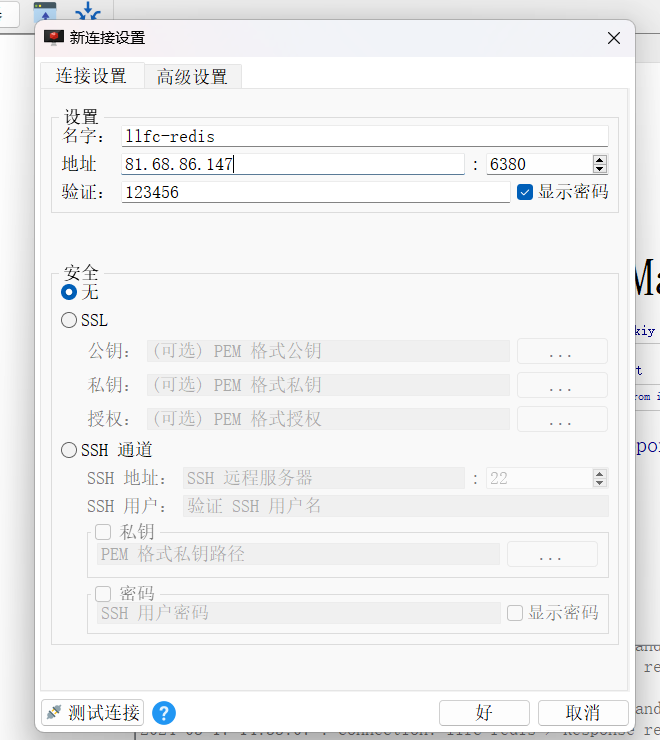
为了方便测试能否链接以及以后查看数据,大家可以下载redis desktop manager
下载速度慢可以去我的网盘
链接: https://pan.baidu.com/s/1v_foHZLvBeJQMePSGnp4Ow?pwd=yid3 提取码: yid3
下载后安装
设置好ip和密码,点击测试连接连通就成功了
widows编译和配置redis
Linux的redis库直接编译安装即可,windows反而麻烦一些,我们先阐述windows环境如何配置redis库, C++ 的redis库有很多种,最常用的有hredis和redis-plus-plus. 我们用redis-plus-plus. 这里介绍一种简单的安装方式—vcpkg
先安装vcpkg, 源码地址
https://github.com/microsoft/vcpkg/releases
下载源码后
windows版本redis下载地址
https://github.com/microsoftarchive/redis
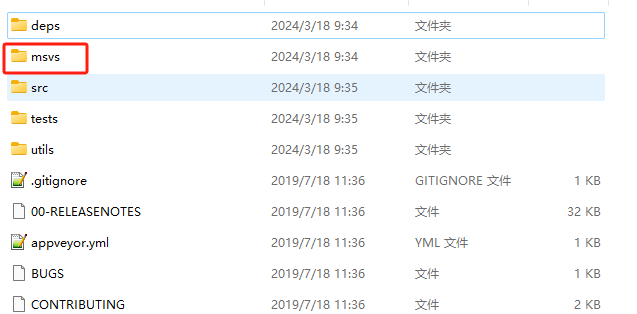
因为是源码,所以进入msvc目录
用visual studio打开sln文件,弹出升级窗口, 我的是vs2019所以升级到142
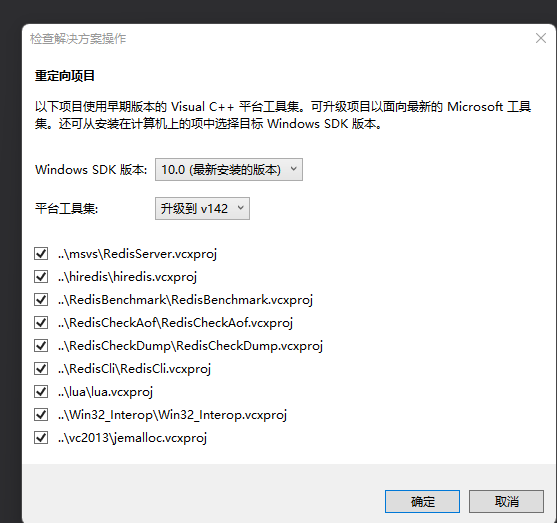
只需要生成hiredis工程和Win32_Interop工程即可,分别点击生成,生成hiredis.lib和Win32_Interop.lib即可
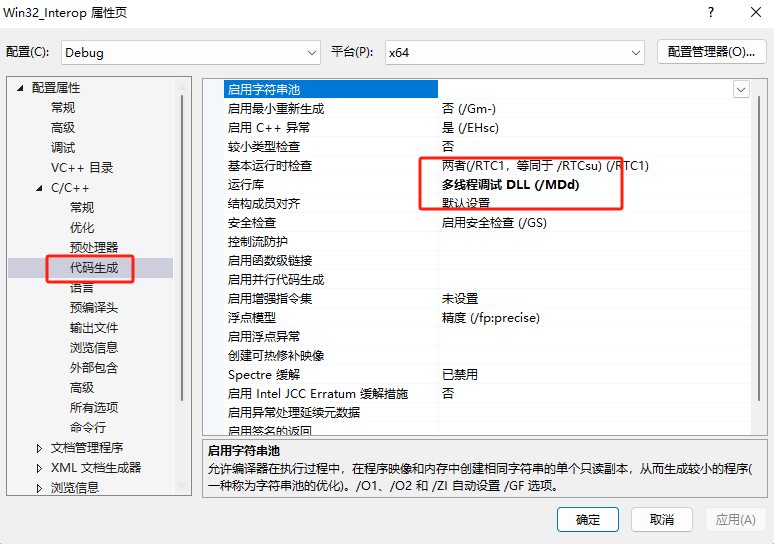
右键两个工程的属性,代码生成里选择运行时库加载模式为MDD(Debug模式动态运行加载),为了兼容我们其他的库,其他的库也是MDD模式
编译Win32_Interop.lib时报错, system_error不是std成员,
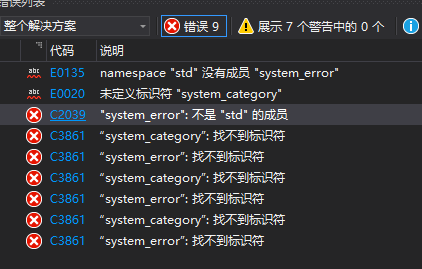
解决办法为在Win32_variadicFunctor.cpp和Win32_FDAPI.cpp添加#include <system_error>,再右键生成成功
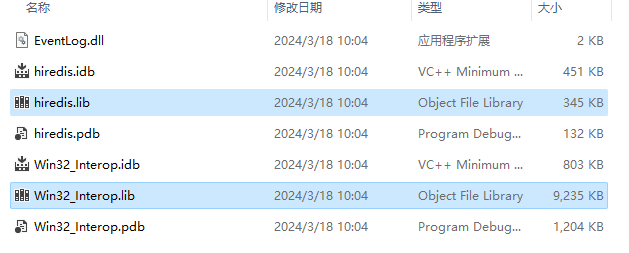
将hiredis.lib和Win32_Interop.lib拷贝到D:\cppsoft\reids\lib
将redis-3.0\deps和redis-3.0\src文件夹拷贝到D:\cppsoft\reids
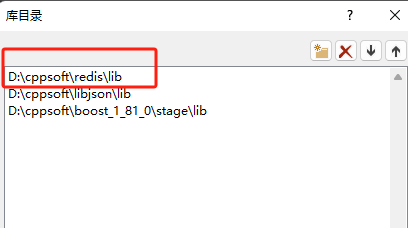
然后我们在visual studio中配置VC++ 包含目录

配置VC++库目录
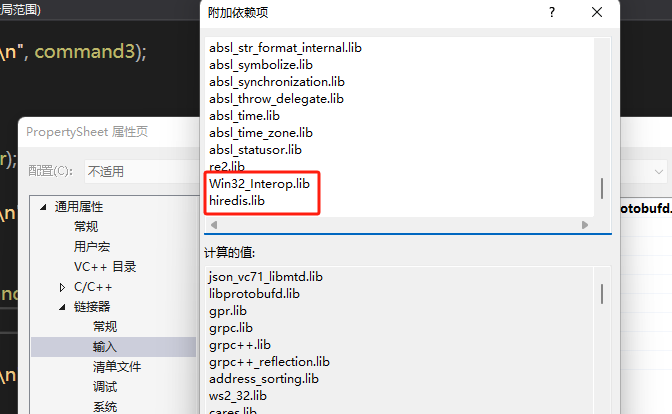
然后在链接器->输入->附加依赖项中添加
代码测试
我们需要写代码测试库配置的情况
1 | void TestRedis() { |
在主函数中调用TestRedis,编译项目时发现编译失败,提示
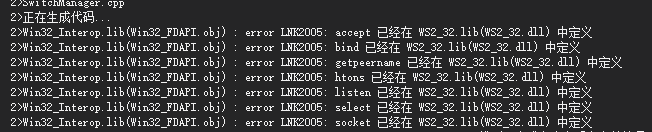
在同时使用Redis连接和socket连接时,遇到了Win32_Interop.lib和WS2_32.lib冲突的问题, 因为我们底层用了socket作为网络通信,也用redis,导致两个库冲突。
引起原因主要是Redis库Win32_FDAPI.cpp有重新定义了socket的一些方法引起来冲突
1 | extern "C" { |
去掉Redis库里面的socket的函数的重定义,把所有使用这些方法的地方都改为下面对应的函数
1 | int FDAPI_accept(int rfd, struct sockaddr *addr, socklen_t *addrlen); |
考虑大家修改起来很麻烦,可以下载我的代码
https://gitee.com/secondtonone1/windows-redis
再次编译生成hredis和Win32_Interop的lib库,重新配置下,项目再次编译就通过了。
封装redis操作类
因为hredis提供的操作太别扭了,我们手动封装redis操作类,简化调用流程。
封装的类叫RedisMgr,它是个单例类并且可接受回调,按照我们之前的风格
1 | class RedisMgr: public Singleton<RedisMgr>, |
连接操作
1 | bool RedisMgr::Connect(const std::string &host, int port) |
获取key对应的value
1 | bool RedisMgr::Get(const std::string &key, std::string& value) |
设置key和value
1 | bool RedisMgr::Set(const std::string &key, const std::string &value){ |
密码认证
1 | bool RedisMgr::Auth(const std::string &password) |
左侧push
1 | bool RedisMgr::LPush(const std::string &key, const std::string &value) |
左侧pop
1 | bool RedisMgr::LPop(const std::string &key, std::string& value){ |
右侧push
1 | bool RedisMgr::RPush(const std::string& key, const std::string& value) { |
右侧pop
1 | bool RedisMgr::RPop(const std::string& key, std::string& value) { |
HSet操作
1 | bool RedisMgr::HSet(const std::string &key, const std::string &hkey, const std::string &value) { |
HGet操作
1 | std::string RedisMgr::HGet(const std::string &key, const std::string &hkey) |
Del 操作
1 | bool RedisMgr::Del(const std::string &key) |
判断键值是否存在
1 | bool RedisMgr::ExistsKey(const std::string &key) |
关闭
1 | void RedisMgr::Close() |
测试用例
1 | void TestRedisMgr() { |
封装redis连接池
1 | class RedisConPool { |
RedisMgr构造函数中初始化pool连接池
1 | RedisMgr::RedisMgr() { |
在析构函数中回收资源
1 | RedisMgr::~RedisMgr() { |
在使用的时候改为从Pool中获取链接
1 | bool RedisMgr::Get(const std::string& key, std::string& value) |
总结
本节告诉大家如何搭建redis服务,linux和windows环境的,并且编译了windows版本的hredis库,解决了链接错误,而且封装了RedisMgr管理类。
并实现了测试用例,大家感兴趣可以测试一下。下一节实现VarifyServer访问的redis功能。