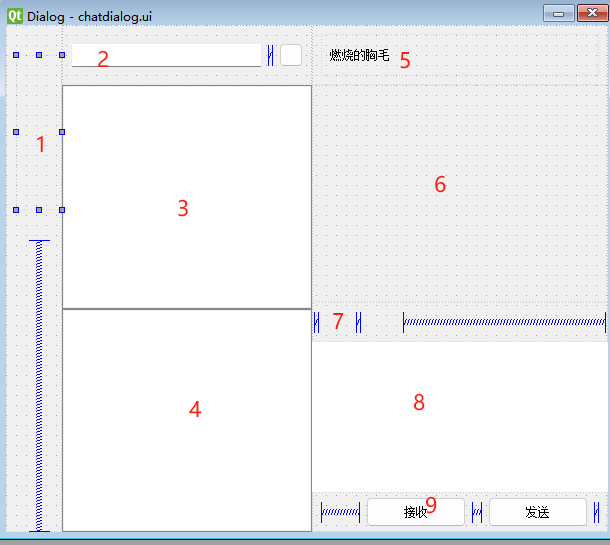
恋恋风辰的个人博客


  • Home

  • Archives

  • Categories

  • Tags

  • Search

C++ 全栈聊天项目(15) 实现自定义可点击Label以及定时按钮

Posted on 2024-08-31 | In C++聊天项目

客户端TCP管理者

因为聊天服务要维持一个长链接,方便服务器和客户端双向通信,那么就需要一个TCPMgr来管理TCP连接。

而实际开发中网络模块一般以单例模式使用,那我们就基于单例基类和可被分享类创建一个自定义的TcpMgr类,在QT工程中新建TcpMgr类,会生成头文件和源文件,头文件修改如下

1
2
3
4
5
6
7
8
9
10
11
12
13
14
15
16
17
18
19
20
21
22
23
24
25
26
27
28
#ifndef TCPMGR_H
#define TCPMGR_H
#include <QTcpSocket>
#include "singleton.h"
#include "global.h"
class TcpMgr:public QObject, public Singleton<TcpMgr>,
public std::enable_shared_from_this<TcpMgr>
{
Q_OBJECT
public:
TcpMgr();
private:
QTcpSocket _socket;
QString _host;
uint16_t _port;
QByteArray _buffer;
bool _b_recv_pending;
quint16 _message_id;
quint16 _message_len;
public slots:
void slot_tcp_connect(ServerInfo);
void slot_send_data(ReqId reqId, QString data);
signals:
void sig_con_success(bool bsuccess);
void sig_send_data(ReqId reqId, QString data);
};

#endif // TCPMGR_H

接下来我们在构造函数中连接网络请求的各种信号

1
2
3
4
5
6
7
8
9
10
11
12
13
14
15
16
17
18
19
20
21
22
23
24
25
26
27
28
29
30
31
32
33
34
35
36
37
38
39
40
41
42
43
44
45
46
47
48
49
50
51
52
53
54
55
56
57
58
59
60
61
62
63
64
65
66
67
68
69
70
71
72
73
74
75
76
77
78
79
80
81
82
83
84
85
86
87
88
89
90
91
92
93
TcpMgr::TcpMgr():_host(""),_port(0),_b_recv_pending(false),_message_id(0),_message_len(0)
{
QObject::connect(&_socket, &QTcpSocket::connected, [&]() {
qDebug() << "Connected to server!";
// 连接建立后发送消息
emit sig_con_success(true);
});

QObject::connect(&_socket, &QTcpSocket::readyRead, [&]() {
// 当有数据可读时,读取所有数据
// 读取所有数据并追加到缓冲区
_buffer.append(_socket.readAll());

QDataStream stream(&_buffer, QIODevice::ReadOnly);
stream.setVersion(QDataStream::Qt_5_0);

forever {
//先解析头部
if(!_b_recv_pending){
// 检查缓冲区中的数据是否足够解析出一个消息头(消息ID + 消息长度)
if (_buffer.size() < static_cast<int>(sizeof(quint16) * 2)) {
return; // 数据不够,等待更多数据
}

// 预读取消息ID和消息长度,但不从缓冲区中移除
stream >> _message_id >> _message_len;

//将buffer 中的前四个字节移除
_buffer = _buffer.mid(sizeof(quint16) * 2);

// 输出读取的数据
qDebug() << "Message ID:" << _message_id << ", Length:" << _message_len;

}

//buffer剩余长读是否满足消息体长度,不满足则退出继续等待接受
if(_buffer.size() < _message_len){
_b_recv_pending = true;
return;
}

_b_recv_pending = false;
// 读取消息体
QByteArray messageBody = _buffer.mid(0, _message_len);
qDebug() << "receive body msg is " << messageBody ;

_buffer = _buffer.mid(_message_len);
}

});

//5.15 之后版本
// QObject::connect(&_socket, QOverload<QAbstractSocket::SocketError>::of(&QTcpSocket::errorOccurred), [&](QAbstractSocket::SocketError socketError) {
// Q_UNUSED(socketError)
// qDebug() << "Error:" << _socket.errorString();
// });

// 处理错误(适用于Qt 5.15之前的版本)
QObject::connect(&_socket, static_cast<void (QTcpSocket::*)(QTcpSocket::SocketError)>(&QTcpSocket::error),
[&](QTcpSocket::SocketError socketError) {
qDebug() << "Error:" << _socket.errorString() ;
switch (socketError) {
case QTcpSocket::ConnectionRefusedError:
qDebug() << "Connection Refused!";
emit sig_con_success(false);
break;
case QTcpSocket::RemoteHostClosedError:
qDebug() << "Remote Host Closed Connection!";
break;
case QTcpSocket::HostNotFoundError:
qDebug() << "Host Not Found!";
emit sig_con_success(false);
break;
case QTcpSocket::SocketTimeoutError:
qDebug() << "Connection Timeout!";
emit sig_con_success(false);
break;
case QTcpSocket::NetworkError:
qDebug() << "Network Error!";
break;
default:
qDebug() << "Other Error!";
break;
}
});

// 处理连接断开
QObject::connect(&_socket, &QTcpSocket::disconnected, [&]() {
qDebug() << "Disconnected from server.";
});

QObject::connect(this, &TcpMgr::sig_send_data, this, &TcpMgr::slot_send_data);
}

连接对端服务器

1
2
3
4
5
6
7
8
9
void TcpMgr::slot_tcp_connect(ServerInfo si)
{
qDebug()<< "receive tcp connect signal";
// 尝试连接到服务器
qDebug() << "Connecting to server...";
_host = si.Host;
_port = static_cast<uint16_t>(si.Port.toUInt());
_socket.connectToHost(si.Host, _port);
}

因为客户端发送数据可能在任何线程,为了保证线程安全,我们在要发送数据时发送TcpMgr的sig_send_data信号,然后实现接受这个信号的槽函数

1
2
3
4
5
6
7
8
9
10
11
12
13
14
15
16
17
18
19
20
21
22
23
24
25
26
void TcpMgr::slot_send_data(ReqId reqId, QString data)
{
uint16_t id = reqId;

// 将字符串转换为UTF-8编码的字节数组
QByteArray dataBytes = data.toUtf8();

// 计算长度(使用网络字节序转换)
quint16 len = static_cast<quint16>(data.size());

// 创建一个QByteArray用于存储要发送的所有数据
QByteArray block;
QDataStream out(&block, QIODevice::WriteOnly);

// 设置数据流使用网络字节序
out.setByteOrder(QDataStream::BigEndian);

// 写入ID和长度
out << id << len;

// 添加字符串数据
block.append(data);

// 发送数据
_socket.write(block);
}

然后修改LoginDialog中的initHandlers中的收到服务器登陆回复后的逻辑,这里发送信号准备发起长链接到聊天服务器

1
2
3
4
5
6
7
8
9
10
11
12
13
14
15
16
17
18
19
20
21
22
23
24
25
26
void LoginDialog::initHttpHandlers()
{
//注册获取登录回包逻辑
_handlers.insert(ReqId::ID_LOGIN_USER, [this](QJsonObject jsonObj){
int error = jsonObj["error"].toInt();
if(error != ErrorCodes::SUCCESS){
showTip(tr("参数错误"),false);
enableBtn(true);
return;
}
auto user = jsonObj["user"].toString();

//发送信号通知tcpMgr发送长链接
ServerInfo si;
si.Uid = jsonObj["uid"].toInt();
si.Host = jsonObj["host"].toString();
si.Port = jsonObj["port"].toString();
si.Token = jsonObj["token"].toString();

_uid = si.Uid;
_token = si.Token;
qDebug()<< "user is " << user << " uid is " << si.Uid <<" host is "
<< si.Host << " Port is " << si.Port << " Token is " << si.Token;
emit sig_connect_tcp(si);
});
}

在LoginDialog构造函数中连接信号,包括建立tcp连接,以及收到TcpMgr连接成功或者失败的信号处理

1
2
3
4
//连接tcp连接请求的信号和槽函数
connect(this, &LoginDialog::sig_connect_tcp, TcpMgr::GetInstance().get(), &TcpMgr::slot_tcp_connect);
//连接tcp管理者发出的连接成功信号
connect(TcpMgr::GetInstance().get(), &TcpMgr::sig_con_success, this, &LoginDialog::slot_tcp_con_finish);

LoginDialog收到连接结果的槽函数

1
2
3
4
5
6
7
8
9
10
11
12
13
14
15
16
17
18
19
20
21
void LoginDialog::slot_tcp_con_finish(bool bsuccess)
{

if(bsuccess){
showTip(tr("聊天服务连接成功,正在登录..."),true);
QJsonObject jsonObj;
jsonObj["uid"] = _uid;
jsonObj["token"] = _token;

QJsonDocument doc(jsonObj);
QString jsonString = doc.toJson(QJsonDocument::Indented);

//发送tcp请求给chat server
TcpMgr::GetInstance()->sig_send_data(ReqId::ID_CHAT_LOGIN, jsonString);

}else{
showTip(tr("网络异常"),false);
enableBtn(true);
}

}

在这个槽函数中我们发送了sig_send_data信号并且通知TcpMgr将数据发送给服务器。

这样TcpMgr发送完数据收到服务器的回复后就可以进一步根据解析出来的信息处理不同的情况了。我们先到此为止。具体如何处理后续再讲。

C++ 全栈聊天项目(16) 重置密码功能

Posted on 2024-08-31 | In C++聊天项目

ChatServer

一个TCP服务器必然会有连接的接收,维持,收发数据等逻辑。那我们就要基于asio完成这个服务的搭建。主服务是这个样子的

1
2
3
4
5
6
7
8
9
10
11
12
13
14
15
16
17
18
19
20
21
22
23
24
25
26
27
28
29
30
31
32
#include "LogicSystem.h"
#include <csignal>
#include <thread>
#include <mutex>
#include "AsioIOServicePool.h"
#include "CServer.h"
#include "ConfigMgr.h"
using namespace std;
bool bstop = false;
std::condition_variable cond_quit;
std::mutex mutex_quit;

int main()
{
try {
auto &cfg = ConfigMgr::Inst();
auto pool = AsioIOServicePool::GetInstance();
boost::asio::io_context io_context;
boost::asio::signal_set signals(io_context, SIGINT, SIGTERM);
signals.async_wait([&io_context, pool](auto, auto) {
io_context.stop();
pool->Stop();
});
auto port_str = cfg["SelfServer"]["Port"];
CServer s(io_context, atoi(port_str.c_str()));
io_context.run();
}
catch (std::exception& e) {
std::cerr << "Exception: " << e.what() << endl;
}

}

CServer类的声明

1
2
3
4
5
6
7
8
9
10
11
12
13
14
15
16
17
18
19
20
21
22
#include <boost/asio.hpp>
#include "CSession.h"
#include <memory.h>
#include <map>
#include <mutex>
using namespace std;
using boost::asio::ip::tcp;
class CServer
{
public:
CServer(boost::asio::io_context& io_context, short port);
~CServer();
void ClearSession(std::string);
private:
void HandleAccept(shared_ptr<CSession>, const boost::system::error_code & error);
void StartAccept();
boost::asio::io_context &_io_context;
short _port;
tcp::acceptor _acceptor;
std::map<std::string, shared_ptr<CSession>> _sessions;
std::mutex _mutex;
};

构造函数中监听对方连接

1
2
3
4
5
6
CServer::CServer(boost::asio::io_context& io_context, short port):_io_context(io_context), _port(port),
_acceptor(io_context, tcp::endpoint(tcp::v4(),port))
{
cout << "Server start success, listen on port : " << _port << endl;
StartAccept();
}

接受连接的函数

1
2
3
4
5
void CServer::StartAccept() {
auto &io_context = AsioIOServicePool::GetInstance()->GetIOService();
shared_ptr<CSession> new_session = make_shared<CSession>(io_context, this);
_acceptor.async_accept(new_session->GetSocket(), std::bind(&CServer::HandleAccept, this, new_session, placeholders::_1));
}

AsioIOServicePool

从AsioIOServicePool中返回一个可用的iocontext构造Session,然后将接受的新链接的socket写入这个Session保管。

AsioIOServicePool已经在前面讲解很多次了,它的声明如下

1
2
3
4
5
6
7
8
9
10
11
12
13
14
15
16
17
18
19
20
21
22
23
#include <vector>
#include <boost/asio.hpp>
#include "Singleton.h"
class AsioIOServicePool:public Singleton<AsioIOServicePool>
{
friend Singleton<AsioIOServicePool>;
public:
using IOService = boost::asio::io_context;
using Work = boost::asio::io_context::work;
using WorkPtr = std::unique_ptr<Work>;
~AsioIOServicePool();
AsioIOServicePool(const AsioIOServicePool&) = delete;
AsioIOServicePool& operator=(const AsioIOServicePool&) = delete;
// 使用 round-robin 的方式返回一个 io_service
boost::asio::io_context& GetIOService();
void Stop();
private:
AsioIOServicePool(std::size_t size = std::thread::hardware_concurrency());
std::vector<IOService> _ioServices;
std::vector<WorkPtr> _works;
std::vector<std::thread> _threads;
std::size_t _nextIOService;
};

AsioIOServicePool具体实现

1
2
3
4
5
6
7
8
9
10
11
12
13
14
15
16
17
18
19
20
21
22
23
24
25
26
27
28
29
30
31
32
33
34
35
36
37
38
39
40
41
42
#include "AsioIOServicePool.h"
#include <iostream>
using namespace std;
AsioIOServicePool::AsioIOServicePool(std::size_t size):_ioServices(size),
_works(size), _nextIOService(0){
for (std::size_t i = 0; i < size; ++i) {
_works[i] = std::unique_ptr<Work>(new Work(_ioServices[i]));
}

//遍历多个ioservice,创建多个线程,每个线程内部启动ioservice
for (std::size_t i = 0; i < _ioServices.size(); ++i) {
_threads.emplace_back([this, i]() {
_ioServices[i].run();
});
}
}

AsioIOServicePool::~AsioIOServicePool() {
std::cout << "AsioIOServicePool destruct" << endl;
}

boost::asio::io_context& AsioIOServicePool::GetIOService() {
auto& service = _ioServices[_nextIOService++];
if (_nextIOService == _ioServices.size()) {
_nextIOService = 0;
}
return service;
}

void AsioIOServicePool::Stop(){
//因为仅仅执行work.reset并不能让iocontext从run的状态中退出
//当iocontext已经绑定了读或写的监听事件后,还需要手动stop该服务。
for (auto& work : _works) {
//把服务先停止
work->get_io_context().stop();
work.reset();
}

for (auto& t : _threads) {
t.join();
}
}

CServer的处理连接逻辑

1
2
3
4
5
6
7
8
9
10
11
12
void CServer::HandleAccept(shared_ptr<CSession> new_session, const boost::system::error_code& error){
if (!error) {
new_session->Start();
lock_guard<mutex> lock(_mutex);
_sessions.insert(make_pair(new_session->GetUuid(), new_session));
}
else {
cout << "session accept failed, error is " << error.what() << endl;
}

StartAccept();
}

Session层

上面的逻辑接受新链接后执行Start函数,新链接接受数据,然后Server继续监听新的连接

1
2
3
void CSession::Start(){
AsyncReadHead(HEAD_TOTAL_LEN);
}

先读取头部数据

1
2
3
4
5
6
7
8
9
10
11
12
13
14
15
16
17
18
19
20
21
22
23
24
25
26
27
28
29
30
31
32
33
34
35
36
37
38
39
40
41
42
43
44
45
46
47
48
49
50
51
52
53
54
55
56
void CSession::AsyncReadHead(int total_len)
{
auto self = shared_from_this();
asyncReadFull(HEAD_TOTAL_LEN, [self, this](const boost::system::error_code& ec, std::size_t bytes_transfered) {
try {
if (ec) {
std::cout << "handle read failed, error is " << ec.what() << endl;
Close();
_server->ClearSession(_uuid);
return;
}

if (bytes_transfered < HEAD_TOTAL_LEN) {
std::cout << "read length not match, read [" << bytes_transfered << "] , total ["
<< HEAD_TOTAL_LEN << "]" << endl;
Close();
_server->ClearSession(_uuid);
return;
}

_recv_head_node->Clear();
memcpy(_recv_head_node->_data, _data, bytes_transfered);

//获取头部MSGID数据
short msg_id = 0;
memcpy(&msg_id, _recv_head_node->_data, HEAD_ID_LEN);
//网络字节序转化为本地字节序
msg_id = boost::asio::detail::socket_ops::network_to_host_short(msg_id);
std::cout << "msg_id is " << msg_id << endl;
//id非法
if (msg_id > MAX_LENGTH) {
std::cout << "invalid msg_id is " << msg_id << endl;
_server->ClearSession(_uuid);
return;
}
short msg_len = 0;
memcpy(&msg_len, _recv_head_node->_data + HEAD_ID_LEN, HEAD_DATA_LEN);
//网络字节序转化为本地字节序
msg_len = boost::asio::detail::socket_ops::network_to_host_short(msg_len);
std::cout << "msg_len is " << msg_len << endl;

//id非法
if (msg_len > MAX_LENGTH) {
std::cout << "invalid data length is " << msg_len << endl;
_server->ClearSession(_uuid);
return;
}

_recv_msg_node = make_shared<RecvNode>(msg_len, msg_id);
AsyncReadBody(msg_len);
}
catch (std::exception& e) {
std::cout << "Exception code is " << e.what() << endl;
}
});
}

上面的逻辑里调用asyncReadFull读取整个长度,然后解析收到的数据,前两个字节为id,之后两个字节为长度,最后n个长度字节为消息内容。

1
2
3
4
5
6
//读取完整长度
void CSession::asyncReadFull(std::size_t maxLength, std::function<void(const boost::system::error_code&, std::size_t)> handler )
{
::memset(_data, 0, MAX_LENGTH);
asyncReadLen(0, maxLength, handler);
}

读取指定长度

1
2
3
4
5
6
7
8
9
10
11
12
13
14
15
16
17
18
19
20
21
22
23
//读取指定字节数
void CSession::asyncReadLen(std::size_t read_len, std::size_t total_len,
std::function<void(const boost::system::error_code&, std::size_t)> handler)
{
auto self = shared_from_this();
_socket.async_read_some(boost::asio::buffer(_data + read_len, total_len-read_len),
[read_len, total_len, handler, self](const boost::system::error_code& ec, std::size_t bytesTransfered) {
if (ec) {
// 出现错误,调用回调函数
handler(ec, read_len + bytesTransfered);
return;
}

if (read_len + bytesTransfered >= total_len) {
//长度够了就调用回调函数
handler(ec, read_len + bytesTransfered);
return;
}

// 没有错误,且长度不足则继续读取
self->asyncReadLen(read_len + bytesTransfered, total_len, handler);
});
}

读取头部成功后,其回调函数内部调用了读包体的逻辑

1
2
3
4
5
6
7
8
9
10
11
12
13
14
15
16
17
18
19
20
21
22
23
24
25
26
27
28
29
30
31
32
33
34
void CSession::AsyncReadBody(int total_len)
{
auto self = shared_from_this();
asyncReadFull(total_len, [self, this, total_len](const boost::system::error_code& ec, std::size_t bytes_transfered) {
try {
if (ec) {
std::cout << "handle read failed, error is " << ec.what() << endl;
Close();
_server->ClearSession(_uuid);
return;
}

if (bytes_transfered < total_len) {
std::cout << "read length not match, read [" << bytes_transfered << "] , total ["
<< total_len<<"]" << endl;
Close();
_server->ClearSession(_uuid);
return;
}

memcpy(_recv_msg_node->_data , _data , bytes_transfered);
_recv_msg_node->_cur_len += bytes_transfered;
_recv_msg_node->_data[_recv_msg_node->_total_len] = '\0';
cout << "receive data is " << _recv_msg_node->_data << endl;
//此处将消息投递到逻辑队列中
LogicSystem::GetInstance()->PostMsgToQue(make_shared<LogicNode>(shared_from_this(), _recv_msg_node));
//继续监听头部接受事件
AsyncReadHead(HEAD_TOTAL_LEN);
}
catch (std::exception& e) {
std::cout << "Exception code is " << e.what() << endl;
}
});
}

读取包体完成后,在回调中继续读包头。以此循环往复直到读完所有数据。如果对方不发送数据,则回调函数就不会触发。不影响程序执行其他工作,因为我们采用的是asio异步的读写操作。

当然我们解析完包体后会调用LogicSystem单例将解析好的消息封装为逻辑节点传递给逻辑层进行处理。

LogicSystem

我们在逻辑层处理

1
2
3
4
5
6
7
8
9
10
11
12
13
14
15
void LogicSystem::RegisterCallBacks() {
_fun_callbacks[MSG_CHAT_LOGIN] = std::bind(&LogicSystem::LoginHandler, this,
placeholders::_1, placeholders::_2, placeholders::_3);
}

void LogicSystem::LoginHandler(shared_ptr<CSession> session, const short &msg_id, const string &msg_data) {
Json::Reader reader;
Json::Value root;
reader.parse(msg_data, root);
std::cout << "user login uid is " << root["uid"].asInt() << " user token is "
<< root["token"].asString() << endl;

std::string return_str = root.toStyledString();
session->Send(return_str, msg_id);
}

并在构造函数中注册这些处理流程

1
2
3
4
LogicSystem::LogicSystem():_b_stop(false){
RegisterCallBacks();
_worker_thread = std::thread (&LogicSystem::DealMsg, this);
}

总结

到此,完成了ChatServer收到QT客户端发送过来的长链接请求,并解析读取的数据,将收到的数据通过tcp发送给对端。接下来还要做ChatServer到GateServer的token验证,判断是否合理,这个教给之后的文章处理。

C++ 全栈聊天项目(17) 登录验证和状态服务

Posted on 2024-08-31 | In C++聊天项目

完善proto

在proto文件里新增登陆验证服务

1
2
3
4
5
6
7
8
9
10
11
12
13
14
15
message LoginReq{
int32 uid = 1;
string token= 2;
}

message LoginRsp {
int32 error = 1;
int32 uid = 2;
string token = 3;
}

service StatusService {
rpc GetChatServer (GetChatServerReq) returns (GetChatServerRsp) {}
rpc Login(LoginReq) returns(LoginRsp);
}

接下来是调用grpc命令生成新的pb文件覆盖原有的,并且也拷贝给StatusServer一份

我们完善登陆逻辑,先去StatusServer验证token是否合理,如果合理再从内存中寻找用户信息,如果没找到则从数据库加载一份。

1
2
3
4
5
6
7
8
9
10
11
12
13
14
15
16
17
18
19
20
21
22
23
24
25
26
27
28
29
30
31
32
33
34
35
36
37
38
39
40
41
void LogicSystem::LoginHandler(shared_ptr<CSession> session, const short &msg_id, const string &msg_data) {
Json::Reader reader;
Json::Value root;
reader.parse(msg_data, root);
auto uid = root["uid"].asInt();
std::cout << "user login uid is " << uid << " user token is "
<< root["token"].asString() << endl;
//从状态服务器获取token匹配是否准确
auto rsp = StatusGrpcClient::GetInstance()->Login(uid, root["token"].asString());
Json::Value rtvalue;
Defer defer([this, &rtvalue, session]() {
std::string return_str = rtvalue.toStyledString();
session->Send(return_str, MSG_CHAT_LOGIN_RSP);
});

rtvalue["error"] = rsp.error();
if (rsp.error() != ErrorCodes::Success) {
return;
}

//内存中查询用户信息
auto find_iter = _users.find(uid);
std::shared_ptr<UserInfo> user_info = nullptr;
if (find_iter == _users.end()) {
//查询数据库
user_info = MysqlMgr::GetInstance()->GetUser(uid);
if (user_info == nullptr) {
rtvalue["error"] = ErrorCodes::UidInvalid;
return;
}

_users[uid] = user_info;
}
else {
user_info = find_iter->second;
}

rtvalue["uid"] = uid;
rtvalue["token"] = rsp.token();
rtvalue["name"] = user_info->name;
}

StatusServer验证token

在StatusServer验证token之前,我们需要在StatusServer中的GetServer的服务里将token写入内存

1
2
3
4
5
6
7
8
9
10
11
Status StatusServiceImpl::GetChatServer(ServerContext* context, const GetChatServerReq* request, GetChatServerRsp* reply)
{
std::string prefix("llfc status server has received : ");
const auto& server = getChatServer();
reply->set_host(server.host);
reply->set_port(server.port);
reply->set_error(ErrorCodes::Success);
reply->set_token(generate_unique_string());
insertToken(request->uid(), reply->token());
return Status::OK;
}

接下来我们实现登陆验证服务

1
2
3
4
5
6
7
8
9
10
11
12
13
14
15
16
17
18
19
Status StatusServiceImpl::Login(ServerContext* context, const LoginReq* request, LoginRsp* reply)
{
auto uid = request->uid();
auto token = request->token();
std::lock_guard<std::mutex> guard(_token_mtx);
auto iter = _tokens.find(uid);
if (iter == _tokens.end()) {
reply->set_error(ErrorCodes::UidInvalid);
return Status::OK;
}
if (iter->second != token) {
reply->set_error(ErrorCodes::TokenInvalid);
return Status::OK;
}
reply->set_error(ErrorCodes::Success);
reply->set_uid(uid);
reply->set_token(token);
return Status::OK;
}

这样当GateServer访问StatusServer的Login服务做验证后,就可以将数据返回给QT前端了。

客户端处理登陆回包

QT 的客户端TcpMgr收到请求后要进行对应的逻辑处理。所以我们在TcpMgr的构造函数中调用initHandlers注册消息

1
2
3
4
5
6
7
8
9
10
11
12
13
14
15
16
17
18
19
20
21
22
23
24
25
26
27
28
29
30
31
32
33
34
35
36
void TcpMgr::initHandlers()
{
//auto self = shared_from_this();
_handlers.insert(ID_CHAT_LOGIN_RSP, [this](ReqId id, int len, QByteArray data){
qDebug()<< "handle id is "<< id << " data is " << data;
// 将QByteArray转换为QJsonDocument
QJsonDocument jsonDoc = QJsonDocument::fromJson(data);

// 检查转换是否成功
if(jsonDoc.isNull()){
qDebug() << "Failed to create QJsonDocument.";
return;
}

QJsonObject jsonObj = jsonDoc.object();

if(!jsonObj.contains("error")){
int err = ErrorCodes::ERR_JSON;
qDebug() << "Login Failed, err is Json Parse Err" << err ;
emit sig_login_failed(err);
return;
}

int err = jsonObj["error"].toInt();
if(err != ErrorCodes::SUCCESS){
qDebug() << "Login Failed, err is " << err ;
emit sig_login_failed(err);
return;
}

UserMgr::GetInstance()->SetUid(jsonObj["uid"].toInt());
UserMgr::GetInstance()->SetName(jsonObj["name"].toString());
UserMgr::GetInstance()->SetToken(jsonObj["token"].toString());
emit sig_swich_chatdlg();
});
}

并且增加处理请求

1
2
3
4
5
6
7
8
9
10
void TcpMgr::handleMsg(ReqId id, int len, QByteArray data)
{
auto find_iter = _handlers.find(id);
if(find_iter == _handlers.end()){
qDebug()<< "not found id ["<< id << "] to handle";
return ;
}

find_iter.value()(id,len,data);
}

用户管理

为管理用户数据,需要创建一个UserMgr类,统一管理用户数据,我们这么声明

1
2
3
4
5
6
7
8
9
10
11
12
13
14
15
16
17
18
19
20
21
22
23
24
#ifndef USERMGR_H
#define USERMGR_H
#include <QObject>
#include <memory>
#include <singleton.h>

class UserMgr:public QObject,public Singleton<UserMgr>,
public std::enable_shared_from_this<UserMgr>
{
Q_OBJECT
public:
friend class Singleton<UserMgr>;
~ UserMgr();
void SetName(QString name);
void SetUid(int uid);
void SetToken(QString token);
private:
UserMgr();
QString _name;
QString _token;
int _uid;
};

#endif // USERMGR_H

简单实现几个功能

1
2
3
4
5
6
7
8
9
10
11
12
13
14
15
16
17
18
19
20
21
22
23
24
25
26
#include "usermgr.h"

UserMgr::~UserMgr()
{

}

void UserMgr::SetName(QString name)
{
_name = name;
}

void UserMgr::SetUid(int uid)
{
_uid = uid;
}

void UserMgr::SetToken(QString token)
{
_token = token;
}

UserMgr::UserMgr()
{

}

详细和复杂的管理后续不断往这里补充就行了。

登陆界面

登陆界面响应TcpMgr返回的登陆请求,在其构造函数中添加

1
2
//连接tcp管理者发出的登陆失败信号
connect(TcpMgr::GetInstance().get(), &TcpMgr::sig_login_failed, this, &LoginDialog::slot_login_failed);

并实现槽函数

1
2
3
4
5
6
7
void LoginDialog::slot_login_failed(int err)
{
QString result = QString("登录失败, err is %1")
.arg(err);
showTip(result,false);
enableBtn(true);
}

到此完成了登陆的请求和响应,接下来要实现响应登陆成功后跳转到聊天界面。下一篇先实现聊天布局。

聊天项目(18) 聊天界面布局以及可点击按钮的实现

Posted on 2024-08-31 | In C++聊天项目

聊天界面整体展示

我们先看下整体的聊天界面,方便以后逐个功能添加
https://cdn.llfc.club/1716523002662.jpg

QT Designer中 ui 设计如下
https://cdn.llfc.club/1716528347175.jpg

将聊天对话框分为几个部分:

1 处为左侧功能切换区域,包括聊天,联系人等。

2 处为搜索区域,可以搜索联系人,聊天记录等, 搜索框后面的按钮是快速拉人创建群聊的功能。

3 处为近期聊天联系列表

4 处为搜索结果列表,包括匹配到的联系人,聊天记录,以及添加联系人的按钮。

5 处为聊天对象名称和头像的显示区域,这里先做简单演示写死。

6 处为聊天记录区域。

7 处为工具栏区域。

8 处为输入区域

9 处为发送按钮区域。

大家可以按照这个布局拖动和修改,达到我的布局效果。

创建ChatDialog

右键项目,选择创建设计师界面类,选择创建QDialog without buttons。对话框的名字为ChatDialog

创建完成后,在之前登录成功的回调里,跳转到这个对话框。在MainWindow里添加槽函数

1
2
3
4
5
6
7
8
9
10
void MainWindow::SlotSwitchChat()
{
_chat_dlg = new ChatDialog();
_chat_dlg->setWindowFlags(Qt::CustomizeWindowHint|Qt::FramelessWindowHint);
setCentralWidget(_chat_dlg);
_chat_dlg->show();
_login_dlg->hide();
this->setMinimumSize(QSize(1050,900));
this->setMaximumSize(QWIDGETSIZE_MAX, QWIDGETSIZE_MAX);
}

在MainWindow的构造函数中添加信号和槽的链接

1
2
3
//连接创建聊天界面信号
connect(TcpMgr::GetInstance().get(),&TcpMgr::sig_swich_chatdlg, this, &MainWindow::SlotSwitchChat);

并且在TcpMgr中添加信号

1
void sig_swich_chatdlg();

为了方便测试,我们在MainWindow的构造函数中直接发送sig_switch_chatdlg信号,这样程序运行起来就会直接跳转到聊天界面

ChatDialog ui文件

ui文件的结构可以参考我的源码中的结构,这里我们可以简单看下

https://cdn.llfc.club/1716603750779.jpg

按照这个布局拖动并设置宽高即可,接下来需要设置下qss调整颜色

1
2
3
#side_bar{
background-color:rgb(46,46,46);
}

重写点击按钮

为了实现点击效果,我们继承QPushButton实现按钮的点击效果,包括普通状态,悬浮状态,以及按下状态

1
2
3
4
5
6
7
8
9
10
11
12
13
14
15
16
17
class ClickedBtn:public QPushButton
{
Q_OBJECT
public:
ClickedBtn(QWidget * parent = nullptr);
~ClickedBtn();
void SetState(QString nomal, QString hover, QString press);
protected:
virtual void enterEvent(QEvent *event) override; // 鼠标进入
virtual void leaveEvent(QEvent *event) override;// 鼠标离开
virtual void mousePressEvent(QMouseEvent *event) override; // 鼠标按下
virtual void mouseReleaseEvent(QMouseEvent *event) override; // 鼠标释放
private:
QString _normal;
QString _hover;
QString _press;
};

接下来实现其按下,离开进入等资源加载,并且重写这些事件

1
2
3
4
5
6
7
8
9
10
11
12
13
14
15
16
17
18
19
20
21
22
23
24
25
26
27
28
29
30
31
32
33
34
35
36
37
38
39
40
41
42
ClickedBtn::ClickedBtn(QWidget *parent):QPushButton (parent)
{
setCursor(Qt::PointingHandCursor); // 设置光标为小手
}

ClickedBtn::~ClickedBtn(){

}

void ClickedBtn::SetState(QString normal, QString hover, QString press)
{
_hover = hover;
_normal = normal;
_press = press;
setProperty("state",normal);
repolish(this);
update();
}

void ClickedBtn::enterEvent(QEvent *event)
{
setProperty("state",_hover);
repolish(this);
update();
QPushButton::enterEvent(event);
}

void ClickedBtn::mousePressEvent(QMouseEvent *event)
{
setProperty("state",_press);
repolish(this);
update();
QPushButton::mousePressEvent(event);
}

void ClickedBtn::mouseReleaseEvent(QMouseEvent *event)
{
setProperty("state",_hover);
repolish(this);
update();
QPushButton::mouseReleaseEvent(event);
}

回到chatdialog.ui文件,将add_btn升级为ClickedBtn

接着在qss文件中添加样式

1
2
3
4
5
6
7
8
9
10
11
12
#add_btn[state='normal']{
border-image: url(:/res/add_friend_normal.png);
}

#add_btn[state='hover']{
border-image: url(:/res/add_friend_hover.png);

}

#add_btn[state='press']{
border-image: url(:/res/add_friend_hover.png);
}

add_btn的样式一定要显示设置一下三个样式,所以我们回到ChatDialog的构造函数中设置样式

1
ui->add_btn->SetState("normal","hover","press");

再次启动运行,可以看到添加群组的按钮样式和sidebar的样式生效了。

为了美观显示,我们去mainwindow.ui中移除状态栏和菜单栏。

聊天项目(19) 实现搜索框和聊天列表

Posted on 2024-08-31 | In C++聊天项目

搜索框

我们需要实现如下效果

https://cdn.llfc.club/1717211817129.jpg

输入框默认不显示关闭按钮,当输入文字后显示关闭按钮,点击关闭按钮清空文字

添加CustomizeEdit类,头文件

1
2
3
4
5
6
7
8
9
10
11
12
13
14
15
16
17
18
19
20
21
22
23
24
25
26
27
28
29
30
31
32
33
34
35
36
37
38
39
40
41
#ifndef CUSTOMIZEEDIT_H
#define CUSTOMIZEEDIT_H
#include <QLineEdit>
#include <QDebug>

class CustomizeEdit: public QLineEdit
{
Q_OBJECT
public:
CustomizeEdit(QWidget *parent = nullptr);
void SetMaxLength(int maxLen);
protected:
void focusOutEvent(QFocusEvent *event) override
{
// 执行失去焦点时的处理逻辑
//qDebug() << "CustomizeEdit focusout";
// 调用基类的focusOutEvent()方法,保证基类的行为得到执行
QLineEdit::focusOutEvent(event);
//发送失去焦点得信号
emit sig_foucus_out();
}
private:
void limitTextLength(QString text) {
if(_max_len <= 0){
return;
}

QByteArray byteArray = text.toUtf8();

if (byteArray.size() > _max_len) {
byteArray = byteArray.left(_max_len);
this->setText(QString::fromUtf8(byteArray));
}
}

int _max_len;
signals:
void sig_foucus_out();
};

#endif // CUSTOMIZEEDIT_H

源文件

1
2
3
4
5
6
7
8
9
10
11
#include "customizeedit.h"

CustomizeEdit::CustomizeEdit(QWidget *parent):QLineEdit (parent),_max_len(0)
{
connect(this, &QLineEdit::textChanged, this, &CustomizeEdit::limitTextLength);
}

void CustomizeEdit::SetMaxLength(int maxLen)
{
_max_len = maxLen;
}

设计师界面类里将ui->search_edit提升为CustomizeEdit

在ChatDialog的构造函数中设置输入的长度限制以及关闭等图标的配置

1
2
3
4
5
6
7
8
9
10
11
12
13
14
15
16
17
18
19
20
21
22
23
24
25
26
27
28
29
30
31
32
33
QAction *searchAction = new QAction(ui->search_edit);
searchAction->setIcon(QIcon(":/res/search.png"));
ui->search_edit->addAction(searchAction,QLineEdit::LeadingPosition);
ui->search_edit->setPlaceholderText(QStringLiteral("搜索"));


// 创建一个清除动作并设置图标
QAction *clearAction = new QAction(ui->search_edit);
clearAction->setIcon(QIcon(":/res/close_transparent.png"));
// 初始时不显示清除图标
// 将清除动作添加到LineEdit的末尾位置
ui->search_edit->addAction(clearAction, QLineEdit::TrailingPosition);

// 当需要显示清除图标时,更改为实际的清除图标
connect(ui->search_edit, &QLineEdit::textChanged, [clearAction](const QString &text) {
if (!text.isEmpty()) {
clearAction->setIcon(QIcon(":/res/close_search.png"));
} else {
clearAction->setIcon(QIcon(":/res/close_transparent.png")); // 文本为空时,切换回透明图标
}

});

// 连接清除动作的触发信号到槽函数,用于清除文本
connect(clearAction, &QAction::triggered, [this, clearAction]() {
ui->search_edit->clear();
clearAction->setIcon(QIcon(":/res/close_transparent.png")); // 清除文本后,切换回透明图标
ui->search_edit->clearFocus();
//清除按钮被按下则不显示搜索框
//ShowSearch(false);
});

ui->search_edit->SetMaxLength(15);

stylesheet.qss 中修改样式

1
2
3
4
5
6
7
#search_wid{
background-color:rgb(247,247,247);
}

#search_edit {
border: 2px solid #f1f1f1;
}

聊天记录列表

创建C++ 类ChatUserList

1
2
3
4
5
6
7
8
9
10
11
12
13
14
15
16
17
18
19
20
21
#ifndef CHATUSERLIST_H
#define CHATUSERLIST_H
#include <QListWidget>
#include <QWheelEvent>
#include <QEvent>
#include <QScrollBar>
#include <QDebug>

class ChatUserList: public QListWidget
{
Q_OBJECT
public:
ChatUserList(QWidget *parent = nullptr);
protected:
bool eventFilter(QObject *watched, QEvent *event) override;

signals:
void sig_loading_chat_user();
};

#endif // CHATUSERLIST_H

实现

1
2
3
4
5
6
7
8
9
10
11
12
13
14
15
16
17
18
19
20
21
22
23
24
25
26
27
28
29
30
31
32
33
34
35
36
37
38
39
40
41
42
43
44
45
46
47
48
49
50
51
#include "chatuserlist.h"

ChatUserList::ChatUserList(QWidget *parent):QListWidget(parent)
{
Q_UNUSED(parent);
this->setHorizontalScrollBarPolicy(Qt::ScrollBarAlwaysOff);
this->setVerticalScrollBarPolicy(Qt::ScrollBarAlwaysOff);
// 安装事件过滤器
this->viewport()->installEventFilter(this);
}

bool ChatUserList::eventFilter(QObject *watched, QEvent *event)
{
// 检查事件是否是鼠标悬浮进入或离开
if (watched == this->viewport()) {
if (event->type() == QEvent::Enter) {
// 鼠标悬浮,显示滚动条
this->setVerticalScrollBarPolicy(Qt::ScrollBarAsNeeded);
} else if (event->type() == QEvent::Leave) {
// 鼠标离开,隐藏滚动条
this->setVerticalScrollBarPolicy(Qt::ScrollBarAlwaysOff);
}
}

// 检查事件是否是鼠标滚轮事件
if (watched == this->viewport() && event->type() == QEvent::Wheel) {
QWheelEvent *wheelEvent = static_cast<QWheelEvent*>(event);
int numDegrees = wheelEvent->angleDelta().y() / 8;
int numSteps = numDegrees / 15; // 计算滚动步数

// 设置滚动幅度
this->verticalScrollBar()->setValue(this->verticalScrollBar()->value() - numSteps);

// 检查是否滚动到底部
QScrollBar *scrollBar = this->verticalScrollBar();
int maxScrollValue = scrollBar->maximum();
int currentValue = scrollBar->value();
//int pageSize = 10; // 每页加载的联系人数量

if (maxScrollValue - currentValue <= 0) {
// 滚动到底部,加载新的联系人
qDebug()<<"load more chat user";
//发送信号通知聊天界面加载更多聊天内容
emit sig_loading_chat_user();
}

return true; // 停止事件传递
}

return QListWidget::eventFilter(watched, event);
}

在设计师界面类里提升ui->chat_user_list为ChatUserList

在ChatDialog构造函数和搜索清除按钮的回调中增加

1
ShowSearch(false);

该函数的具体实现

1
2
3
4
5
6
7
8
9
10
11
12
13
14
15
16
17
18
19
void ChatDialog::ShowSearch(bool bsearch)
{
if(bsearch){
ui->chat_user_list->hide();
ui->con_user_list->hide();
ui->search_list->show();
_mode = ChatUIMode::SearchMode;
}else if(_state == ChatUIMode::ChatMode){
ui->chat_user_list->show();
ui->con_user_list->hide();
ui->search_list->hide();
_mode = ChatUIMode::ChatMode;
}else if(_state == ChatUIMode::ContactMode){
ui->chat_user_list->hide();
ui->search_list->hide();
ui->con_user_list->show();
_mode = ChatUIMode::ContactMode;
}
}

ChatDialog类中声明添加

1
2
3
ChatUIMode _mode;
ChatUIMode _state;
bool _b_loading;

构造函数的初始化列表初始化这些模式和状态

1
2
3
4
ChatDialog::ChatDialog(QWidget *parent) :
QDialog(parent),
ui(new Ui::ChatDialog),_mode(ChatUIMode::ChatMode),
_state(ChatUIMode::ChatMode),_b_loading(false){//...}

为了让用户聊天列表更美观,修改qss文件

1
2
3
4
5
6
7
8
9
10
11
12
13
14
15
16
17
18
19
20
21
22
23
24
25
26
#chat_user_wid{
background-color:rgb(0,0,0);
}

#chat_user_list {
background-color: rgb(247,247,248);
border: none;
}


#chat_user_list::item:selected {
background-color: #d3d7d4;
border: none;
outline: none;
}

#chat_user_list::item:hover {
background-color: rgb(206,207,208);
border: none;
outline: none;
}

#chat_user_list::focus {
border: none;
outline: none;
}

添加聊天item

我们要为聊天列表添加item,每个item包含的样式为

https://cdn.llfc.club/1717215988933.jpg

对于这样的列表元素,我们采用设计师界面类设计非常方便, 新建设计师界面类ChatUserWid, 在ChatUserWid.ui中拖动布局如下

https://cdn.llfc.club/1717217007100.jpg

我们定义一个基类ListItemBase

1
2
3
4
5
6
7
8
9
10
11
12
13
14
15
16
17
18
19
20
21
22
23
24
25
#ifndef LISTITEMBASE_H
#define LISTITEMBASE_H
#include <QWidget>
#include "global.h"

class ListItemBase : public QWidget
{
Q_OBJECT
public:
explicit ListItemBase(QWidget *parent = nullptr);
void SetItemType(ListItemType itemType);

ListItemType GetItemType();

private:
ListItemType _itemType;

public slots:

signals:


};

#endif // LISTITEMBASE_H

我们实现这个基类

1
2
3
4
5
6
7
8
9
10
11
12
13
14
15
16
#include "listitembase.h"

ListItemBase::ListItemBase(QWidget *parent) : QWidget(parent)
{

}

void ListItemBase::SetItemType(ListItemType itemType)
{
_itemType = itemType;
}

ListItemType ListItemBase::GetItemType()
{
return _itemType;
}

我们实现ChatUserWid

1
2
3
4
5
6
7
8
9
10
11
12
13
14
15
16
17
18
19
20
21
22
23
24
25
26
27
28
29
30
31
32
#ifndef CHATUSERWID_H
#define CHATUSERWID_H

#include <QWidget>
#include "listitembase.h"
namespace Ui {
class ChatUserWid;
}

class ChatUserWid : public ListItemBase
{
Q_OBJECT

public:
explicit ChatUserWid(QWidget *parent = nullptr);
~ChatUserWid();

QSize sizeHint() const override {
return QSize(250, 70); // 返回自定义的尺寸
}

void SetInfo(QString name, QString head, QString msg);

private:
Ui::ChatUserWid *ui;
QString _name;
QString _head;
QString _msg;
};

#endif // CHATUSERWID_H

具体实现

1
2
3
4
5
6
7
8
9
10
11
12
13
14
15
16
17
18
19
20
21
22
23
24
25
26
27
28
29
30
31
#include "chatuserwid.h"
#include "ui_chatuserwid.h"

ChatUserWid::ChatUserWid(QWidget *parent) :
ListItemBase(parent),
ui(new Ui::ChatUserWid)
{
ui->setupUi(this);
SetItemType(ListItemType::CHAT_USER_ITEM);
}

ChatUserWid::~ChatUserWid()
{
delete ui;
}

void ChatUserWid::SetInfo(QString name, QString head, QString msg)
{
_name = name;
_head = head;
_msg = msg;
// 加载图片
QPixmap pixmap(_head);

// 设置图片自动缩放
ui->icon_lb->setPixmap(pixmap.scaled(ui->icon_lb->size(), Qt::KeepAspectRatio, Qt::SmoothTransformation));
ui->icon_lb->setScaledContents(true);

ui->user_name_lb->setText(_name);
ui->user_chat_lb->setText(_msg);
}

在ChatDialog里定义一些全局的变量用来做测试

1
2
3
4
5
6
7
8
9
10
11
12
13
14
15
16
17
18
19
20
21
22
23
24
std::vector<QString>  strs ={"hello world !",
"nice to meet u",
"New year,new life",
"You have to love yourself",
"My love is written in the wind ever since the whole world is you"};

std::vector<QString> heads = {
":/res/head_1.jpg",
":/res/head_2.jpg",
":/res/head_3.jpg",
":/res/head_4.jpg",
":/res/head_5.jpg"
};

std::vector<QString> names = {
"llfc",
"zack",
"golang",
"cpp",
"java",
"nodejs",
"python",
"rust"
};

这些数据只是测试数据,实际数据是后端传输过来的,我们目前只测试界面功能,用测试数据即可,写一个函数根据上面的数据添加13条item记录

1
2
3
4
5
6
7
8
9
10
11
12
13
14
15
16
17
18
void ChatDialog::addChatUserList()
{
// 创建QListWidgetItem,并设置自定义的widget
for(int i = 0; i < 13; i++){
int randomValue = QRandomGenerator::global()->bounded(100); // 生成0到99之间的随机整数
int str_i = randomValue%strs.size();
int head_i = randomValue%heads.size();
int name_i = randomValue%names.size();

auto *chat_user_wid = new ChatUserWid();
chat_user_wid->SetInfo(names[name_i], heads[head_i], strs[str_i]);
QListWidgetItem *item = new QListWidgetItem;
//qDebug()<<"chat_user_wid sizeHint is " << chat_user_wid->sizeHint();
item->setSizeHint(chat_user_wid->sizeHint());
ui->chat_user_list->addItem(item);
ui->chat_user_list->setItemWidget(item, chat_user_wid);
}
}

在ChatDialog构造函数中添加

1
addChatUserList();

完善界面效果,新增qss

1
2
3
4
5
6
7
8
9
10
11
12
13
14
15
16
17
18
19
20
21
22
23
24
25
26
27
28
29
30
31
32
33
34
35
36
37
38
39
40
41
42
43
44
45
ChatUserWid {
background-color:rgb(247,247,247);
border: none;
}

#user_chat_lb{
color:rgb(153,153,153);
font-size: 12px;
font-family: "Microsoft YaHei";
}

#user_name_lb{
color:rgb(0,0,0);
font-size: 14px;
font-weight: normal;
font-family: "Microsoft YaHei";
}

#time_wid #time_lb{
color:rgb(140,140,140);
font-size: 12px;
font-family: "Microsoft YaHei";
}

QScrollBar:vertical {
background: transparent; /* 将轨道背景设置为透明 */
width: 8px; /* 滚动条宽度,根据需要调整 */
margin: 0px; /* 移除滚动条与滑块之间的间距 */
}

QScrollBar::handle:vertical {
background: rgb(173,170,169); /* 滑块颜色 */
min-height: 10px; /* 滑块最小高度,根据需要调整 */
border-radius: 4px; /* 滑块边缘圆角,调整以形成椭圆形状 */
}

QScrollBar::add-line:vertical, QScrollBar::sub-line:vertical {
height: 0px; /* 移除上下按钮 */
border: none; /* 移除边框 */
background: transparent; /* 背景透明 */
}

QScrollBar::add-page:vertical, QScrollBar::sub-page:vertical {
background: none; /* 页面滚动部分背景透明 */
}

测试效果

https://cdn.llfc.club/1717218961063.jpg

源码链接

https://gitee.com/secondtonone1/llfcchat

视频链接

https://www.bilibili.com/video/BV13Z421W7WA/?spm_id_from=333.788&vd_source=8be9e83424c2ed2c9b2a3ed1d01385e9

C++ 全栈聊天项目(2) 内存泄漏修复和qss样式切换

Posted on 2024-08-31 | In C++聊天项目

完善注册类界面

先在注册类构造函数里添加lineEdit的模式为密码模式

1
2
ui->lineEdit_Passwd->setEchoMode(QLineEdit::Password);
ui->lineEdit_Confirm->setEchoMode(QLineEdit::Password);

我们在注册界面的ui里添加一个widget,widget内部包含一个tip居中显示,用来提示错误。设置label的显示为文字居中。

https://cdn.llfc.club/1709103910427.jpg

我们在qss里添加err_tip样式,根据不同的状态做字体显示

1
2
3
4
5
6
7
#err_tip[state='normal']{
color: green;
}

#err_tip[state='err']{
color: red;
}

接下来项目中添加global.h和global.cpp文件,global.h声明repolish函数,global.cpp用来定义这个函数。

.h中的声明

1
2
3
4
5
6
7
8
#ifndef GLOBAL_H
#define GLOBAL_H
#include <QWidget>
#include <functional>
#include "QStyle"
extern std::function<void(QWidget*)> repolish;

#endif // GLOBAL_H

.cpp中的定义

1
2
3
4
5
6
7
#include "global.h"

std::function<void(QWidget*)> repolish =[](QWidget *w){
w->style()->unpolish(w);
w->style()->polish(w);
};

在Register的构造函数中添加样式设置。

1
2
ui->err_tip->setProperty("state","normal");
repolish(ui->err_tip);

接下来实现获取验证码的逻辑,ui里关联get_code按钮的槽事件,并实现槽函数

1
2
3
4
5
6
7
8
9
10
11
12
13
14
void RegisterDialog::on_get_code_clicked()
{
//验证邮箱的地址正则表达式
auto email = ui->email_edit->text();
// 邮箱地址的正则表达式
QRegularExpression regex(R"((\w+)(\.|_)?(\w*)@(\w+)(\.(\w+))+)");
bool match = regex.match(email).hasMatch(); // 执行正则表达式匹配
if(match){
//发送http请求获取验证码
}else{
//提示邮箱不正确
showTip(tr("邮箱地址不正确"));
}
}

在RegisterDialog中添加showTip函数

1
2
3
4
5
6
void RegisterDialog::showTip(QString str)
{
ui->err_tip->setText(str);
ui->err_tip->setProperty("state","err");
repolish(ui->err_tip);
}

好了,这样就完成了。测试提示功能正确,下面要实现判断邮箱正确后发送http请求。

单例类封装

网络请求类要做成一个单例类,这样方便在任何需要发送http请求的时候调用,我们先实现单例类,添加singleton.h实现如下

1
2
3
4
5
6
7
8
9
10
11
12
13
14
15
16
17
18
19
20
21
22
23
24
25
26
27
28
29
30
31
#include <memory>
#include <mutex>
#include <iostream>
using namespace std;
template <typename T>
class Singleton {
protected:
Singleton() = default;
Singleton(const Singleton<T>&) = delete;
Singleton& operator=(const Singleton<T>& st) = delete;

static std::shared_ptr<T> _instance;
public:
static std::shared_ptr<T> GetInstance() {
static std::once_flag s_flag;
std::call_once(s_flag, [&]() {
_instance = shared_ptr<T>(new T);
});

return _instance;
}
void PrintAddress() {
std::cout << _instance.get() << endl;
}
~Singleton() {
std::cout << "this is singleton destruct" << std::endl;
}
};

template <typename T>
std::shared_ptr<T> Singleton<T>::_instance = nullptr;

http管理类

http管理类主要用来管理http发送接收等请求得,我们需要在pro中添加网络库

1
QT       += core gui network

在pro中添加C++类,命名为HttpMgr,然后头文件如下

1
2
3
4
5
6
7
8
9
10
11
12
13
14
15
16
17
18
19
20
21
22
23
#include "singleton.h"
#include <QString>
#include <QUrl>
#include <QObject>
#include <QNetworkAccessManager>
#include "global.h"
#include <memory>
#include <QJsonObject>
#include <QJsonDocument>
class HttpMgr:public QObject, public Singleton<HttpMgr>,
public std::enable_shared_from_this<HttpMgr>
{
Q_OBJECT

public:
~HttpMgr();
private:
friend class Singleton<HttpMgr>;
HttpMgr();
QNetworkAccessManager _manager;
signals:
void sig_http_finish();
};

我们先实现PostHttpReq请求的函数,也就是发送http的post请求, 发送请求要用到请求的url,请求的数据(json或者protobuf序列化),以及请求的id,以及哪个模块发出的请求mod,那么一个请求接口应该是这样的

1
void PostHttpReq(QUrl url, QJsonObject json, ReqId req_id, Modules mod);

我们去global.h定义ReqId枚举类型

1
2
3
4
enum ReqId{
ID_GET_VARIFY_CODE = 1001, //获取验证码
ID_REG_USER = 1002, //注册用户
};

在global.h定义ErrorCodes

1
2
3
4
5
enum ErrorCodes{
SUCCESS = 0,
ERR_JSON = 1, //Json解析失败
ERR_NETWORK = 2,
};

在global.h中定义模块

1
2
3
enum Modules{
REGISTERMOD = 0,
};

还需要修改下要发送的信号,在HttpMgr的头文件里,让他携带参数

1
void sig_http_finish(ReqId id, QString res, ErrorCodes err, Modules mod);

我们实现PostHttpReq

1
2
3
4
5
6
7
8
9
10
11
12
13
14
15
16
17
18
19
20
21
22
23
24
25
26
27
28
29
30
31
void HttpMgr::PostHttpReq(QUrl url, QJsonObject json, ReqId req_id, Modules mod)
{
//创建一个HTTP POST请求,并设置请求头和请求体
QByteArray data = QJsonDocument(json).toJson();
//通过url构造请求
QNetworkRequest request(url);
request.setHeader(QNetworkRequest::ContentTypeHeader, "application/json");
request.setHeader(QNetworkRequest::ContentLengthHeader, QByteArray::number(data.length()));
//发送请求,并处理响应, 获取自己的智能指针,构造伪闭包并增加智能指针引用计数
auto self = shared_from_this();
QNetworkReply * reply = _manager.post(request, data);
//设置信号和槽等待发送完成
QObject::connect(reply, &QNetworkReply::finished, [reply, self, req_id, mod](){
//处理错误的情况
if(reply->error() != QNetworkReply::NoError){
qDebug() << reply->errorString();
//发送信号通知完成
emit self->sig_http_finish(req_id, "", ErrorCodes::ERR_NETWORK, mod);
reply->deleteLater();
return;
}

//无错误则读回请求
QString res = reply->readAll();

//发送信号通知完成
emit self->sig_http_finish(req_id, res, ErrorCodes::SUCCESS,mod);
reply->deleteLater();
return;
});
}

加下来HttpMgr内实现一个slot_http_finish的槽函数用来接收sig_http_finish信号。

1
2
3
4
5
6
7
void HttpMgr::slot_http_finish(ReqId id, QString res, ErrorCodes err, Modules mod)
{
if(mod == Modules::REGISTERMOD){
//发送信号通知指定模块http响应结束
emit sig_reg_mod_finish(id, res, err);
}
}

我们在HttpMgr.h中添加信号sig_reg_mod_finish,

1
2
3
4
5
6
7
8
9
10
11
class HttpMgr:public QObject, public Singleton<HttpMgr>,
public std::enable_shared_from_this<HttpMgr>
{
Q_OBJECT

public:
//...省略
signals:
void sig_http_finish(ReqId id, QString res, ErrorCodes err, Modules mod);
void sig_reg_mod_finish(ReqId id, QString res, ErrorCodes err);
};

并且在cpp文件中连接slot_http_finish和sig_http_finish.

1
2
3
4
5
HttpMgr::HttpMgr()
{
//连接http请求和完成信号,信号槽机制保证队列消费
connect(this, &HttpMgr::sig_http_finish, this, &HttpMgr::slot_http_finish);
}

我们在注册界面连接sig_reg_mod_finish信号

1
2
3
4
5
6
7
RegisterDialog::RegisterDialog(QWidget *parent) :
QDialog(parent),
ui(new Ui::RegisterDialog)
{
//省略...
connect(HttpMgr::GetInstance().get(), &HttpMgr::sig_reg_mod_finish, this, &RegisterDialog::slot_reg_mod_finish);
}

接下俩实现slot_reg_mod_finish函数

1
2
3
4
5
6
7
8
9
10
11
12
13
14
15
16
17
18
19
20
21
22
23
24
25
26
void RegisterDialog::slot_reg_mod_finish(ReqId id, QString res, ErrorCodes err)
{
if(err != ErrorCodes::SUCCESS){
showTip(tr("网络请求错误"),false);
return;
}

// 解析 JSON 字符串,res需转化为QByteArray
QJsonDocument jsonDoc = QJsonDocument::fromJson(res.toUtf8());
//json解析错误
if(jsonDoc.isNull()){
showTip(tr("json解析错误"),false);
return;
}

//json解析错误
if(!jsonDoc.isObject()){
showTip(tr("json解析错误"),false);
return;
}

QJsonObject jsonObj = jsonDoc.object();

//调用对应的逻辑
return;
}

showTip逻辑稍作修改,增加bool类型参数

1
2
3
4
5
6
7
8
9
10
11
12
void RegisterDialog::showTip(QString str, bool b_ok)
{
if(b_ok){
ui->err_tip->setProperty("state","err");
}else{
ui->err_tip->setProperty("state","normal");
}

ui->err_tip->setText(str);

repolish(ui->err_tip);
}

注册消息处理

我们需要对RegisterDialog注册消息处理,头文件声明

1
QMap<ReqId, std::function<void(const QJsonObject&)>> _handlers;

在RegisterDialog中添加注册消息处理的声明和定义

1
2
3
4
5
6
7
8
9
10
11
12
13
14
void RegisterDialog::initHttpHandlers()
{
//注册获取验证码回包逻辑
_handlers.insert(ReqId::ID_GET_VARIFY_CODE, [this](QJsonObject jsonObj){
int error = jsonObj["error"].toInt();
if(error != ErrorCodes::SUCCESS){
showTip(tr("参数错误"),false);
return;
}
auto email = jsonObj["email"].toString();
showTip(tr("验证码已发送到邮箱,注意查收"), true);
qDebug()<< "email is " << email ;
});
}

回到slot_reg_mod_finish函数添加根据id调用函数处理对应逻辑

1
2
3
4
5
6
7
8
void RegisterDialog::slot_reg_mod_finish(ReqId id, QString res, ErrorCodes err)
{
//前面逻辑省略...
//调用对应的逻辑,根据id回调。
_handlers[id](jsonDoc.object());

return;
}

聊天项目(20) 动态加载聊天列表

Posted on 2024-08-31 | In C++聊天项目

聊天列表动态加载

如果要动态加载聊天列表内容,我们可以在列表的滚动区域捕获鼠标滑轮事件,并且在滚动到底部的时候我们发送一个加载聊天用户的信号

1
2
3
4
5
6
7
8
9
10
11
12
13
14
15
16
17
18
19
20
21
22
23
24
25
26
27
28
29
30
31
32
33
34
35
36
37
38
39
40
bool ChatUserList::eventFilter(QObject *watched, QEvent *event)
{
// 检查事件是否是鼠标悬浮进入或离开
if (watched == this->viewport()) {
if (event->type() == QEvent::Enter) {
// 鼠标悬浮,显示滚动条
this->setVerticalScrollBarPolicy(Qt::ScrollBarAsNeeded);
} else if (event->type() == QEvent::Leave) {
// 鼠标离开,隐藏滚动条
this->setVerticalScrollBarPolicy(Qt::ScrollBarAlwaysOff);
}
}

// 检查事件是否是鼠标滚轮事件
if (watched == this->viewport() && event->type() == QEvent::Wheel) {
QWheelEvent *wheelEvent = static_cast<QWheelEvent*>(event);
int numDegrees = wheelEvent->angleDelta().y() / 8;
int numSteps = numDegrees / 15; // 计算滚动步数

// 设置滚动幅度
this->verticalScrollBar()->setValue(this->verticalScrollBar()->value() - numSteps);

// 检查是否滚动到底部
QScrollBar *scrollBar = this->verticalScrollBar();
int maxScrollValue = scrollBar->maximum();
int currentValue = scrollBar->value();
//int pageSize = 10; // 每页加载的联系人数量

if (maxScrollValue - currentValue <= 0) {
// 滚动到底部,加载新的联系人
qDebug()<<"load more chat user";
//发送信号通知聊天界面加载更多聊天内容
emit sig_loading_chat_user();
}

return true; // 停止事件传递
}

return QListWidget::eventFilter(watched, event);
}

回到ChatDialog类里添加槽函数

1
2
3
4
5
6
7
8
9
10
11
12
13
14
15
16
17
void ChatDialog::slot_loading_chat_user()
{
if(_b_loading){
return;
}

_b_loading = true;
LoadingDlg *loadingDialog = new LoadingDlg(this);
loadingDialog->setModal(true);
loadingDialog->show();
qDebug() << "add new data to list.....";
addChatUserList();
// 加载完成后关闭对话框
loadingDialog->deleteLater();

_b_loading = false;
}

槽函数中我们添加了LoadingDlg类,这个类也是个QT 设计师界面类,ui如下

https://cdn.llfc.club/1717637779912.jpg

添加stackwidget管理界面

ChatDialog界面里添加stackedWidget,然后添加两个页面

https://cdn.llfc.club/1717639561119.jpg

回头我们将这两个界面升级为我们自定义的界面

我们先添加一个自定义的QT设计师界面类ChatPage,然后将原来放在ChatDialog.ui中的chat_data_wid这个widget移动到ChatPage中ui布局如下

https://cdn.llfc.club/1717640323397.jpg

布局属性如下

https://cdn.llfc.club/1717640426705.jpg

然后我们将ChatDialog.ui中的chat_page 升级为ChatPage。

接着我们将ChatPage中的一些控件比如emo_lb, file_lb升级为ClickedLabel, receive_btn, send_btn升级为ClickedBtn

如下图:

https://cdn.llfc.club/1717644080174.jpg

然后我们在ChatPage的构造函数中添加按钮样式的编写

1
2
3
4
5
6
7
8
9
10
11
12
13
ChatPage::ChatPage(QWidget *parent) :
QWidget(parent),
ui(new Ui::ChatPage)
{
ui->setupUi(this);
//设置按钮样式
ui->receive_btn->SetState("normal","hover","press");
ui->send_btn->SetState("normal","hover","press");

//设置图标样式
ui->emo_lb->SetState("normal","hover","press","normal","hover","press");
ui->file_lb->SetState("normal","hover","press","normal","hover","press");
}

因为我们继承了QWidget,我们想实现样式更新,需要重写paintEvent

1
2
3
4
5
6
7
void ChatPage::paintEvent(QPaintEvent *event)
{
QStyleOption opt;
opt.init(this);
QPainter p(this);
style()->drawPrimitive(QStyle::PE_Widget, &opt, &p, this);
}

类似的,我们的ListItemBase

1
2
3
4
5
6
7
void ListItemBase::paintEvent(QPaintEvent *event)
{
QStyleOption opt;
opt.init(this);
QPainter p(this);
style()->drawPrimitive(QStyle::PE_Widget, &opt, &p, this);
}

ClickedLabel完善

我们希望ClickedLabel在按下的时候显示按下状态的资源,在抬起的时候显示抬起的资源,所以修改按下事件和抬起事件

1
2
3
4
5
6
7
8
9
10
11
12
13
14
15
16
17
18
19
20
21
22
void ClickedLabel::mousePressEvent(QMouseEvent *event)
{
if (event->button() == Qt::LeftButton) {
if(_curstate == ClickLbState::Normal){
qDebug()<<"clicked , change to selected hover: "<< _selected_hover;
_curstate = ClickLbState::Selected;
setProperty("state",_selected_press);
repolish(this);
update();

}else{
qDebug()<<"clicked , change to normal hover: "<< _normal_hover;
_curstate = ClickLbState::Normal;
setProperty("state",_normal_press);
repolish(this);
update();
}
return;
}
// 调用基类的mousePressEvent以保证正常的事件处理
QLabel::mousePressEvent(event);
}

抬起事件

1
2
3
4
5
6
7
8
9
10
11
12
13
14
15
16
17
18
19
20
21
void ClickedLabel::mouseReleaseEvent(QMouseEvent *event)
{
if (event->button() == Qt::LeftButton) {
if(_curstate == ClickLbState::Normal){
// qDebug()<<"ReleaseEvent , change to normal hover: "<< _normal_hover;
setProperty("state",_normal_hover);
repolish(this);
update();

}else{
// qDebug()<<"ReleaseEvent , change to select hover: "<< _selected_hover;
setProperty("state",_selected_hover);
repolish(this);
update();
}
emit clicked();
return;
}
// 调用基类的mousePressEvent以保证正常的事件处理
QLabel::mousePressEvent(event);
}

qss美化

我们添加qss美化一下

1
2
3
4
5
6
7
8
9
10
11
12
13
14
15
16
17
18
19
20
21
22
23
24
25
26
27
28
29
30
31
32
33
34
35
36
37
38
39
40
41
42
43
44
45
46
47
48
49
50
51
52
53
54
55
56
57
58
59
60
61
62
63
64
65
66
67
68
69
70
71
72
73
74
75
76
77
78
79
80
81
82
83
84
85
86
87
88
89
90
91
92
93
94
95
96
97
98
99
100
101
102
103
104
105
106
107
108
109
110
111
112
LoadingDlg{
background: #f2eada;
}

#title_lb{
font-family: "Microsoft YaHei";
font-size: 18px;
font-weight: normal;
}

#chatEdit{
background: #ffffff;
border: none; /* 隐藏边框 */
font-family: "Microsoft YaHei"; /* 设置字体 */
font-size: 18px; /* 设置字体大小 */
padding: 5px; /* 设置内边距 */
}

#send_wid{
background: #ffffff;
border: none; /* 隐藏边框 */
}

#add_btn[state='normal']{
border-image: url(:/res/add_friend_normal.png);
}

#add_btn[state='hover']{
border-image: url(:/res/add_friend_hover.png);

}

#add_btn[state='press']{
border-image: url(:/res/add_friend_hover.png);
}

#receive_btn[state='normal']{
background: #f0f0f0;
color: #2cb46e;
font-size: 16px; /* 设置字体大小 */
font-family: "Microsoft YaHei"; /* 设置字体 */
border-radius: 20px; /* 设置圆角 */
}

#receive_btn[state='hover']{
background: #d2d2d2;
color: #2cb46e;
font-size: 16px; /* 设置字体大小 */
font-family: "Microsoft YaHei"; /* 设置字体 */
border-radius: 20px; /* 设置圆角 */
}

#receive_btn[state='press']{
background: #c6c6c6;
color: #2cb46e;
font-size: 16px; /* 设置字体大小 */
font-family: "Microsoft YaHei"; /* 设置字体 */
border-radius: 20px; /* 设置圆角 */
}

#send_btn[state='normal']{
background: #f0f0f0;
color: #2cb46e;
font-size: 16px; /* 设置字体大小 */
font-family: "Microsoft YaHei"; /* 设置字体 */
border-radius: 20px; /* 设置圆角 */
}

#send_btn[state='hover']{
background: #d2d2d2;
color: #2cb46e;
font-size: 16px; /* 设置字体大小 */
font-family: "Microsoft YaHei"; /* 设置字体 */
border-radius: 20px; /* 设置圆角 */
}

#send_btn[state='press']{
background: #c6c6c6;
color: #2cb46e;
font-size: 16px; /* 设置字体大小 */
font-family: "Microsoft YaHei"; /* 设置字体 */
border-radius: 20px; /* 设置圆角 */
}

#tool_wid{
background: #ffffff;
border-bottom: 0.5px solid #ececec; /* 设置下边框颜色和宽度 */
}

#emo_lb[state='normal']{
border-image: url(:/res/smile.png);
}

#emo_lb[state='hover']{
border-image: url(:/res/smile_hover.png);
}

#emo_lb[state='press']{
border-image: url(:/res/smile_press.png);
}

#file_lb[state='normal']{
border-image: url(:/res/filedir.png);
}

#file_lb[state='hover']{
border-image: url(:/res/filedir_hover.png);
}

#file_lb[state='press']{
border-image: url(:/res/filedir_press.png);
}

效果

最后整体运行一下看看效果, 下一节我们实现红框内的内容

https://cdn.llfc.club/1717645209118.jpg

视频链接

https://www.bilibili.com/video/BV13Z421W7WA/?spm_id_from=333.788&vd_source=8be9e83424c2ed2c9b2a3ed1d01385e9

源码链接

https://gitee.com/secondtonone1/llfcchat

聊天项目(21) 滚动聊天布局设计

Posted on 2024-08-31 | In C++聊天项目

滚动聊天布局设计

我们的聊天布局如下图
最外层的是一个chatview(黑色), chatview内部在添加一个MainLayout(蓝色),MainLayout内部添加一个scrollarea(红色),scrollarea内部包含一个widget(绿色),同时也包含一个HLayout(紫色)用来浮动显示滚动条。widget内部包含一个垂直布局Vlayout(黄色),黄色布局内部包含一个粉色的widget,widget占据拉伸比一万,保证充满整个布局。

https://cdn.llfc.club/layoutpic.png

代码实现

我们对照上面的图手写代码,在项目中添加ChatView类,然后先实现类的声明

1
2
3
4
5
6
7
8
9
10
11
12
13
14
15
16
17
18
19
20
21
class ChatView: public QWidget
{
Q_OBJECT
public:
ChatView(QWidget *parent = Q_NULLPTR);
void appendChatItem(QWidget *item); //尾插
void prependChatItem(QWidget *item); //头插
void insertChatItem(QWidget *before, QWidget *item);//中间插
protected:
bool eventFilter(QObject *o, QEvent *e) override;
void paintEvent(QPaintEvent *event) override;
private slots:
void onVScrollBarMoved(int min, int max);
private:
void initStyleSheet();
private:
//QWidget *m_pCenterWidget;
QVBoxLayout *m_pVl;
QScrollArea *m_pScrollArea;
bool isAppended;
};

接下来实现其函数定义, 先实现构造函数

1
2
3
4
5
6
7
8
9
10
11
12
13
14
15
16
17
18
19
20
21
22
23
24
25
26
27
28
29
30
31
32
33
34
35
ChatView::ChatView(QWidget *parent)  : QWidget(parent)
, isAppended(false)
{
QVBoxLayout *pMainLayout = new QVBoxLayout();
this->setLayout(pMainLayout);
pMainLayout->setMargin(0);

m_pScrollArea = new QScrollArea();
m_pScrollArea->setObjectName("chat_area");
pMainLayout->addWidget(m_pScrollArea);

QWidget *w = new QWidget(this);
w->setObjectName("chat_bg");
w->setAutoFillBackground(true);

QVBoxLayout *pVLayout_1 = new QVBoxLayout();
pVLayout_1->addWidget(new QWidget(), 100000);
w->setLayout(pVLayout_1);
m_pScrollArea->setWidget(w);

m_pScrollArea->setVerticalScrollBarPolicy(Qt::ScrollBarAlwaysOff);
QScrollBar *pVScrollBar = m_pScrollArea->verticalScrollBar();
connect(pVScrollBar, &QScrollBar::rangeChanged,this, &ChatView::onVScrollBarMoved);

//把垂直ScrollBar放到上边 而不是原来的并排
QHBoxLayout *pHLayout_2 = new QHBoxLayout();
pHLayout_2->addWidget(pVScrollBar, 0, Qt::AlignRight);
pHLayout_2->setMargin(0);
m_pScrollArea->setLayout(pHLayout_2);
pVScrollBar->setHidden(true);

m_pScrollArea->setWidgetResizable(true);
m_pScrollArea->installEventFilter(this);
initStyleSheet();
}

再实现添加条目到聊天背景

1
2
3
4
5
6
void ChatView::appendChatItem(QWidget *item)
{
QVBoxLayout *vl = qobject_cast<QVBoxLayout *>(m_pScrollArea->widget()->layout());
vl->insertWidget(vl->count()-1, item);
isAppended = true;
}

重写事件过滤器

1
2
3
4
5
6
7
8
9
10
11
12
13
14
15
16
bool ChatView::eventFilter(QObject *o, QEvent *e)
{
/*if(e->type() == QEvent::Resize && o == )
{

}
else */if(e->type() == QEvent::Enter && o == m_pScrollArea)
{
m_pScrollArea->verticalScrollBar()->setHidden(m_pScrollArea->verticalScrollBar()->maximum() == 0);
}
else if(e->type() == QEvent::Leave && o == m_pScrollArea)
{
m_pScrollArea->verticalScrollBar()->setHidden(true);
}
return QWidget::eventFilter(o, e);
}

重写paintEvent支持子类绘制

1
2
3
4
5
6
7
void ChatView::paintEvent(QPaintEvent *event)
{
QStyleOption opt;
opt.init(this);
QPainter p(this);
style()->drawPrimitive(QStyle::PE_Widget, &opt, &p, this);
}

监听滚动区域变化的槽函数

1
2
3
4
5
6
7
8
9
10
11
12
13
void ChatView::onVScrollBarMoved(int min, int max)
{
if(isAppended) //添加item可能调用多次
{
QScrollBar *pVScrollBar = m_pScrollArea->verticalScrollBar();
pVScrollBar->setSliderPosition(pVScrollBar->maximum());
//500毫秒内可能调用多次
QTimer::singleShot(500, [this]()
{
isAppended = false;
});
}
}

本节先到这里,完成聊天布局基本的构造

视频链接

https://www.bilibili.com/video/BV1xz421h7Ad/?vd_source=8be9e83424c2ed2c9b2a3ed1d01385e9

源码链接

https://gitee.com/secondtonone1/llfcchat

聊天项目(22) 实现气泡聊天对话框

Posted on 2024-08-31 | In C++聊天项目

气泡聊天框设计

我们期待实现如下绿色的气泡对话框

https://cdn.llfc.club/1718417551126.jpg

对于我们自己发出的信息,我们可以实现这样一个网格布局管理

https://cdn.llfc.club/1718423760358.jpg

NameLabel用来显示用户的名字,Bubble用来显示聊天信息,Spacer是个弹簧,保证将NameLabel,IconLabel,Bubble等挤压到右侧。

如果是别人发出的消息,我们设置这样一个网格布局

https://cdn.llfc.club/1718497364660.jpg

下面是实现布局的核心代码

1
2
3
4
5
6
7
8
9
10
11
12
13
14
15
16
17
18
19
20
21
22
23
24
25
26
27
28
29
30
31
32
33
34
35
36
37
38
39
40
41
ChatItemBase::ChatItemBase(ChatRole role, QWidget *parent)
: QWidget(parent)
, m_role(role)
{
m_pNameLabel = new QLabel();
m_pNameLabel->setObjectName("chat_user_name");
QFont font("Microsoft YaHei");
font.setPointSize(9);
m_pNameLabel->setFont(font);
m_pNameLabel->setFixedHeight(20);
m_pIconLabel = new QLabel();
m_pIconLabel->setScaledContents(true);
m_pIconLabel->setFixedSize(42, 42);
m_pBubble = new QWidget();
QGridLayout *pGLayout = new QGridLayout();
pGLayout->setVerticalSpacing(3);
pGLayout->setHorizontalSpacing(3);
pGLayout->setMargin(3);
QSpacerItem*pSpacer = new QSpacerItem(40, 20, QSizePolicy::Expanding, QSizePolicy::Minimum);
if(m_role == ChatRole::Self)
{
m_pNameLabel->setContentsMargins(0,0,8,0);
m_pNameLabel->setAlignment(Qt::AlignRight);
pGLayout->addWidget(m_pNameLabel, 0,1, 1,1);
pGLayout->addWidget(m_pIconLabel, 0, 2, 2,1, Qt::AlignTop);
pGLayout->addItem(pSpacer, 1, 0, 1, 1);
pGLayout->addWidget(m_pBubble, 1,1, 1,1);
pGLayout->setColumnStretch(0, 2);
pGLayout->setColumnStretch(1, 3);
}else{
m_pNameLabel->setContentsMargins(8,0,0,0);
m_pNameLabel->setAlignment(Qt::AlignLeft);
pGLayout->addWidget(m_pIconLabel, 0, 0, 2,1, Qt::AlignTop);
pGLayout->addWidget(m_pNameLabel, 0,1, 1,1);
pGLayout->addWidget(m_pBubble, 1,1, 1,1);
pGLayout->addItem(pSpacer, 2, 2, 1, 1);
pGLayout->setColumnStretch(1, 3);
pGLayout->setColumnStretch(2, 2);
}
this->setLayout(pGLayout);
}

设置用户名和头像

1
2
3
4
5
6
7
8
9
void ChatItemBase::setUserName(const QString &name)
{
m_pNameLabel->setText(name);
}

void ChatItemBase::setUserIcon(const QPixmap &icon)
{
m_pIconLabel->setPixmap(icon);
}

因为我们还要定制化实现气泡widget,所以要写个函数更新这个widget

1
2
3
4
5
6
7
void ChatItemBase::setWidget(QWidget *w)
{
QGridLayout *pGLayout = (qobject_cast<QGridLayout *>)(this->layout());
pGLayout->replaceWidget(m_pBubble, w);
delete m_pBubble;
m_pBubble = w;
}

聊天气泡

我们的消息分为几种,文件,文本,图片等。所以先实现BubbleFrame作为基类

1
2
3
4
5
6
7
8
9
10
11
12
13
14
15
class BubbleFrame : public QFrame
{
Q_OBJECT
public:
BubbleFrame(ChatRole role, QWidget *parent = nullptr);
void setMargin(int margin);
//inline int margin(){return margin;}
void setWidget(QWidget *w);
protected:
void paintEvent(QPaintEvent *e);
private:
QHBoxLayout *m_pHLayout;
ChatRole m_role;
int m_margin;
};

BubbleFrame基类构造函数创建一个布局,要根据是自己发送的消息还是别人发送的,做margin分布

1
2
3
4
5
6
7
8
9
10
11
12
13
14
const int WIDTH_SANJIAO  = 8;  //三角宽
BubbleFrame::BubbleFrame(ChatRole role, QWidget *parent)
:QFrame(parent)
,m_role(role)
,m_margin(3)
{
m_pHLayout = new QHBoxLayout();
if(m_role == ChatRole::Self)
m_pHLayout->setContentsMargins(m_margin, m_margin, WIDTH_SANJIAO + m_margin, m_margin);
else
m_pHLayout->setContentsMargins(WIDTH_SANJIAO + m_margin, m_margin, m_margin, m_margin);

this->setLayout(m_pHLayout);
}

将气泡框内设置文本内容,或者图片内容,所以实现了下面的函数

1
2
3
4
5
6
7
8
void BubbleFrame::setWidget(QWidget *w)
{
if(m_pHLayout->count() > 0)
return ;
else{
m_pHLayout->addWidget(w);
}
}

接下来绘制气泡

1
2
3
4
5
6
7
8
9
10
11
12
13
14
15
16
17
18
19
20
21
22
23
24
25
26
27
28
29
30
31
32
33
34
35
36
37
38
39
void BubbleFrame::paintEvent(QPaintEvent *e)
{
QPainter painter(this);
painter.setPen(Qt::NoPen);

if(m_role == ChatRole::Other)
{
//画气泡
QColor bk_color(Qt::white);
painter.setBrush(QBrush(bk_color));
QRect bk_rect = QRect(WIDTH_SANJIAO, 0, this->width()-WIDTH_SANJIAO, this->height());
painter.drawRoundedRect(bk_rect,5,5);
//画小三角
QPointF points[3] = {
QPointF(bk_rect.x(), 12),
QPointF(bk_rect.x(), 10+WIDTH_SANJIAO +2),
QPointF(bk_rect.x()-WIDTH_SANJIAO, 10+WIDTH_SANJIAO-WIDTH_SANJIAO/2),
};
painter.drawPolygon(points, 3);
}
else
{
QColor bk_color(158,234,106);
painter.setBrush(QBrush(bk_color));
//画气泡
QRect bk_rect = QRect(0, 0, this->width()-WIDTH_SANJIAO, this->height());
painter.drawRoundedRect(bk_rect,5,5);
//画三角
QPointF points[3] = {
QPointF(bk_rect.x()+bk_rect.width(), 12),
QPointF(bk_rect.x()+bk_rect.width(), 12+WIDTH_SANJIAO +2),
QPointF(bk_rect.x()+bk_rect.width()+WIDTH_SANJIAO, 10+WIDTH_SANJIAO-WIDTH_SANJIAO/2),
};
painter.drawPolygon(points, 3);

}

return QFrame::paintEvent(e);
}

绘制的过程很简单,先创建QPainter,然后设置NoPen,表示不绘制轮廓线,接下来用设置指定颜色的画刷绘制图形,我们先绘制矩形再绘制三角形。

对于文本消息的绘制

1
2
3
4
5
6
7
8
9
10
11
12
13
14
15
TextBubble::TextBubble(ChatRole role, const QString &text, QWidget *parent)
:BubbleFrame(role, parent)
{
m_pTextEdit = new QTextEdit();
m_pTextEdit->setReadOnly(true);
m_pTextEdit->setVerticalScrollBarPolicy(Qt::ScrollBarAlwaysOff);
m_pTextEdit->setHorizontalScrollBarPolicy(Qt::ScrollBarAlwaysOff);
m_pTextEdit->installEventFilter(this);
QFont font("Microsoft YaHei");
font.setPointSize(12);
m_pTextEdit->setFont(font);
setPlainText(text);
setWidget(m_pTextEdit);
initStyleSheet();
}

setPlainText设置文本最大宽度

1
2
3
4
5
6
7
8
9
10
11
12
13
14
15
16
17
18
19
20
void TextBubble::setPlainText(const QString &text)
{
m_pTextEdit->setPlainText(text);
//m_pTextEdit->setHtml(text);
//找到段落中最大宽度
qreal doc_margin = m_pTextEdit->document()->documentMargin();
int margin_left = this->layout()->contentsMargins().left();
int margin_right = this->layout()->contentsMargins().right();
QFontMetricsF fm(m_pTextEdit->font());
QTextDocument *doc = m_pTextEdit->document();
int max_width = 0;
//遍历每一段找到 最宽的那一段
for (QTextBlock it = doc->begin(); it != doc->end(); it = it.next()) //字体总长
{
int txtW = int(fm.width(it.text()));
max_width = max_width < txtW ? txtW : max_width; //找到最长的那段
}
//设置这个气泡的最大宽度 只需要设置一次
setMaximumWidth(max_width + doc_margin * 2 + (margin_left + margin_right)); //设置最大宽度
}

我们拉伸的时候要调整气泡的高度,这里重写事件过滤器

1
2
3
4
5
6
7
8
bool TextBubble::eventFilter(QObject *o, QEvent *e)
{
if(m_pTextEdit == o && e->type() == QEvent::Paint)
{
adjustTextHeight(); //PaintEvent中设置
}
return BubbleFrame::eventFilter(o, e);
}

调整高度

1
2
3
4
5
6
7
8
9
10
11
12
13
14
15
16
void TextBubble::adjustTextHeight()
{
qreal doc_margin = m_pTextEdit->document()->documentMargin(); //字体到边框的距离默认为4
QTextDocument *doc = m_pTextEdit->document();
qreal text_height = 0;
//把每一段的高度相加=文本高
for (QTextBlock it = doc->begin(); it != doc->end(); it = it.next())
{
QTextLayout *pLayout = it.layout();
QRectF text_rect = pLayout->boundingRect(); //这段的rect
text_height += text_rect.height();
}
int vMargin = this->layout()->contentsMargins().top();
//设置这个气泡需要的高度 文本高+文本边距+TextEdit边框到气泡边框的距离
setFixedHeight(text_height + doc_margin *2 + vMargin*2 );
}

设置样式表

1
2
3
4
void TextBubble::initStyleSheet()
{
m_pTextEdit->setStyleSheet("QTextEdit{background:transparent;border:none}");
}

对于图像的旗袍对话框类似,只是计算图像的宽高即可

1
2
3
4
5
6
7
8
9
10
11
12
13
14
15
16
17
#define PIC_MAX_WIDTH 160
#define PIC_MAX_HEIGHT 90

PictureBubble::PictureBubble(const QPixmap &picture, ChatRole role, QWidget *parent)
:BubbleFrame(role, parent)
{
QLabel *lb = new QLabel();
lb->setScaledContents(true);
QPixmap pix = picture.scaled(QSize(PIC_MAX_WIDTH, PIC_MAX_HEIGHT), Qt::KeepAspectRatio);
lb->setPixmap(pix);
this->setWidget(lb);

int left_margin = this->layout()->contentsMargins().left();
int right_margin = this->layout()->contentsMargins().right();
int v_margin = this->layout()->contentsMargins().bottom();
setFixedSize(pix.width()+left_margin + right_margin, pix.height() + v_margin *2);
}

发送测试

接下来在发送处实现文本和图片消息的展示,点击发送按钮根据不同的类型创建不同的气泡消息

1
2
3
4
5
6
7
8
9
10
11
12
13
14
15
16
17
18
19
20
21
22
23
24
25
26
27
28
29
30
31
32
33
34
void ChatPage::on_send_btn_clicked()
{
auto pTextEdit = ui->chatEdit;
ChatRole role = ChatRole::Self;
QString userName = QStringLiteral("恋恋风辰");
QString userIcon = ":/res/head_1.jpg";

const QVector<MsgInfo>& msgList = pTextEdit->getMsgList();
for(int i=0; i<msgList.size(); ++i)
{
QString type = msgList[i].msgFlag;
ChatItemBase *pChatItem = new ChatItemBase(role);
pChatItem->setUserName(userName);
pChatItem->setUserIcon(QPixmap(userIcon));
QWidget *pBubble = nullptr;
if(type == "text")
{
pBubble = new TextBubble(role, msgList[i].content);
}
else if(type == "image")
{
pBubble = new PictureBubble(QPixmap(msgList[i].content) , role);
}
else if(type == "file")
{

}
if(pBubble != nullptr)
{
pChatItem->setWidget(pBubble);
ui->chat_data_list->appendChatItem(pChatItem);
}
}
}

效果展示

https://cdn.llfc.club/1718499438435.jpg

源码和视频

https://www.bilibili.com/video/BV1Mz4218783/?vd_source=8be9e83424c2ed2c9b2a3ed1d01385e9

源码链接

https://gitee.com/secondtonone1/llfcchat

聊天项目(23) 侧边栏切换和搜索列表

Posted on 2024-08-31 | In C++聊天项目

侧边栏按钮

我们接下来实现侧边栏按钮功能,希望点击一个按钮,清空其他按钮的选中状态。而我们又希望按钮上面能在有新的通知的时候出现红点的图标,所以不能用简单的按钮,要用自定义的一个widget实现点击效果

我们自定义StateWidget ,声明如下

1
2
3
4
5
6
7
8
9
10
11
12
13
14
15
16
17
18
19
20
21
22
23
24
25
26
27
28
29
30
31
32
33
34
35
36
37
38
39
40
41
42
43
44
class StateWidget : public QWidget
{
Q_OBJECT
public:
explicit StateWidget(QWidget *parent = nullptr);

void SetState(QString normal="", QString hover="", QString press="",
QString select="", QString select_hover="", QString select_press="");

ClickLbState GetCurState();
void ClearState();

void SetSelected(bool bselected);
void AddRedPoint();
void ShowRedPoint(bool show=true);

protected:
void paintEvent(QPaintEvent* event);

virtual void mousePressEvent(QMouseEvent *ev) override;
virtual void mouseReleaseEvent(QMouseEvent *ev) override;
virtual void enterEvent(QEvent* event) override;
virtual void leaveEvent(QEvent* event) override;

private:

QString _normal;
QString _normal_hover;
QString _normal_press;

QString _selected;
QString _selected_hover;
QString _selected_press;

ClickLbState _curstate;
QLabel * _red_point;

signals:
void clicked(void);

signals:

public slots:
};

接下来实现定义

1
2
3
4
5
6
7
8
9
10
11
12
13
14
15
16
17
18
19
20
21
22
23
24
25
26
27
28
29
30
31
32
33
34
35
36
37
38
39
40
41
42
43
44
45
46
47
48
49
50
51
52
53
54
55
56
57
58
59
60
61
62
63
64
65
66
67
68
69
70
71
72
73
74
75
76
77
78
79
80
81
82
83
84
85
86
87
88
89
90
91
92
93
94
95
96
97
98
99
100
101
102
103
104
105
106
107
108
109
110
111
112
113
114
115
116
117
118
119
120
121
122
123
124
125
126
127
128
129
130
131
132
133
134
135
136
137
138
139
140
141
142
143
144
145
146
147
148
149
150
151
152
153
154
155
156
157
158
159
160
161
162
163
StateWidget::StateWidget(QWidget *parent): QWidget(parent),_curstate(ClickLbState::Normal)
{
setCursor(Qt::PointingHandCursor);
//添加红点
AddRedPoint();
}

void StateWidget::SetState(QString normal, QString hover, QString press, QString select, QString select_hover, QString select_press)
{
_normal = normal;
_normal_hover = hover;
_normal_press = press;

_selected = select;
_selected_hover = select_hover;
_selected_press = select_press;

setProperty("state",normal);
repolish(this);
}

ClickLbState StateWidget::GetCurState()
{
return _curstate;
}

void StateWidget::ClearState()
{
_curstate = ClickLbState::Normal;
setProperty("state",_normal);
repolish(this);
update();
}

void StateWidget::SetSelected(bool bselected)
{
if(bselected){
_curstate = ClickLbState::Selected;
setProperty("state",_selected);
repolish(this);
update();
return;
}

_curstate = ClickLbState::Normal;
setProperty("state",_normal);
repolish(this);
update();
return;
}


void StateWidget::AddRedPoint()
{
//添加红点示意图
_red_point = new QLabel();
_red_point->setObjectName("red_point");
QVBoxLayout* layout2 = new QVBoxLayout;
_red_point->setAlignment(Qt::AlignCenter);
layout2->addWidget(_red_point);
layout2->setMargin(0);
this->setLayout(layout2);
_red_point->setVisible(false);
}

void StateWidget::ShowRedPoint(bool show)
{
_red_point->setVisible(true);
}

void StateWidget::paintEvent(QPaintEvent *event)
{
QStyleOption opt;
opt.init(this);
QPainter p(this);
style()->drawPrimitive(QStyle::PE_Widget, &opt, &p, this);
return;
}

void StateWidget::mousePressEvent(QMouseEvent *event)
{
if (event->button() == Qt::LeftButton) {
if(_curstate == ClickLbState::Selected){
qDebug()<<"PressEvent , already to selected press: "<< _selected_press;
//emit clicked();
// 调用基类的mousePressEvent以保证正常的事件处理
QWidget::mousePressEvent(event);
return;
}

if(_curstate == ClickLbState::Normal){
qDebug()<<"PressEvent , change to selected press: "<< _selected_press;
_curstate = ClickLbState::Selected;
setProperty("state",_selected_press);
repolish(this);
update();
}

return;
}
// 调用基类的mousePressEvent以保证正常的事件处理
QWidget::mousePressEvent(event);
}

void StateWidget::mouseReleaseEvent(QMouseEvent *event)
{
if (event->button() == Qt::LeftButton) {
if(_curstate == ClickLbState::Normal){
//qDebug()<<"ReleaseEvent , change to normal hover: "<< _normal_hover;
setProperty("state",_normal_hover);
repolish(this);
update();

}else{
//qDebug()<<"ReleaseEvent , change to select hover: "<< _selected_hover;
setProperty("state",_selected_hover);
repolish(this);
update();
}
emit clicked();
return;
}
// 调用基类的mousePressEvent以保证正常的事件处理
QWidget::mousePressEvent(event);
}

void StateWidget::enterEvent(QEvent *event)
{
// 在这里处理鼠标悬停进入的逻辑
if(_curstate == ClickLbState::Normal){
//qDebug()<<"enter , change to normal hover: "<< _normal_hover;
setProperty("state",_normal_hover);
repolish(this);
update();

}else{
//qDebug()<<"enter , change to selected hover: "<< _selected_hover;
setProperty("state",_selected_hover);
repolish(this);
update();
}

QWidget::enterEvent(event);
}

void StateWidget::leaveEvent(QEvent *event)
{
// 在这里处理鼠标悬停离开的逻辑
if(_curstate == ClickLbState::Normal){
// qDebug()<<"leave , change to normal : "<< _normal;
setProperty("state",_normal);
repolish(this);
update();

}else{
// qDebug()<<"leave , change to select normal : "<< _selected;
setProperty("state",_selected);
repolish(this);
update();
}
QWidget::leaveEvent(event);
}

为了让按钮好看一点,我们修改下qss文件

1
2
3
4
5
6
7
8
9
10
11
12
13
14
15
16
17
18
19
20
21
22
23
24
25
26
27
28
29
30
31
32
33
34
35
36
37
38
39
40
41
42
43
44
45
46
47
48
49
50
51
52
53
#chat_user_name {
color:rgb(153,153,153);
font-size: 14px;
font-family: "Microsoft YaHei";
}

#side_chat_lb[state='normal']{
border-image: url(:/res/chat_icon.png);
}

#side_chat_lb[state='hover']{
border-image: url(:/res/chat_icon_hover.png);
}

#side_chat_lb[state='pressed']{
border-image: url(:/res/chat_icon_press.png);
}

#side_chat_lb[state='selected_normal']{
border-image: url(:/res/chat_icon_press.png);
}

#side_chat_lb[state='selected_hover']{
border-image: url(:/res/chat_icon_press.png);
}

#side_chat_lb[state='selected_pressed']{
border-image: url(:/res/chat_icon_press.png);
}

#side_contact_lb[state='normal']{
border-image: url(:/res/contact_list.png);
}

#side_contact_lb[state='hover']{
border-image: url(:/res/contact_list_hover.png);
}

#side_contact_lb[state='pressed']{
border-image: url(:/res/contact_list_press.png);
}

#side_contact_lb[state='selected_normal']{
border-image: url(:/res/contact_list_press.png);
}

#side_contact_lb[state='selected_hover']{
border-image: url(:/res/contact_list_press.png);
}

#side_contact_lb[state='selected_pressed']{
border-image: url(:/res/contact_list_press.png);
}

回到ChatDialog.ui中,将side_chat_lb改为StateWidget,side_contact_lb改为StateWidget。

https://cdn.llfc.club/1719028635439.jpg

接下来回到ChatDialog.cpp中构造函数中添加

1
2
3
4
5
6
7
8
9
10
11
12
13
14
15
16
17
QPixmap pixmap(":/res/head_1.jpg");
ui->side_head_lb->setPixmap(pixmap); // 将图片设置到QLabel上
QPixmap scaledPixmap = pixmap.scaled( ui->side_head_lb->size(), Qt::KeepAspectRatio); // 将图片缩放到label的大小
ui->side_head_lb->setPixmap(scaledPixmap); // 将缩放后的图片设置到QLabel上
ui->side_head_lb->setScaledContents(true); // 设置QLabel自动缩放图片内容以适应大小

ui->side_chat_lb->setProperty("state","normal");

ui->side_chat_lb->SetState("normal","hover","pressed","selected_normal","selected_hover","selected_pressed");

ui->side_contact_lb->SetState("normal","hover","pressed","selected_normal","selected_hover","selected_pressed");

AddLBGroup(ui->side_chat_lb);
AddLBGroup(ui->side_contact_lb);

connect(ui->side_chat_lb, &StateWidget::clicked, this, &ChatDialog::slot_side_chat);
connect(ui->side_contact_lb, &StateWidget::clicked, this, &ChatDialog::slot_side_contact);

切换函数中实现如下

1
2
3
4
5
6
7
8
void ChatDialog::slot_side_chat()
{
qDebug()<< "receive side chat clicked";
ClearLabelState(ui->side_chat_lb);
ui->stackedWidget->setCurrentWidget(ui->chat_page);
_state = ChatUIMode::ChatMode;
ShowSearch(false);
}

上述函数我们实现了清楚其他标签选中状态,只将被点击的标签设置为选中的效果,核心功能是下面

1
2
3
4
5
6
7
8
9
10
void ChatDialog::ClearLabelState(StateWidget *lb)
{
for(auto & ele: _lb_list){
if(ele == lb){
continue;
}

ele->ClearState();
}
}

我们在构造函数里将要管理的标签通过AddGroup函数加入_lb_list实现管理

1
2
3
4
void ChatDialog::AddLBGroup(StateWidget *lb)
{
_lb_list.push_back(lb);
}

搜索列表类

在pro中添加我们自定义一个搜索列表类

1
2
3
4
5
6
7
8
9
10
11
12
13
14
15
16
17
18
19
20
21
22
23
24
25
26
27
28
29
30
31
32
33
34
35
36
37
38
39
40
41
42
43
44
45
46
47
class SearchList: public QListWidget
{
Q_OBJECT
public:
SearchList(QWidget *parent = nullptr);
void CloseFindDlg();
void SetSearchEdit(QWidget* edit);
protected:
bool eventFilter(QObject *watched, QEvent *event) override {
// 检查事件是否是鼠标悬浮进入或离开
if (watched == this->viewport()) {
if (event->type() == QEvent::Enter) {
// 鼠标悬浮,显示滚动条
this->setVerticalScrollBarPolicy(Qt::ScrollBarAsNeeded);
} else if (event->type() == QEvent::Leave) {
// 鼠标离开,隐藏滚动条
this->setVerticalScrollBarPolicy(Qt::ScrollBarAlwaysOff);
}
}

// 检查事件是否是鼠标滚轮事件
if (watched == this->viewport() && event->type() == QEvent::Wheel) {
QWheelEvent *wheelEvent = static_cast<QWheelEvent*>(event);
int numDegrees = wheelEvent->angleDelta().y() / 8;
int numSteps = numDegrees / 15; // 计算滚动步数

// 设置滚动幅度
this->verticalScrollBar()->setValue(this->verticalScrollBar()->value() - numSteps);

return true; // 停止事件传递
}

return QListWidget::eventFilter(watched, event);
}
private:
void waitPending(bool pending = true);
bool _send_pending;
void addTipItem();
std::shared_ptr<QDialog> _find_dlg;
QWidget* _search_edit;
LoadingDlg * _loadingDialog;
private slots:
void slot_item_clicked(QListWidgetItem *item);
void slot_user_search(std::shared_ptr<SearchInfo> si);
signals:

};

然后在构造函数中初始化条目列表

1
2
3
4
5
6
7
8
9
10
11
12
13
14
SearchList::SearchList(QWidget *parent):QListWidget(parent),_find_dlg(nullptr), _search_edit(nullptr), _send_pending(false)
{
Q_UNUSED(parent);
this->setHorizontalScrollBarPolicy(Qt::ScrollBarAlwaysOff);
this->setVerticalScrollBarPolicy(Qt::ScrollBarAlwaysOff);
// 安装事件过滤器
this->viewport()->installEventFilter(this);
//连接点击的信号和槽
connect(this, &QListWidget::itemClicked, this, &SearchList::slot_item_clicked);
//添加条目
addTipItem();
//连接搜索条目
connect(TcpMgr::GetInstance().get(), &TcpMgr::sig_user_search, this, &SearchList::slot_user_search);
}

addTipItem是用来添加一个一个条目的

1
2
3
4
5
6
7
8
9
10
11
12
13
14
15
16
17
18
19
void SearchList::addTipItem()
{
auto *invalid_item = new QWidget();
QListWidgetItem *item_tmp = new QListWidgetItem;
//qDebug()<<"chat_user_wid sizeHint is " << chat_user_wid->sizeHint();
item_tmp->setSizeHint(QSize(250,10));
this->addItem(item_tmp);
invalid_item->setObjectName("invalid_item");
this->setItemWidget(item_tmp, invalid_item);
item_tmp->setFlags(item_tmp->flags() & ~Qt::ItemIsSelectable);


auto *add_user_item = new AddUserItem();
QListWidgetItem *item = new QListWidgetItem;
//qDebug()<<"chat_user_wid sizeHint is " << chat_user_wid->sizeHint();
item->setSizeHint(add_user_item->sizeHint());
this->addItem(item);
this->setItemWidget(item, add_user_item);
}

sig_user_search可以先在TcpMgr中声明信号

1
void sig_user_search(std::shared_ptr<SearchInfo>);

SearchInfo定义在userdata.h中

1
2
3
4
5
6
7
8
9
class SearchInfo {
public:
SearchInfo(int uid, QString name, QString nick, QString desc, int sex);
int _uid;
QString _name;
QString _nick;
QString _desc;
int _sex;
};

接下来实现我们自定义的AddUserItem, 在pro中添加qt设计师界面类AddUserItem

1
2
3
4
5
6
7
8
9
10
11
12
13
14
15
class AddUserItem : public ListItemBase
{
Q_OBJECT

public:
explicit AddUserItem(QWidget *parent = nullptr);
~AddUserItem();
QSize sizeHint() const override {
return QSize(250, 70); // 返回自定义的尺寸
}
protected:

private:
Ui::AddUserItem *ui;
};

实现

1
2
3
4
5
6
7
8
9
10
11
12
AddUserItem::AddUserItem(QWidget *parent) :
ListItemBase(parent),
ui(new Ui::AddUserItem)
{
ui->setupUi(this);
SetItemType(ListItemType::ADD_USER_TIP_ITEM);
}

AddUserItem::~AddUserItem()
{
delete ui;
}

我们将ChatDialog.ui中将search_list升级为SearchList类型

美化界面

我们用qss美化界面

1
2
3
4
5
6
7
8
9
10
11
12
13
14
15
16
17
18
19
20
21
22
23
24
25
26
27
28
29
30
31
32
33
34
35
36
37
38
39
40
41
42
43
44
45
46
#search_edit {
border: 2px solid #f1f1f1;
}

/* 搜索框列表*/
#search_list {
background-color: rgb(247,247,248);
border: none;
}

#search_list::item:selected {
background-color: #d3d7d4;
border: none;
outline: none;
}

#search_list::item:hover {
background-color: rgb(206,207,208);
border: none;
outline: none;
}

#search_list::focus {
border: none;
outline: none;
}

#invalid_item {
background-color: #eaeaea;
border: none;
}

#add_tip {
border-image: url(:/res/addtip.png);
}

#right_tip{
border-image: url(:/res/right_tip.png);
}

#message_tip{
text-align: center;
font-family: "Microsoft YaHei";
font-size: 12pt;
}

我们在ChatDialog的构造函数中添加

1
2
//链接搜索框输入变化
connect(ui->search_edit, &QLineEdit::textChanged, this, &ChatDialog::slot_text_changed);

slot_text_changed槽函数中实现

1
2
3
4
5
6
7
void ChatDialog::slot_text_changed(const QString &str)
{
//qDebug()<< "receive slot text changed str is " << str;
if (!str.isEmpty()) {
ShowSearch(true);
}
}

源码和视频

再次启动后在输入框输入文字,就会显示搜索框

https://cdn.llfc.club/1719113143252.jpg

视频

https://www.bilibili.com/video/BV1uM4m1U7MP/?spm_id_from=333.999.0.0&vd_source=8be9e83424c2ed2c9b2a3ed1d01385e9

源码链接

https://gitee.com/secondtonone1/llfcchat

<1…456…37>

370 posts
17 categories
21 tags
RSS
GitHub ZhiHu
© 2025 恋恋风辰 本站总访问量次 | 本站访客数人
Powered by Hexo
|
Theme — NexT.Muse v5.1.3