boost::asio之socket的创建和连接

网络编程基本流程

网络编程的基本流程对于服务端是这样的
服务端
1)socket—-创建socket对象。

2)bind—-绑定本机ip+port。

3)listen—-监听来电,若在监听到来电,则建立起连接。

4)accept—-再创建一个socket对象给其收发消息。原因是现实中服务端都是面对多个客户端,那么为了区分各个客户端,则每个客户端都需再分配一个socket对象进行收发消息。

5)read、write—-就是收发消息了。

对于客户端是这样的
客户端
1)socket—-创建socket对象。

2)connect—-根据服务端ip+port,发起连接请求。

3)write、read—-建立连接后,就可发收消息了。

图示如下
https://cdn.llfc.club/1540562-20190417002428451-62583604.jpg
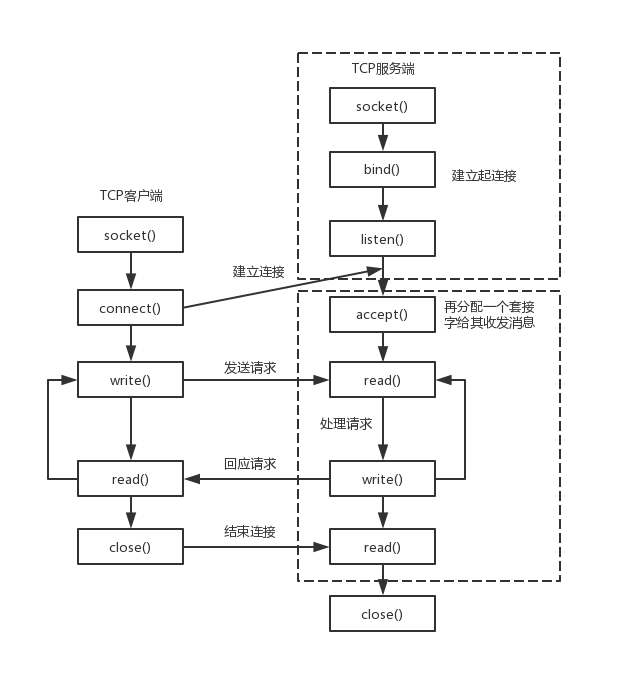
相关的网络编程技术可以看看我之前写的文章
https://llfc.club/articlepage?id=2LXIKWJtKGblnWtHT7TplLKK6ze
接下来按照上述流程,我们用boost::asio逐步介绍。

终端节点的创建

所谓终端节点就是用来通信的端对端的节点,可以通过ip地址和端口构造,其的节点可以连接这个终端节点做通信.
如果我们是客户端,我们可以通过对端的ip和端口构造一个endpoint,用这个endpoint和其通信。

1
2
3
4
5
6
7
8
9
10
11
12
13
14
15
16
17
18
19
20
21
22
23
24
25
26
27
28
29
30
31
int  client_end_point() {
// Step 1. Assume that the client application has already
// obtained the IP-address and the protocol port number.
std::string raw_ip_address = "127.0.0.1";
unsigned short port_num = 3333;

// Used to store information about error that happens
// while parsing the raw IP-address.
boost::system::error_code ec;
// Step 2. Using IP protocol version independent address
// representation.
asio::ip::address ip_address =
asio::ip::address::from_string(raw_ip_address, ec);

if (ec.value() != 0) {
// Provided IP address is invalid. Breaking execution.
std::cout
<< "Failed to parse the IP address. Error code = "
<< ec.value() << ". Message: " << ec.message();
return ec.value();
}

// Step 3.
asio::ip::tcp::endpoint ep(ip_address, port_num);

// Step 4. The endpoint is ready and can be used to specify a
// particular server in the network the client wants to
// communicate with.

return 0;
}

如果是服务端,则只需根据本地地址绑定就可以生成endpoint

1
2
3
4
5
6
7
8
9
10
11
12
13
14
15
16
17
18
19
20
int  server_end_point(){
// Step 1. Here we assume that the server application has
//already obtained the protocol port number.
unsigned short port_num = 3333;

// Step 2. Create special object of asio::ip::address class
// that specifies all IP-addresses available on the host. Note
// that here we assume that server works over IPv6 protocol.
asio::ip::address ip_address = asio::ip::address_v6::any();

// Step 3.
asio::ip::tcp::endpoint ep(ip_address, port_num);

// Step 4. The endpoint is created and can be used to
// specify the IP addresses and a port number on which
// the server application wants to listen for incoming
// connections.

return 0;
}

创建socket

创建socket分为4步,创建上下文iocontext,选择协议,生成socket,打开socket。

1
2
3
4
5
6
7
8
9
10
11
12
13
14
15
16
17
18
19
20
21
22
23
24
25
26
27
28
29
int create_tcp_socket() {
// Step 1. An instance of 'io_service' class is required by
// socket constructor.
asio::io_context ios;

// Step 2. Creating an object of 'tcp' class representing
// a TCP protocol with IPv4 as underlying protocol.
asio::ip::tcp protocol = asio::ip::tcp::v4();

// Step 3. Instantiating an active TCP socket object.
asio::ip::tcp::socket sock(ios);

// Used to store information about error that happens
// while opening the socket.
boost::system::error_code ec;

// Step 4. Opening the socket.
sock.open(protocol, ec);

if (ec.value() != 0) {
// Failed to open the socket.
std::cout
<< "Failed to open the socket! Error code = "
<< ec.value() << ". Message: " << ec.message();
return ec.value();
}

return 0;
}

上述socket只是通信的socket,如果是服务端,我们还需要生成一个acceptor的socket,用来接收新的连接。

1
2
3
4
5
6
7
8
9
10
11
12
13
14
15
16
17
18
19
20
21
22
23
24
25
26
27
28
29
30
int  create_acceptor_socket() {
// Step 1. An instance of 'io_service' class is required by
// socket constructor.
asio::io_context ios;

// Step 2. Creating an object of 'tcp' class representing
// a TCP protocol with IPv6 as underlying protocol.
asio::ip::tcp protocol = asio::ip::tcp::v6();

// Step 3. Instantiating an acceptor socket object.
asio::ip::tcp::acceptor acceptor(ios);

// Used to store information about error that happens
// while opening the acceptor socket.
boost::system::error_code ec;

// Step 4. Opening the acceptor socket.
acceptor.open(protocol, ec);

if (ec.value() != 0) {
// Failed to open the socket.
std::cout
<< "Failed to open the acceptor socket!"
<< "Error code = "
<< ec.value() << ". Message: " << ec.message();
return ec.value();
}

return 0;
}

绑定acceptor

对于acceptor类型的socket,服务器要将其绑定到指定的断点,所有连接这个端点的连接都可以被接收到。

1
2
3
4
5
6
7
8
9
10
11
12
13
14
15
16
17
18
19
20
21
22
23
24
25
26
27
28
29
30
31
32
33
34
int  bind_acceptor_socket() {

// Step 1. Here we assume that the server application has
// already obtained the protocol port number.
unsigned short port_num = 3333;

// Step 2. Creating an endpoint.
asio::ip::tcp::endpoint ep(asio::ip::address_v4::any(),
port_num);

// Used by 'acceptor' class constructor.
asio::io_context ios;

// Step 3. Creating and opening an acceptor socket.
asio::ip::tcp::acceptor acceptor(ios, ep.protocol());

boost::system::error_code ec;

// Step 4. Binding the acceptor socket.
acceptor.bind(ep, ec);

// Handling errors if any.
if (ec.value() != 0) {
// Failed to bind the acceptor socket. Breaking
// execution.
std::cout << "Failed to bind the acceptor socket."
<< "Error code = " << ec.value() << ". Message: "
<< ec.message();

return ec.value();
}

return 0;
}

连接指定的端点

作为客户端可以连接服务器指定的端点进行连接

1
2
3
4
5
6
7
8
9
10
11
12
13
14
15
16
17
18
19
20
21
22
23
24
25
26
27
28
29
30
31
32
33
34
35
36
int  connect_to_end() {
// Step 1. Assume that the client application has already
// obtained the IP address and protocol port number of the
// target server.
std::string raw_ip_address = "127.0.0.1";
unsigned short port_num = 3333;

try {
// Step 2. Creating an endpoint designating
// a target server application.
asio::ip::tcp::endpoint
ep(asio::ip::address::from_string(raw_ip_address),
port_num);

asio::io_context ios;

// Step 3. Creating and opening a socket.
asio::ip::tcp::socket sock(ios, ep.protocol());

// Step 4. Connecting a socket.
sock.connect(ep);

// At this point socket 'sock' is connected to
// the server application and can be used
// to send data to or receive data from it.
}
// Overloads of asio::ip::address::from_string() and
// asio::ip::tcp::socket::connect() used here throw
// exceptions in case of error condition.
catch (system::system_error& e) {
std::cout << "Error occured! Error code = " << e.code()
<< ". Message: " << e.what();

return e.code().value();
}
}

服务器接收连接

当有客户端连接时,服务器需要接收连接

1
2
3
4
5
6
7
8
9
10
11
12
13
14
15
16
17
18
19
20
21
22
23
24
25
26
27
28
29
30
31
32
33
34
35
36
37
38
39
40
41
42
43
44
45
int accept_new_connection(){
// The size of the queue containing the pending connection
// requests.
const int BACKLOG_SIZE = 30;

// Step 1. Here we assume that the server application has
// already obtained the protocol port number.
unsigned short port_num = 3333;

// Step 2. Creating a server endpoint.
asio::ip::tcp::endpoint ep(asio::ip::address_v4::any(),
port_num);

asio::io_context ios;

try {
// Step 3. Instantiating and opening an acceptor socket.
asio::ip::tcp::acceptor acceptor(ios, ep.protocol());

// Step 4. Binding the acceptor socket to the
// server endpint.
acceptor.bind(ep);

// Step 5. Starting to listen for incoming connection
// requests.
acceptor.listen(BACKLOG_SIZE);

// Step 6. Creating an active socket.
asio::ip::tcp::socket sock(ios);

// Step 7. Processing the next connection request and
// connecting the active socket to the client.
acceptor.accept(sock);

// At this point 'sock' socket is connected to
//the client application and can be used to send data to
// or receive data from it.
}
catch (system::system_error& e) {
std::cout << "Error occured! Error code = " << e.code()
<< ". Message: " << e.what();

return e.code().value();
}
}

关于buffer

任何网络库都有提供buffer的数据结构,所谓buffer就是接收和发送数据时缓存数据的结构。
boost::asio提供了asio::mutable_buffer 和 asio::const_buffer这两个结构,他们是一段连续的空间,首字节存储了后续数据的长度。
asio::mutable_buffer用于写服务,asio::const_buffer用于读服务。但是这两个结构都没有被asio的api直接使用。
对于api的buffer参数,asio提出了MutableBufferSequence和ConstBufferSequence概念,他们是由多个asio::mutable_buffer和asio::const_buffer组成的。也就是说boost::asio为了节省空间,将一部分连续的空间组合起来,作为参数交给api使用。
我们可以理解为MutableBufferSequence的数据结构为std::vectorasio::mutable_buffer
结构如下
https://cdn.llfc.club/1676257797218.jpg
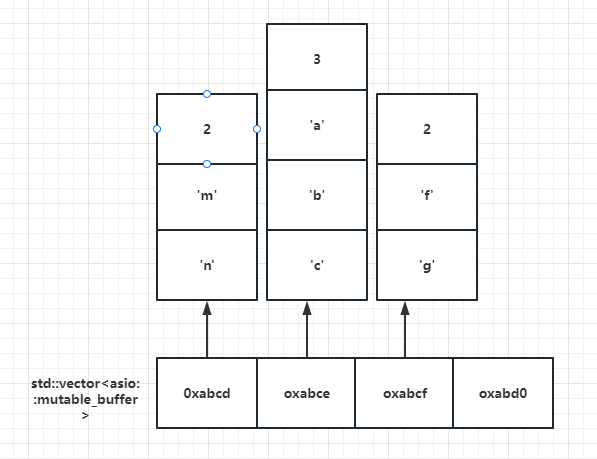
每隔vector存储的都是mutable_buffer的地址,每个mutable_buffer的第一个字节表示数据的长度,后面跟着数据内容。
这么复杂的结构交给用户使用并不合适,所以asio提出了buffer()函数,该函数接收多种形式的字节流,该函数返回asio::mutable_buffers_1 o或者asio::const_buffers_1结构的对象。
如果传递给buffer()的参数是一个只读类型,则函数返回asio::const_buffers_1 类型对象。
如果传递给buffer()的参数是一个可写类型,则返回asio::mutable_buffers_1 类型对象。
asio::const_buffers_1和asio::mutable_buffers_1是asio::mutable_buffer和asio::const_buffer的适配器,提供了符合MutableBufferSequence和ConstBufferSequence概念的接口,所以他们可以作为boost::asio的api函数的参数使用。
简单概括一下,我们可以用buffer()函数生成我们要用的缓存存储数据。
比如boost的发送接口send要求的参数为ConstBufferSequence类型

1
2
template<typename ConstBufferSequence>
std::size_t send(const ConstBufferSequence & buffers);

我们需要将”Hello Word转化为该类型”

1
2
3
4
5
6
void use_const_buffer() {
std::string buf = "hello world!";
asio::const_buffer asio_buf(buf.c_str(), buf.length());
std::vector<asio::const_buffer> buffers_sequence;
buffers_sequence.push_back(asio_buf);
}

最终buffers_sequence就是可以传递给发送接口send的类型。但是这太复杂了,可以直接用buffer函数转化为send需要的参数类型

1
2
3
void use_buffer_str() {
asio::const_buffers_1 output_buf = asio::buffer("hello world");
}

output_buf可以直接传递给该send接口。我们也可以将数组转化为send接受的类型

1
2
3
4
5
void use_buffer_array(){
const size_t BUF_SIZE_BYTES = 20;
std::unique_ptr<char[] > buf(new char[BUF_SIZE_BYTES]);
auto input_buf = asio::buffer(static_cast<void*>(buf.get()), BUF_SIZE_BYTES);
}

对于流式操作,我们可以用streambuf,将输入输出流和streambuf绑定,可以实现流式输入和输出。

1
2
3
4
5
6
7
8
9
10
11
12
13
14
15
16
17
18
19
20
21
void use_stream_buffer() {
asio::streambuf buf;

std::ostream output(&buf);

// Writing the message to the stream-based buffer.
output << "Message1\nMessage2";

// Now we want to read all data from a streambuf
// until '\n' delimiter.
// Instantiate an input stream which uses our
// stream buffer.
std::istream input(&buf);

// We'll read data into this string.
std::string message1;

std::getline(input, message1);

// Now message1 string contains 'Message1'.
}