无锁并发的应用(无锁队列)

简介

前文介绍了如何通过内存顺序实现内存模型,本文基于前文的基础,利用内存顺序和内存模型的知识,带着大家探索无锁并发的应用,主要是通过无锁队列的实现来让大家熟悉无锁并发的实现方式。

环形队列

我们要实现无锁并发,经常会用到一种结构无锁队列,而无锁队列和我们经常使用的队列颇有不同,它采用的是环状的队列结构,为什么成环呢?主要有两个好处,一个是成环的队列大小是固定的,另外一个我们通过移动头和尾就能实现数据的插入和取出。

我们看下图是一个环形队列的基本结构

https://cdn.llfc.club/4a6ee05475ca071cc608c9eb35920af.png

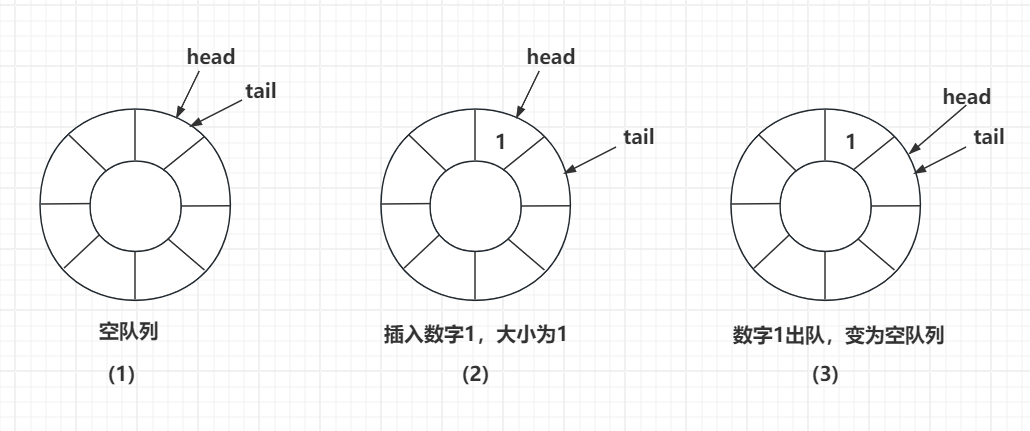
图1表示队列为空的时候,头节点和尾节点交会在一起,指向同一个扇区。

图2表示当我们你插入一个数字1后,队列大小为1,此时tail指针移动到下一个扇区,head指向头部,1被存储在头部了。

图3表示当我们将数字1出队后,head指针向后移动一个扇区,此时head和tail指向同一个扇区,表示队列又为空了。那有人会问队列中数字1为什么不清空呢?其实不用清空,因为当我们插入新数据时就可以覆盖掉1这个无效的数据。

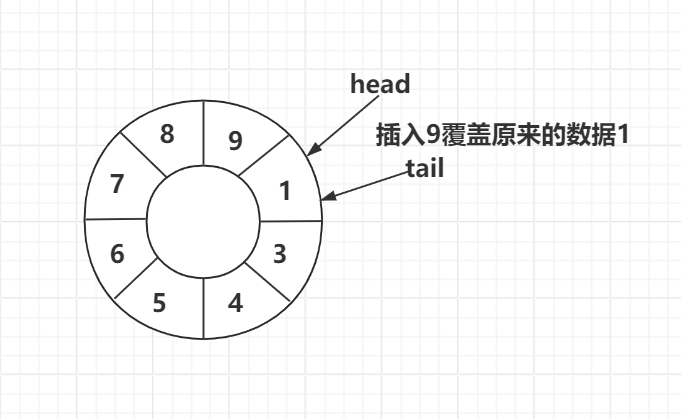
比如我们继续3图,连续插入几个数字,将队列填满。

https://cdn.llfc.club/1698926107471.jpg

图4说明的就是当我们连续插入了几个数字,插入数据9的时候将原来1的数据覆盖了,所以环形队列删除数据的时候我们不用让数据出队,只要移动head指针即可。

另外我们从图4也能看出,此时tail指向的位置正好是head的前一个位置,这种情况表示队列满了。

用锁实现环形队列

我们可以用锁实现上述环形队列,在push和pop时分别加锁,并通过head和tail计算队列是否为满或者空。

代码比较简单,可以看看下面的写法

1
2
3
4
5
6
7
8
9
10
11
12
13
14
15
16
17
18
19
20
21
22
23
24
25
26
27
28
29
30
31
32
33
34
35
36
37
38
39
40
41
42
43
44
45
46
47
48
49
50
51
52
53
54
55
56
57
58
59
60
61
62
63
64
65
66
67
68
69
70
71
72
73
74
75
76
#include <iostream>
#include <mutex>
#include <memory>

template<typename T, size_t Cap>
class CircularQueLk :private std::allocator<T> {
public:
CircularQueLk() :_max_size(Cap + 1),_data(std::allocator<T>::allocate(_max_size)), _head(0), _tail(0) {}
CircularQueLk(const CircularQueLk&) = delete;
CircularQueLk& operator = (const CircularQueLk&) volatile = delete;
CircularQueLk& operator = (const CircularQueLk&) = delete;

~CircularQueLk() {
//循环销毁
std::lock_guard<std::mutex> lock(_mtx);
//调用内部元素的析构函数
while (_head != _tail) {
std::allocator<T>::destroy(_data + _head);
_head = (_head+1)% _max_size;
}
//调用回收操作
std::allocator<T>::deallocate(_data, _max_size);
}

//先实现一个可变参数列表版本的插入函数最为基准函数
template <typename ...Args>
bool emplace(Args && ... args) {
std::lock_guard<std::mutex> lock(_mtx);
//判断队列是否满了
if ((_tail + 1) % _max_size == _head) {
std::cout << "circular que full ! " << std::endl;
return false;
}
//在尾部位置构造一个T类型的对象,构造参数为args...
std::allocator<T>::construct(_data + _tail, std::forward<Args>(args)...);
//更新尾部元素位置
_tail = (_tail + 1) % _max_size;
return true;
}

//push 实现两个版本,一个接受左值引用,一个接受右值引用

//接受左值引用版本
bool push(const T& val) {
std::cout << "called push const T& version" << std::endl;
return emplace(val);
}

//接受右值引用版本,当然也可以接受左值引用,T&&为万能引用
// 但是因为我们实现了const T&
bool push(T&& val) {
std::cout << "called push T&& version" << std::endl;
return emplace(std::move(val));
}

//出队函数
bool pop(T& val) {
std::lock_guard<std::mutex> lock(_mtx);
//判断头部和尾部指针是否重合,如果重合则队列为空
if (_head == _tail) {
std::cout << "circular que empty ! " << std::endl;
return false;
}
//取出头部指针指向的数据
val = std::move(_data[_head]);
//更新头部指针
_head = (_head + 1) % _max_size;
return true;
}
private:
size_t _max_size;
T* _data;
std::mutex _mtx;
size_t _head = 0;
size_t _tail = 0;
};

测试也比较简单,我们写一个函数,初始化队列大小为5,测试队列push满的情况和pop直到为空的情况

1
2
3
4
5
6
7
8
9
10
11
12
13
14
15
16
17
18
19
20
21
22
23
24
25
26
27
28
void TestCircularQue() {
//最大容量为10
CircularQueLk<MyClass, 5> cq_lk;
MyClass mc1(1);
MyClass mc2(2);
cq_lk.push(mc1);
cq_lk.push(std::move(mc2));
for (int i = 3; i <= 5; i++) {
MyClass mc(i);
auto res = cq_lk.push(mc);
if (res == false) {
break;
}
}

cq_lk.push(mc2);

for (int i = 0; i < 5; i++) {
MyClass mc1;
auto res = cq_lk.pop(mc1);
if (!res) {
break;
}
std::cout << "pop success, " << mc1 << std::endl;
}

auto res = cq_lk.pop(mc1);
}

结果如下

1
2
3
4
5
6
7
8
9
10
11
12
13
14
called push const T& version
called push T&& version
called push const T& version
circular que full !

pop success, MyClass Data is 1
pop success, MyClass Data is 2
pop success, MyClass Data is 3
pop success, MyClass Data is 4
pop success, MyClass Data is 5
circular que empty !

无锁队列

那如果我们用原子变量而不是用锁实现环形队列,那就是无锁并发的队列了。还记得我们之前提到的原子变量的读改写操作吗?

1
2
bool std::atomic<T>::compare_exchange_weak(T &expected, T desired);
bool std::atomic<T>::compare_exchange_strong(T &expected, T desired);

compare_exchange_strong会比较原子变量atomic<T>的值和expected的值是否相等,如果相等则执行交换操作,将atomic<T>的值换为desired并且返回true,否则将expected的值修改为bool变量的值,并且返回false.

其伪代码可以这么理解

1
2
3
4
5
6
7
8
template <typename T>
bool atomic<T>::compare_exchange_strong(T &expected, T desired) {
std::lock_guard<std::mutex> guard(m_lock);
if (m_val == expected)
return m_val = desired, true;
else
return expected = m_val, false;
}

compare_exchange_weak功能比compare_exchange_strong弱一些,他不能保证atomic<T>的值和expected的值相等时也会做交换,很可能原子变量和预期值相等也会返回false,所以使用要多次循环使用。

我们们定义一个类CircularQueSeq, 其内容和之前我们定义的类CircularQueLk差不多,只不过将类的成员变量mutex换成atomic类型的原子变量, 我们可以利用自旋锁的思路将锁替换为原子变量循环检测的方式,进而达到锁住互斥逻辑的效果。

大家可以先看一下全部的代码感受一下

1
2
3
4
5
6
7
8
9
10
11
12
13
14
15
16
17
18
19
20
21
22
23
24
25
26
27
28
29
30
31
32
33
34
35
36
37
38
39
40
41
42
43
44
45
46
47
48
49
50
51
52
53
54
55
56
57
58
59
60
61
62
63
64
65
66
67
68
69
70
71
72
73
74
75
76
77
78
79
80
81
82
83
84
85
86
87
88
89
90
91
92
93
94
95
96
97
98
99
100
101
102
103
104
105
106
107
108
109
110
111
112
113
114
115
116
117
118
119
120
121
122
123
124
125
126
127
128
129
template<typename T, size_t Cap>
class CircularQueSeq :private std::allocator<T> {
public:
CircularQueSeq() :_max_size(Cap + 1), _data(std::allocator<T>::allocate(_max_size)), _atomic_using(false),_head(0), _tail(0) {}
CircularQueSeq(const CircularQueSeq&) = delete;
CircularQueSeq& operator = (const CircularQueSeq&) volatile = delete;
CircularQueSeq& operator = (const CircularQueSeq&) = delete;

~CircularQueSeq() {
//循环销毁
bool use_expected = false;
bool use_desired = true;
do
{
use_expected = false;
use_desired = true;
}
while (!_atomic_using.compare_exchange_strong(use_expected, use_desired));
//调用内部元素的析构函数
while (_head != _tail) {
std::allocator<T>::destroy(_data + _head);
_head = (_head+1)% _max_size;
}
//调用回收操作
std::allocator<T>::deallocate(_data, _max_size);

do
{
use_expected = true;
use_desired = false;
}
while (!_atomic_using.compare_exchange_strong(use_expected, use_desired));
}

//先实现一个可变参数列表版本的插入函数最为基准函数
template <typename ...Args>
bool emplace(Args && ... args) {

bool use_expected = false;
bool use_desired = true;
do
{
use_expected = false;
use_desired = true;
}
while (!_atomic_using.compare_exchange_strong(use_expected, use_desired));

//判断队列是否满了
if ((_tail + 1) % _max_size == _head) {
std::cout << "circular que full ! " << std::endl;
do
{
use_expected = true;
use_desired = false;
}
while (!_atomic_using.compare_exchange_strong(use_expected, use_desired));
return false;
}
//在尾部位置构造一个T类型的对象,构造参数为args...
std::allocator<T>::construct(_data + _tail, std::forward<Args>(args)...);
//更新尾部元素位置
_tail = (_tail + 1) % _max_size;

do
{
use_expected = true;
use_desired = false;
}
while (!_atomic_using.compare_exchange_strong(use_expected, use_desired));

return true;
}

//push 实现两个版本,一个接受左值引用,一个接受右值引用

//接受左值引用版本
bool push(const T& val) {
std::cout << "called push const T& version" << std::endl;
return emplace(val);
}

//接受右值引用版本,当然也可以接受左值引用,T&&为万能引用
// 但是因为我们实现了const T&
bool push(T&& val) {
std::cout << "called push T&& version" << std::endl;
return emplace(std::move(val));
}

//出队函数
bool pop(T& val) {

bool use_expected = false;
bool use_desired = true;
do
{
use_desired = true;
use_expected = false;
} while (!_atomic_using.compare_exchange_strong(use_expected, use_desired));
//判断头部和尾部指针是否重合,如果重合则队列为空
if (_head == _tail) {
std::cout << "circular que empty ! " << std::endl;
do
{
use_expected = true;
use_desired = false;
}
while (!_atomic_using.compare_exchange_strong(use_expected, use_desired));
return false;
}
//取出头部指针指向的数据
val = std::move(_data[_head]);
//更新头部指针
_head = (_head + 1) % _max_size;

do
{
use_expected = true;
use_desired = false;
}while (!_atomic_using.compare_exchange_strong(use_expected, use_desired));
return true;
}
private:
size_t _max_size;
T* _data;
std::atomic<bool> _atomic_using;
size_t _head = 0;
size_t _tail = 0;
};

我们可以看到emplace函数以及pop函数等将锁替换为原子变量。采用do while的方式就是因为compare_exchange_strong比较原子变量和use_expected的值不同的时候会使use_expected改变,所以我们需要在再次循环之前重置use_expecteduse_desired的值。

我们可以写一个函数在单线程情况下下测试一下

1
2
3
4
5
6
7
8
9
10
11
12
13
14
15
16
17
18
19
20
21
22
23
24
25
26
27
28
29
30
31
32
33
34
35
36
37
38
39
40
41
42
43
44
45
46
47
48
void TestCircularQueSeq()
{
CircularQueSeq<MyClass, 3> cq_seq;
for(int i = 0; i < 4; i++)
{
MyClass mc1(i);
auto res = cq_seq.push(mc1);
if(!res)
{
break;
}
}

for(int i = 0; i < 4; i++)
{
MyClass mc1;
auto res = cq_seq.pop(mc1);
if(!res)
{
break;
}

std::cout << "pop success, " << mc1 << std::endl;
}

for (int i = 0; i < 4; i++)
{
MyClass mc1(i);
auto res = cq_seq.push(mc1);
if (!res)
{
break;
}
}

for (int i = 0; i < 4; i++)
{
MyClass mc1;
auto res = cq_seq.pop(mc1);
if (!res)
{
break;
}

std::cout << "pop success, " << mc1 << std::endl;
}
}

运行结果

1
2
3
4
5
6
7
8
9
10
11
12
13
14
15
16
17
18
called push const T& version
circular que full !
pop success, MyClass Data is 0
pop success, MyClass Data is 1
pop success, MyClass Data is 2
circular que empty !
called push const T& version
circular que full !
pop success, MyClass Data is 0
pop success, MyClass Data is 1
pop success, MyClass Data is 2
circular que empty !

多线程情况下也能保证安全是因为原子变量循环检测保证有且只有一个线程修改成功。读取也是这样。

单一原子变量的弊端

我们考虑上述单一原子变量的弊端

多个线程push和pop操作耦合读太高,同一时刻仅有一个线程pop或者push,而且互斥逻辑的精度不够。影响效率。

我们需要考虑将pop和push操作解耦,我们采用的是环形队列,将tailhead作为原子变量可以实现精细控制。

比如我们做push操作的时候,一个线程更新万tail标签和数据后,其他线程就可以pop或者push了,精细控制的好处就是效率提升。

我们定义一个新的类CircularQueLight,类的基本数据结构和CircularQueSeq差不多。

1
2
3
4
5
6
7
8
9
10
11
12
13
14
15
16
17
template<typename T, size_t Cap>
class CircularQueLight: private std::allocator<T>
{
public:
CircularQueLight():_max_size(Cap + 1),
_data(std::allocator<T>::allocate(_max_size))
, _head(0), _tail(0) {}

CircularQueLight(const CircularQueLight&) = delete;
CircularQueLight& operator = (const CircularQueLight&) volatile = delete;
CircularQueLight& operator = (const CircularQueLight&) = delete;
private:
size_t _max_size;
T* _data;
std::atomic<size_t> _head;
std::atomic<size_t> _tail;
};

我们将_head_tail 替换为原子变量。

接下来我们考虑pop逻辑

1
2
3
4
5
6
7
8
9
10
11
12
13
14
15
16
17
18
bool pop(T& val) {

size_t h;
do
{
h = _head.load(); //1 处
//判断头部和尾部指针是否重合,如果重合则队列为空
if(h == _tail.load())
{
return false;
}
val = _data[h]; // 2处

} while (!_head.compare_exchange_strong(h,
(h+1)% _max_size)); //3 处

return true;
}

在pop逻辑里我们在1处load获取头部head的值,在2处采用了复制的方式将头部元素取出赋值给val,而不是通过std::move,因为多个线程同时pop最后只有一个线程成功执行3处代码退出,而失败的则需要继续循环,从更新后的head处pop元素。所以不能用std::move,否则会破坏原有的队列数据。

接下来我们来做push的函数逻辑

1
2
3
4
5
6
7
8
9
10
11
12
13
14
15
16
17
18
19
   bool push(T& val)
{
size_t t;
do
{
t = _tail.load(); //1
//判断队列是否满
if( (t+1)%_max_size == _head.load())
{
return false;
}

_data[t] = val; //2

} while (!_tail.compare_exchange_strong(t,
(t + 1) % _max_size)); //3

return true;
}

push函数的逻辑乍一看和pop一样,但是我们会发现多线程push的情况存在线程安全问题。

比如我们线程1 push(1) 而线程2 push(2). 很有可能的顺序是

1.1 -> 1.2 -> 2.1 -> 2.2 -> 1.3

这样我们看到的效果就是_data[t]被存储为2了,而实际情况应该是被存储为1,因为线程1的原子变量生效,而线程2的原子变量不满足需继续循环。所以_data[t]必须修改为1.

那我们改进一下push的函数

1
2
3
4
5
6
7
8
9
10
11
12
13
14
15
16
17
18
19
20
21
 bool push(T& val)
{
size_t t;
do
{
t = _tail.load(); //1
//判断队列是否满
if( (t+1)%_max_size == _head.load())
{
return false;
}


} while (!_tail.compare_exchange_strong(t,
(t + 1) % _max_size)); //3

_data[t] = val; //2

return true;
}

我们将2处的代码移动到循环之外,这样能保证多个线程push,仅有一个线程生效时,他写入的数据一定是本线程要写入到tail的数据,而此时tail被缓存在t里,那是一个线程本地变量,所以在这种情况下我们能确定即使多个线程运行到2处,他们的t值也是不同的,并不会产生线程安全问题。

毕竟多个线程push数据时对资源的竞争仅限tail。

但是这种push操作仍然会有安全问题

我们思考这种情况

https://cdn.llfc.club/1699154222424.jpg

此时head和tail都指向1这个位置,当我们执行push(9)时,按照我们的逻辑会先执行3再执行2.

也就是会先将tail移动,然后更新1的值为9.

那如果我们更新了tail之后,还没来的及更新1为9,那么此时如果有其他的线程读取head的值,会读取到1,而不是9.

从多线程安全角度来讲这是不安全的,我们理想的情况是一个线程写完数据后另一个线程读取的就是之前写入的最新值。

为了解决这个问题,我们可以增加另一个原子变量_tail_update来标记尾部数据是否修改完成,如果尾部数据没有修改完成,此时其他线程pop时获取的数据就是不安全的,所以pop要返回false。

先实现push版本

1
2
3
4
5
6
7
8
9
10
11
12
13
14
15
16
17
18
19
20
21
22
23
24
25
26
27
   bool push(const T& val)
{
size_t t;
do
{
t = _tail.load(); //1
//判断队列是否满
if( (t+1)%_max_size == _head.load())
{
return false;
}


} while (!_tail.compare_exchange_strong(t,
(t + 1) % _max_size)); //3

_data[t] = val; //2
size_t tailup;
do
{
tailup = t;

} while (_tail_update.compare_exchange_strong(tailup,
(tailup + 1) % _max_size));
return true;
}

再实现pop版本

1
2
3
4
5
6
7
8
9
10
11
12
13
14
15
16
17
18
19
20
21
22
23
24
bool pop(T& val) {

size_t h;
do
{
h = _head.load(); //1 处
//判断头部和尾部指针是否重合,如果重合则队列为空
if(h == _tail.load())
{
return false;
}

//判断如果此时要读取的数据和tail_update是否一致,如果一致说明尾部数据未更新完
if(h == _tail_update.load())
{
return false;
}
val = _data[h]; // 2处

} while (!_head.compare_exchange_strong(h,
(h+1)% _max_size)); //3 处

return true;
}

pop版本也是,先判断队列是否为空,再判断h是否和_tail_update的值相等,如果相等说明有写数据的没更新完,直接返回false或者循环等待也行,为了方便我们直接返回false即可。

因为我们知道原子操作默认采用的是memory_order_seq_cst内存顺序,性能上不是最优的,我们可以用acquirerelease的内存顺序实现同步的效果。

优化性能

我们用acquire和release模型优化上述代码,实现同步。
最简单的方式就是将load的地方变为memory_order_relaxed,compare_exchange_strong的地方变为memory_order_release

我们先看pop操作

1
2
3
4
5
6
7
8
9
10
11
12
13
14
15
16
17
18
19
20
21
22
23
24
25
bool pop(T& val) {

size_t h;
do
{
h = _head.load(std::memory_order_relaxed); //1 处
//判断头部和尾部指针是否重合,如果重合则队列为空
if (h == _tail.load(std::memory_order_acquire)) //2处
{
std::cout << "circular que empty ! " << std::endl;
return false;
}

//判断如果此时要读取的数据和tail_update是否一致,如果一致说明尾部数据未更新完
if (h == _tail_update.load(std::memory_order_acquire)) //3处
{
return false;
}
val = _data[h]; // 2处

} while (!_head.compare_exchange_strong(h,
(h + 1) % _max_size, std::memory_order_release, std::memory_order_relaxed)); //4 处
std::cout << "pop data success, data is " << val << std::endl;
return true;
}

1 处为memory_order_relaxed是因为即使多个线程pop,每个线程获取的head可能不及时,这个没关系,因为我们有4处的while来重试。

2 compare_exchange_strong操作,在期望的条件匹配时采用memory_order_release, 期望的条件不匹配时memory_order_relaxed可以提升效率,毕竟还是要重试的。

我们再看push 操作

1
2
3
4
5
6
7
8
9
10
11
12
13
14
15
16
17
18
19
20
21
22
23
24
25
26
27
28
29
30
bool push(const T& val)
{
size_t t;
do
{
t = _tail.load(std::memory_order_relaxed); //5
//判断队列是否满
if ((t + 1) % _max_size == _head.load(std::memory_order_acquire))
{
std::cout << "circular que full ! " << std::endl;
return false;
}


} while (!_tail.compare_exchange_strong(t,
(t + 1) % _max_size, std::memory_order_release, std::memory_order_relaxed)); //6

_data[t] = val;
size_t tailup;
do
{
tailup = t;

} while (_tail_update.compare_exchange_strong(tailup,
(tailup + 1) % _max_size, std::memory_order_release, std::memory_order_relaxed)); //7

std::cout << "called push data success " << val << std::endl;
return true;
}

两个线程协同工作,一个线程先push,另一个线程后pop,那么对于tail部分和_tail_update,我们要保证push的结果_data[t] = val;先于pop的结果val = _data[h];

所以push线程中对于_tail_update的compare_exchange_strong操作采用memory_order_release方式。

pop线程对于_tail_update的load操作采用memory_order_acquire

如果一个线程先pop,另一个线程先push,那么对于head部分,我们要保证pop的结果val = _data[h];先于pop的结果_data[t] = val;

思考

优势

无锁高并发. 虽然存在循环重试, 但是这只会在相同操作并发的时候出现. push 不会因为与 pop 并发而重试, 反之亦然.

缺陷

这样队列只应该存储标量, 如果存储类对象时,多个push线程只有一个线程push成功,而拷贝复制的开销很大,其他线程会循环重试,每次重试都会有开销。

视频链接

https://space.bilibili.com/271469206/channel/collectiondetail?sid=1623290

源码链接

https://gitee.com/secondtonone1/boostasio-learn/tree/master/concurrent/day12-circularque