恋恋风辰的个人博客


  • Home

  • Archives

  • Categories

  • Tags

  • Search

C++ 全栈聊天项目(3) CRTP实现Http管理者

Posted on 2024-08-31 | In C++聊天项目

GateServer

网关服务器主要应答客户端基本的连接请求,包括根据服务器负载情况选择合适服务器给客户端登录,注册,获取验证服务等,接收http请求并应答。

boost库安装

boost库的安装分为Windows和Linux两部分,Linux部分放在后面再讲解。因为Windows比较直观,便于我们编写代码,所以优先在windows平台搭建环境并编写代码,测试无误后再移植到linux。

boost官网地址:

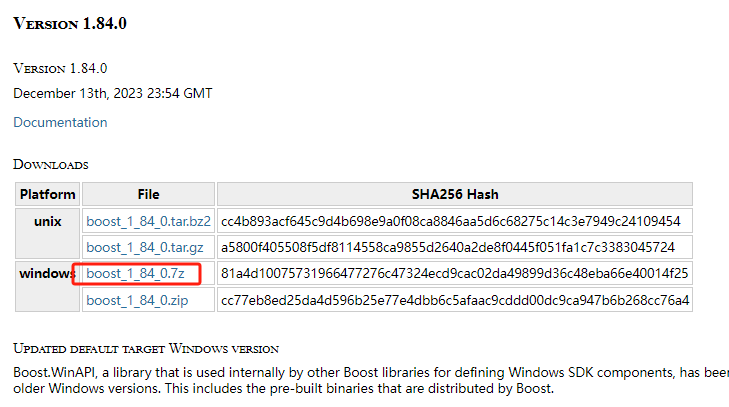
Boost库官网https://www.boost.org/,首先进入官网下载对应的Boost库文件。点击下图所示红框中Download进入下载页面。更多版本点击链接下载。

https://cdn.llfc.club/1709188088318.jpg

点击进入页面后,接下来选择7z或者zip文件都可以。

https://cdn.llfc.club/1709188365491.jpg

如果下载缓慢,大家可以去我的网盘下载
链接:https://pan.baidu.com/s/1Uf-7gZxWpCOl7dnYzlYRHg?pwd=xt01

提取码:xt01

我的是boost_1_81_0版本,大家可以和我的版本匹配,也可以自己用最新版。

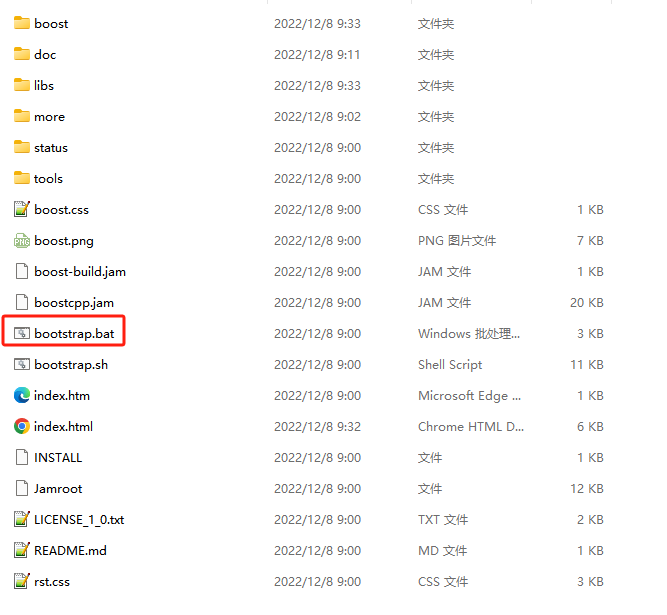
下载好后解压, 其中booststrap.bat点击后生成编译程序
https://cdn.llfc.club/1709189119436.jpg

点击后,生成b2.exe,我们执行如下命令

1
.\b2.exe install --toolset=msvc-14.2 --build-type=complete --prefix="D:\cppsoft\boost_1_81_0" link=static runtime-link=shared threading=multi debug release

先逐一解释各参数含义

  1. install可以更改为stage, stage表示只生成库(dll和lib), install还会生成包含头文件的include目录。一般来说用stage就可以了,我们将生成的lib和下载的源码包的include头文件夹放到项目要用的地方即可。

  2. toolset 指定编译器,gcc用来编译生成linux用的库,msvc-14.2(VS2019)用来编译windows使用的库,版本号看你的编译器比如msvc-10.0(VS2010),我的是VS2019所以是msvc-14.2。

  3. 如果选择的是install 命令,指定生成的库文件夹要用--prefix,如果使用的是stage命令,需要用--stagedir指定。

  4. link 表示生成动态库还是静态库,static表示生成lib库,shared表示生成dll库。

  5. runtime-link 表示用于指定运行时链接方式为静态库还是动态库,指定为static就是MT模式,指定shared就是MD模式。MD 和 MT 是微软 Visual C++ 编译器的选项,用于指定运行时库的链接方式。这两个选项有以下区别:

    • /MD:表示使用多线程 DLL(Dynamic Link Library)版本的运行时库。这意味着你的应用程序将使用动态链接的运行时库(MSVCRT.dll)。这样的设置可以减小最终可执行文件的大小,并且允许应用程序与其他使用相同运行时库版本的程序共享代码和数据。
    • /MT:表示使用多线程静态库(Static Library)版本的运行时库。这意味着所有的运行时函数将被静态链接到应用程序中,使得应用程序不再依赖于动态链接的运行时库。这样可以确保应用程序在没有额外依赖的情况下独立运行,但可能会导致最终可执行文件的体积增大。

执行上述命令后就会在指定目录生成lib库了,我们将lib库拷贝到要使用的地方即可。

一句话简化上面的含义,就是我们生成的是lib库,运行时采用的md加载模式。

下面是编译界面
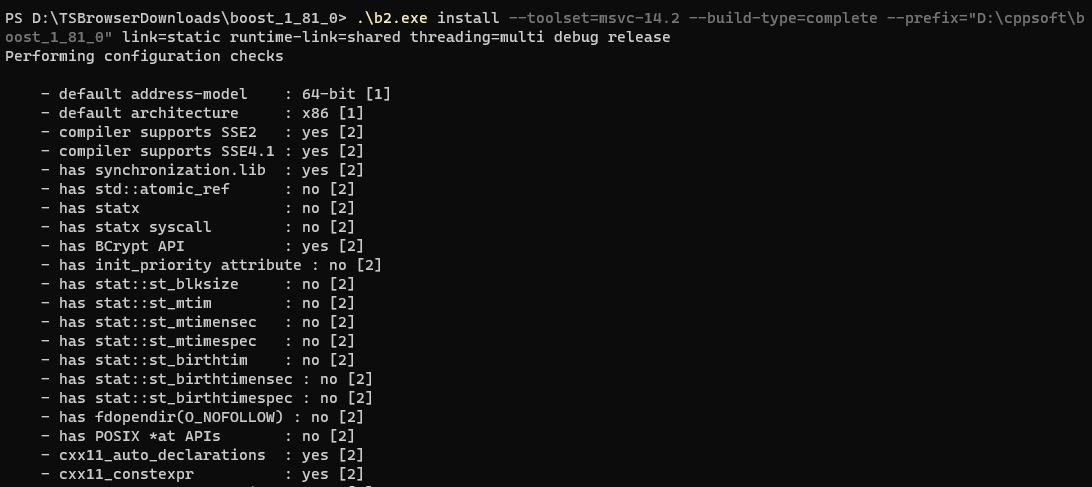
https://cdn.llfc.club/1709190169393.jpg

编译后生成如下目录和文件, 我的是D盘 cppsoft目录下的boost文件夹,大家可以根据自己的设置去指定文件夹查看。
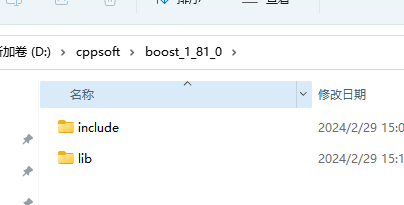
https://cdn.llfc.club/1709192144529.jpg

为了兼容我之前做的旧项目,我创建了一个stage文件夹,将lib文件夹和内容移动到stage中了。然后将include文件夹下的boost文件夹移出到boost_1_81_0目录下,整体看就就是如下
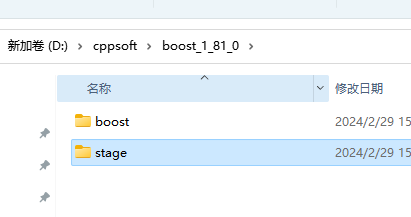
https://cdn.llfc.club/1709192797632.jpg

接下来我们创建项目并配置boost

配置boost

打开visual studio 创建项目
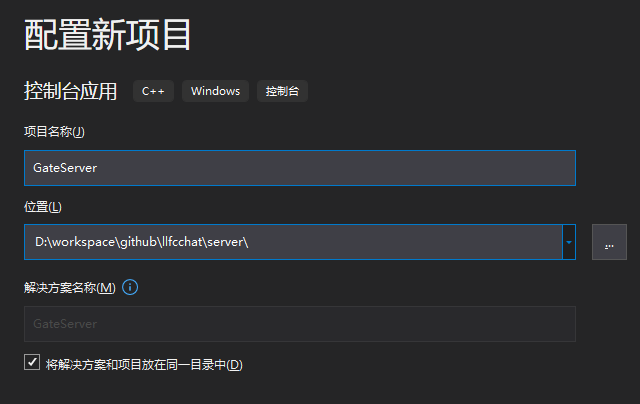
https://cdn.llfc.club/1709193315698.jpg

接下来配置boost到项目中,右键项目选择属性,配置VC++包含目录,添加D:\cppsoft\boost_1_81_0(根据你自己的boost目录配置)
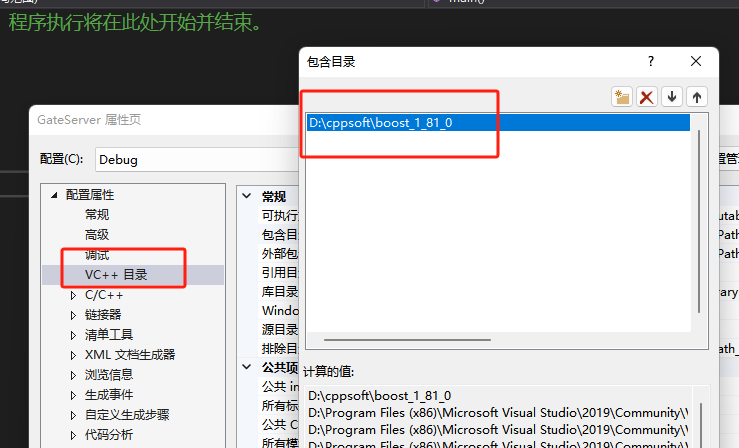
https://cdn.llfc.club/1709193680525.jpg

再配置VC++库目录, 添加D:\cppsoft\boost_1_81_0\stage\lib
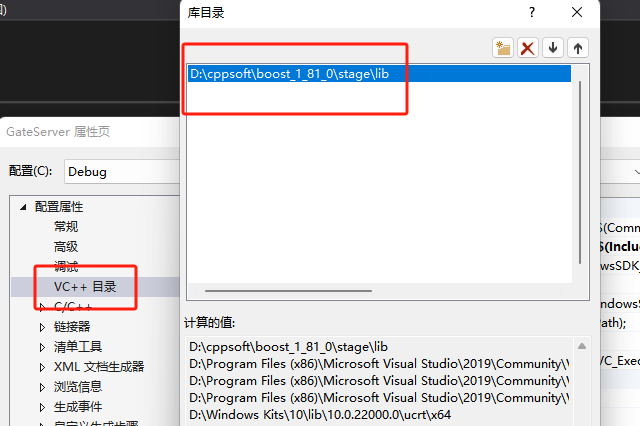
https://cdn.llfc.club/1709194005921.jpg

写个代码测试一下

1
2
3
4
5
6
7
8
9
10
11
12
13
14
15
16
17
18
#include <iostream>
#include <string>
#include "boost/lexical_cast.hpp"
int main()
{
using namespace std;
cout << "Enter your weight: ";
float weight;
cin >> weight;
string gain = "A 10% increase raises ";
string wt = boost::lexical_cast<string> (weight);
gain = gain + wt + " to "; // string operator()
weight = 1.1 * weight;
gain = gain + boost::lexical_cast<string>(weight) + ".";
cout << gain << endl;
system("pause");
return 0;
}

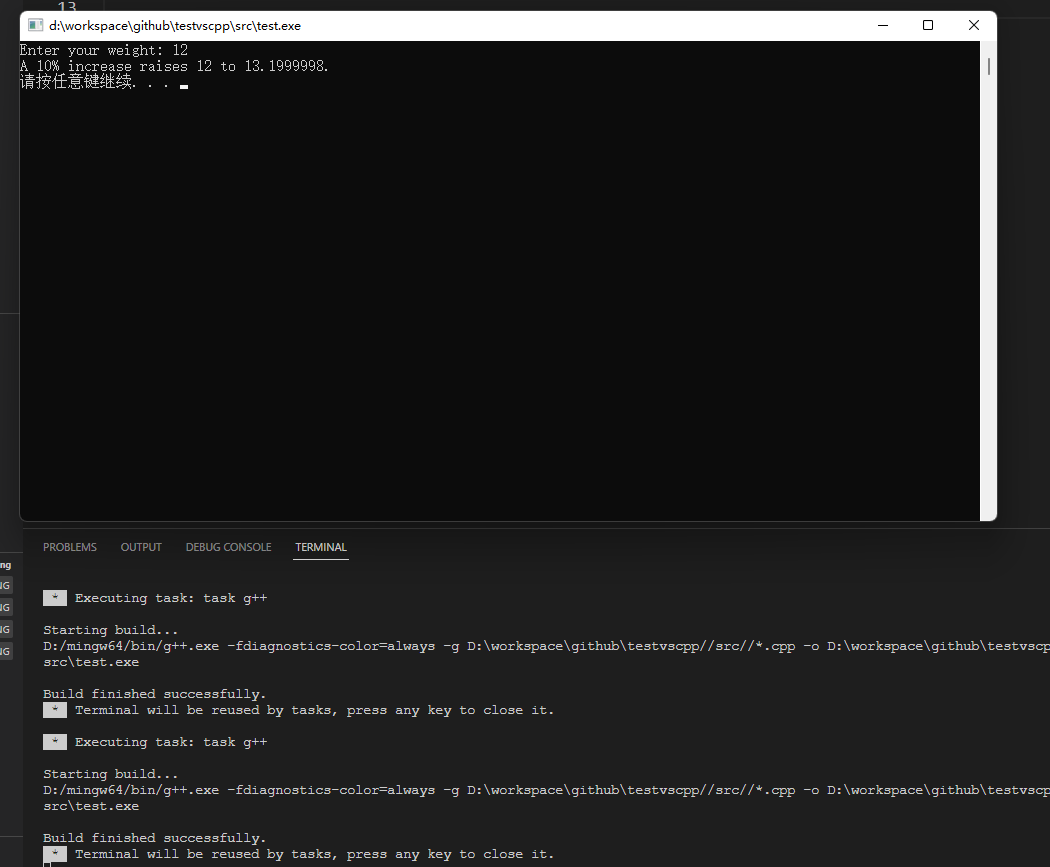
运行成功,可以看到弹出了窗口

https://cdn.llfc.club/1675233803676.jpg

配置jsoncpp

因为要用到json解析,所以我们选择jsoncpp来做后端json解析工作

jsoncpp下载地址:
https://github.com/open-source-parsers/jsoncpp
官方文档:
http://jsoncpp.sourceforge.net/old.html

选择windows版本的下载。

如果下载速度很慢,可以去我的网盘地址下载
https://pan.baidu.com/s/1Yg9Usdc3T-CYhyr9GiePCw?pwd=ng6x

验证码ng6x
下载后我们解压文件夹,解压后文件夹如下图
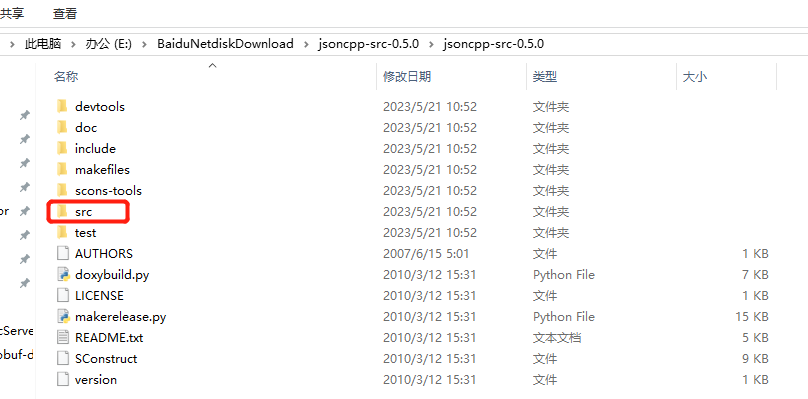
https://cdn.llfc.club/1684638346874.jpg

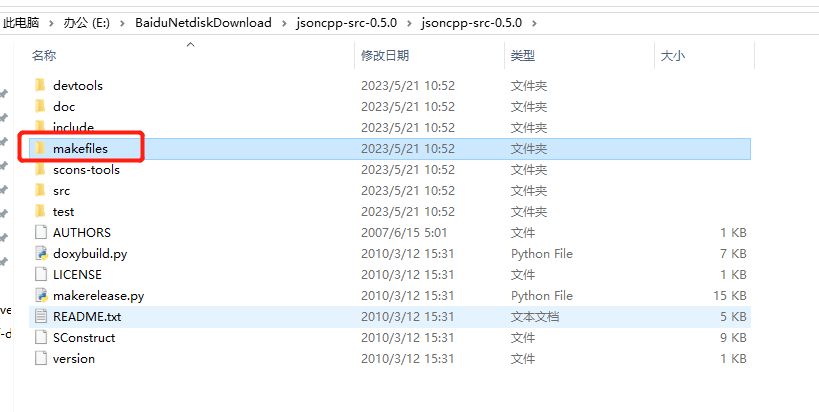
然后进行编译,编译需要进入makefile文件夹下

https://cdn.llfc.club/1684638830012.jpg

找到jsoncpp.sln文件,用visual studio打开,因为我的是visual studio2019版本,所以会提示我升级。
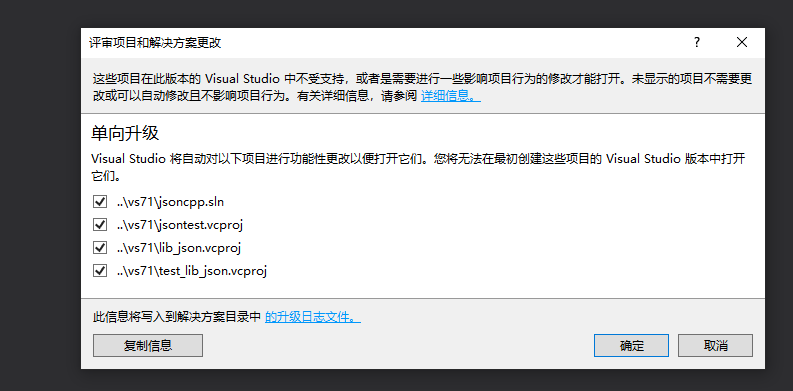
https://cdn.llfc.club/1684638950615.jpg

点击确定升级,之后我们选择编译lib_json即可,当然偷懒可以选择编译整个解决方案。
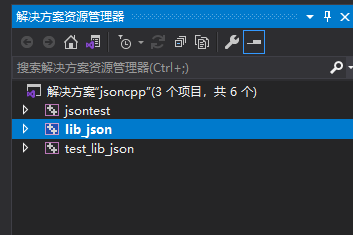
https://cdn.llfc.club/1684639169065.jpg

然后我们配置编译属性,我想要用x64位的,所以配置编译平台为X64位,编译模式为debug模式,大家最好把release版和debug版都编译一遍。

右键lib_json属性里选择C++,再选择代码生成,之后在右侧选择运行库,选择md(release版), mdd(debug版).
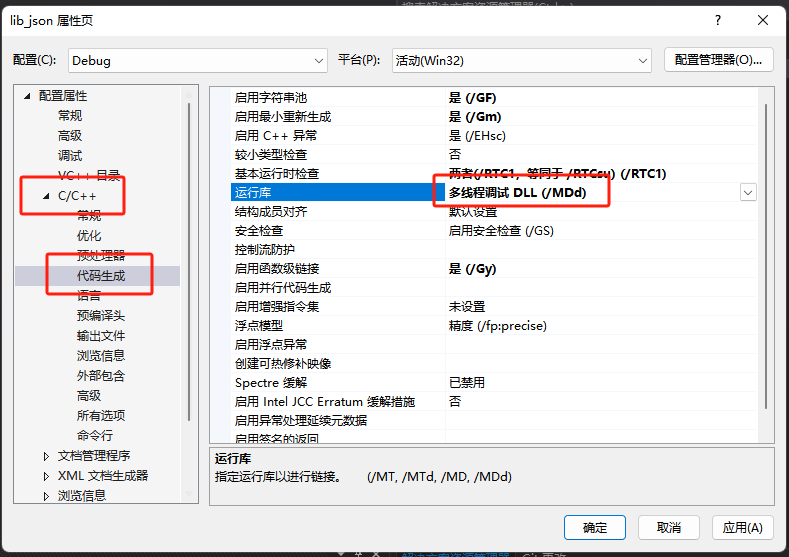
https://cdn.llfc.club/1709197886189.jpg

编译生成后,我们的json库生成在项目同级目录的x64文件夹下的debug目录下
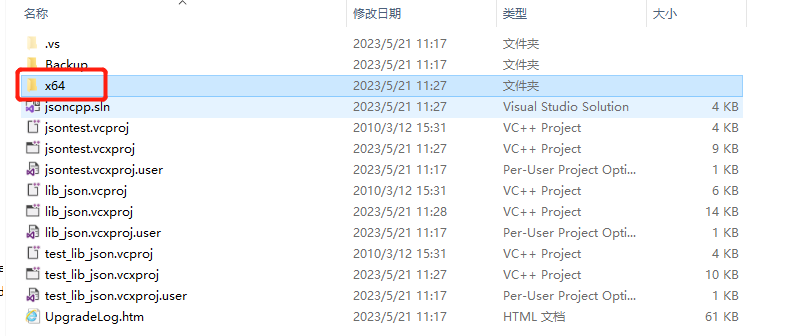
https://cdn.llfc.club/1684640251160.jpg

接下来我们在D盘cppsoft新建一个文件夹libjson,然后在其内部分别建立include和lib文件夹
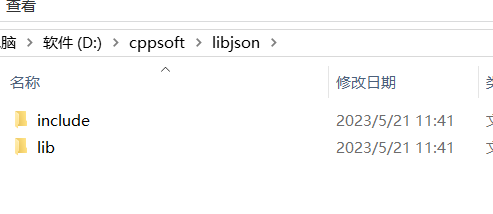
https://cdn.llfc.club/1684640531206.jpg

将jsoncpp-src-0.5.0源码文件夹下include文件夹里的内容copy到libjson下的include文件夹内。

将jsoncpp-src-0.5.0源码文件夹下x64位debug文件夹和Release文件夹下生成的库copy到libjson下的lib文件夹内。
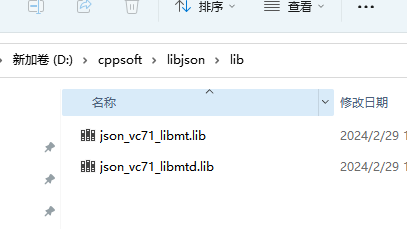
https://cdn.llfc.club/1709198276119.jpg

我们生成的是mdd和md版本的库,但是名字却是mt,这个是visual studio生成的小bug先不管了。

接下来我们新建一个项目,在项目属性中配置jsoncpp

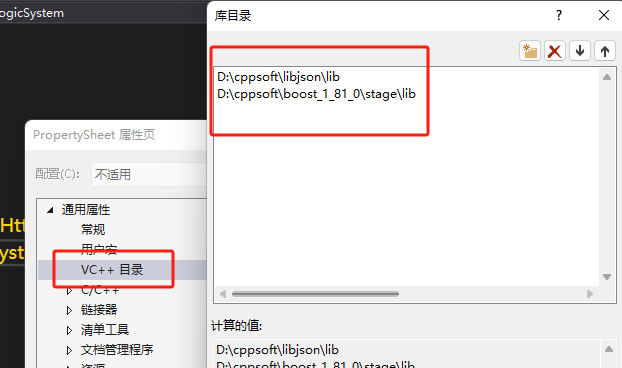
项目属性中,VC++包含目录设置为 D:\cppsoft\libjson\include

库目录选择为 VC++库目录设置为 D:\cppsoft\libjson\lib
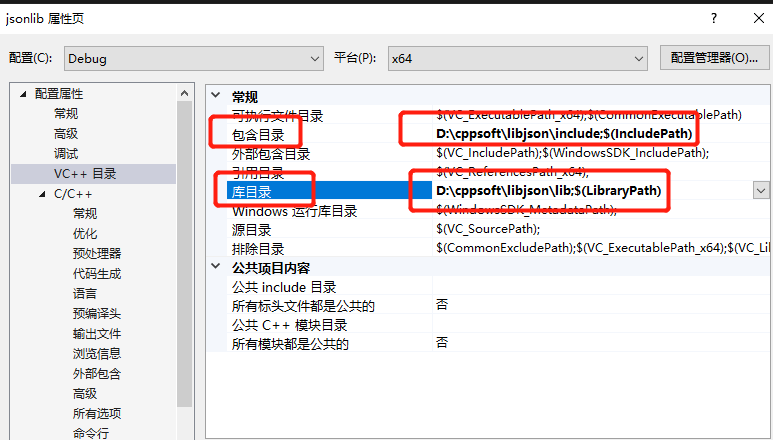
https://cdn.llfc.club/1684641520042.jpg

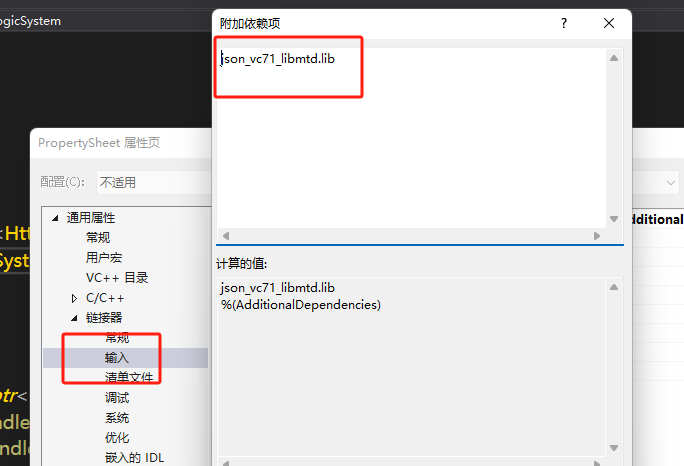
另外我们还要设置链接器->输入->附加依赖项里设置json_vc71_libmtd.lib
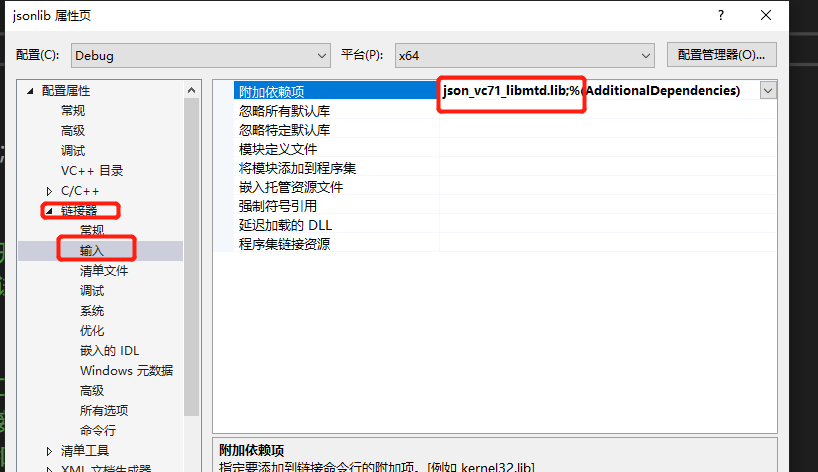
https://cdn.llfc.club/1684641902273.jpg

我们写个程序测试一下json库安装的情况

1
2
3
4
5
6
7
8
9
10
11
12
13
14
15
16
17
18
#include <iostream>
#include <json/json.h>
#include <json/value.h>
#include <json/reader.h>

int main()
{
Json::Value root;
root["id"] = 1001;
root["data"] = "hello world";
std::string request = root.toStyledString();
std::cout << "request is " << request << std::endl;

Json::Value root2;
Json::Reader reader;
reader.parse(request, root2);
std::cout << "msg id is " << root2["id"] << " msg is " << root2["data"] << std::endl;
}

从这段代码中,我们先将root序列化为字符串,再将字符串反序列化为root2.

输出如下
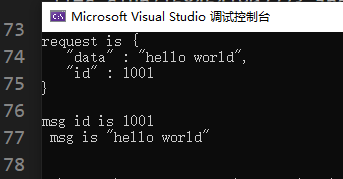
https://cdn.llfc.club/1684642765063.jpg

C++ 全栈聊天项目(4) visualstudio配置boost与jsoncpp

Posted on 2024-08-31 | In C++聊天项目

绑定和监听连接

我们利用visual studio创建一个空项目,项目名字为GateServer,然后按照day03的方法配置boost库和jsoncpp配置好后,我们添加一个新的类,名字叫CServer。添加成功后生成的CServer.h和CServer.cpp也会自动加入到项目中。

CServer类构造函数接受一个端口号,创建acceptor接受新到来的链接。

CServer.h包含必要的头文件,以及简化作用域声明

1
2
3
4
5
6
7
8
#include <boost/beast/http.hpp>
#include <boost/beast.hpp>
#include <boost/asio.hpp>

namespace beast = boost::beast; // from <boost/beast.hpp>
namespace http = beast::http; // from <boost/beast/http.hpp>
namespace net = boost::asio; // from <boost/asio.hpp>
using tcp = boost::asio::ip::tcp; // from <boost/asio/ip/tcp.hpp>

CServer.h中声明acceptor, 以及用于事件循环的上下文iocontext,和构造函数

1
2
3
4
5
6
7
8
9
10
class CServer:public std::enable_shared_from_this<CServer>
{
public:
CServer(boost::asio::io_context& ioc, unsigned short& port);
void Start();
private:
tcp::acceptor _acceptor;
net::io_context& _ioc;
boost::asio::ip::tcp::socket _socket;
};

cpp中实现构造函数如下

1
2
3
4
CServer::CServer(boost::asio::io_context& ioc, unsigned short& port) :_ioc(ioc),
_acceptor(ioc, tcp::endpoint(tcp::v4(), port)),_socket(ioc) {

}

接下来我们实现Start函数,用来监听新链接

1
2
3
4
5
6
7
8
9
10
11
12
13
14
15
16
17
18
19
20
21
22
void CServer::Start()
{
auto self = shared_from_this();
_acceptor.async_accept(_socket, [self](beast::error_code ec) {
try {
//出错则放弃这个连接,继续监听新链接
if (ec) {
self->Start();
return;
}

//处理新链接,创建HpptConnection类管理新连接
std::make_shared<HttpConnection>(std::move(self->_socket))->Start();
//继续监听
self->Start();
}
catch (std::exception& exp) {
std::cout << "exception is " << exp.what() << std::endl;
self->Start();
}
});
}

Start函数内创建HttpConnection类型智能指针,将_socket内部数据转移给HttpConnection管理,_socket继续用来接受写的链接。

我们创建const.h将文件件和一些作用于声明放在const.h里,这样以后创建的文件包含这个const.h即可,不用写那么多头文件了。

1
2
3
4
5
6
7
8
#include <boost/beast/http.hpp>
#include <boost/beast.hpp>
#include <boost/asio.hpp>

namespace beast = boost::beast; // from <boost/beast.hpp>
namespace http = beast::http; // from <boost/beast/http.hpp>
namespace net = boost::asio; // from <boost/asio.hpp>
using tcp = boost::asio::ip::tcp; // from <boost/asio/ip/tcp.hpp>

新建HttpConnection类文件,在头文件添加声明

1
2
3
4
5
6
7
8
9
10
11
12
13
14
15
16
17
18
19
20
21
22
23
24
25
26
27
#include "const.h"

class HttpConnection: public std::enable_shared_from_this<HttpConnection>
{
friend class LogicSystem;
public:
HttpConnection(tcp::socket socket);
void Start();

private:
void CheckDeadline();
void WriteResponse();
void HandleReq();
tcp::socket _socket;
// The buffer for performing reads.
beast::flat_buffer _buffer{ 8192 };

// The request message.
http::request<http::dynamic_body> _request;

// The response message.
http::response<http::dynamic_body> _response;

// The timer for putting a deadline on connection processing.
net::steady_timer deadline_{
_socket.get_executor(), std::chrono::seconds(60) };
};

_buffer 用来接受数据

_request 用来解析请求

_response 用来回应客户端

_deadline 用来做定时器判断请求是否超时

实现HttpConnection构造函数

1
2
3
HttpConnection::HttpConnection(tcp::socket socket)
: _socket(std::move(socket)) {
}

我们考虑在HttpConnection::Start内部调用http::async_read函数,其源码为

1
2
3
4
5
async_read(
AsyncReadStream& stream,
DynamicBuffer& buffer,
basic_parser<isRequest>& parser,
ReadHandler&& handler)

第一个参数为异步可读的数据流,大家可以理解为socket.

第二个参数为一个buffer,用来存储接受的数据,因为http可接受文本,图像,音频等多种资源文件,所以是Dynamic动态类型的buffer。

第三个参数是请求参数,我们一般也要传递能接受多种资源类型的请求参数。

第四个参数为回调函数,接受成功或者失败,都会触发回调函数,我们用lambda表达式就可以了。

我们已经将1,2,3这几个参数写到HttpConnection类的成员声明里了

实现HttpConnection的Start函数

1
2
3
4
5
6
7
8
9
10
11
12
13
14
15
16
17
18
19
20
21
22
void HttpConnection::Start()
{
auto self = shared_from_this();
http::async_read(_socket, _buffer, _request, [self](beast::error_code ec,
std::size_t bytes_transferred) {
try {
if (ec) {
std::cout << "http read err is " << ec.what() << std::endl;
return;
}

//处理读到的数据
boost::ignore_unused(bytes_transferred);
self->HandleReq();
self->CheckDeadline();
}
catch (std::exception& exp) {
std::cout << "exception is " << exp.what() << std::endl;
}
}
);
}

我们实现HandleReq

1
2
3
4
5
6
7
8
9
10
11
12
13
14
15
16
17
18
19
20
21
22
void HttpConnection::HandleReq() {
//设置版本
_response.version(_request.version());
//设置为短链接
_response.keep_alive(false);

if (_request.method() == http::verb::get) {
bool success = LogicSystem::GetInstance()->HandleGet(_request.target(), shared_from_this());
if (!success) {
_response.result(http::status::not_found);
_response.set(http::field::content_type, "text/plain");
beast::ostream(_response.body()) << "url not found\r\n";
WriteResponse();
return;
}

_response.result(http::status::ok);
_response.set(http::field::server, "GateServer");
WriteResponse();
return;
}
}

为了方便我们先实现Get请求的处理,根据请求类型为get调用LogicSystem的HandleGet接口处理get请求,根据处理成功还是失败回应数据包给对方。

我们先实现LogicSystem,采用单例模式,单例基类之前讲解过了

1
2
3
4
5
6
7
8
9
10
11
12
13
14
15
16
17
18
19
20
21
22
23
24
25
26
27
28
29
30
#include <memory>
#include <mutex>
#include <iostream>
template <typename T>
class Singleton {
protected:
Singleton() = default;
Singleton(const Singleton<T>&) = delete;
Singleton& operator=(const Singleton<T>& st) = delete;

static std::shared_ptr<T> _instance;
public:
static std::shared_ptr<T> GetInstance() {
static std::once_flag s_flag;
std::call_once(s_flag, [&]() {
_instance = shared_ptr<T>(new T);
});

return _instance;
}
void PrintAddress() {
std::cout << _instance.get() << endl;
}
~Singleton() {
std::cout << "this is singleton destruct" << std::endl;
}
};

template <typename T>
std::shared_ptr<T> Singleton<T>::_instance = nullptr;

实现LogicSystem单例类

1
2
3
4
5
6
7
8
9
10
11
12
13
14
15
16
17
18
19
#include "Singleton.h"
#include <functional>
#include <map>
#include "const.h"

class HttpConnection;
typedef std::function<void(std::shared_ptr<HttpConnection>)> HttpHandler;
class LogicSystem :public Singleton<LogicSystem>
{
friend class Singleton<LogicSystem>;
public:
~LogicSystem();
bool HandleGet(std::string, std::shared_ptr<HttpConnection>);
void RegGet(std::string, HttpHandler handler);
private:
LogicSystem();
std::map<std::string, HttpHandler> _post_handlers;
std::map<std::string, HttpHandler> _get_handlers;
};

_post_handlers和_get_handlers分别是post请求和get请求的回调函数map,key为路由,value为回调函数。

我们实现RegGet函数,接受路由和回调函数作为参数

1
2
3
void LogicSystem::RegGet(std::string url, HttpHandler handler) {
_get_handlers.insert(make_pair(url, handler));
}

在构造函数中实现具体的消息注册

1
2
3
4
5
LogicSystem::LogicSystem() {
RegGet("/get_test", [](std::shared_ptr<HttpConnection> connection) {
beast::ostream(connection->_response.body()) << "receive get_test req";
});
}

为防止互相引用,以及LogicSystem能够成功访问HttpConnection,在LogicSystem.cpp中包含HttpConnection头文件

并且在HttpConnection中添加友元类LogicSystem, 且在HttpConnection.cpp中包含LogicSystem.h文件

1
2
3
4
5
6
7
8
bool LogicSystem::HandleGet(std::string path, std::shared_ptr<HttpConnection> con) {
if (_get_handlers.find(path) == _get_handlers.end()) {
return false;
}

_get_handlers[path](con);
return true;
}

这样我们在HttpConnection里实现WriteResponse函数

1
2
3
4
5
6
7
8
9
10
11
12
void HttpConnection::WriteResponse() {
auto self = shared_from_this();
_response.content_length(_response.body().size());
http::async_write(
_socket,
_response,
[self](beast::error_code ec, std::size_t)
{
self->_socket.shutdown(tcp::socket::shutdown_send, ec);
self->deadline_.cancel();
});
}

因为http是短链接,所以发送完数据后不需要再监听对方链接,直接断开发送端即可。

另外,http处理请求需要有一个时间约束,发送的数据包不能超时。所以在发送时我们启动一个定时器,收到发送的回调后取消定时器。

我们实现检测超时的函数

1
2
3
4
5
6
7
8
9
10
11
12
13
void HttpConnection::CheckDeadline() {
auto self = shared_from_this();

deadline_.async_wait(
[self](beast::error_code ec)
{
if (!ec)
{
// Close socket to cancel any outstanding operation.
self->_socket.close(ec);
}
});
}

我们在主函数中初始化上下文iocontext以及启动信号监听ctr-c退出事件, 并且启动iocontext服务

1
2
3
4
5
6
7
8
9
10
11
12
13
14
15
16
17
18
19
20
21
22
23
24
25
26
27
28
29
30
31
32
33
34
35
36
37
38
39
40
int main()
{
try
{
unsigned short port = static_cast<unsigned short>(8080);
net::io_context ioc{ 1 };
boost::asio::signal_set signals(ioc, SIGINT, SIGTERM);
signals.async_wait([&ioc](const boost::system::error_code& error, int signal_number) {

if (error) {
return;
}
ioc.stop();
});
std::make_shared<CServer>(ioc, port)->Start();
ioc.run();
}
catch (std::exception const& e)
{
std::cerr << "Error: " << e.what() << std::endl;
return EXIT_FAILURE;
}
}
``
启动服务器,在浏览器输入`http://localhost:8080/get_test`

会看到服务器回包`receive get_test req`

如果我们输入带参数的url请求`http://localhost:8080/get_test?key1=value1&key2=value2`

会收到服务器反馈`url not found`

所以对于get请求带参数的情况我们要实现参数解析,我们可以自己实现简单的url解析函数

``` cpp
//char 转为16进制
unsigned char ToHex(unsigned char x)
{
return x > 9 ? x + 55 : x + 48;
}

将十进制的char转为16进制,如果是数字不超过9则加48转为对应的ASCII码的值

如果字符是大于9的,比如AZ, az等则加55,获取到对应字符的ASCII码值

详细的ASCII码表大家可以看这个https://c.biancheng.net/c/ascii/

接下来实现从16进制转为十进制的char的方法

1
2
3
4
5
6
7
8
9
unsigned char FromHex(unsigned char x)
{
unsigned char y;
if (x >= 'A' && x <= 'Z') y = x - 'A' + 10;
else if (x >= 'a' && x <= 'z') y = x - 'a' + 10;
else if (x >= '0' && x <= '9') y = x - '0';
else assert(0);
return y;
}

接下来我们实现url编码工作

1
2
3
4
5
6
7
8
9
10
11
12
13
14
15
16
17
18
19
20
21
22
23
24
25
std::string UrlEncode(const std::string& str)
{
std::string strTemp = "";
size_t length = str.length();
for (size_t i = 0; i < length; i++)
{
//判断是否仅有数字和字母构成
if (isalnum((unsigned char)str[i]) ||
(str[i] == '-') ||
(str[i] == '_') ||
(str[i] == '.') ||
(str[i] == '~'))
strTemp += str[i];
else if (str[i] == ' ') //为空字符
strTemp += "+";
else
{
//其他字符需要提前加%并且高四位和低四位分别转为16进制
strTemp += '%';
strTemp += ToHex((unsigned char)str[i] >> 4);
strTemp += ToHex((unsigned char)str[i] & 0x0F);
}
}
return strTemp;
}

我们先判断str[i]是否为字母或者数字,或者一些简单的下划线,如果是泽直接拼接,否则判断是否为空字符,如果为空则换成’+’拼接。否则就是特殊字符,我们需要将特殊字符转化为’%’和两个十六进制字符拼接。现拼接’%’,再将字符的高四位拼接到strTemp上,最后将低四位拼接到strTemp上。

url解码的工作正好相反

1
2
3
4
5
6
7
8
9
10
11
12
13
14
15
16
17
18
19
20
std::string UrlDecode(const std::string& str)
{
std::string strTemp = "";
size_t length = str.length();
for (size_t i = 0; i < length; i++)
{
//还原+为空
if (str[i] == '+') strTemp += ' ';
//遇到%将后面的两个字符从16进制转为char再拼接
else if (str[i] == '%')
{
assert(i + 2 < length);
unsigned char high = FromHex((unsigned char)str[++i]);
unsigned char low = FromHex((unsigned char)str[++i]);
strTemp += high * 16 + low;
}
else strTemp += str[i];
}
return strTemp;
}

接下来实现get请求的参数解析, 在HttpConnection里添加两个成员

1
2
std::string _get_url;
std::unordered_map<std::string, std::string> _get_params;

参数解析如下

1
2
3
4
5
6
7
8
9
10
11
12
13
14
15
16
17
18
19
20
21
22
23
24
25
26
27
28
29
30
31
32
33
34
35
void HttpConnection::PreParseGetParam() {
// 提取 URI
auto uri = _request.target();
// 查找查询字符串的开始位置(即 '?' 的位置)
auto query_pos = uri.find('?');
if (query_pos == std::string::npos) {
_get_url = uri;
return;
}

_get_url = uri.substr(0, query_pos);
std::string query_string = uri.substr(query_pos + 1);
std::string key;
std::string value;
size_t pos = 0;
while ((pos = query_string.find('&')) != std::string::npos) {
auto pair = query_string.substr(0, pos);
size_t eq_pos = pair.find('=');
if (eq_pos != std::string::npos) {
key = UrlDecode(pair.substr(0, eq_pos)); // 假设有 url_decode 函数来处理URL解码
value = UrlDecode(pair.substr(eq_pos + 1));
_get_params[key] = value;
}
query_string.erase(0, pos + 1);
}
// 处理最后一个参数对(如果没有 & 分隔符)
if (!query_string.empty()) {
size_t eq_pos = query_string.find('=');
if (eq_pos != std::string::npos) {
key = UrlDecode(query_string.substr(0, eq_pos));
value = UrlDecode(query_string.substr(eq_pos + 1));
_get_params[key] = value;
}
}
}

HttpConnection::HandleReq函数略作修改

1
2
3
4
5
6
7
8
void HttpConnection::HandleReq() {
//...省略
if (_request.method() == http::verb::get) {
PreParseGetParam();
bool success = LogicSystem::GetInstance()->HandleGet(_get_url, shared_from_this());
}
//...省略
}

我们修改LogicSytem构造函数,在get_test的回调里返回参数给对端

1
2
3
4
5
6
7
8
9
10
11
LogicSystem::LogicSystem() {
RegGet("/get_test", [](std::shared_ptr<HttpConnection> connection) {
beast::ostream(connection->_response.body()) << "receive get_test req " << std::endl;
int i = 0;
for (auto& elem : connection->_get_params) {
i++;
beast::ostream(connection->_response.body()) << "param" << i << " key is " << elem.first;
beast::ostream(connection->_response.body()) << ", " << " value is " << elem.second << std::endl;
}
});
}

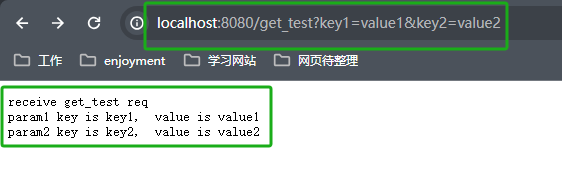
在浏览器输入http://localhost:8080/get_test?key1=value1&key2=value2

看到浏览器收到如下图信息,说明我们的get请求逻辑处理完了

https://cdn.llfc.club/1710148646788.jpg

C++ 全栈聊天项目(5) Beast实现http get请求处理

Posted on 2024-08-31 | In C++聊天项目

注册Post请求

我们实现RegPost函数

1
2
3
void LogicSystem::RegPost(std::string url, HttpHandler handler) {
_post_handlers.insert(make_pair(url, handler));
}

在const.h中添加ErrorCodes定义并且包含JsonCpp相关的头文件

1
2
3
4
5
6
7
8
9
#include <json/json.h>
#include <json/value.h>
#include <json/reader.h>

enum ErrorCodes {
Success = 0,
Error_Json = 1001, //Json解析错误
RPCFailed = 1002, //RPC请求错误
};

然后在LogicSystem的构造函数里添加获取验证码的处理逻辑,

1
2
3
4
5
6
7
8
9
10
11
12
13
14
15
16
17
18
19
20
21
22
23
24
RegPost("/get_varifycode", [](std::shared_ptr<HttpConnection> connection) {
auto body_str = boost::beast::buffers_to_string(connection->_request.body().data());
std::cout << "receive body is " << body_str << std::endl;
connection->_response.set(http::field::content_type, "text/json");
Json::Value root;
Json::Reader reader;
Json::Value src_root;
bool parse_success = reader.parse(body_str, src_root);
if (!parse_success) {
std::cout << "Failed to parse JSON data!" << std::endl;
root["error"] = ErrorCodes::Error_Json;
std::string jsonstr = root.toStyledString();
beast::ostream(connection->_response.body()) << jsonstr;
return true;
}

auto email = src_root["email"].asString();
cout << "email is " << email << endl;
root["error"] = 0;
root["email"] = src_root["email"];
std::string jsonstr = root.toStyledString();
beast::ostream(connection->_response.body()) << jsonstr;
return true;
});

然后我们在LogicSystem中添加Post请求的处理

1
2
3
4
5
6
7
8
bool LogicSystem::HandlePost(std::string path, std::shared_ptr<HttpConnection> con) {
if (_post_handlers.find(path) == _post_handlers.end()) {
return false;
}

_post_handlers[path](con);
return true;
}

在HttpConnection的HandleReq中添加post请求处理

1
2
3
4
5
6
7
8
9
10
11
12
13
14
15
16
17
18
19
void HttpConnection::HandleReq() {
//省略...
if (_request.method() == http::verb::post) {
bool success = LogicSystem::GetInstance()->HandlePost(_request.target(), shared_from_this());
if (!success) {
_response.result(http::status::not_found);
_response.set(http::field::content_type, "text/plain");
beast::ostream(_response.body()) << "url not found\r\n";
WriteResponse();
return;
}

_response.result(http::status::ok);
_response.set(http::field::server, "GateServer");
WriteResponse();
return;
}

}

然后我们启动服务器,然后下载postman,大家可以去官网下载,如果速度慢可以去我的网盘下载
https://pan.baidu.com/s/1DBIf7Y6G3v0XYfW5LyDKMg?pwd=kjxz

提取码:kjxz

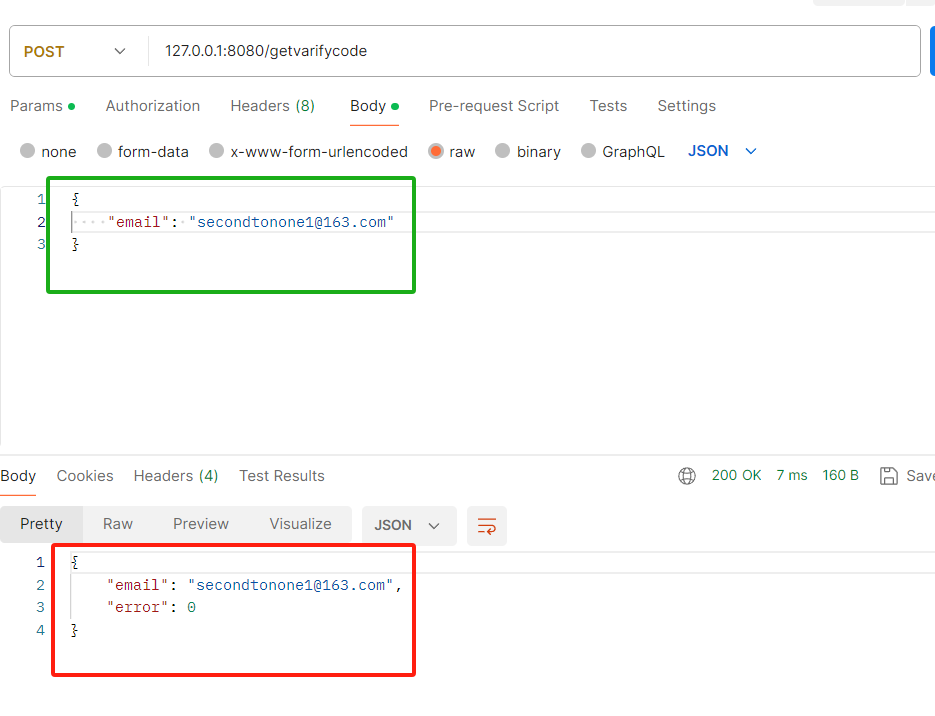
打开postman,将请求修改为post

https://cdn.llfc.club/1710163652661.png

绿色的为post请求的json参数,红色的为服务器返回的json数据包。

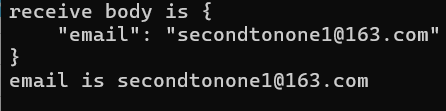
我们看服务器打印的日志

https://cdn.llfc.club/1710164199348.jpg

客户端增加post逻辑

我们之前在客户端实现了httpmgr的post请求,在点击获取验证码的槽函数里添加发送http的post请求即可

1
2
3
4
5
6
7
8
9
10
11
12
13
14
15
16
17
18
19
void RegisterDialog::on_get_code_clicked()
{
//验证邮箱的地址正则表达式
auto email = ui->email_edit->text();
// 邮箱地址的正则表达式
QRegularExpression regex(R"((\w+)(\.|_)?(\w*)@(\w+)(\.(\w+))+)");
bool match = regex.match(email).hasMatch(); // 执行正则表达式匹配
if(match){
//发送http请求获取验证码
QJsonObject json_obj;
json_obj["email"] = email;
HttpMgr::GetInstance()->PostHttpReq(QUrl("http://localhost:8080/get_varifycode"),
json_obj, ReqId::ID_GET_VARIFY_CODE,Modules::REGISTERMOD);

}else{
//提示邮箱不正确
showTip(tr("邮箱地址不正确"),false);
}
}

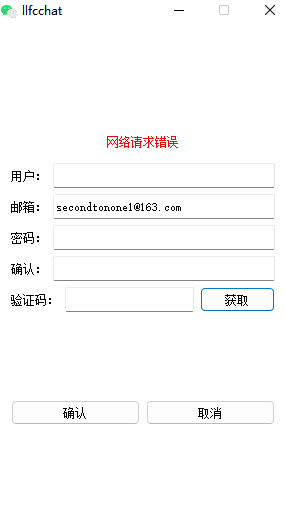
当服务器不启动,客户端输入邮箱,点击获取验证码,客户端会收到网络连接失败的提示

https://cdn.llfc.club/1710209670231.jpg

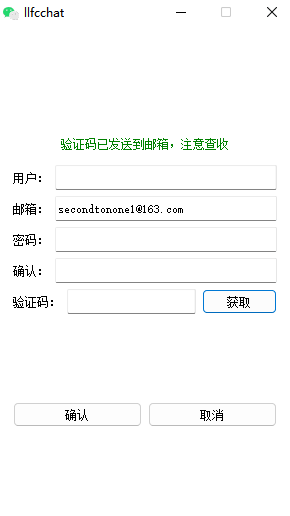
启动服务器后,再次获取验证码,就显示正确提示了,而且客户端输出了服务器回传的邮箱地址email is "secondtonone1@163.com",界面也刷新为正确显示

https://cdn.llfc.club/1710210157771.jpg

客户端配置管理

我们发现客户端代码中很多参数都是写死的,最好通过配置文件管理,我们在代码所在目录中新建一个config.ini文件, 内部添加配置

1
2
3
[GateServer]
host=localhost
port=8080

接着右键项目添加现有文件config.ini即可加入项目中。

因为我们的程序最终会输出的bin目录,所以在pro中添加拷贝脚本将配置也拷贝到bin目录

1
2
3
4
5
6
7
8
9
10
11
12
13
win32:CONFIG(release, debug | release)
{
#指定要拷贝的文件目录为工程目录下release目录下的所有dll、lib文件,例如工程目录在D:\QT\Test
#PWD就为D:/QT/Test,DllFile = D:/QT/Test/release/*.dll
TargetConfig = $${PWD}/config.ini
#将输入目录中的"/"替换为"\"
TargetConfig = $$replace(TargetConfig, /, \\)
#将输出目录中的"/"替换为"\"
OutputDir = $${OUT_PWD}/$${DESTDIR}
OutputDir = $$replace(OutputDir, /, \\)
//执行copy命令
QMAKE_POST_LINK += copy /Y \"$$TargetConfig\" \"$$OutputDir\"
}

global.h中添加声明

1
extern QString gate_url_prefix;

在cpp中添加定义

1
QString gate_url_prefix = "";

在main函数中添加解析配置的逻辑

1
2
3
4
5
6
7
8
9
10
11
// 获取当前应用程序的路径
QString app_path = QCoreApplication::applicationDirPath();
// 拼接文件名
QString fileName = "config.ini";
QString config_path = QDir::toNativeSeparators(app_path +
QDir::separator() + fileName);

QSettings settings(config_path, QSettings::IniFormat);
QString gate_host = settings.value("GateServer/host").toString();
QString gate_port = settings.value("GateServer/port").toString();
gate_url_prefix = "http://"+gate_host+":"+gate_port;

将RegisterDialog发送post请求修改为

1
2
HttpMgr::GetInstance()->PostHttpReq(QUrl(gate_url_prefix+"/get_varifycode"),
json_obj, ReqId::ID_GET_VARIFY_CODE,Modules::REGISTERMOD);

再次测试仍旧可以收到服务器回馈的http包。

这么做的好处就是客户端增加了配置,而且以后修改参数也方便。

C++ 全栈聊天项目(7) 客户端实现Post验证码请求

Posted on 2024-08-31 | In C++聊天项目

属性管理器

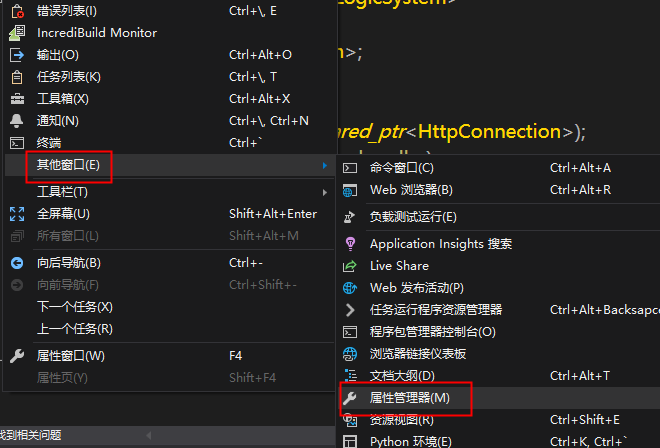
推荐一种可复制配置的方式,视图里选择其他窗口,再选择属性管理器

https://cdn.llfc.club/1710292918199.jpg

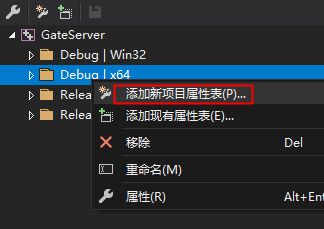
我们选择要配置的类型,我选择Debug 64位的配置,添加新项目属性表

https://cdn.llfc.club/2789d4d0598e69bff5f0452159d3c14.png

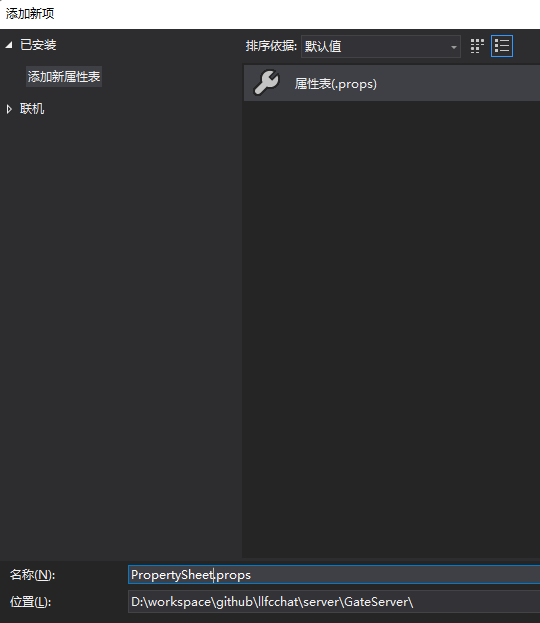
选择创建属性的名字

https://cdn.llfc.club/7675ab8ac46308693eec2ea4ec0f708.png

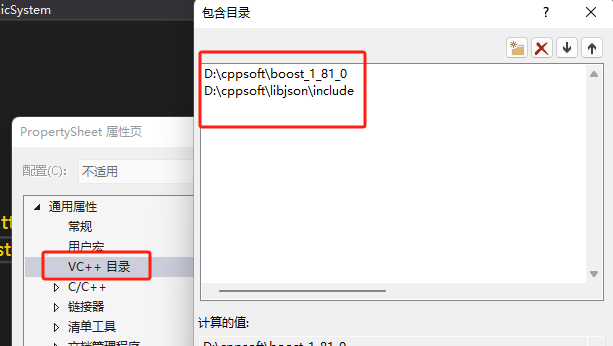
接下来双击我们创建好的属性文件,将之前配置的boost和jsoncpp库属性移动到这里,把之前在项目中配置的删除。

包含目录

https://cdn.llfc.club/3e98a4ba407416e8a433a7b6254c3a6.png

库目录

https://cdn.llfc.club/56a894eca5a6b3888ba07f29678b291.png

链接库

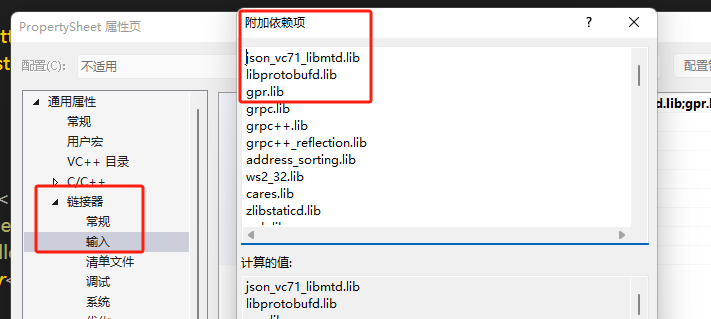
https://cdn.llfc.club/43aba5606318b56dc56ba1a884c18b3.png

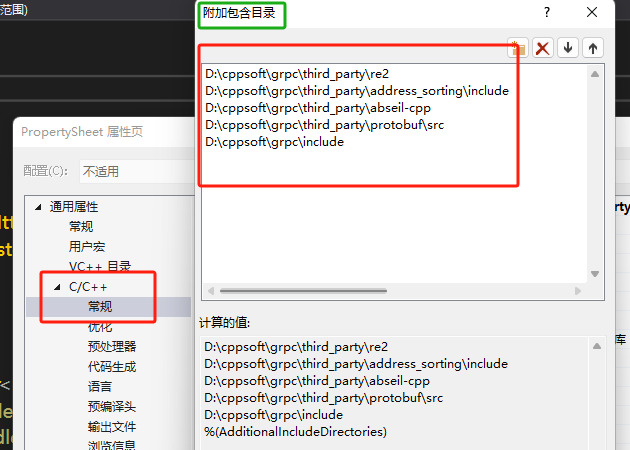
接下来配置grpc头文件包含目录,C++ 常规-> 附加包含目录添加如下

1
2
3
4
5
D:\cppsoft\grpc\third_party\re2
D:\cppsoft\grpc\third_party\address_sorting\include
D:\cppsoft\grpc\third_party\abseil-cpp
D:\cppsoft\grpc\third_party\protobuf\src
D:\cppsoft\grpc\include

https://cdn.llfc.club/375f8c4b21f643408b73a19e415fcd5.png

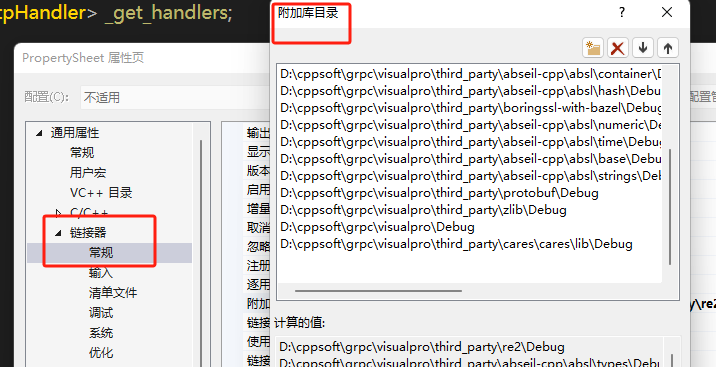
接下来配置库路径, 在链接器常规选项下,点击附加库目录,添加我们需要的库目录

1
2
3
4
5
6
7
8
9
10
11
12
13
14
15
16
17
18
D:\cppsoft\grpc\visualpro\third_party\re2\Debug
D:\cppsoft\grpc\visualpro\third_party\abseil-cpp\absl\types\Debug
D:\cppsoft\grpc\visualpro\third_party\abseil-cpp\absl\synchronization\Debug
D:\cppsoft\grpc\visualpro\third_party\abseil-cpp\absl\status\Debug
D:\cppsoft\grpc\visualpro\third_party\abseil-cpp\absl\random\Debug
D:\cppsoft\grpc\visualpro\third_party\abseil-cpp\absl\flags\Debug
D:\cppsoft\grpc\visualpro\third_party\abseil-cpp\absl\debugging\Debug
D:\cppsoft\grpc\visualpro\third_party\abseil-cpp\absl\container\Debug
D:\cppsoft\grpc\visualpro\third_party\abseil-cpp\absl\hash\Debug
D:\cppsoft\grpc\visualpro\third_party\boringssl-with-bazel\Debug
D:\cppsoft\grpc\visualpro\third_party\abseil-cpp\absl\numeric\Debug
D:\cppsoft\grpc\visualpro\third_party\abseil-cpp\absl\time\Debug
D:\cppsoft\grpc\visualpro\third_party\abseil-cpp\absl\base\Debug
D:\cppsoft\grpc\visualpro\third_party\abseil-cpp\absl\strings\Debug
D:\cppsoft\grpc\visualpro\third_party\protobuf\Debug
D:\cppsoft\grpc\visualpro\third_party\zlib\Debug
D:\cppsoft\grpc\visualpro\Debug
D:\cppsoft\grpc\visualpro\third_party\cares\cares\lib\Debug

https://cdn.llfc.club/89fcb7a4afef6721c893187fffcfecf.png

在链接器->输入->附加依赖项中添加

1
2
3
4
5
6
7
8
9
10
11
12
13
14
15
16
17
18
19
20
21
22
23
24
25
26
27
28
29
30
31
32
33
34
35
36
37
38
39
40
41
42
43
44
45
46
47
48
49
50
51
52
53
54
55
56
57
58
59
60
61
62
63
64
65
66
67
libprotobufd.lib
gpr.lib
grpc.lib
grpc++.lib
grpc++_reflection.lib
address_sorting.lib
ws2_32.lib
cares.lib
zlibstaticd.lib
upb.lib
ssl.lib
crypto.lib
absl_bad_any_cast_impl.lib
absl_bad_optional_access.lib
absl_bad_variant_access.lib
absl_base.lib
absl_city.lib
absl_civil_time.lib
absl_cord.lib
absl_debugging_internal.lib
absl_demangle_internal.lib
absl_examine_stack.lib
absl_exponential_biased.lib
absl_failure_signal_handler.lib
absl_flags.lib
absl_flags_config.lib
absl_flags_internal.lib
absl_flags_marshalling.lib
absl_flags_parse.lib
absl_flags_program_name.lib
absl_flags_usage.lib
absl_flags_usage_internal.lib
absl_graphcycles_internal.lib
absl_hash.lib
absl_hashtablez_sampler.lib
absl_int128.lib
absl_leak_check.lib
absl_leak_check_disable.lib
absl_log_severity.lib
absl_malloc_internal.lib
absl_periodic_sampler.lib
absl_random_distributions.lib
absl_random_internal_distribution_test_util.lib
absl_random_internal_pool_urbg.lib
absl_random_internal_randen.lib
absl_random_internal_randen_hwaes.lib
absl_random_internal_randen_hwaes_impl.lib
absl_random_internal_randen_slow.lib
absl_random_internal_seed_material.lib
absl_random_seed_gen_exception.lib
absl_random_seed_sequences.lib
absl_raw_hash_set.lib
absl_raw_logging_internal.lib
absl_scoped_set_env.lib
absl_spinlock_wait.lib
absl_stacktrace.lib
absl_status.lib
absl_strings.lib
absl_strings_internal.lib
absl_str_format_internal.lib
absl_symbolize.lib
absl_synchronization.lib
absl_throw_delegate.lib
absl_time.lib
absl_time_zone.lib
absl_statusor.lib
re2.lib

https://cdn.llfc.club/1710301100655.jpg

之后点击保存会看到项目目录下生成了PropertySheet.props文件

proto文件编写

在项目的根目录下创建一个proto名字为message.proto

1
2
3
4
5
6
7
8
9
10
11
12
13
14
15
16
17
syntax = "proto3";

package message;

service VarifyService {
rpc GetVarifyCode (GetVarifyReq) returns (GetVarifyRsp) {}
}

message GetVarifyReq {
string email = 1;
}

message GetVarifyRsp {
int32 error = 1;
string email = 2;
string code = 3;
}

接下来我们利用grpc编译后生成的proc.exe生成proto的grpc的头文件和源文件

1
D:\cppsoft\grpc\visualpro\third_party\protobuf\Debug\protoc.exe  -I="." --grpc_out="." --plugin=protoc-gen-grpc="D:\cppsoft\grpc\visualpro\Debug\grpc_cpp_plugin.exe" "message.proto"

上述命令会生成message.grpc.pb.h和message.grpc.pb.cc文件。

接下来我们生成用于序列化和反序列化的pb文件

1
D:\cppsoft\grpc\visualpro\third_party\protobuf\Debug\protoc.exe --cpp_out=. "message.proto"

上述命令会生成message.pb.h和message.pb.cc文件

接下来我们将这些pb.h和pb.cc放入项目中

我们新建一个VarifyGrpcClient类,vs帮我们自动生成头文件和源文件,我们在头文件添加Grpc客户端类

1
2
3
4
5
6
7
8
9
10
11
12
13
14
15
16
17
18
19
20
21
22
23
24
25
26
27
28
29
30
31
32
33
34
35
36
37
38
39
40
41
42
43
#include <grpcpp/grpcpp.h>
#include "message.grpc.pb.h"
#include "const.h"
#include "Singleton.h"
using grpc::Channel;
using grpc::Status;
using grpc::ClientContext;

using message::GetVarifyReq;
using message::GetVarifyRsp;
using message::VarifyService;

class VerifyGrpcClient:public Singleton<VerifyGrpcClient>
{
friend class Singleton<VerifyGrpcClient>;
public:

GetVarifyRsp GetVarifyCode(std::string email) {
ClientContext context;
GetVarifyRsp reply;
GetVarifyReq request;
request.set_email(email);

Status status = stub_->GetVarifyCode(&context, request, &reply);

if (status.ok()) {

return reply;
}
else {
reply.set_error(ErrorCodes::RPCFailed);
return reply;
}
}

private:
VerifyGrpcClient() {
std::shared_ptr<Channel> channel = grpc::CreateChannel("127.0.0.1:50051", grpc::InsecureChannelCredentials());
stub_ = VarifyService::NewStub(channel);
}

std::unique_ptr<VarifyService::Stub> stub_;
};

我们在之前收到post请求获取验证码的逻辑里添加处理

1
2
3
4
5
6
7
8
9
10
11
12
13
14
15
16
17
18
19
20
21
22
23
24
25
RegPost("/get_varifycode", [](std::shared_ptr<HttpConnection> connection) {
auto body_str = boost::beast::buffers_to_string(connection->_request.body().data());
std::cout << "receive body is " << body_str << std::endl;
connection->_response.set(http::field::content_type, "text/json");
Json::Value root;
Json::Reader reader;
Json::Value src_root;
bool parse_success = reader.parse(body_str, src_root);
if (!parse_success) {
std::cout << "Failed to parse JSON data!" << std::endl;
root["error"] = ErrorCodes::Error_Json;
std::string jsonstr = root.toStyledString();
beast::ostream(connection->_response.body()) << jsonstr;
return true;
}

auto email = src_root["email"].asString();
GetVarifyRsp rsp = VerifyGrpcClient::GetInstance()->GetVarifyCode(email);
cout << "email is " << email << endl;
root["error"] = rsp.error();
root["email"] = src_root["email"];
std::string jsonstr = root.toStyledString();
beast::ostream(connection->_response.body()) << jsonstr;
return true;
});

服务器读取配置

我们很多参数都是写死的,现通过配置文件读取以方便以后修改
在项目中添加config.ini文件

1
2
3
4
[GateServer]
Port = 8080
[VarifyServer]
Port = 50051

添加ConfigMgr类用来读取和管理配置, 定义一个SectionInfo类管理key和value

1
2
3
4
5
6
7
8
9
10
11
12
13
14
15
16
17
18
19
20
21
22
23
24
25
26
27
struct SectionInfo {
SectionInfo(){}
~SectionInfo(){
_section_datas.clear();
}

SectionInfo(const SectionInfo& src) {
_section_datas = src._section_datas;
}

SectionInfo& operator = (const SectionInfo& src) {
if (&src == this) {
return *this;
}

this->_section_datas = src._section_datas;
}

std::map<std::string, std::string> _section_datas;
std::string operator[](const std::string &key) {
if (_section_datas.find(key) == _section_datas.end()) {
return "";
}
// 这里可以添加一些边界检查
return _section_datas[key];
}
};

定义ComigMgr管理section和其包含的key与value

1
2
3
4
5
6
7
8
9
10
11
12
13
14
15
16
17
18
19
20
21
22
23
24
25
26
27
28
29
30
31
32
class ConfigMgr
{
public:
~ConfigMgr() {
_config_map.clear();
}
SectionInfo operator[](const std::string& section) {
if (_config_map.find(section) == _config_map.end()) {
return SectionInfo();
}
return _config_map[section];
}


ConfigMgr& operator=(const ConfigMgr& src) {
if (&src == this) {
return *this;
}

this->_config_map = src._config_map;
};

ConfigMgr(const ConfigMgr& src) {
this->_config_map = src._config_map;
}

ConfigMgr();
private:

// 存储section和key-value对的map
std::map<std::string, SectionInfo> _config_map;
};

构造函数里实现config读取

1
2
3
4
5
6
7
8
9
10
11
12
13
14
15
16
17
18
19
20
21
22
23
24
25
26
27
28
29
30
31
32
33
34
35
36
37
38
39
40
41
ConfigMgr::ConfigMgr(){
// 获取当前工作目录
boost::filesystem::path current_path = boost::filesystem::current_path();
// 构建config.ini文件的完整路径
boost::filesystem::path config_path = current_path / "config.ini";
std::cout << "Config path: " << config_path << std::endl;

// 使用Boost.PropertyTree来读取INI文件
boost::property_tree::ptree pt;
boost::property_tree::read_ini(config_path.string(), pt);


// 遍历INI文件中的所有section
for (const auto& section_pair : pt) {
const std::string& section_name = section_pair.first;
const boost::property_tree::ptree& section_tree = section_pair.second;

// 对于每个section,遍历其所有的key-value对
std::map<std::string, std::string> section_config;
for (const auto& key_value_pair : section_tree) {
const std::string& key = key_value_pair.first;
const std::string& value = key_value_pair.second.get_value<std::string>();
section_config[key] = value;
}
SectionInfo sectionInfo;
sectionInfo._section_datas = section_config;
// 将section的key-value对保存到config_map中
_config_map[section_name] = sectionInfo;
}

// 输出所有的section和key-value对
for (const auto& section_entry : _config_map) {
const std::string& section_name = section_entry.first;
SectionInfo section_config = section_entry.second;
std::cout << "[" << section_name << "]" << std::endl;
for (const auto& key_value_pair : section_config._section_datas) {
std::cout << key_value_pair.first << "=" << key_value_pair.second << std::endl;
}
}

}

在const.h里声明一个全局变量

1
2
class ConfigMgr;
extern ConfigMgr gCfgMgr;

接下来在main函数中将8080端口改为从配置读取

1
2
3
ConfigMgr gCfgMgr;
std::string gate_port_str = gCfgMgr["GateServer"]["Port"];
unsigned short gate_port = atoi(gate_port_str.c_str());

其他地方想要获取配置信息就不需要定义了,直接包含const.h并且使用gCfgMgr即可。

总结

本节基于visual studio配置grpc,并实现了grpc客户端发送请求的逻辑。下一节实现 grpc server

C++ 全栈聊天项目(8) windows配置和使用grpc

Posted on 2024-08-31 | In C++聊天项目

认证服务

我们的认证服务要给邮箱发送验证码,所以用nodejs较为合适,nodejs是一门IO效率很高而且生态完善的语言,用到发送邮件的库也方便。

nodejs可以去官网下载https://nodejs.org/en,一路安装就可以了

我们新建VarifyServer文件夹,在文件夹内部初始化server要用到的nodejs库的配置文件

1
npm init

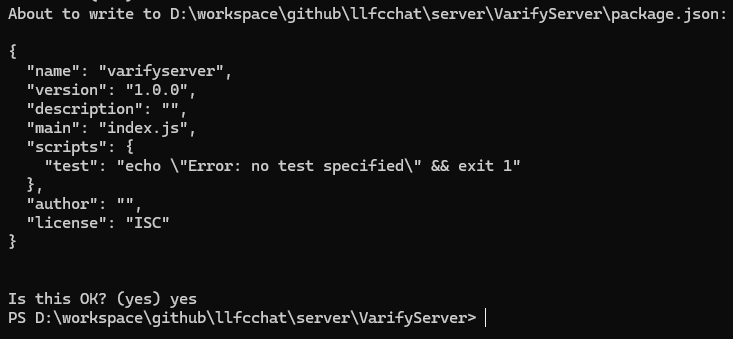
根据提示同意会创建一个package.json文件

https://cdn.llfc.club/1710380349325.jpg

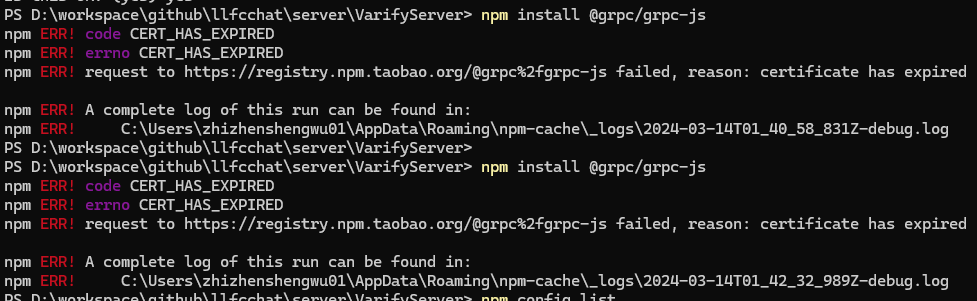
接下来安装grpc-js包,也可以安装grpc,grpc是C++版本,grpc-js是js版本,C++版本停止维护了。所以用grpc-js版本。

安装过程出现了错误,因为淘宝镜像地址过期了

https://cdn.llfc.club/1710381278285.jpg

清除之前npm镜像地址

1
npm cache clean --force

重新设置新的淘宝镜像

1
npm config set registry https://registry.npmmirror.com

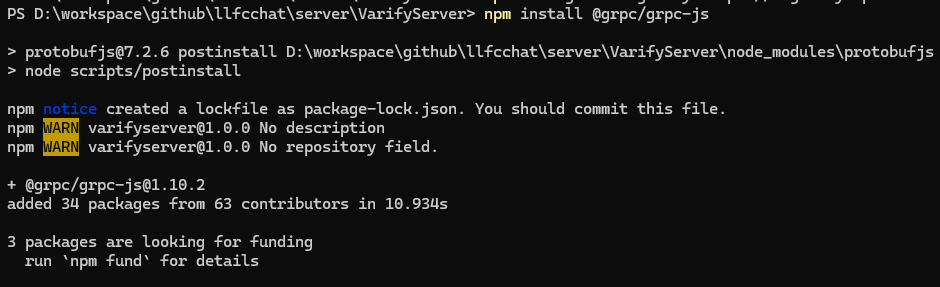
接着下载grpc-js就成功了

https://cdn.llfc.club/1710381922730.jpg

接着安装proto-loader用来动态解析proto文件

1
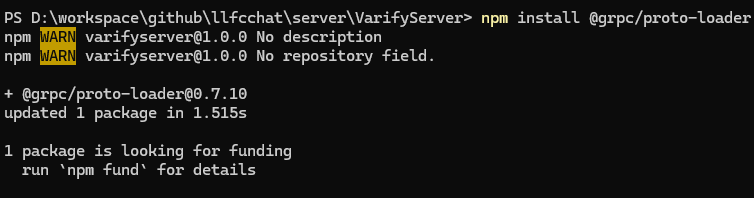
npm install @grpc/proto-loader

https://cdn.llfc.club/1710382537391.jpg

我们再安装email处理的库

1
npm install nodemailer

我们将proto文件放入VarifyServer文件夹,并且新建一个proto.js用来解析proto文件

1
2
3
4
5
6
7
8
9
10
11
const path = require('path')
const grpc = require('@grpc/grpc-js')
const protoLoader = require('@grpc/proto-loader')

const PROTO_PATH = path.join(__dirname, 'message.proto')
const packageDefinition = protoLoader.loadSync(PROTO_PATH, { keepCase: true, longs: String, enums: String, defaults: true, oneofs: true })
const protoDescriptor = grpc.loadPackageDefinition(packageDefinition)

const message_proto = protoDescriptor.message

module.exports = message_proto

keepCase: 如果为 true,则保留字段名的原始大小写。如果为 false,则将所有字段名转换为驼峰命名法。

longs: 控制如何表示 Protocol Buffers 中的 long 类型。如果设置为 String,则长整数会被转换为字符串,以避免 JavaScript 中的整数溢出问题。

enums: 控制如何表示 Protocol Buffers 中的枚举类型。如果设置为 String,则枚举值会被转换为字符串。

defaults: 如果为 true,则为未明确设置的字段提供默认值。

oneofs: 如果为 true,则支持 Protocol Buffers 中的 oneof 特性。

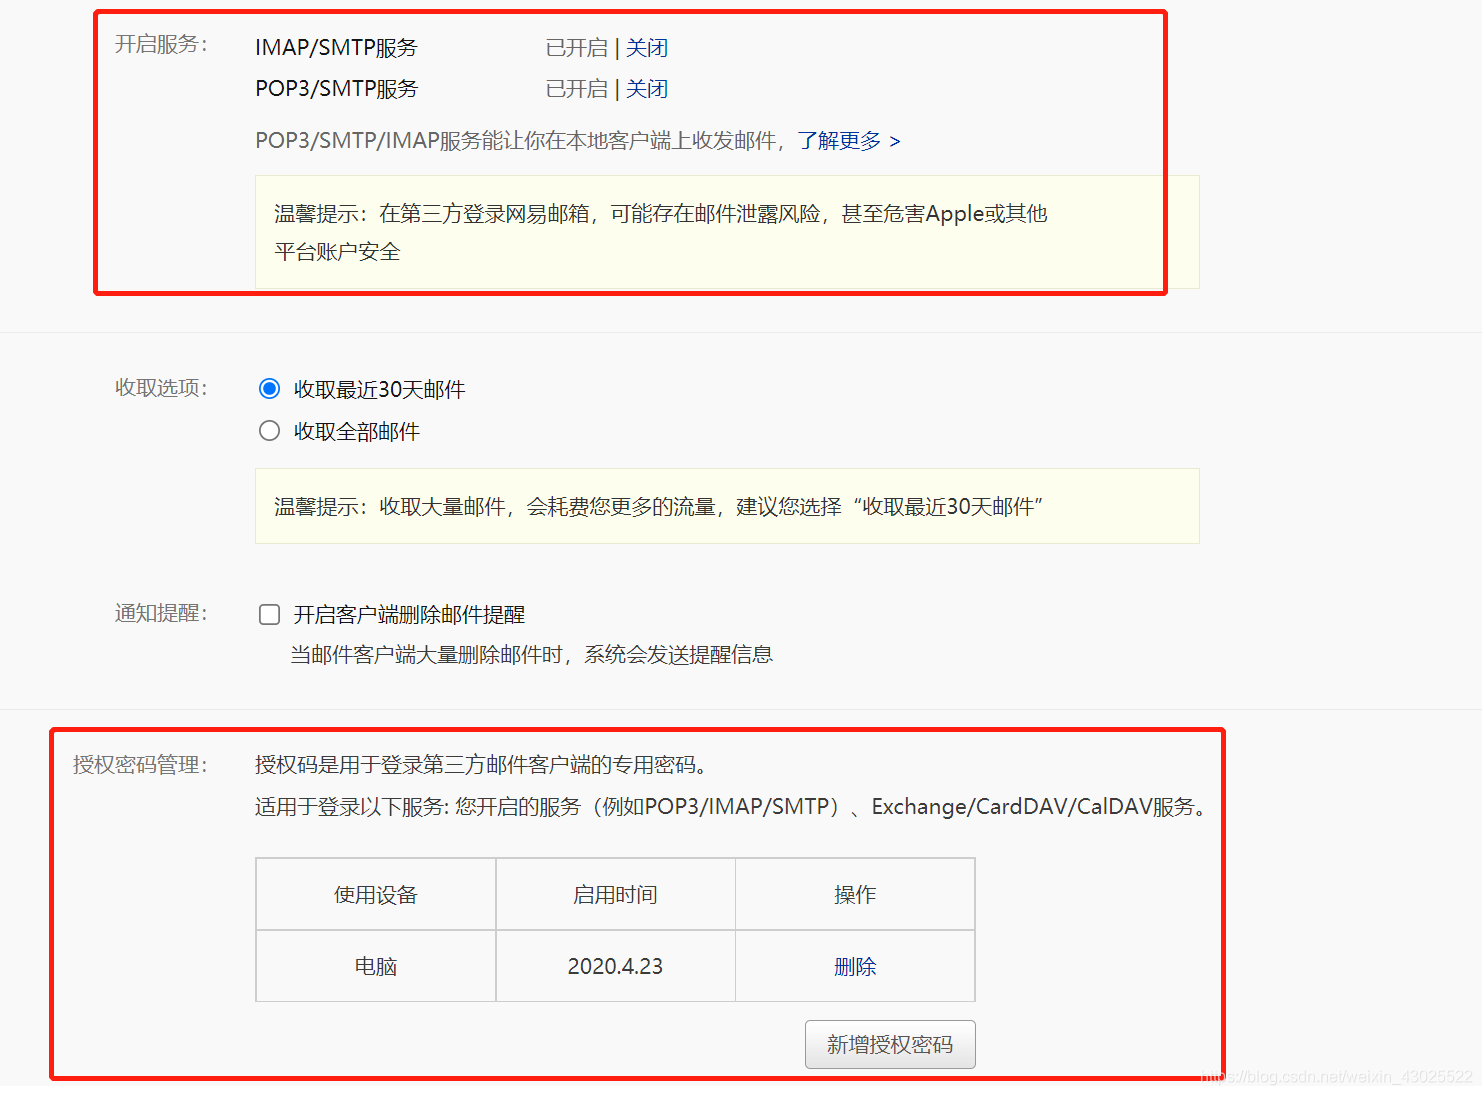
在写代码发送邮件之前,我们先去邮箱开启smtp服务。我用的163邮箱,在邮箱设置中查找smtp服务器地址,需要开启smtp服务。这个是固定的,不需要修改。

网易163邮箱的 SMTP 服务器地址为: smtp.163.com

发送邮件,建议使用授权码(有的邮箱叫 独立密码),确保邮箱密码的安全性。授权码在邮箱设置中进行设置。如果开启了授权码,发送邮件的时候,必须使用授权码。

这里设置开启smtp服务和授权码。我这里已经是设置好的。

https://cdn.llfc.club/20210625165014232.png

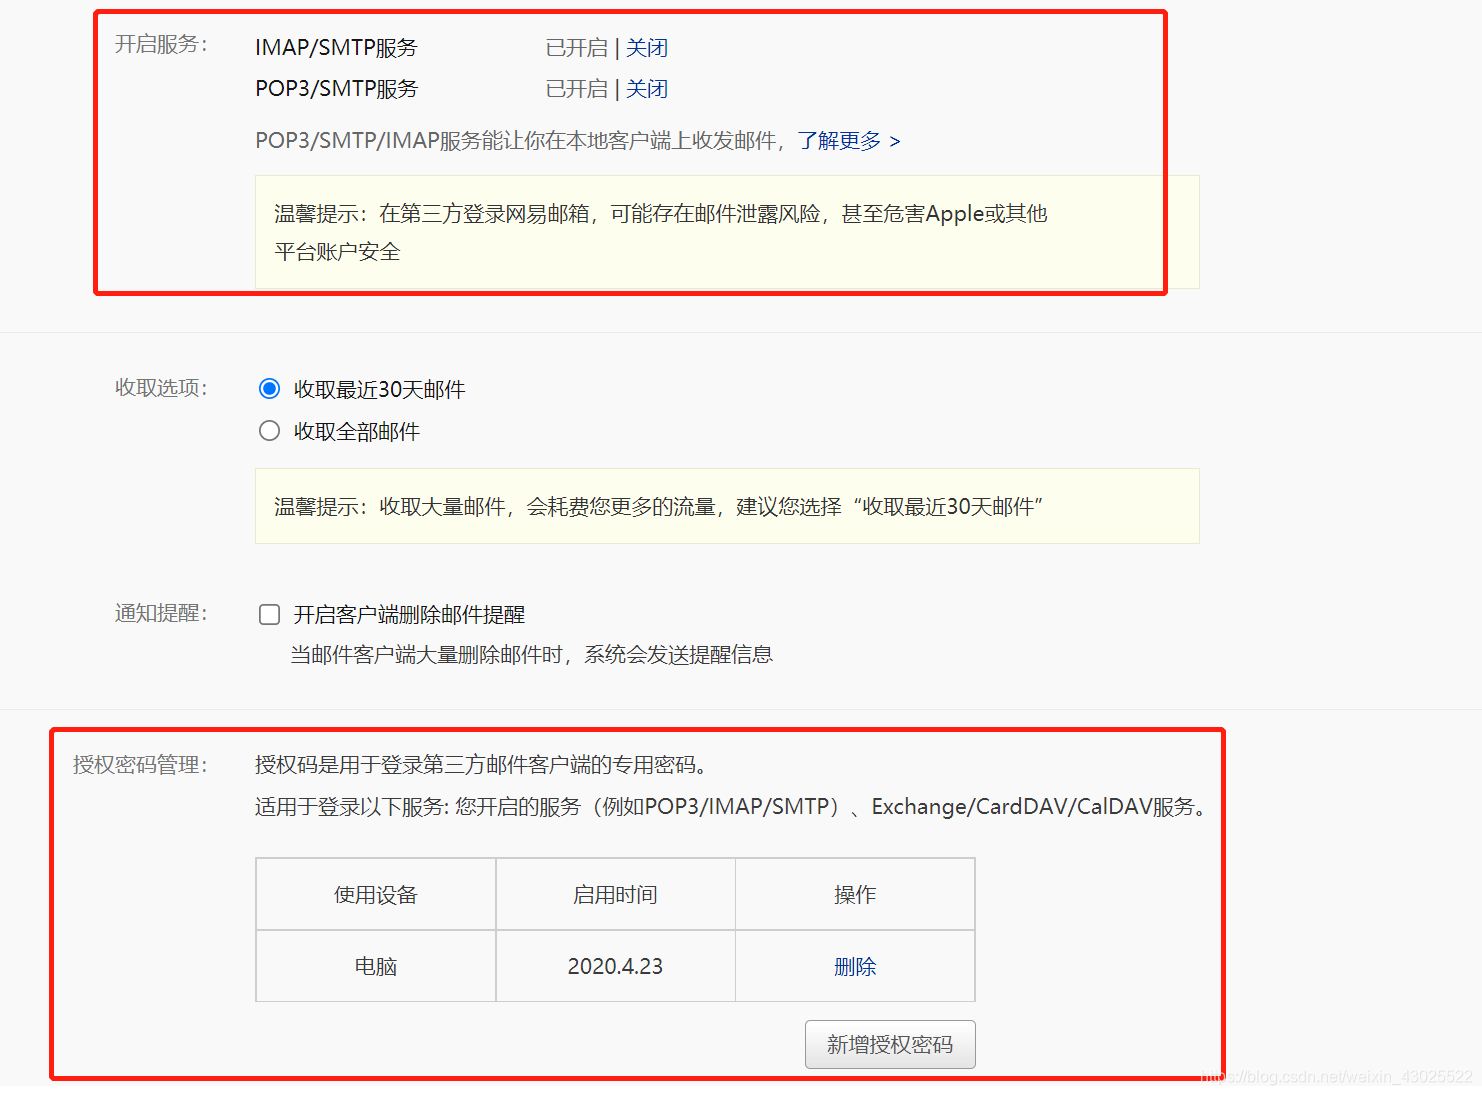
新增一个授权码用于发邮件

https://cdn.llfc.club/20210625165014232%20%282%29.png

读取配置

因为我们要实现参数可配置,所以要读取配置,先在文件夹内创建一个config.json文件

1
2
3
4
5
6
{
"email": {
"user": "secondtonone1@163.com",
"pass": "CRWTAZOSNCWDDQQTllfc"
},
}

user是我们得邮箱地址,pass是邮箱得授权码,只有有了授权码才能用代码发邮件。大家记得把授权码改为你们自己的,否则用我的无法发送成功。

另外我们也要用到一些常量和全局得变量,所以我们定义一个const.js

1
2
3
4
5
6
7
8
9
10
let code_prefix = "code_";

const Errors = {
Success : 0,
RedisErr : 1,
Exception : 2,
};


module.exports = {code_prefix,Errors}

新建config.js用来读取配置

1
2
3
4
5
6
7
8
9
10
11
12
13
14
const fs = require('fs');

let config = JSON.parse(fs.readFileSync('config.json', 'utf8'));
let email_user = config.email.user;
let email_pass = config.email.pass;
let mysql_host = config.mysql.host;
let mysql_port = config.mysql.port;
let redis_host = config.redis.host;
let redis_port = config.redis.port;
let redis_passwd = config.redis.passwd;
let code_prefix = "code_";


module.exports = {email_pass, email_user, mysql_host, mysql_port,redis_host, redis_port, redis_passwd, code_prefix}

接下来封装发邮件的模块,新建一个email.js文件

1
2
3
4
5
6
7
8
9
10
11
12
13
14
15
const nodemailer = require('nodemailer');
const config_module = require("./config")

/**
* 创建发送邮件的代理
*/
let transport = nodemailer.createTransport({
host: 'smtp.163.com',
port: 465,
secure: true,
auth: {
user: config_module.email_user, // 发送方邮箱地址
pass: config_module.email_pass // 邮箱授权码或者密码
}
});

接下来实现发邮件函数

1
2
3
4
5
6
7
8
9
10
11
12
13
14
15
16
17
18
19
20
21
/**
* 发送邮件的函数
* @param {*} mailOptions_ 发送邮件的参数
* @returns
*/
function SendMail(mailOptions_){
return new Promise(function(resolve, reject){
transport.sendMail(mailOptions_, function(error, info){
if (error) {
console.log(error);
reject(error);
} else {
console.log('邮件已成功发送:' + info.response);
resolve(info.response)
}
});
})

}

module.exports.SendMail = SendMail

因为transport.SendMail相当于一个异步函数,调用该函数后发送的结果是通过回调函数通知的,所以我们没办法同步使用,需要用Promise封装这个调用,抛出Promise给外部,那么外部就可以通过await或者then catch的方式处理了。

我们新建server.js,用来启动grpc server

1
2
3
4
5
6
7
8
9
10
11
12
13
14
15
16
17
18
19
20
21
22
23
24
25
26
27
28
29
30
31
32
33
34
35
36
37
38
39
40
41
42
async function GetVarifyCode(call, callback) {
console.log("email is ", call.request.email)
try{
uniqueId = uuidv4();
console.log("uniqueId is ", uniqueId)
let text_str = '您的验证码为'+ uniqueId +'请三分钟内完成注册'
//发送邮件
let mailOptions = {
from: 'secondtonone1@163.com',
to: call.request.email,
subject: '验证码',
text: text_str,
};

let send_res = await emailModule.SendMail(mailOptions);
console.log("send res is ", send_res)

callback(null, { email: call.request.email,
error:const_module.Errors.Success
});


}catch(error){
console.log("catch error is ", error)

callback(null, { email: call.request.email,
error:const_module.Errors.Exception
});
}

}

function main() {
var server = new grpc.Server()
server.addService(message_proto.VarifyService.service, { GetVarifyCode: GetVarifyCode })
server.bindAsync('0.0.0.0:50051', grpc.ServerCredentials.createInsecure(), () => {
server.start()
console.log('grpc server started')
})
}

main()

GetVarifyCode声明为async是为了能在内部调用await。

提升GateServer并发

添加ASIO IOContext Pool 结构,让多个iocontext跑在不同的线程中

1
2
3
4
5
6
7
8
9
10
11
12
13
14
15
16
17
18
19
20
21
22
23
#include <vector>
#include <boost/asio.hpp>
#include "Singleton.h"
class AsioIOServicePool:public Singleton<AsioIOServicePool>
{
friend Singleton<AsioIOServicePool>;
public:
using IOService = boost::asio::io_context;
using Work = boost::asio::io_context::work;
using WorkPtr = std::unique_ptr<Work>;
~AsioIOServicePool();
AsioIOServicePool(const AsioIOServicePool&) = delete;
AsioIOServicePool& operator=(const AsioIOServicePool&) = delete;
// 使用 round-robin 的方式返回一个 io_service
boost::asio::io_context& GetIOService();
void Stop();
private:
AsioIOServicePool(std::size_t size = 2/*std::thread::hardware_concurrency()*/);
std::vector<IOService> _ioServices;
std::vector<WorkPtr> _works;
std::vector<std::thread> _threads;
std::size_t _nextIOService;
};

实现

1
2
3
4
5
6
7
8
9
10
11
12
13
14
15
16
17
18
19
20
21
22
23
24
25
26
27
28
29
30
31
32
33
34
35
36
37
38
39
40
41
42
43
#include "AsioIOServicePool.h"
#include <iostream>
using namespace std;
AsioIOServicePool::AsioIOServicePool(std::size_t size):_ioServices(size),
_works(size), _nextIOService(0){
for (std::size_t i = 0; i < size; ++i) {
_works[i] = std::unique_ptr<Work>(new Work(_ioServices[i]));
}

//遍历多个ioservice,创建多个线程,每个线程内部启动ioservice
for (std::size_t i = 0; i < _ioServices.size(); ++i) {
_threads.emplace_back([this, i]() {
_ioServices[i].run();
});
}
}

AsioIOServicePool::~AsioIOServicePool() {
Stop();
std::cout << "AsioIOServicePool destruct" << endl;
}

boost::asio::io_context& AsioIOServicePool::GetIOService() {
auto& service = _ioServices[_nextIOService++];
if (_nextIOService == _ioServices.size()) {
_nextIOService = 0;
}
return service;
}

void AsioIOServicePool::Stop(){
//因为仅仅执行work.reset并不能让iocontext从run的状态中退出
//当iocontext已经绑定了读或写的监听事件后,还需要手动stop该服务。
for (auto& work : _works) {
//把服务先停止
work->get_io_context().stop();
work.reset();
}

for (auto& t : _threads) {
t.join();
}
}

修改CServer处Start逻辑, 改为每次从IOServicePool连接池中获取连接

1
2
3
4
5
6
7
8
9
10
11
12
13
14
15
16
17
18
19
20
21
22
23
24
void CServer::Start()
{
auto self = shared_from_this();
auto& io_context = AsioIOServicePool::GetInstance()->GetIOService();
std::shared_ptr<HttpConnection> new_con = std::make_shared<HttpConnection>(io_context);
_acceptor.async_accept(new_con->GetSocket(), [self, new_con](beast::error_code ec) {
try {
//出错则放弃这个连接,继续监听新链接
if (ec) {
self->Start();
return;
}

//处理新链接,创建HpptConnection类管理新连接
new_con->Start();
//继续监听
self->Start();
}
catch (std::exception& exp) {
std::cout << "exception is " << exp.what() << std::endl;
self->Start();
}
});
}

为了方便读取配置文件,将ConfigMgr改为单例, 将构造函数变成私有,添加Inst函数

1
2
3
4
static ConfigMgr& Inst() {
static ConfigMgr cfg_mgr;
return cfg_mgr;
}

VerifyGrpcClient.cpp中添加

1
2
3
4
5
6
7
8
9
10
11
12
13
14
15
16
17
18
19
20
21
22
23
24
25
26
27
28
29
30
31
32
33
34
35
36
37
38
39
40
41
42
43
44
45
46
47
48
49
50
51
52
53
54
55
56
57
58
59
60
61
class RPConPool {
public:
RPConPool(size_t poolSize, std::string host, std::string port)
: poolSize_(poolSize), host_(host), port_(port), b_stop_(false) {
for (size_t i = 0; i < poolSize_; ++i) {

std::shared_ptr<Channel> channel = grpc::CreateChannel(host+":"+port,
grpc::InsecureChannelCredentials());

connections_.push(VarifyService::NewStub(channel));
}
}

~RPConPool() {
std::lock_guard<std::mutex> lock(mutex_);
Close();
while (!connections_.empty()) {
connections_.pop();
}
}

std::unique_ptr<VarifyService::Stub> getConnection() {
std::unique_lock<std::mutex> lock(mutex_);
cond_.wait(lock, [this] {
if (b_stop_) {
return true;
}
return !connections_.empty();
});
//如果停止则直接返回空指针
if (b_stop_) {
return nullptr;
}
auto context = std::move(connections_.front());
connections_.pop();
return context;
}

void returnConnection(std::unique_ptr<VarifyService::Stub> context) {
std::lock_guard<std::mutex> lock(mutex_);
if (b_stop_) {
return;
}
connections_.push(std::move(context));
cond_.notify_one();
}

void Close() {
b_stop_ = true;
cond_.notify_all();
}

private:
atomic<bool> b_stop_;
size_t poolSize_;
std::string host_;
std::string port_;
std::queue<std::unique_ptr<VarifyService::Stub>> connections_;
std::mutex mutex_;
std::condition_variable cond_;
};

我们在VerifyGrpcClient类中添加成员

1
std::unique_ptr<RPConPool> pool_;

修改构造函数

1
2
3
4
5
6
VerifyGrpcClient::VerifyGrpcClient() {
auto& gCfgMgr = ConfigMgr::Inst();
std::string host = gCfgMgr["VarifyServer"]["Host"];
std::string port = gCfgMgr["VarifyServer"]["Port"];
pool_.reset(new RPConPool(5, host, port));
}

当我们想连接grpc server端时,可以通过池子获取连接,用完之后再返回连接给池子

1
2
3
4
5
6
7
8
9
10
11
12
13
14
15
16
17
18
GetVarifyRsp GetVarifyCode(std::string email) {
ClientContext context;
GetVarifyRsp reply;
GetVarifyReq request;
request.set_email(email);
auto stub = pool_->getConnection();
Status status = stub->GetVarifyCode(&context, request, &reply);

if (status.ok()) {
pool_->returnConnection(std::move(stub));
return reply;
}
else {
pool_->returnConnection(std::move(stub));
reply.set_error(ErrorCodes::RPCFailed);
return reply;
}
}

总结

到本节为止我们完成nodejs搭建的grpc server, 修改package.json中的脚本

1
2
3
"scripts": {
"serve": "node server.js"
},

接着命令行执行 npm run serve即可启动grpc 服务。

C++ 全栈聊天项目(9) nodejs实现邮箱验证服务

Posted on 2024-08-31 | In C++聊天项目

邮箱验证服务联调

我们启动GateServer和VarifyServer

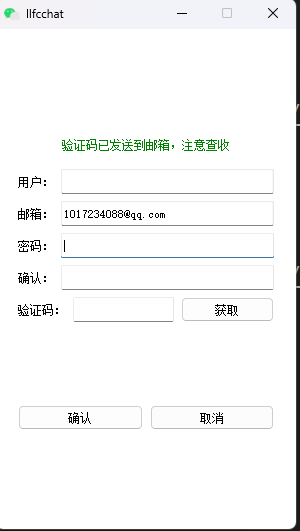
我们启动客户端,点击注册按钮进入注册界面,输入邮箱并且点击获取验证码

https://cdn.llfc.club/1710646053282.jpg

GateServer收到Client发送的请求后,会调用grpc 服务 访问VarifyServer,VarifyServer会随机生成验证码,并且调用邮箱模块发送邮件给指定邮箱。而且把发送的结果给GateServer,GateServer再将消息回传给客户端。

设置验证码过期

我们的验证码是要设置过期的,可以用redis管理过期的验证码自动删除,key为邮箱,value为验证码,过期时间为3min。

windows 安装redis服务

windows 版本下载地址:

https://github.com/tporadowski/redis/releases

下载速度慢可以去我的网盘

链接: https://pan.baidu.com/s/1v_foHZLvBeJQMePSGnp4Ow?pwd=yid3 提取码: yid3

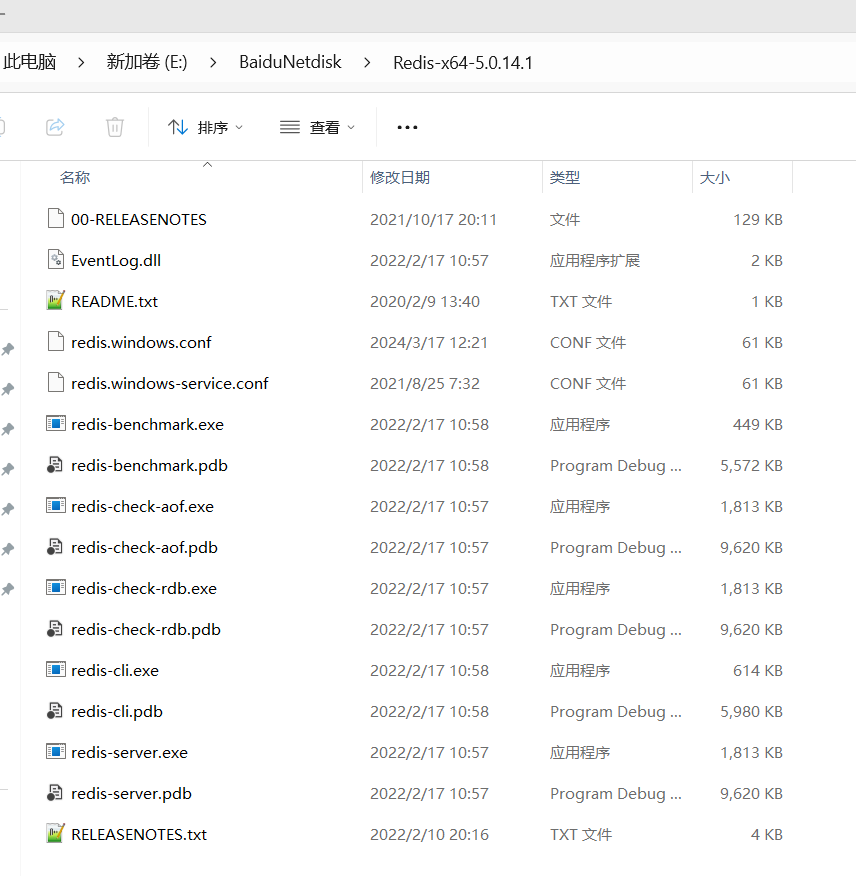
下载完成后解压

https://cdn.llfc.club/1710649614458.jpg

修改redis.windows.conf, 并且修改端口

1
port 6380

找到requirepass foobared,下面添加requirepass

1
2
# requirepass foobared
requirepass 123456

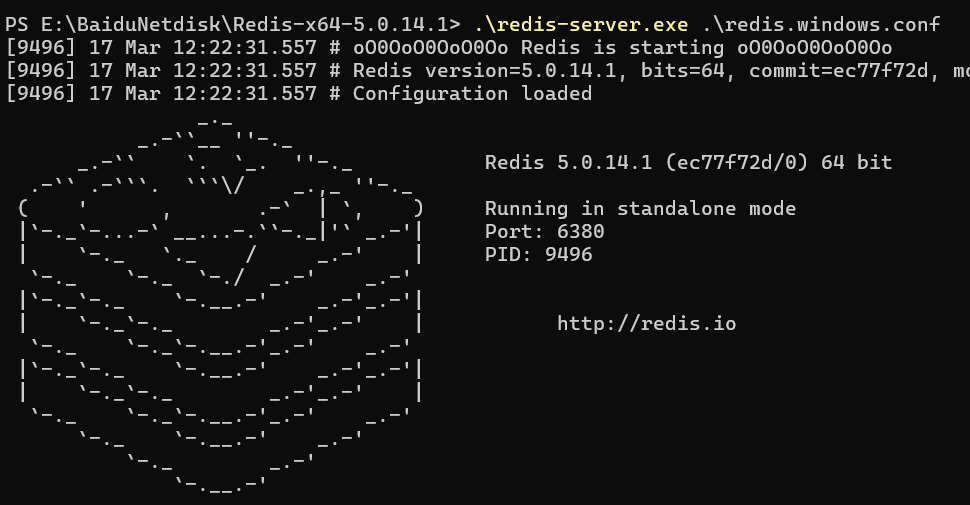
启动redis 服务器 .\redis-server.exe .\redis.windows.conf

https://cdn.llfc.club/1710649945760.jpg

启动客户端 .\redis-cli.exe -p 6380, 输入密码登录成功

https://cdn.llfc.club/1710650063208.jpg

Linux 安装redis服务

Linux安装容器后,直接用容器启动redis

1
docker run -d --name llfc-redis -p 6380:6379 redis  --requirepass "123456"

为了方便测试能否链接以及以后查看数据,大家可以下载redis desktop manager

官网链接
redisdesktop.com/

下载速度慢可以去我的网盘

链接: https://pan.baidu.com/s/1v_foHZLvBeJQMePSGnp4Ow?pwd=yid3 提取码: yid3

下载后安装

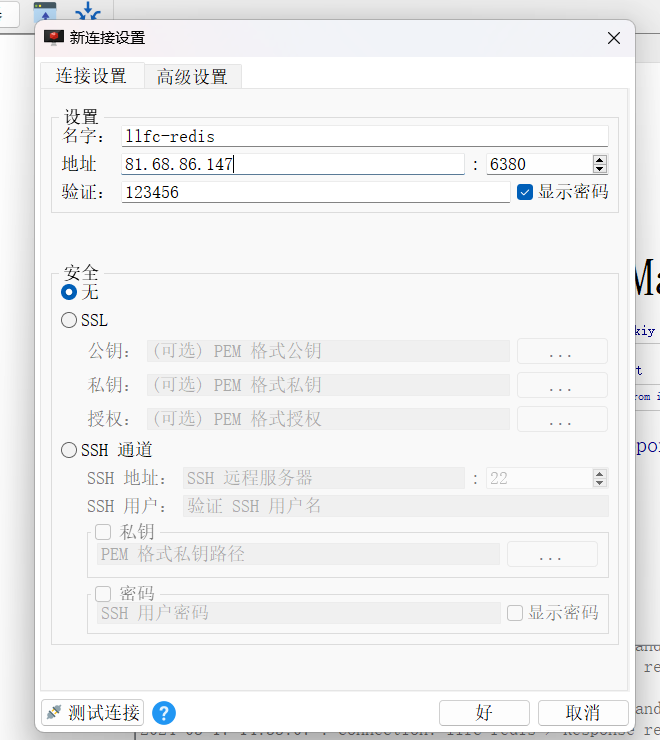
设置好ip和密码,点击测试连接连通就成功了

https://cdn.llfc.club/1710657223612.jpg

widows编译和配置redis

Linux的redis库直接编译安装即可,windows反而麻烦一些,我们先阐述windows环境如何配置redis库, C++ 的redis库有很多种,最常用的有hredis和redis-plus-plus. 我们用redis-plus-plus. 这里介绍一种简单的安装方式—vcpkg

先安装vcpkg, 源码地址

https://github.com/microsoft/vcpkg/releases

下载源码后

windows版本redis下载地址

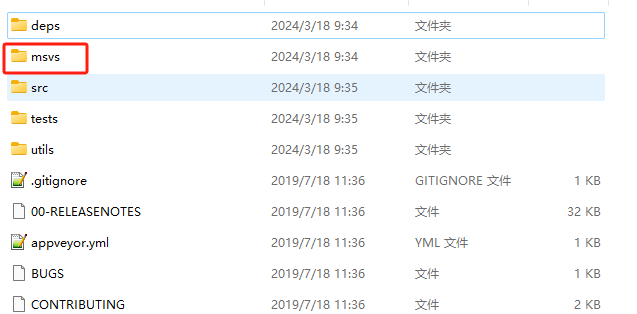
https://github.com/microsoftarchive/redis

因为是源码,所以进入msvc目录

https://cdn.llfc.club/1710725726234.jpg

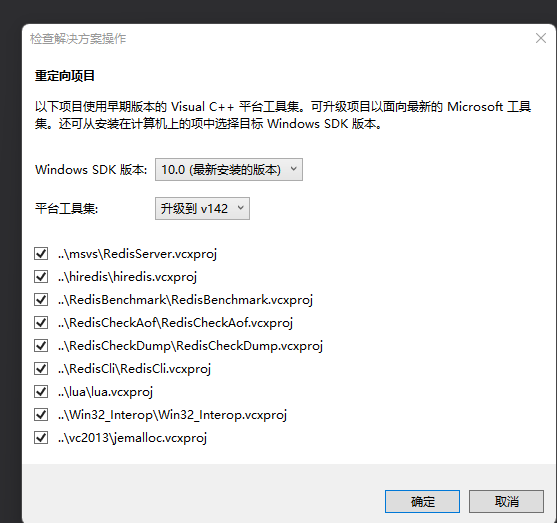
用visual studio打开sln文件,弹出升级窗口, 我的是vs2019所以升级到142

https://cdn.llfc.club/1710725937787.jpg

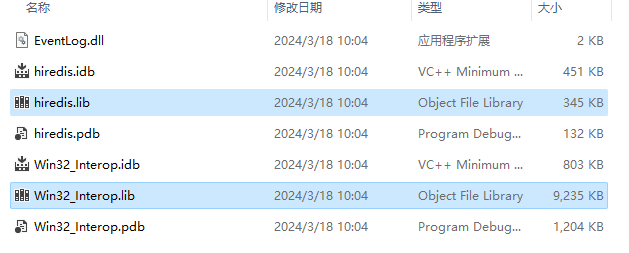
只需要生成hiredis工程和Win32_Interop工程即可,分别点击生成,生成hiredis.lib和Win32_Interop.lib即可

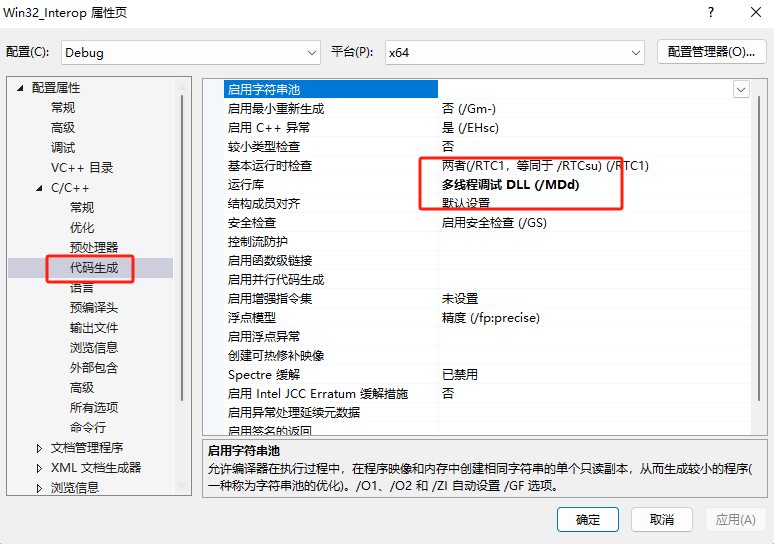
右键两个工程的属性,代码生成里选择运行时库加载模式为MDD(Debug模式动态运行加载),为了兼容我们其他的库,其他的库也是MDD模式

https://cdn.llfc.club/1710726777016.jpg

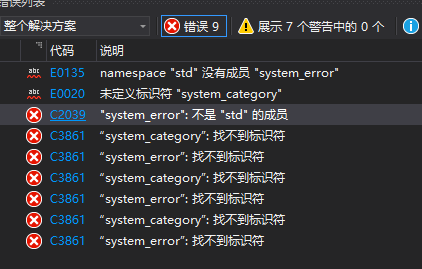
编译Win32_Interop.lib时报错, system_error不是std成员,

https://cdn.llfc.club/1710727129177.jpg

解决办法为在Win32_variadicFunctor.cpp和Win32_FDAPI.cpp添加
#include <system_error>,再右键生成成功

https://cdn.llfc.club/1710729372811.jpg

将hiredis.lib和Win32_Interop.lib拷贝到D:\cppsoft\reids\lib

将redis-3.0\deps和redis-3.0\src文件夹拷贝到D:\cppsoft\reids

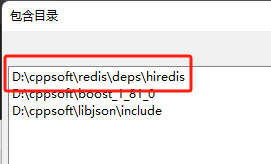
然后我们在visual studio中配置VC++ 包含目录

https://cdn.llfc.club/1710811823982.jpg

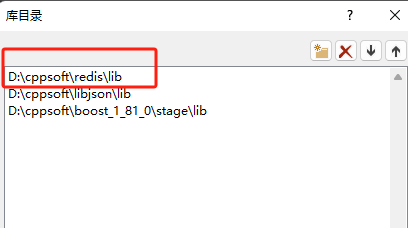
配置VC++库目录

https://cdn.llfc.club/1710811986563.jpg

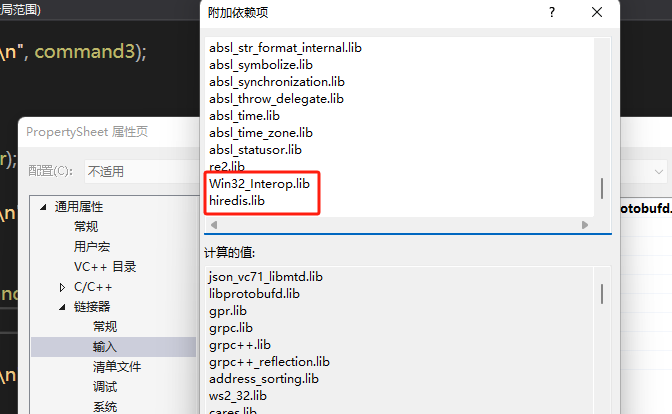
然后在链接器->输入->附加依赖项中添加

https://cdn.llfc.club/1710812099185.jpg

代码测试

我们需要写代码测试库配置的情况

1
2
3
4
5
6
7
8
9
10
11
12
13
14
15
16
17
18
19
20
21
22
23
24
25
26
27
28
29
30
31
32
33
34
35
36
37
38
39
40
41
42
43
44
45
46
47
48
49
50
51
52
53
54
55
56
57
58
59
60
61
62
63
64
65
66
67
68
69
70
71
72
73
74
75
76
77
78
79
80
81
82
83
84
85
86
87
88
89
void TestRedis() {
//连接redis 需要启动才可以进行连接
//redis默认监听端口为6387 可以再配置文件中修改
redisContext* c = redisConnect("127.0.0.1", 6380);
if (c->err)
{
printf("Connect to redisServer faile:%s\n", c->errstr);
redisFree(c); return;
}
printf("Connect to redisServer Success\n");

std::string redis_password = "123456";
redisReply* r = (redisReply*)redisCommand(c, "AUTH %s", redis_password);
if (r->type == REDIS_REPLY_ERROR) {
printf("Redis认证失败!\n");
}else {
printf("Redis认证成功!\n");
}

//为redis设置key
const char* command1 = "set stest1 value1";

//执行redis命令行
r = (redisReply*)redisCommand(c, command1);

//如果返回NULL则说明执行失败
if (NULL == r)
{
printf("Execut command1 failure\n");
redisFree(c); return;
}

//如果执行失败则释放连接
if (!(r->type == REDIS_REPLY_STATUS && (strcmp(r->str, "OK") == 0 || strcmp(r->str, "ok") == 0)))
{
printf("Failed to execute command[%s]\n", command1);
freeReplyObject(r);
redisFree(c); return;
}

//执行成功 释放redisCommand执行后返回的redisReply所占用的内存
freeReplyObject(r);
printf("Succeed to execute command[%s]\n", command1);

const char* command2 = "strlen stest1";
r = (redisReply*)redisCommand(c, command2);

//如果返回类型不是整形 则释放连接
if (r->type != REDIS_REPLY_INTEGER)
{
printf("Failed to execute command[%s]\n", command2);
freeReplyObject(r);
redisFree(c); return;
}

//获取字符串长度
int length = r->integer;
freeReplyObject(r);
printf("The length of 'stest1' is %d.\n", length);
printf("Succeed to execute command[%s]\n", command2);

//获取redis键值对信息
const char* command3 = "get stest1";
r = (redisReply*)redisCommand(c, command3);
if (r->type != REDIS_REPLY_STRING)
{
printf("Failed to execute command[%s]\n", command3);
freeReplyObject(r);
redisFree(c); return;
}
printf("The value of 'stest1' is %s\n", r->str);
freeReplyObject(r);
printf("Succeed to execute command[%s]\n", command3);

const char* command4 = "get stest2";
r = (redisReply*)redisCommand(c, command4);
if (r->type != REDIS_REPLY_NIL)
{
printf("Failed to execute command[%s]\n", command4);
freeReplyObject(r);
redisFree(c); return;
}
freeReplyObject(r);
printf("Succeed to execute command[%s]\n", command4);

//释放连接资源
redisFree(c);

}

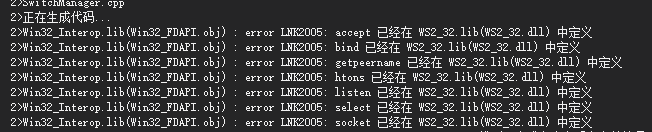
在主函数中调用TestRedis,编译项目时发现编译失败,提示

https://cdn.llfc.club/1710812579501.jpg

在同时使用Redis连接和socket连接时,遇到了Win32_Interop.lib和WS2_32.lib冲突的问题, 因为我们底层用了socket作为网络通信,也用redis,导致两个库冲突。

引起原因主要是Redis库Win32_FDAPI.cpp有重新定义了socket的一些方法引起来冲突

1
2
3
4
5
6
7
8
9
10
11
12
13
14
15
16
17
18
19
20
21
22
23
24
25
26
27
28
29
30
31
32
33
34
35
36
37
38
39
40
41
42
43
44
45
46
47
48
49
50
51
52
53
54
55
56
57
58
59
60
61
62
63
64
65
66
extern "C" {
// Unix compatible FD based routines
fdapi_accept accept = NULL;
fdapi_access access = NULL;
fdapi_bind bind = NULL;
fdapi_connect connect = NULL;
fdapi_fcntl fcntl = NULL;
fdapi_fstat fdapi_fstat64 = NULL;
fdapi_fsync fsync = NULL;
fdapi_ftruncate ftruncate = NULL;
fdapi_freeaddrinfo freeaddrinfo = NULL;
fdapi_getaddrinfo getaddrinfo = NULL;
fdapi_getpeername getpeername = NULL;
fdapi_getsockname getsockname = NULL;
fdapi_getsockopt getsockopt = NULL;
fdapi_htonl htonl = NULL;
fdapi_htons htons = NULL;
fdapi_isatty isatty = NULL;
fdapi_inet_ntop inet_ntop = NULL;
fdapi_inet_pton inet_pton = NULL;
fdapi_listen listen = NULL;
fdapi_lseek64 lseek64 = NULL;
fdapi_ntohl ntohl = NULL;
fdapi_ntohs ntohs = NULL;
fdapi_open open = NULL;
fdapi_pipe pipe = NULL;
fdapi_poll poll = NULL;
fdapi_read read = NULL;
fdapi_select select = NULL;
fdapi_setsockopt setsockopt = NULL;
fdapi_socket socket = NULL;
fdapi_write write = NULL;
}
auto f_WSACleanup = dllfunctor_stdcall<int>("ws2_32.dll", "WSACleanup");
auto f_WSAFDIsSet = dllfunctor_stdcall<int, SOCKET, fd_set*>("ws2_32.dll", "__WSAFDIsSet");
auto f_WSAGetLastError = dllfunctor_stdcall<int>("ws2_32.dll", "WSAGetLastError");
auto f_WSAGetOverlappedResult = dllfunctor_stdcall<BOOL, SOCKET, LPWSAOVERLAPPED, LPDWORD, BOOL, LPDWORD>("ws2_32.dll", "WSAGetOverlappedResult");
auto f_WSADuplicateSocket = dllfunctor_stdcall<int, SOCKET, DWORD, LPWSAPROTOCOL_INFO>("ws2_32.dll", "WSADuplicateSocketW");
auto f_WSAIoctl = dllfunctor_stdcall<int, SOCKET, DWORD, LPVOID, DWORD, LPVOID, DWORD, LPVOID, LPWSAOVERLAPPED, LPWSAOVERLAPPED_COMPLETION_ROUTINE>("ws2_32.dll", "WSAIoctl");
auto f_WSARecv = dllfunctor_stdcall<int, SOCKET, LPWSABUF, DWORD, LPDWORD, LPDWORD, LPWSAOVERLAPPED, LPWSAOVERLAPPED_COMPLETION_ROUTINE>("ws2_32.dll", "WSARecv");
auto f_WSASocket = dllfunctor_stdcall<SOCKET, int, int, int, LPWSAPROTOCOL_INFO, GROUP, DWORD>("ws2_32.dll", "WSASocketW");
auto f_WSASend = dllfunctor_stdcall<int, SOCKET, LPWSABUF, DWORD, LPDWORD, DWORD, LPWSAOVERLAPPED, LPWSAOVERLAPPED_COMPLETION_ROUTINE>("ws2_32.dll", "WSASend");
auto f_WSAStartup = dllfunctor_stdcall<int, WORD, LPWSADATA>("ws2_32.dll", "WSAStartup");
auto f_ioctlsocket = dllfunctor_stdcall<int, SOCKET, long, u_long*>("ws2_32.dll", "ioctlsocket");

auto f_accept = dllfunctor_stdcall<SOCKET, SOCKET, struct sockaddr*, int*>("ws2_32.dll", "accept");
auto f_bind = dllfunctor_stdcall<int, SOCKET, const struct sockaddr*, int>("ws2_32.dll", "bind");
auto f_closesocket = dllfunctor_stdcall<int, SOCKET>("ws2_32.dll", "closesocket");
auto f_connect = dllfunctor_stdcall<int, SOCKET, const struct sockaddr*, int>("ws2_32.dll", "connect");
auto f_freeaddrinfo = dllfunctor_stdcall<void, addrinfo*>("ws2_32.dll", "freeaddrinfo");
auto f_getaddrinfo = dllfunctor_stdcall<int, PCSTR, PCSTR, const ADDRINFOA*, ADDRINFOA**>("ws2_32.dll", "getaddrinfo");
auto f_gethostbyname = dllfunctor_stdcall<struct hostent*, const char*>("ws2_32.dll", "gethostbyname");
auto f_getpeername = dllfunctor_stdcall<int, SOCKET, struct sockaddr*, int*>("ws2_32.dll", "getpeername");
auto f_getsockname = dllfunctor_stdcall<int, SOCKET, struct sockaddr*, int*>("ws2_32.dll", "getsockname");
auto f_getsockopt = dllfunctor_stdcall<int, SOCKET, int, int, char*, int*>("ws2_32.dll", "getsockopt");
auto f_htonl = dllfunctor_stdcall<u_long, u_long>("ws2_32.dll", "htonl");
auto f_htons = dllfunctor_stdcall<u_short, u_short>("ws2_32.dll", "htons");
auto f_listen = dllfunctor_stdcall<int, SOCKET, int>("ws2_32.dll", "listen");
auto f_ntohs = dllfunctor_stdcall<u_short, u_short>("ws2_32.dll", "ntohs");
auto f_ntohl = dllfunctor_stdcall<u_long, u_long>("ws2_32.dll", "ntohl");
auto f_recv = dllfunctor_stdcall<int, SOCKET, char*, int, int>("ws2_32.dll", "recv");
auto f_select = dllfunctor_stdcall<int, int, fd_set*, fd_set*, fd_set*, const struct timeval*>("ws2_32.dll", "select");
auto f_send = dllfunctor_stdcall<int, SOCKET, const char*, int, int>("ws2_32.dll", "send");
auto f_setsockopt = dllfunctor_stdcall<int, SOCKET, int, int, const char*, int>("ws2_32.dll", "setsockopt");
auto f_socket = dllfunctor_stdcall<SOCKET, int, int, int>("ws2_32.dll", "socket");

去掉Redis库里面的socket的函数的重定义,把所有使用这些方法的地方都改为下面对应的函数

1
2
3
4
5
6
7
8
9
10
11
12
13
14
15
16
17
18
19
20
21
22
23
24
25
26
int FDAPI_accept(int rfd, struct sockaddr *addr, socklen_t *addrlen);
int FDAPI_access(const char *pathname, int mode);
int FDAPI_bind(int rfd, const struct sockaddr *addr, socklen_t addrlen);
int FDAPI_connect(int rfd, const struct sockaddr *addr, size_t addrlen);
int FDAPI_fcntl(int rfd, int cmd, int flags);
int FDAPI_fstat64(int rfd, struct __stat64 *buffer);
void FDAPI_freeaddrinfo(struct addrinfo *ai);
int FDAPI_fsync(int rfd);
int FDAPI_ftruncate(int rfd, PORT_LONGLONG length);
int FDAPI_getaddrinfo(const char *node, const char *service, const struct addrinfo *hints, struct addrinfo **res);
int FDAPI_getsockopt(int rfd, int level, int optname, void *optval, socklen_t *optlen);
int FDAPI_getpeername(int rfd, struct sockaddr *addr, socklen_t * addrlen);
int FDAPI_getsockname(int rfd, struct sockaddr* addrsock, int* addrlen);
u_long FDAPI_htonl(u_long hostlong);
u_short FDAPI_htons(u_short hostshort);
u_int FDAPI_ntohl(u_int netlong);
u_short FDAPI_ntohs(u_short netshort);
int FDAPI_open(const char * _Filename, int _OpenFlag, int flags);
int FDAPI_pipe(int *pfds);
int FDAPI_poll(struct pollfd *fds, nfds_t nfds, int timeout);
int FDAPI_listen(int rfd, int backlog);
int FDAPI_socket(int af, int type, int protocol);
int FDAPI_select(int nfds, fd_set *readfds, fd_set *writefds, fd_set *exceptfds, struct timeval *timeout);
int FDAPI_setsockopt(int rfd, int level, int optname, const void *optval, socklen_t optlen);
ssize_t FDAPI_read(int rfd, void *buf, size_t count);
ssize_t FDAPI_write(int rfd, const void *buf, size_t count);

考虑大家修改起来很麻烦,可以下载我的代码

https://gitee.com/secondtonone1/windows-redis

再次编译生成hredis和Win32_Interop的lib库,重新配置下,项目再次编译就通过了。

封装redis操作类

因为hredis提供的操作太别扭了,我们手动封装redis操作类,简化调用流程。

封装的类叫RedisMgr,它是个单例类并且可接受回调,按照我们之前的风格

1
2
3
4
5
6
7
8
9
10
11
12
13
14
15
16
17
18
19
20
21
22
23
24
25
26
class RedisMgr: public Singleton<RedisMgr>, 
public std::enable_shared_from_this<RedisMgr>
{
friend class Singleton<RedisMgr>;
public:
~RedisMgr();
bool Connect(const std::string& host, int port);
bool Get(const std::string &key, std::string& value);
bool Set(const std::string &key, const std::string &value);
bool Auth(const std::string &password);
bool LPush(const std::string &key, const std::string &value);
bool LPop(const std::string &key, std::string& value);
bool RPush(const std::string& key, const std::string& value);
bool RPop(const std::string& key, std::string& value);
bool HSet(const std::string &key, const std::string &hkey, const std::string &value);
bool HSet(const char* key, const char* hkey, const char* hvalue, size_t hvaluelen);
std::string HGet(const std::string &key, const std::string &hkey);
bool Del(const std::string &key);
bool ExistsKey(const std::string &key);
void Close();
private:
RedisMgr();

redisContext* _connect;
redisReply* _reply;
};

连接操作

1
2
3
4
5
6
7
8
9
10
bool RedisMgr::Connect(const std::string &host, int port)
{
this->_connect = redisConnect(host.c_str(), port);
if (this->_connect != NULL && this->_connect->err)
{
std::cout << "connect error " << this->_connect->errstr << std::endl;
return false;
}
return true;
}

获取key对应的value

1
2
3
4
5
6
7
8
9
10
11
12
13
14
15
16
17
18
19
20
21
bool RedisMgr::Get(const std::string &key, std::string& value)
{
this->_reply = (redisReply*)redisCommand(this->_connect, "GET %s", key.c_str());
if (this->_reply == NULL) {
std::cout << "[ GET " << key << " ] failed" << std::endl;
freeReplyObject(this->_reply);
return false;
}

if (this->_reply->type != REDIS_REPLY_STRING) {
std::cout << "[ GET " << key << " ] failed" << std::endl;
freeReplyObject(this->_reply);
return false;
}

value = this->_reply->str;
freeReplyObject(this->_reply);

std::cout << "Succeed to execute command [ GET " << key << " ]" << std::endl;
return true;
}

设置key和value

1
2
3
4
5
6
7
8
9
10
11
12
13
14
15
16
17
18
19
20
21
22
23
24
25
26
bool RedisMgr::Set(const std::string &key, const std::string &value){
//执行redis命令行

this->_reply = (redisReply*)redisCommand(this->_connect, "SET %s %s", key.c_str(), value.c_str());

//如果返回NULL则说明执行失败
if (NULL == this->_reply)
{
std::cout << "Execut command [ SET " << key << " "<< value << " ] failure ! " << std::endl;
freeReplyObject(this->_reply);
return false;
}

//如果执行失败则释放连接
if (!(this->_reply->type == REDIS_REPLY_STATUS && (strcmp(this->_reply->str, "OK") == 0 || strcmp(this->_reply->str, "ok") == 0)))
{
std::cout << "Execut command [ SET " << key << " " << value << " ] failure ! " << std::endl;
freeReplyObject(this->_reply);
return false;
}

//执行成功 释放redisCommand执行后返回的redisReply所占用的内存
freeReplyObject(this->_reply);
std::cout << "Execut command [ SET " << key << " " << value << " ] success ! " << std::endl;
return true;
}

密码认证

1
2
3
4
5
6
7
8
9
10
11
12
13
14
15
16
bool RedisMgr::Auth(const std::string &password)
{
this->_reply = (redisReply*)redisCommand(this->_connect, "AUTH %s", password.c_str());
if (this->_reply->type == REDIS_REPLY_ERROR) {
std::cout << "认证失败" << std::endl;
//执行成功 释放redisCommand执行后返回的redisReply所占用的内存
freeReplyObject(this->_reply);
return false;
}
else {
//执行成功 释放redisCommand执行后返回的redisReply所占用的内存
freeReplyObject(this->_reply);
std::cout << "认证成功" << std::endl;
return true;
}
}

左侧push

1
2
3
4
5
6
7
8
9
10
11
12
13
14
15
16
17
18
19
20
bool RedisMgr::LPush(const std::string &key, const std::string &value)
{
this->_reply = (redisReply*)redisCommand(this->_connect, "LPUSH %s %s", key.c_str(), value.c_str());
if (NULL == this->_reply)
{
std::cout << "Execut command [ LPUSH " << key << " " << value << " ] failure ! " << std::endl;
freeReplyObject(this->_reply);
return false;
}

if (this->_reply->type != REDIS_REPLY_INTEGER || this->_reply->integer <= 0) {
std::cout << "Execut command [ LPUSH " << key << " " << value << " ] failure ! " << std::endl;
freeReplyObject(this->_reply);
return false;
}

std::cout << "Execut command [ LPUSH " << key << " " << value << " ] success ! " << std::endl;
freeReplyObject(this->_reply);
return true;
}

左侧pop

1
2
3
4
5
6
7
8
9
10
11
12
bool RedisMgr::LPop(const std::string &key, std::string& value){
this->_reply = (redisReply*)redisCommand(this->_connect, "LPOP %s ", key.c_str());
if (_reply == nullptr || _reply->type == REDIS_REPLY_NIL) {
std::cout << "Execut command [ LPOP " << key<< " ] failure ! " << std::endl;
freeReplyObject(this->_reply);
return false;
}
value = _reply->str;
std::cout << "Execut command [ LPOP " << key << " ] success ! " << std::endl;
freeReplyObject(this->_reply);
return true;
}

右侧push

1
2
3
4
5
6
7
8
9
10
11
12
13
14
15
16
17
18
19
bool RedisMgr::RPush(const std::string& key, const std::string& value) {
this->_reply = (redisReply*)redisCommand(this->_connect, "RPUSH %s %s", key.c_str(), value.c_str());
if (NULL == this->_reply)
{
std::cout << "Execut command [ RPUSH " << key << " " << value << " ] failure ! " << std::endl;
freeReplyObject(this->_reply);
return false;
}

if (this->_reply->type != REDIS_REPLY_INTEGER || this->_reply->integer <= 0) {
std::cout << "Execut command [ RPUSH " << key << " " << value << " ] failure ! " << std::endl;
freeReplyObject(this->_reply);
return false;
}

std::cout << "Execut command [ RPUSH " << key << " " << value << " ] success ! " << std::endl;
freeReplyObject(this->_reply);
return true;
}

右侧pop

1
2
3
4
5
6
7
8
9
10
11
12
bool RedisMgr::RPop(const std::string& key, std::string& value) {
this->_reply = (redisReply*)redisCommand(this->_connect, "RPOP %s ", key.c_str());
if (_reply == nullptr || _reply->type == REDIS_REPLY_NIL) {
std::cout << "Execut command [ RPOP " << key << " ] failure ! " << std::endl;
freeReplyObject(this->_reply);
return false;
}
value = _reply->str;
std::cout << "Execut command [ RPOP " << key << " ] success ! " << std::endl;
freeReplyObject(this->_reply);
return true;
}

HSet操作

1
2
3
4
5
6
7
8
9
10
11
12
13
14
15
16
17
18
19
20
21
22
23
24
25
26
27
28
29
30
31
32
33
34
35
bool RedisMgr::HSet(const std::string &key, const std::string &hkey, const std::string &value) {
this->_reply = (redisReply*)redisCommand(this->_connect, "HSET %s %s %s", key.c_str(), hkey.c_str(), value.c_str());
if (_reply == nullptr || _reply->type != REDIS_REPLY_INTEGER ) {
std::cout << "Execut command [ HSet " << key << " " << hkey <<" " << value << " ] failure ! " << std::endl;
freeReplyObject(this->_reply);
return false;
}
std::cout << "Execut command [ HSet " << key << " " << hkey << " " << value << " ] success ! " << std::endl;
freeReplyObject(this->_reply);
return true;
}


bool RedisMgr::HSet(const char* key, const char* hkey, const char* hvalue, size_t hvaluelen)
{
const char* argv[4];
size_t argvlen[4];
argv[0] = "HSET";
argvlen[0] = 4;
argv[1] = key;
argvlen[1] = strlen(key);
argv[2] = hkey;
argvlen[2] = strlen(hkey);
argv[3] = hvalue;
argvlen[3] = hvaluelen;
this->_reply = (redisReply*)redisCommandArgv(this->_connect, 4, argv, argvlen);
if (_reply == nullptr || _reply->type != REDIS_REPLY_INTEGER) {
std::cout << "Execut command [ HSet " << key << " " << hkey << " " << hvalue << " ] failure ! " << std::endl;
freeReplyObject(this->_reply);
return false;
}
std::cout << "Execut command [ HSet " << key << " " << hkey << " " << hvalue << " ] success ! " << std::endl;
freeReplyObject(this->_reply);
return true;
}

HGet操作

1
2
3
4
5
6
7
8
9
10
11
12
13
14
15
16
17
18
19
20
21
22
std::string RedisMgr::HGet(const std::string &key, const std::string &hkey)
{
const char* argv[3];
size_t argvlen[3];
argv[0] = "HGET";
argvlen[0] = 4;
argv[1] = key.c_str();
argvlen[1] = key.length();
argv[2] = hkey.c_str();
argvlen[2] = hkey.length();
this->_reply = (redisReply*)redisCommandArgv(this->_connect, 3, argv, argvlen);
if (this->_reply == nullptr || this->_reply->type == REDIS_REPLY_NIL) {
freeReplyObject(this->_reply);
std::cout << "Execut command [ HGet " << key << " "<< hkey <<" ] failure ! " << std::endl;
return "";
}

std::string value = this->_reply->str;
freeReplyObject(this->_reply);
std::cout << "Execut command [ HGet " << key << " " << hkey << " ] success ! " << std::endl;
return value;
}

Del 操作

1
2
3
4
5
6
7
8
9
10
11
12
bool RedisMgr::Del(const std::string &key)
{
this->_reply = (redisReply*)redisCommand(this->_connect, "DEL %s", key.c_str());
if (this->_reply == nullptr || this->_reply->type != REDIS_REPLY_INTEGER) {
std::cout << "Execut command [ Del " << key << " ] failure ! " << std::endl;
freeReplyObject(this->_reply);
return false;
}
std::cout << "Execut command [ Del " << key << " ] success ! " << std::endl;
freeReplyObject(this->_reply);
return true;
}

判断键值是否存在

1
2
3
4
5
6
7
8
9
10
11
12
bool RedisMgr::ExistsKey(const std::string &key)
{
this->_reply = (redisReply*)redisCommand(this->_connect, "exists %s", key.c_str());
if (this->_reply == nullptr || this->_reply->type != REDIS_REPLY_INTEGER || this->_reply->integer == 0) {
std::cout << "Not Found [ Key " << key << " ] ! " << std::endl;
freeReplyObject(this->_reply);
return false;
}
std::cout << " Found [ Key " << key << " ] exists ! " << std::endl;
freeReplyObject(this->_reply);
return true;
}

关闭

1
2
3
4
void RedisMgr::Close()
{
redisFree(_connect);
}

测试用例

1
2
3
4
5
6
7
8
9
10
11
12
13
14
15
16
17
18
19
20
21
22
void TestRedisMgr() {
assert(RedisMgr::GetInstance()->Connect("127.0.0.1", 6380));
assert(RedisMgr::GetInstance()->Auth("123456"));
assert(RedisMgr::GetInstance()->Set("blogwebsite","llfc.club"));
std::string value="";
assert(RedisMgr::GetInstance()->Get("blogwebsite", value) );
assert(RedisMgr::GetInstance()->Get("nonekey", value) == false);
assert(RedisMgr::GetInstance()->HSet("bloginfo","blogwebsite", "llfc.club"));
assert(RedisMgr::GetInstance()->HGet("bloginfo","blogwebsite") != "");
assert(RedisMgr::GetInstance()->ExistsKey("bloginfo"));
assert(RedisMgr::GetInstance()->Del("bloginfo"));
assert(RedisMgr::GetInstance()->ExistsKey("bloginfo") == false);
assert(RedisMgr::GetInstance()->LPush("lpushkey1", "lpushvalue1"));
assert(RedisMgr::GetInstance()->LPush("lpushkey1", "lpushvalue2"));
assert(RedisMgr::GetInstance()->LPush("lpushkey1", "lpushvalue3"));
assert(RedisMgr::GetInstance()->RPop("lpushkey1", value));
assert(RedisMgr::GetInstance()->LPop("lpushkey1", value));
assert(RedisMgr::GetInstance()->LPop("lpushkey2", value)==false);
RedisMgr::GetInstance()->Close();
}

封装redis连接池

1
2
3
4
5
6
7
8
9
10
11
12
13
14
15
16
17
18
19
20
21
22
23
24
25
26
27
28
29
30
31
32
33
34
35
36
37
38
39
40
41
42
43
44
45
46
47
48
49
50
51
52
53
54
55
56
57
58
59
60
61
62
63
64
65
66
67
68
69
70
71
72
73
74
75
76
class RedisConPool {
public:
RedisConPool(size_t poolSize, const char* host, int port, const char* pwd)
: poolSize_(poolSize), host_(host), port_(port), b_stop_(false){
for (size_t i = 0; i < poolSize_; ++i) {
auto* context = redisConnect(host, port);
if (context == nullptr || context->err != 0) {
if (context != nullptr) {
redisFree(context);
}
continue;
}

auto reply = (redisReply*)redisCommand(context, "AUTH %s", pwd);
if (reply->type == REDIS_REPLY_ERROR) {
std::cout << "认证失败" << std::endl;
//执行成功 释放redisCommand执行后返回的redisReply所占用的内存
freeReplyObject(reply);
continue;
}

//执行成功 释放redisCommand执行后返回的redisReply所占用的内存
freeReplyObject(reply);
std::cout << "认证成功" << std::endl;
connections_.push(context);
}

}

~RedisConPool() {
std::lock_guard<std::mutex> lock(mutex_);
while (!connections_.empty()) {
connections_.pop();
}
}

redisContext* getConnection() {
std::unique_lock<std::mutex> lock(mutex_);
cond_.wait(lock, [this] {
if (b_stop_) {
return true;
}
return !connections_.empty();
});
//如果停止则直接返回空指针
if (b_stop_) {
return nullptr;
}
auto* context = connections_.front();
connections_.pop();
return context;
}

void returnConnection(redisContext* context) {
std::lock_guard<std::mutex> lock(mutex_);
if (b_stop_) {
return;
}
connections_.push(context);
cond_.notify_one();
}

void Close() {
b_stop_ = true;
cond_.notify_all();
}

private:
atomic<bool> b_stop_;
size_t poolSize_;
const char* host_;
int port_;
std::queue<redisContext*> connections_;
std::mutex mutex_;
std::condition_variable cond_;
};

RedisMgr构造函数中初始化pool连接池

1
2
3
4
5
6
7
RedisMgr::RedisMgr() {
auto& gCfgMgr = ConfigMgr::Inst();
auto host = gCfgMgr["Redis"]["Host"];
auto port = gCfgMgr["Redis"]["Port"];
auto pwd = gCfgMgr["Redis"]["Passwd"];
_con_pool.reset(new RedisConPool(5, host.c_str(), atoi(port.c_str()), pwd.c_str()));
}

在析构函数中回收资源

1
2
3
4
5
6
7
RedisMgr::~RedisMgr() {
Close();
}

void RedisMgr::Close() {
_con_pool->Close();
}

在使用的时候改为从Pool中获取链接

1
2
3
4
5
6
7
8
9
10
11
12
13
14
15
16
17
18
19
20
21
22
23
24
25
26
27
28
bool RedisMgr::Get(const std::string& key, std::string& value)
{
auto connect = _con_pool->getConnection();
if (connect == nullptr) {
return false;
}
auto reply = (redisReply*)redisCommand(connect, "GET %s", key.c_str());
if (reply == NULL) {
std::cout << "[ GET " << key << " ] failed" << std::endl;
freeReplyObject(reply);
_con_pool->returnConnection(connect);
return false;
}

if (reply->type != REDIS_REPLY_STRING) {
std::cout << "[ GET " << key << " ] failed" << std::endl;
freeReplyObject(reply);
_con_pool->returnConnection(connect);
return false;
}

value = reply->str;
freeReplyObject(reply);

std::cout << "Succeed to execute command [ GET " << key << " ]" << std::endl;
_con_pool->returnConnection(connect);
return true;
}

总结

本节告诉大家如何搭建redis服务,linux和windows环境的,并且编译了windows版本的hredis库,解决了链接错误,而且封装了RedisMgr管理类。
并实现了测试用例,大家感兴趣可以测试一下。下一节实现VarifyServer访问的redis功能。

并发编程排错思路和方法

Posted on 2024-02-24 | In C++

简介

到目前为止,前面一系列的文章已经将多线程编程技术介绍完了,很多人问我如何排查多线程程序的问题,本节是最后一节,给大家提供一些在多线程编程过程中排查问题的思路。因为本节代码演示和实际操作内容较多,该文档仅做基本的说明,详细操作可看视频, 视频链接:

https://space.bilibili.com/271469206/channel/collectiondetail?sid=1623290

常见问题

在介绍如何排查前我们先将问题做几个归类:

  1. 内存问题,包括内存泄露(未回收内存),空指针,悬垂指针(野指针),double free问题等。
  2. 资源竞争,多个线程竞争同一块临界区的资源,未保证互斥
  3. 死锁(互相引用阻塞卡死)和活锁(乐观锁尝试)
  4. 引用已释放的变量,生命周期管理失效导致
  5. 浅拷贝造成内存异常
  6. 线程管控失败,修改或者回收一个已经绑定正在运行线程的变量,或者线程本该回收却被卡死,皆因线程管控失败导致
  7. 智能指针和裸指针混用导致二次析构,也属于double free。

接下来根据上面列出的问题,我们根据实际案例排查出现问题的原因以及规避的方法。

接下来的案例均取自我的源码,源码链接如下:

https://gitee.com/secondtonone1/boostasio-learn/tree/master/concurrent/day24-TroubleShoot

空指针

空指针的问题比较好排查,我们在封装无锁队列的时候照抄《C++并发编程实战》一书引发了崩溃,详见源码链接中crushque.h以及lockfreequetest.cpp。

测试用例如下:

1
2
3
4
5
6
7
8
9
10
11
12
13
14
15
16
17
18
19
20
21
22
23
24
25
26
void TestCrushQue() {
crush_que<int> que;
std::thread t1([&]() {
for (int i = 0; i < TESTCOUNT * 10000; i++) {
que.push(i);
std::cout << "push data is " << i << std::endl;
std::this_thread::sleep_for(std::chrono::milliseconds(10));
}
});

std::thread t2([&]() {
for (int i = 0; i < TESTCOUNT * 10000;) {
auto p = que.pop();
if (p == nullptr) {
std::this_thread::sleep_for(std::chrono::milliseconds(10));
continue;
}
i++;
std::cout << "pop data is " << *p << std::endl;
}
});

t1.join();
t2.join();

}

最后显示的崩溃点在

https://cdn.llfc.club/1708328384150.jpg

很明显这是引发崩溃的底层代码,并不是上层代码,通过调用堆栈找到和崩溃最相近的逻辑

https://cdn.llfc.club/1708328755799.jpg

我们点击第二行的栈调用跳转到队列的push操作。

https://cdn.llfc.club/1708328906480.jpg

在代码166行处是崩溃的上层调用,我们通过分析old_tail.ptr此时为空指针,该问题的根因在于构造无锁队列时未进行头节点和尾部节点的初始化所致。

无论linux还是windows,排查崩溃问题最首要的解决方式为观察栈调用,gdb或者windows的栈信息直观的反应了崩溃的触发顺序。

内存泄漏

一般来说内存泄漏检测有专门的工具库,linux环境下可使用valgrind,windows的visual studio环境下Visual Leak Detector, 这些工具只能被动的检测内存泄漏,很多情况我们需要针对已经开发的类或者逻辑编写测试用例,检测内存泄漏。

比如我们对于无锁队列中提供了一个内存泄漏的版本,详见memoryleakque.h以及测试用例lockfreequetest.cpp,以下为测试代码

1
2
3
4
5
6
7
8
9
10
11
12
13
14
15
16
17
18
19
20
21
22
23
24
25
26
27
28
void TestLeakQue() {
memoryleak_que<int> que;
std::thread t1([&]() {
for (int i = 0; i < TESTCOUNT; i++) {
que.push(i);
std::cout << "push data is " << i << std::endl;
std::this_thread::sleep_for(std::chrono::milliseconds(10));
}
});

std::thread t2([&]() {
for (int i = 0; i < TESTCOUNT;) {
auto p = que.pop();
if (p == nullptr) {
std::this_thread::sleep_for(std::chrono::milliseconds(10));
continue;
}
i++;
std::cout << "pop data is " << *p << std::endl;
}
});

t1.join();
t2.join();

assert(que.destruct_count == TESTCOUNT);

}

针对这个队列, 我们统计释放节点的个数和开辟节点的个数是否相等,通过assert(que.destruct_count == TESTCOUNT);断言检测,实际测试过程中发现存在内存泄漏。

https://cdn.llfc.club/1708330464493.jpg

针对无锁队列的内存泄漏无外乎就是push和pop操作造成的,我们把测试用例改为单线程,先将多线程这个可变因素去掉

1
2
3
4
5
6
7
8
9
10
11
12
13
14
15
16
17
18
19
20
21
void TestLeakQueSingleThread() {
memoryleak_que<int> que;
std::thread t1([&]() {
for (int i = 0; i < TESTCOUNT; i++) {
que.push(i);
std::cout << "push data is " << i << std::endl;
std::this_thread::sleep_for(std::chrono::milliseconds(10));

auto p = que.pop();
if (p == nullptr) {
std::this_thread::sleep_for(std::chrono::milliseconds(10));
continue;
}
std::cout << "pop data is " << *p << std::endl;
}
});

t1.join();

assert(que.destruct_count == TESTCOUNT);
}

上面的代码测试未发现内存泄漏,但这还不能将问题归因于多线程,我们构造一种情况触发空队列的pop

1
2
3
4
5
6
7
8
9
10
11
12
13
14
15
16
17
18
19
20
21
22
23
24
25
26
27
28
void TestLeakQueMultiPop() {
memoryleak_que<int> que;
std::thread t1([&]() {
for (int i = 0; i < TESTCOUNT; i++) {
que.push(i);
std::cout << "push data is " << i << std::endl;
std::this_thread::sleep_for(std::chrono::milliseconds(10));

auto p = que.pop();
if (p == nullptr) {
std::this_thread::sleep_for(std::chrono::milliseconds(10));
continue;
}
std::cout << "pop data is " << *p << std::endl;

auto p2 = que.pop();
if (p2 == nullptr) {
std::this_thread::sleep_for(std::chrono::milliseconds(10));
continue;
}
std::cout << "pop data is " << *p2 << std::endl;
}
});

t1.join();

assert(que.destruct_count == TESTCOUNT);
}

上面的代码再一次触发断言,说明存在内存泄漏,那我们可以将问题归因于pop操作,而且是队列为空的pop操作。

接下来配合断点调试,windows断点调试较为方便,或者linux环境gdb调试麻烦,可以在关键点打印信息排查问题。

我们使用visual studio断点排查这个问题,先让队列push一个数据,再pop两次,第二次pop肯定无效因为是空队列,但也是引发泄漏的关键原因。

接下来再push一个数据,再pop节点,我们需观察这次pop是否会触发节点回收的逻辑。

回收节点的逻辑只有两处,在release_ref和free_external_counter内部判断internal_count和external_counters为0时才会调用delete回收内存,所以我们只需要在release_ref和free_external_counter中打断点,观察这两个引用计数是否为0,如果不为0说明引用计数的计算出了问题。

https://cdn.llfc.club/1708334690329.jpg

为了便于观察数据,我们采取单步调试的方式,经过断点调试,发现第二次循环pop时,free_external_count内部old_node_ptr.external_count为3,而第一次循环pop时old_node_ptr.external_count为2. 那么第二次计算internal_count就不会为0,导致节点不会回收。

问题的根因也找到了在pop判断队列为空的时候直接返回了,之前进行了increase_external_count将外部引用计数增加了,在判断队列为空未进行修改就返回了,我们知道外部引用计数只是一个副本,可能同时有多个线程修改外部引用计数,所以只需要让内部引用计数释放一次即可

1
2
3
4
5
if (ptr == tail.load().ptr)
{
ptr->release_ref();
return std::unique_ptr<T>();
}

再次测试未发现内存泄漏。

自己设计测试用例时要注意覆盖多种情况,比如无锁队列,我后来又测试了单线程,多线程一进一出,多线程一进多出,多线程一出多进,多线程多出多进等,以及加大线程数测试。详细案例可以看看源码, lockfreequetest.cpp。

double free

对于悬垂指针也叫做野指针,指的是释放内存后,再次使用这个指针访问数据造成崩溃。double free也属于指针管理失效导致,我们看看网络编程中对官方案例存在隐患的剖析。案例在网络编程network文件夹,day05-AsyncServer中,我们实现了一个异步的echo应答server。
正常情况下应答server没有任何问题,但是对于全双工情况(实际情况都是收发解耦合),比如我们在收到消息后监听读事件,并发送,而不是在发送消息后监听读事件。我们将handle_read处理改为如下

1
2
3
4
5
6
7
8
9
10
11
12
13
14
15
void Session::handle_read(const boost::system::error_code& error, size_t bytes_transfered) {

if (!error) {
cout << "server receive data is " << _data << endl;
std::string send_data(_data);
//在发送
_socket.async_read_some(boost::asio::buffer(_data, max_length), std::bind(&Session::handle_read,
this, placeholders::_1, placeholders::_2));
boost::asio::async_write(_socket, boost::asio::buffer(send_data, bytes_transfered),
std::bind(&Session::handle_write, this, placeholders::_1));
}
else {
delete this;
}
}

我们启动day04-SyncClient和day05-AsyncServer分别测试,在Server handle_read里async_read_some处打断点,然后启动客户端,客户端发送数据后服务器触发async_read_some断点,此时关闭客户端,然后服务器继续执行后面的逻辑会引发崩溃。

https://cdn.llfc.club/1708481010816.jpg

遇到崩溃第一反应是看看崩溃的栈信息,崩溃在最底层代码

https://cdn.llfc.club/1708482046203.jpg

栈信息也看不懂

https://cdn.llfc.club/1708482122640.jpg

看栈调用应该是崩溃在asio底层iocp模型写回调里了。

那我们可以用注释的方式排查问题。我们把handle_write回调里面的逻辑注释掉

1
2
3
4
5
6
7
8
9
10
void Session::handle_write(const boost::system::error_code& error) {
// if (!error) {
// memset(_data, 0, max_length);
// _socket.async_read_some(boost::asio::buffer(_data, max_length), std::bind(&Session::handle_read,
// this, placeholders::_1, placeholders::_2));
// }
// else {
// delete this;
// }
}

再次启动客户端和服务器,在服务器收到读回调后断点并关闭客户端,服务器放开断点继续执行,未发现崩溃。

观察注释掉的逻辑,最有嫌疑的是delete this, 我们仅仅将delete this注释掉后就不会崩溃了,那我们找到问题根因了

第一次回调触发handle_read没问题,此时在回调里关闭客户端,因为第一次回调再次调用async_read_some将读事件注册给asio底层的事件循环,调用async_write将写事件注册给asio底层循环,当客户端关闭后会第二次触发读回调,这次读回调会执行delete操作,delete this之后,Session所有的数据都被回收,而写回调也会触发,因为那么就行了二次delete操作,这就是double free问题。

解决这个问题我们提出了利用智能指针构造一个伪闭包的方式延长Session周期,保证回调之前不会delete Session。具体可以看看这篇文章https://llfc.club/articlepage?id=2OEQEc6p4k79cXsTr6dOVfZbo79

视频链接

https://www.bilibili.com/video/BV15P411S7fp/?spm_id_from=333.788&vd_source=8be9e83424c2ed2c9b2a3ed1d01385e9

本文仅作排查故障方法整理,其他不做赘述,相关处理方案可以看我博客其他文章和视频。

资源竞争

资源竞争大部分情况是逻辑错误,比如两个线程A和B同时修改互斥区域,互斥区域未加锁,这期间也可能造成崩溃,比如线程A删除了数据C,而线程B正在访问数据C,引发崩溃后大家不要慌,先看崩溃的堆栈信息,如果是指针显示为0xdddd之类的说明是访问了被删除的数据,那么我们排查删除的逻辑,或者屏蔽删除的逻辑看看会不会出问题,基本思路是

  1. 崩溃看堆栈信息,排查是不是野指针或者double free问题。
  2. 如果不是崩溃信息,数据混乱就查找修改数据的逻辑,或者屏蔽这个逻辑,看看是不是多线程造成的。
  3. 崩溃问题也可以通过屏蔽部分逻辑排查是不是多线程导致的。
  4. 在必要的逻辑区间增加日志,排查逻辑异常的上层原因。

这部分问题要结合实际工作去排查,慢慢熟悉这种思路以后就不陌生了。

死锁问题

多线程出现死锁问题是很头疼,现象不如内存崩溃或者资源竞争那么明显,表现给开发者的是一种卡死的现象。造成死锁的根本原因在于锁资源互相竞争,遇到这种问题要先梳理逻辑,找到互相引用的关键点。
我们通过代码仓库中concurrent文件夹day24-TroubleShoot 中deadlock.h演示

1
2
3
4
5
6
7
8
9
10
11
12
13
14
15
16
void deadlockdemo() {
std::mutex mtx;
int global_data = 0;
std::thread t1([&mtx, &global_data]() {
std::lock_guard<std::mutex> outer_lock(mtx);
global_data++;
std::async([&mtx, &global_data]() {
std::lock_guard<std::mutex> inner_lock(mtx);
global_data++;
std::cout << global_data << std::endl;
});

});

t1.join();
}

主函数调用这个函数,主进程无法退出。因为不是崩溃问题所以无法查看调用栈,对于这个问题,我们在关键位置打印日志,看看具体走到哪里出了问题。

1
2
3
4
5
6
7
8
9
10
11
12
13
14
15
16
17
18
19
20
21
void deadlockdemo() {
std::mutex mtx;
int global_data = 0;
std::thread t1([&mtx, &global_data]() {
std::cout << "begin lock outer_lock..." << std::endl;
std::lock_guard<std::mutex> outer_lock(mtx);
std::cout << "after lock outer_lock..." << std::endl;
global_data++;
std::async([&mtx, &global_data]() {
std::cout << "begin lock inner_lock..." << std::endl;
std::lock_guard<std::mutex> inner_lock(mtx);
std::cout << "after lock inner_lock..." << std::endl;
global_data++;
std::cout << global_data << std::endl;
std::cout << "unlock inner_lock..." << std::endl;
});
std::cout << "unlock outer_lock..." << std::endl;
});

t1.join();
}

日志输出

1
2
3
begin lock outer_lock...
after lock outer_lock...
begin lock inner_lock...

可以看到内部锁没有加成功。这种情况就是死锁了,再来分析原因,因为async会返回一个future,作为右值这个future会立即调用析构函数,析构函数内部会等待任务完成(并发编程已经从源码剖析了,这里不再赘述)。内部任务要加锁加不上,外部解不开锁因为async返回的future析构无法调用成功。这就是死锁的原因了。
修正,只要让future不立即调用析构即可,我们可以用变量接受future,这样析构就会延缓到解锁之后,变量可以放在最外层,这样变量不会触发析构。

1
2
3
4
5
6
7
8
9
10
11
12
13
14
15
16
17
18
19
20
21
22
void lockdemo() {
std::mutex mtx;
int global_data = 0;
std::future<void> future_res;
std::thread t1([&mtx, &global_data,&future_res]() {
std::cout << "begin lock outer_lock..." << std::endl;
std::lock_guard<std::mutex> outer_lock(mtx);
std::cout << "after lock outer_lock..." << std::endl;
global_data++;
future_res = std::async([&mtx, &global_data]() {
std::cout << "begin lock inner_lock..." << std::endl;
std::lock_guard<std::mutex> inner_lock(mtx);
std::cout << "after lock inner_lock..." << std::endl;
global_data++;
std::cout << global_data << std::endl;
std::cout << "unlock inner_lock..." << std::endl;
});
std::cout << "unlock outer_lock..." << std::endl;
});

t1.join();
}

程序输出

1
2
3
4
5
6
7
begin lock outer_lock...
after lock outer_lock...
unlock outer_lock...
begin lock inner_lock...
after lock inner_lock...
2
unlock inner_lock...

关于活锁,解决方式类似,在关键位置添加注释排查具体原因。

引用释放的变量

随着C++ 11 lambda表达式推出后,编程更方便了,但是引用释放的变量这个问题也随之而来。案例在day24-TroubleShoot文件夹deadlock.cpp中reference_invalid函数。

1
2
3
4
5
6
7
8
9
10
11
12
13
14
15
16
17
18
19
20
21
22
23
24
25
26
27
28
29
30
void reference_invalid()
{
class task_data {
public:
task_data(int i):_data(new int(i)){}
~task_data() { delete _data; }
int* _data;
};
std::queue<std::function<void()>> task_que;
for (int i = 0; i < 10; i++) {
task_data data(i);
task_que.push([&data]() {
(*data._data)++;
std::cout << "data is " << *data._data << std::endl;
});
}

auto res_future = std::async([&task_que]() {
for (;;) {
if (task_que.empty()) {
break;
}
auto& task = task_que.front();
task();
task_que.pop();
}
});

res_future.wait();
}

上述函数调用后输出的数值为

1
2
3
4
5
6
7
8
9
10
data is -572662307
data is 1349705340
data is -2147481856
data is -572662307
data is -572662307
data is -572662307
data is -572662307
data is -572662307
data is -572662307
data is -572662307

为什么数据变乱了呢?我们分析一下,这种多线程的逻辑问题就要通过加日志或者梳理逻辑排查了。异步任务里从任务队列弹出任务并执行,我们观察任务是一个lambda表达式,捕获的是task_data类型的引用,既然是引用就有生命周期,我们在将task放入队列时,task_data类型变量data为局部变量,此时还未失效,等离开循环的作用域调用data会调用析构函数,那么内部的数据就被释放了,所以之后线程异步访问时会出现乱码。

怎么改呢?我们在网络编程中介绍了一种思路,利用智能指针构造一个伪闭包逻辑,C++不像js,python,go等有闭包机制,但是我们可以通过智能指针增加引用计数,达到闭包效果。

1
2
3
4
5
6
7
8
9
10
11
12
13
14
15
16
17
18
19
20
21
22
23
24
25
26
27
28
29
30
void reference_sharedptr()
{
class task_data {
public:
task_data(int i) :_data(new int(i)) {}
~task_data() { delete _data; }
int* _data;
};
std::queue<std::function<void()>> task_que;
for (int i = 0; i < 10; i++) {
std::shared_ptr<task_data> taskptr = std::make_shared<task_data>(i);
task_que.push([taskptr]() {
(*( taskptr->_data))++;
std::cout << "data is " << *(taskptr->_data) << std::endl;
});
}

auto res_future = std::async([&task_que]() {
for (;;) {
if (task_que.empty()) {
break;
}
auto& task = task_que.front();
task();
task_que.pop();
}
});

res_future.wait();
}

再次运行输出正确。

浅拷贝

浅拷贝这个词对于C++开发者并不陌生,如果没有合理的内存管理机制,浅拷贝会造成很严重的内存崩溃问题。
看下面这个例子,同样在day24-TroubleShoot文件夹deadlock.cpp中

1
2
3
4
5
6
7
8
9
10
11
12
13
14
void shallow_copy(){
class task_data {
public:
task_data(int i) :_data(new int(i)) {}
~task_data() {
std::cout << "call task_data destruct" << std::endl;
delete _data;
}
int* _data;
};

task_data data1(1);
task_data data2 = std::move(data1);
}

上面这个例子运行会导致崩溃,我们看data1移动给data2后,二者在作用域结束时都进行析构。

因为我们没实现移动构造和拷贝构造,系统默认的移动构造执行拷贝构造,默认的拷贝构造是浅拷贝,所以data1和data2内部的_data引用同一块内存,他们析构的时候会造成二次析构。

读者可能觉得这个例子太简单,不会犯错,那我们看第二个例子

1
2
3
4
5
6
7
8
9
10
11
12
13
14
15
16
17
18
void shallow_copy2(){
class task_data {
public:
task_data(int i) :_data(new int(i)) {}
~task_data() {
std::cout << "call task_data destruct" << std::endl;
delete _data;
}
int* _data;
};

auto task_call = []() -> task_data {
task_data data(100);
return data;
};

task_call();
}

第二个例子中我们定义了一个lambda表达式task_call,返回task_data类型的对象。

关于返回局部对象,编译器有两种情况:

  1. 如果编译器支持返回值优化(Return Value Optimization, RVO),那么在返回局部对象时,编译器可能会通过返回值优化来避免执行移动构造函数。RVO 是一种编译器优化技术,可以避免对返回值进行拷贝或移动操作,直接将局部对象的值放置到调用者提供的空间中,从而减少了不必要的资源开销和性能消耗。

  2. 在 C++11 引入移动语义后,编译器有权将返回的局部对象视为右值,从而执行移动构造而非拷贝构造。

无论上述哪一种,都是将值返回,那么都会执行浅拷贝,局部变量随着作用域结束被释放,内部的内存_data被回收,而外部接收的返回值仍在引用_data,此时_data就是野指针。外部对象释放会造成二次析构,或者外部对象使用_data时也会引发野指针崩溃问题。

解决的方式就是实现拷贝构造和移动构造。

1
2
3
4
5
6
7
8
9
10
11
12
13
14
15
16
17
18
19
20
21
22
23
24
25
26
void normal_copy() {
class task_data {
public:
task_data(int i) :_data(new int(i)) {}
~task_data() {
std::cout << "call task_data destruct" << std::endl;
delete _data;
}
task_data(const task_data& src) {
_data = new int(*(src._data));
}

task_data(task_data&& src) {
_data = new int(*(src._data));
}

int* _data;
};

auto task_call = []() -> task_data {
task_data data(100);
return data;
};

task_call();
}

再次运行,看到调用两个析构函数,并且未崩溃

1
2
3
call task_data destruct
main exit

线程管控

多线程编程常遇到的一个问题就是线程管控。案例在day24-TroubleShoot文件夹deadlock.cpp中。

我们实现了一个生产者和消费者的管理类和一个用来控制退出的原子变量。

1
2
3
4
5
6
7
8
9
10
11
12
13
14
15
16
17
18
19
20
21
22
23
24
25
26
27
28
29
30
31
32
33
34
35
36
37
38
39
40
41
42
43
44
45
46
47
48
49
50
51
52
 std::atomic<bool>  b_stop = false;

class ProductConsumerMgr {
public:
ProductConsumerMgr(){
_consumer = std::thread([this]() {
while (!b_stop) {
std::unique_lock<std::mutex> lock(_mtx);
_consume_cv.wait(lock, [this]() {
if (_data_que.empty()) {
return false;
}
return true;
});
int data = _data_que.front();
_data_que.pop();
std::cout << "pop data is " << data << std::endl;
lock.unlock();
_producer_cv.notify_one();
}
});

_producer = std::thread([this]() {
int data = 0;
while (!b_stop) {
std::unique_lock<std::mutex> lock(_mtx);
_producer_cv.wait(lock, [this]() {
if (_data_que.size() > 100) {
return false;
}
return true;
});
_data_que.push(++data);
std::cout << "push data is " << data << std::endl;
lock.unlock();
_consume_cv.notify_one();
}
});

}
~ProductConsumerMgr(){
_producer.join();
_consumer.join();
}
private:
std::mutex _mtx;
std::condition_variable _consume_cv;
std::condition_variable _producer_cv;
std::queue<int> _data_que;
std::thread _consumer;
std::thread _producer;
};
  1. 生产者不断生产数据放入队列,消费者不断从队列消费数据。
  2. ProductConsumerMgr析构时等待生产者和消费者两个线程退出。
  3. b_stop用来控制线程退出。

我们实现捕获ctl+c以及关闭窗口信号的函数,然后将b_stop设置为true.

1
2
3
4
5
6
7
8
9
10
11
12
13
14
15
16
17
18
19
20
21
22
23
24
25
26
27
28
29
30
31
32
33
34
BOOL CtrlHandler(DWORD fdwCtrlType)
{
switch (fdwCtrlType)
{
// Handle the CTRL-C signal.
case CTRL_C_EVENT:
printf("Ctrl-C event\n\n");
b_stop = true;
return(TRUE);

// CTRL-CLOSE: confirm that the user wants to exit.
case CTRL_CLOSE_EVENT:
b_stop = true;
printf("Ctrl-Close event\n\n");
return(TRUE);

case CTRL_SHUTDOWN_EVENT:
b_stop = true;
printf("Ctrl-Shutdown event\n\n");
return FALSE;

default:
return FALSE;
}
}

void TestProducerConsumer()
{
SetConsoleCtrlHandler((PHANDLER_ROUTINE)CtrlHandler, TRUE);
ProductConsumerMgr mgr;
while (!b_stop) {
std::this_thread::sleep_for(std::chrono::milliseconds(10));
}
}

在主函数中启动TestProducerConsumer,生产者和消费者会不断工作,我们按下ctrl+c会中断程序,程序可以安全退出。在一般情况下没有问题,是不是意味着我们的程序足够健壮呢?

我们延缓生产者生产的效率,假设一个小时生产一个数据放入队列,此时Ctrl+c看看是否会中断程序

1
2
3
4
5
6
7
8
9
10
11
12
13
14
15
16
17
_producer = std::thread([this]() {
int data = 0;
while (!b_stop) {
std::this_thread::sleep_for(std::chrono::seconds(5));
std::unique_lock<std::mutex> lock(_mtx);
_producer_cv.wait(lock, [this]() {
if (_data_que.size() > 100) {
return false;
}
return true;
});
_data_que.push(++data);
std::cout << "push data is " << data << std::endl;
lock.unlock();
_consume_cv.notify_one();
}
});

生产者改为上述每5s产生一个数据,此时ctrl+c并不会中断程序,程序不会退出。

问题的根本在于条件竞争,当我们的生产者生产效率低时,队列为空,测试消费者线程处于挂起状态,ctrl+c虽然将停止信号设置为true,但是ProductConsumerMgr析构并不能执行完成,析构函数会等待两个线程退出,消费者线程不会退出,因为处于挂起状态了。

怎么办呢?我们可以在析构里通知两个线程退出即可。而且两个线程要增加唤醒后判断停止标记的逻辑。

1
2
3
4
5
6
~ProductConsumerMgr(){
_consume_cv.notify_one();
_producer_cv.notify_one();
_producer.join();
_consumer.join();
}

两个线程增加条件判断

1
2
3
4
5
6
7
8
9
10
11
12
13
14
15
16
17
18
19
20
21
22
23
24
25
26
27
28
29
30
31
32
33
34
35
36
37
38
39
40
41
42
43
44
45
46
47
48
49
50
ProductConsumerMgr(){
_consumer = std::thread([this]() {
while (!b_stop) {
std::unique_lock<std::mutex> lock(_mtx);
_consume_cv.wait(lock, [this]() {
if (b_stop) {
return true;
}
if (_data_que.empty()) {
return false;
}
return true;
});

if (b_stop) {
return ;
}
int data = _data_que.front();
_data_que.pop();
std::cout << "pop data is " << data << std::endl;
lock.unlock();
_producer_cv.notify_one();
}
});

_producer = std::thread([this]() {
int data = 0;
while (!b_stop) {
std::this_thread::sleep_for(std::chrono::seconds(5));
std::unique_lock<std::mutex> lock(_mtx);
_producer_cv.wait(lock, [this]() {
if (b_stop) {
return true;
}
if (_data_que.size() > 100) {
return false;
}
return true;
});
if (b_stop) {
return ;
}
_data_que.push(++data);
std::cout << "push data is " << data << std::endl;
lock.unlock();
_consume_cv.notify_one();
}
});

}

按下ctrl+c后,程序输出如下,并且正常退出

1
2
3
4
push data is 1
pop data is 1
Ctrl-C event
main exit

多线程之间协同工作以及安全退出是设计要考虑的事情。

混用智能指针和裸指针

有时候混用智能指针和裸指针,我们也会不小心delete一个交给只能指针管理的裸指针。单例在day24-TroubleShoot文件夹中ThreadSafeQue.h以及deadlock.cpp中。

之前我们为了让线程池从其他队列的尾部窃取任务,所以用双向链表实现了线程安全队列,并且实现了从尾部pop数据的方法。

1
2
3
4
5
6
7
8
9
10
11
12
13
14
15
16
bool try_steal(T& value) {
std::unique_lock<std::mutex> tail_lock(tail_mutex,std::defer_lock);
std::unique_lock<std::mutex> head_lock(head_mutex, std::defer_lock);
std::lock(tail_lock, head_lock);
if (head.get() == tail)
{
return false;
}

node* prev_node = tail->prev;
value = std::move(*(prev_node->data));
delete tail;
tail = prev_node;
tail->next = nullptr;
return true;
}

我们实现测试用例,一个线程push数据,一个线程从尾部pop数据,一个线程

1
2
3
4
5
6
7
8
9
10
11
12
13
14
15
16
17
18
19
20
21
22
23
24
25
26
27
28
29
30
31
32
33
34
35
36
37
38
39
40
void TestSteal() {
threadsafe_queue<int> que;
std::thread t1([&que]() {
int index = 0;
for (; ; ) {
index++;
que.push(index);
std::this_thread::sleep_for(std::chrono::milliseconds(200));
}
});

std::thread t3([&que]() {
for (; ; ) {
int value;
bool res = que.try_pop(value);
if (!res) {
std::this_thread::sleep_for(std::chrono::seconds(1));
continue;
}
std::cout << "pop out value is " << value << std::endl;
}
});

std::thread t2([&que]() {
for (; ; ) {
int value;
bool res = que.try_steal(value);
if (!res) {
std::this_thread::sleep_for(std::chrono::seconds(1));
continue;
}
std::cout << "steal out value is " << value << std::endl;
}
});


t1.join();
t2.join();
t3.join();
}

执行TestSteal时,程序崩溃。

https://cdn.llfc.club/1708753868812.jpg

查看堆栈上层信息,崩溃在try_steal这个函数里了。

https://cdn.llfc.club/1708754187835.jpg

多线程排查问题时,先把最有嫌疑的线程屏蔽,我们把try_steal的线程屏蔽,发现没有引发崩溃。可以确定是try_steal导致。

我们看try_steal函数内部,涉及内存的有个delete tail, 我们将这个delete tail 注释,发现没问题了。可见是delete tail 出了问题,结合底层崩溃的信息是unique_ptr的析构函数,可以推断我们混用了裸指针和智能指针,很可能是delete了智能指针管理的内存,导致智能指针析构的时候又一次delete内存引发崩溃。
我们看下队列里节点的设计

1
2
3
4
5
6
7
8
9
10
11
struct node
{
std::shared_ptr<T> data;
std::unique_ptr<node> next;
node* prev;
};

std::mutex head_mutex;
std::unique_ptr<node> head;
std::mutex tail_mutex;
node* tail;

队列是通过node构造的链表,每个节点的next指针为智能指针指向下一个节点,head为std::unique_ptr<node>,tail虽然为node*类型的指针,但是是从智能指针get获取的,那么tail是不应该删除的。

解决的办法就是不用delete即可,pop 尾部节点后将新的尾部节点next指针设置为nullptr,这样就相当于对原tail所属的unique_ptr减少引用计数了。

总结

本文介绍了C++ 多线程以及内存等问题的排错思路和方法,感兴趣的可以看看源码。

源码链接
https://gitee.com/secondtonone1/boostasio-learn/tree/master/concurrent/day24-TroubleShoot

视频链接:

https://space.bilibili.com/271469206/channel/collectiondetail?sid=1623290

中断线程

Posted on 2024-02-15 | In C++

简介

前几篇文章陆续介绍了线程池(ThreadPool),可汇合线程(join_thread)等技术,其中也用到了当管理类要退出时会通过条件变量唤醒挂起的线程,然后等待其执行完退出。本文按照作者的思路补充设计可中断的线程。

可中断线程

一个可中断的线程大体的实现是这个样子的

1
2
3
4
5
6
7
8
9
10
11
12
13
14
15
16
17
18
19
20
21
22
23
24
25
26
27
28
29
30
31
32
class interruptible_thread
{
std::thread internal_thread;
interrupt_flag* flag;
public:
template<typename FunctionType>
interruptible_thread(FunctionType f)
{
//⇽-- - 2
std::promise<interrupt_flag*> p;
//⇽-- - 3
internal_thread = std::thread([f, &p] {
p.set_value(&this_thread_interrupt_flag);
//⇽-- - 4
f();
});
//⇽-- - 5
flag = p.get_future().get();
}

void join() {
internal_thread.join();
}
void interrupt()
{
if (flag)
{
//⇽-- - 6
flag->set();
}
}
};
  1. interrupt_flag 为中断标记,其set操作用来标记中断
  2. internal_thread为内部线程,其回调函数内部先设置interrupt_flag*类型的promise值,再执行回调函数。
  3. 在interruptible_thread构造函数中等待internal_thread回调函数内部设置好flag的promise值后再退出。
  4. this_thread_interrupt_flag是我们定义的线程变量thread_local interrupt_flag this_thread_interrupt_flag;

中断标记

中断标记interrupt_flag类,主要是用来设置中断标记和判断是否已经中断,有可能挂起在条件变量的wait操作上,此时中断就需要唤醒挂起的线程。

为了扩充功能,我们希望设计接口支持在任何锁上等待,那我们使用condition_variable_any支持任意类型的条件变量。

1
2
3
4
5
6
7
8
9
10
11
12
13
14
15
16
17
18
19
20
21
22
23
24
25
26
27
28
29
30
31
32
33
34
35
36
37
38
39
40
41
42
43
44
45
46
47
48
49
50
51
52
53
54
55
56
57
58
59
60
61
62
63
64
65
66
67
68
69
70
class interrupt_flag
{
std::atomic<bool> flag;
std::condition_variable* thread_cond;
std::condition_variable_any* thread_cond_any;
std::mutex set_clear_mutex;
public:
interrupt_flag() :
thread_cond(0), thread_cond_any(0)
{}
void set()
{
flag.store(true, std::memory_order_relaxed);
std::lock_guard<std::mutex> lk(set_clear_mutex);
if (thread_cond)
{
thread_cond->notify_all();
}
else if (thread_cond_any) {
thread_cond_any->notify_all();
}
}
bool is_set() const
{
return flag.load(std::memory_order_relaxed);
}
void set_condition_variable(std::condition_variable& cv)
{
std::lock_guard<std::mutex> lk(set_clear_mutex);
thread_cond = &cv;
}
void clear_condition_variable()
{
std::lock_guard<std::mutex> lk(set_clear_mutex);
thread_cond = 0;
}


template<typename Lockable>
void wait(std::condition_variable_any& cv, Lockable& lk) {
struct custom_lock {
interrupt_flag* self;
Lockable& lk;
custom_lock(interrupt_flag* self_, std::condition_variable_any& cond, Lockable& lk_) :
self(self_), lk(lk_) {
self->set_clear_mutex.lock();
self->thread_cond_any = &cond;
}

void unlock() {
lk.unlock();
self->set_clear_mutex.unlock();
}

void lock() {
std::lock(self->set_clear_mutex, lk);
}

~custom_lock() {
self->thread_cond_any = 0;
self->set_clear_mutex.unlock();
}
};

custom_lock cl(this, cv, lk);
interruption_point();
cv.wait(cl);
interruption_point();
}
};
  1. set函数将停止标记设置为true,然后用条件变量通知挂起的线程。
  2. set_condition_variable 设置flag关联的条件变量,因为需要用指定的条件变量通知挂起的线程。
  3. clear_condition_variable清除关联的条件变量
  4. wait操作封装了接受任意锁的等待操作,wait函数内部定义了custom_lock,封装了加锁,解锁等操作。
  5. wait操作内部构造了custom_lock对象cl主要是对set_clear_mutex加锁,然后在调用cv.wait,这样能和set函数中的通知条件变量构成互斥,这么做的好处就是要么先将flag设置为true并发送通知,要么先wait,然后再发送通知。这样避免了线程在wait处卡死(线程不会错过发送的通知)

interruption_point函数内部判断flag是否为true,如果为true则抛出异常,这里作者处理的突兀了一些。读者可将这个函数改为bool返回值,调用者根据返回值判断是否继续等都可以。

1
2
3
4
5
6
7
void interruption_point()
{
if (this_thread_interrupt_flag.is_set())
{
throw thread_interrupted();
}
}

thread_interrupted为我们自定义的异常

1
2
3
4
5
6
7
8
9
10
11
12
13
14
class thread_interrupted : public std::exception
{
public:
thread_interrupted() : message("thread interrupted.") {}
~thread_interrupted() throw () {
}

virtual const char* what() const throw () {
return message.c_str();
}

private:
std::string message;
};

接下来定义一个类clear_cv_on_destruct

1
2
3
4
5
struct clear_cv_on_destruct {
~clear_cv_on_destruct(){
this_thread_interrupt_flag.clear_condition_variable();
}
};

clear_cv_on_destruct 这个类主要是用来在析构时释放和flag关联的条件变量。

除此之外,我们还可以封装几个不同版本的等待
支持普通条件变量的等待

1
2
3
4
5
6
7
8
9
10
void interruptible_wait(std::condition_variable& cv,
std::unique_lock<std::mutex>& lk)
{
interruption_point();
this_thread_interrupt_flag.set_condition_variable(cv);
clear_cv_on_destruct guard;
interruption_point();
cv.wait_for(lk, std::chrono::milliseconds(1));
interruption_point();
}

支持谓词的等待

1
2
3
4
5
6
7
8
9
10
11
12
13
14
template<typename Predicate>
void interruptible_wait(std::condition_variable& cv,
std::unique_lock<std::mutex>& lk,
Predicate pred)
{
interruption_point();
this_thread_interrupt_flag.set_condition_variable(cv);
clear_cv_on_destruct guard;
while (!this_thread_interrupt_flag.is_set() && !pred())
{
cv.wait_for(lk, std::chrono::milliseconds(1));
}
interruption_point();
}

上面两个版本采用wait_for而不用wait是因为如果等待之前条件变量的通知已经发送,线程之后才调用wait就会发生死等,所以这里采用的wait_for

支持future的等待

1
2
3
4
5
6
7
8
9
10
11
template<typename T>
void interruptible_wait(std::future<T>& uf)
{
while (!this_thread_interrupt_flag.is_set())
{
if (uf.wait_for(std::chrono::milliseconds(1)) ==
std::future_status::ready)
break;
}
interruption_point();
}

接下来我们用案例测试上面的案例

1
2
3
4
5
6
7
8
9
10
11
12
13
14
15
16
17
18
19
20
21
22
23
24
25
26
27
28
29
30
31
32
33
34
35
36
37
38
39
40
41
42
#include <iostream>
#include "interupthread.h"
std::vector<interruptible_thread> background_threads;
std::mutex mtx1;
std::mutex mtx2;
std::condition_variable cv1;
std::condition_variable_any cv2;
void start_background_processing() {
background_threads.push_back([]() {
try {
std::unique_lock<std::mutex> lock(mtx1);
interruptible_wait(cv1, lock);
}
catch (std::exception& ex) {
std::cout << "catch exception is " << ex.what() << std::endl;
}

});

background_threads.push_back([]() {
try {
std::unique_lock<std::mutex> lock(mtx2);
this_thread_interrupt_flag.wait(cv2, mtx2);
}
catch (std::exception& ex) {
std::cout << "catch exception is " << ex.what() << std::endl;
}

});
}

int main()
{
start_background_processing();
for (unsigned i = 0; i < background_threads.size(); i++) {
background_threads[i].interrupt();
}

for (unsigned i = 0; i < background_threads.size(); i++) {
background_threads[i].join();
}
}

上面的案例中启动了两个线程,每个线程回调函数中调用我们封装的可中断的等待。在主函数中断两个线程,并测试两个线程能否在等待中中断。

程序输出

1
2
catch exception is thread interrupted.

总结

本文介绍了中断线程的设计,说简单点还是设置终止标记为true,利用条件变量通知挂起的线程唤醒。

源码链接:

https://gitee.com/secondtonone1/boostasio-learn/tree/master/concurrent/day23-interupthread

视频链接:

https://space.bilibili.com/271469206/channel/collectiondetail?sid=1623290

线程池技术补充(轮询,等待完成结果,避免争夺,任务窃取)

Posted on 2024-02-12 | In C++

简介

前文我们介绍了线程池,已经给大家提供了一个完整的线程池封装了,本节跟着《C++ 并发编程实战》一书中作者的思路,看看他的线程池的实现,以此作为补充

轮询方式的线程池

配合我们之前封装的线程安全队列threadsafe_queue

1
2
3
4
5
6
7
8
9
10
11
12
13
14
15
16
17
18
19
20
21
22
23
24
25
26
27
28
29
30
31
32
33
34
35
36
37
38
39
40
41
42
43
44
45
46
47
48
49
50
51
52
53
54
55
56
57
58
59
60
61
62
63
64
65
66
67
68
69
70
71
72
73
74
75
76
77
78
79
80
81
82
83
84
85
86
87
88
89
90
91
92
93
94
95
96
97
98
99
100
101
102
103
104
105
106
107
108
109
110
111
112
113
114
115
116
117
118
119
120
121
122
123
124
125
126
127
128
129
130
131
132
133
134
135
136
137
138
139
140
141
142
143
144
145
146
147
148
149
150
151
152
153
154
155
156
157
158
159
160
161
162
163
164
165
166
167
168
169
170
171
172
173
174
175
176
177
178
179
180
181
182
183
184
185
186
187
188
189
190
#include <mutex>
#include <queue>

template<typename T>
class threadsafe_queue
{
private:
struct node
{
std::shared_ptr<T> data;
std::unique_ptr<node> next;
node* prev;
};

std::mutex head_mutex;
std::unique_ptr<node> head;
std::mutex tail_mutex;
node* tail;
std::condition_variable data_cond;
std::atomic_bool bstop;

node* get_tail()
{
std::lock_guard<std::mutex> tail_lock(tail_mutex);
return tail;
}
std::unique_ptr<node> pop_head()
{
std::unique_ptr<node> old_head = std::move(head);
head = std::move(old_head->next);
return old_head;
}

std::unique_lock<std::mutex> wait_for_data()
{
std::unique_lock<std::mutex> head_lock(head_mutex);
data_cond.wait(head_lock,[&] {return head.get() != get_tail() || bstop.load() == true; });
return std::move(head_lock);
}

std::unique_ptr<node> wait_pop_head()
{
std::unique_lock<std::mutex> head_lock(wait_for_data());
if (bstop.load()) {
return nullptr;
}

return pop_head();
}
std::unique_ptr<node> wait_pop_head(T& value)
{
std::unique_lock<std::mutex> head_lock(wait_for_data());
if (bstop.load()) {
return nullptr;
}
value = std::move(*head->data);
return pop_head();
}

std::unique_ptr<node> try_pop_head()
{
std::lock_guard<std::mutex> head_lock(head_mutex);
if (head.get() == get_tail())
{
return std::unique_ptr<node>();
}
return pop_head();
}
std::unique_ptr<node> try_pop_head(T& value)
{
std::lock_guard<std::mutex> head_lock(head_mutex);
if (head.get() == get_tail())
{
return std::unique_ptr<node>();
}
value = std::move(*head->data);
return pop_head();
}
public:

threadsafe_queue() : // ⇽-- - 1
head(new node), tail(head.get())
{}

~threadsafe_queue() {
bstop.store(true);
data_cond.notify_all();
}

threadsafe_queue(const threadsafe_queue& other) = delete;
threadsafe_queue& operator=(const threadsafe_queue& other) = delete;

void Exit() {
bstop.store(true);
data_cond.notify_all();
}

bool wait_and_pop_timeout(T& value) {
std::unique_lock<std::mutex> head_lock(head_mutex);
auto res = data_cond.wait_for(head_lock, std::chrono::milliseconds(100),
[&] {return head.get() != get_tail() || bstop.load() == true; });
if (res == false) {
return false;
}

if (bstop.load()) {
return false;
}

value = std::move(*head->data);
head = std::move(head->next);
return true;
}

std::shared_ptr<T> wait_and_pop() // <------3
{
std::unique_ptr<node> const old_head = wait_pop_head();
if (old_head == nullptr) {
return nullptr;
}
return old_head->data;
}

bool wait_and_pop(T& value) // <------4
{
std::unique_ptr<node> const old_head = wait_pop_head(value);
if (old_head == nullptr) {
return false;
}
return true;
}


std::shared_ptr<T> try_pop()
{
std::unique_ptr<node> old_head = try_pop_head();
return old_head ? old_head->data : std::shared_ptr<T>();
}

bool try_pop(T& value)
{
std::unique_ptr<node> const old_head = try_pop_head(value);
if (old_head) {
return true;
}
return false;
}

bool empty()
{
std::lock_guard<std::mutex> head_lock(head_mutex);
return (head.get() == get_tail());
}

void push(T new_value) //<------2
{
std::shared_ptr<T> new_data(
std::make_shared<T>(std::move(new_value)));
std::unique_ptr<node> p(new node);
{
std::lock_guard<std::mutex> tail_lock(tail_mutex);
tail->data = new_data;
node* const new_tail = p.get();
new_tail->prev = tail;

tail->next = std::move(p);

tail = new_tail;
}

data_cond.notify_one();
}

bool try_steal(T& value) {
std::unique_lock<std::mutex> tail_lock(tail_mutex,std::defer_lock);
std::unique_lock<std::mutex> head_lock(head_mutex, std::defer_lock);
std::lock(tail_lock, head_lock);
if (head.get() == tail)
{
return false;
}

node* prev_node = tail->prev;
value = std::move(*(prev_node->data));
tail = prev_node;
tail->next = nullptr;
return true;
}
};

我们封装了一个简单轮询的线程池

1
2
3
4
5
6
7
8
9
10
11
12
13
14
15
16
17
18
19
20
21
22
23
24
25
26
27
28
29
30
31
32
33
34
35
36
37
38
39
40
41
42
43
44
45
46
47
48
49
50
51
52
53
54
55
56
57
58
59
60
61
62
63
64
65
66
67
68
69
70
71
72
73
74
75
#include <atomic>
#include "ThreadSafeQue.h"
#include "join_thread.h"

class simple_thread_pool
{
std::atomic_bool done;
//⇽-- - 1
threadsafe_queue<std::function<void()> > work_queue;
//⇽-- - 2
std::vector<std::thread> threads;
//⇽-- - 3
join_threads joiner;
void worker_thread()
{
//⇽-- - 4
while (!done)
{
std::function<void()> task;
//⇽-- - 5
if (work_queue.try_pop(task))
{
//⇽-- - 6
task();
}
else
{
//⇽-- - 7
std::this_thread::yield();
}
}
}

simple_thread_pool() :
done(false), joiner(threads)
{
//⇽--- 8
unsigned const thread_count = std::thread::hardware_concurrency();
try
{
for (unsigned i = 0; i < thread_count; ++i)
{
//⇽-- - 9
threads.push_back(std::thread(&simple_thread_pool::worker_thread, this));
}
}
catch (...)
{
//⇽-- - 10
done = true;
throw;
}
}
public:
static simple_thread_pool& instance() {
static simple_thread_pool pool;
return pool;
}
~simple_thread_pool()
{
//⇽-- - 11
done = true;
for (unsigned i = 0; i < threads.size(); ++i)
{
//⇽-- - 9
threads[i].join();
}
}
template<typename FunctionType>
void submit(FunctionType f)
{
//⇽-- - 12
work_queue.push(std::function<void()>(f));
}
};
  1. worker_thread 即为线程的回调函数,回调函数内从队列中取出任务并处理,如果没有任务则调用yield释放cpu资源。

  2. submit函数比较简单,投递了一个返回值为void,参数为void的任务。这和我们之前自己设计的线程池(可执行任意参数类型,返回值不限的函数)相比功能稍差了一些。

获取任务完成结果

因为外部投递任务给线程池后要获取线程池执行任务的结果,我们之前自己设计的线程池采用的是future和decltype推断函数返回值的方式构造一个返回类型的future。

这里作者先封装一个可调用对象的类

1
2
3
4
5
6
7
8
9
10
11
12
13
14
15
16
17
18
19
20
21
22
23
24
25
26
27
28
29
30
31
32
33
class function_wrapper
{
struct impl_base {
virtual void call() = 0;
virtual ~impl_base() {}
};
std::unique_ptr<impl_base> impl;
template<typename F>
struct impl_type : impl_base
{
F f;
impl_type(F&& f_) : f(std::move(f_)) {}
void call() { f(); }
};
public:
template<typename F>
function_wrapper(F&& f) :
impl(new impl_type<F>(std::move(f)))
{}
void operator()() { impl->call(); }
function_wrapper() = default;
function_wrapper(function_wrapper&& other) :
impl(std::move(other.impl))
{}
function_wrapper& operator=(function_wrapper&& other)
{
impl = std::move(other.impl);
return *this;
}
function_wrapper(const function_wrapper&) = delete;
function_wrapper(function_wrapper&) = delete;
function_wrapper& operator=(const function_wrapper&) = delete;
};
  1. impl_base 是一个基类,内部有一个纯虚函数call,以及一个虚析构,这样可以通过delete 基类指针动态析构子类对象。

  2. impl_type 继承了impl_base类,内部包含了一个可调用对象f,并且实现了构造函数和call函数,call内部调用可调用对象f。

  3. function_wrapper 内部有智能指针impl_base类型的unique_ptr变量impl, function_wrapper构造函数根据可调用对象f构造impl

  4. function_wrapper支持移动构造不支持拷贝和赋值。function_wrapper本质上就是当作task给线程池执行的。

可获取任务执行状态的线程池如下

1
2
3
4
5
6
7
8
9
10
11
12
13
14
15
16
17
18
19
20
21
22
23
24
25
26
27
28
29
30
31
32
33
34
35
36
37
38
39
40
41
42
43
44
45
46
47
48
49
50
51
52
53
54
55
56
57
58
59
60
61
62
63
64
65
66
67
68
69
70
71
72
73
74
75
76
77
78
class future_thread_pool
{
private:
void worker_thread()
{
while (!done)
{
function_wrapper task;

if (work_queue.try_pop(task))
{
task();
}
else
{
std::this_thread::yield();
}
}
}
public:

static future_thread_pool& instance() {
static future_thread_pool pool;
return pool;
}
~future_thread_pool()
{
//⇽-- - 11
done = true;
for (unsigned i = 0; i < threads.size(); ++i)
{
//⇽-- - 9
threads[i].join();
}
}

template<typename FunctionType>
std::future<typename std::result_of<FunctionType()>::type>
submit(FunctionType f)
{
typedef typename std::result_of<FunctionType()>::type result_type;
std::packaged_task<result_type()> task(std::move(f));
std::future<result_type> res(task.get_future());
work_queue.push(std::move(task));
return res;
}

private:
future_thread_pool() :
done(false), joiner(threads)
{
//⇽--- 8
unsigned const thread_count = std::thread::hardware_concurrency();
try
{
for (unsigned i = 0; i < thread_count; ++i)
{
//⇽-- - 9
threads.push_back(std::thread(&future_thread_pool::worker_thread, this));
}
}
catch (...)
{
//⇽-- - 10
done = true;
throw;
}
}

std::atomic_bool done;
//⇽-- - 1
threadsafe_queue<function_wrapper> work_queue;
//⇽-- - 2
std::vector<std::thread> threads;
//⇽-- - 3
join_threads joiner;
};

  1. worker_thread内部从队列中pop任务并执行,如果没有任务则交出cpu资源。

  2. submit函数返回值为std::future<typename std::result_of<FunctionType()>::type>类型,通过std::result_of<FunctionType()>推断出函数执行的结果,然后通过::type推断出结果的类型,并且根据这个类型构造future,这样调用者就可以在投递完任务获取任务的执行结果了。

  3. submit函数内部我们将函数执行的结果类型定义为result_type类型,并且利用f构造一个packaged_task任务。通过task返回一个future给外部调用者,然后我们调用队列的push将task放入队列,注意队列存储的是function_wrapper,这里是利用task隐式构造了function_wrapper类型的对象。

利用条件变量等待

当我们的任务队列中没有任务的时候,可以让线程挂起,然后等待有任务投递到队列后在激活线程处理

1
2
3
4
5
6
7
8
9
10
11
12
13
14
15
16
17
18
19
20
21
22
23
24
25
26
27
28
29
30
31
32
33
34
35
36
37
38
39
40
41
42
43
44
45
46
47
48
49
50
51
52
53
54
55
56
57
58
59
60
61
62
63
64
65
66
67
68
69
70
71
72
73
74
75
76
77
class notify_thread_pool
{
private:
void worker_thread()
{
while (!done)
{

auto task_ptr = work_queue.wait_and_pop();
if (task_ptr == nullptr) {
continue;
}

(*task_ptr)();
}
}
public:

static notify_thread_pool& instance() {
static notify_thread_pool pool;
return pool;
}
~notify_thread_pool()
{
//⇽-- - 11
done = true;
work_queue.Exit();
for (unsigned i = 0; i < threads.size(); ++i)
{
//⇽-- - 9
threads[i].join();
}
}

template<typename FunctionType>
std::future<typename std::result_of<FunctionType()>::type>
submit(FunctionType f)
{
typedef typename std::result_of<FunctionType()>::type result_type;
std::packaged_task<result_type()> task(std::move(f));
std::future<result_type> res(task.get_future());
work_queue.push(std::move(task));
return res;
}

private:
notify_thread_pool() :
done(false), joiner(threads)
{
//⇽--- 8
unsigned const thread_count = std::thread::hardware_concurrency();
try
{
for (unsigned i = 0; i < thread_count; ++i)
{
//⇽-- - 9
threads.push_back(std::thread(&notify_thread_pool::worker_thread, this));
}
}
catch (...)
{
//⇽-- - 10
done = true;
work_queue.Exit();
throw;
}
}

std::atomic_bool done;
//⇽-- - 1
threadsafe_queue<function_wrapper> work_queue;
//⇽-- - 2
std::vector<std::thread> threads;
//⇽-- - 3
join_threads joiner;
};

  1. worker_thread内部调用了work_queue的wait_and_pop函数,如果队列中有任务直接返回,如果没任务则挂起。

  2. 另外我们在线程池的析构函数和异常处理时都增加了work_queue.Exit(); 这需要在我们的线程安全队列中增加Exit函数通知线程唤醒,因为线程发现队列为空会阻塞住。

1
2
3
4
void Exit() {
bstop.store(true);
data_cond.notify_all();
}

避免争夺

我们的任务队列只有一个,当向任务队列频繁投递任务,线程池中其他线程从队列中获取任务,队列就会频繁加锁和解锁,一般情况下性能不会有什么损耗,但是如果投递的任务较多,我们可以采取分流的方式,创建多个任务队列(可以和线程池中线程数相等),将任务投递给不同的任务队列,每个线程消费自己的队列即可,这样减少了线程间取任务的冲突。

1
2
3
4
5
6
7
8
9
10
11
12
13
14
15
16
17
18
19
20
21
22
23
24
25
26
27
28
29
30
31
32
33
34
35
36
37
38
39
40
41
42
43
44
45
46
47
48
49
50
51
52
53
54
55
56
57
58
59
60
61
62
63
64
65
66
67
68
69
70
71
72
73
74
75
76
77
78
79
80
81
82
83
84
85
86
87
88
89
90
91
92
93
94
#include "ThreadSafeQue.h"
#include <future>
#include "ThreadSafeQue.h"
#include "join_thread.h"
#include "FutureThreadPool.h"

class parrallen_thread_pool
{
private:

void worker_thread(int index)
{
while (!done)
{

auto task_ptr = thread_work_ques[index].wait_and_pop();
if (task_ptr == nullptr) {
continue;
}

(*task_ptr)();
}
}
public:

static parrallen_thread_pool& instance() {
static parrallen_thread_pool pool;
return pool;
}
~parrallen_thread_pool()
{
//⇽-- - 11
done = true;
for (unsigned i = 0; i < thread_work_ques.size(); i++) {
thread_work_ques[i].Exit();
}

for (unsigned i = 0; i < threads.size(); ++i)
{
//⇽-- - 9
threads[i].join();
}
}

template<typename FunctionType>
std::future<typename std::result_of<FunctionType()>::type>
submit(FunctionType f)
{
int index = (atm_index.load() + 1) % thread_work_ques.size();
atm_index.store(index);
typedef typename std::result_of<FunctionType()>::type result_type;
std::packaged_task<result_type()> task(std::move(f));
std::future<result_type> res(task.get_future());
thread_work_ques[index].push(std::move(task));
return res;
}

private:
parrallen_thread_pool() :
done(false), joiner(threads), atm_index(0)
{
//⇽--- 8
unsigned const thread_count = std::thread::hardware_concurrency();
try
{
thread_work_ques = std::vector < threadsafe_queue<function_wrapper>>(thread_count);

for (unsigned i = 0; i < thread_count; ++i)
{
//⇽-- - 9
threads.push_back(std::thread(&parrallen_thread_pool::worker_thread, this, i));
}
}
catch (...)
{
//⇽-- - 10
done = true;
for (int i = 0; i < thread_work_ques.size(); i++) {
thread_work_ques[i].Exit();
}
throw;
}
}

std::atomic_bool done;
//全局队列
std::vector<threadsafe_queue<function_wrapper>> thread_work_ques;

//⇽-- - 2
std::vector<std::thread> threads;
//⇽-- - 3
join_threads joiner;
std::atomic<int> atm_index;
};
  1. 我们将任务队列变为多个 //全局队列 std::vector<threadsafe_queue<function_wrapper>> thread_work_ques;.

  2. commit的时候根据atm_index索引自增后对总大小取余将任务投递给不同的队列。

  3. worker_thread增加了索引参数,每个线程的在回调的时候会根据自己的索引取出对应队列中的任务进行执行。

任务窃取

当本线程队列中的任务处理完了,它可以去别的线程的任务队列中看看是否有没处理的任务,帮助其他线程处理任务,简称任务窃取。

1
2
3
4
5
6
7
8
9
10
11
12
13
14
15
16
17
18
19
20
21
22
23
24
25
26
27
28
29
30
31
32
33
34
35
36
37
38
39
40
41
42
43
44
45
46
47
48
49
50
51
52
53
54
55
56
57
58
59
60
61
62
63
64
65
66
67
68
69
70
71
72
73
74
75
76
77
78
79
80
81
82
83
84
85
86
87
88
89
90
91
92
93
94
95
96
97
98
99
100
101
102
103
104
105
106
107
108
109
110
111
112
113
#include "ThreadSafeQue.h"
#include <future>
#include "ThreadSafeQue.h"
#include "join_thread.h"
#include "FutureThreadPool.h"

class steal_thread_pool
{
private:

void worker_thread(int index)
{
while (!done)
{
function_wrapper wrapper;
bool pop_res = thread_work_ques[index].try_pop(wrapper);
if (pop_res) {
wrapper();
continue;
}

bool steal_res = false;
for (int i = 0; i < thread_work_ques.size(); i++) {
if (i == index) {
continue;
}

steal_res = thread_work_ques[i].try_pop(wrapper);
if (steal_res) {
wrapper();
break;
}

}

if (steal_res) {
continue;
}

std::this_thread::yield();
}
}
public:

static steal_thread_pool& instance() {
static steal_thread_pool pool;
return pool;
}
~steal_thread_pool()
{
//⇽-- - 11
done = true;
for (unsigned i = 0; i < thread_work_ques.size(); i++) {
thread_work_ques[i].Exit();
}

for (unsigned i = 0; i < threads.size(); ++i)
{
//⇽-- - 9
threads[i].join();
}
}

template<typename FunctionType>
std::future<typename std::result_of<FunctionType()>::type>
submit(FunctionType f)
{
int index = (atm_index.load() + 1) % thread_work_ques.size();
atm_index.store(index);
typedef typename std::result_of<FunctionType()>::type result_type;
std::packaged_task<result_type()> task(std::move(f));
std::future<result_type> res(task.get_future());
thread_work_ques[index].push(std::move(task));
return res;
}

private:
steal_thread_pool() :
done(false), joiner(threads), atm_index(0)
{
//⇽--- 8
unsigned const thread_count = std::thread::hardware_concurrency();
try
{
thread_work_ques = std::vector < threadsafe_queue<function_wrapper>>(thread_count);

for (unsigned i = 0; i < thread_count; ++i)
{
//⇽-- - 9
threads.push_back(std::thread(&steal_thread_pool::worker_thread, this, i));
}
}
catch (...)
{
//⇽-- - 10
done = true;
for (int i = 0; i < thread_work_ques.size(); i++) {
thread_work_ques[i].Exit();
}
throw;
}
}

std::atomic_bool done;
//全局队列
std::vector<threadsafe_queue<function_wrapper>> thread_work_ques;

//⇽-- - 2
std::vector<std::thread> threads;
//⇽-- - 3
join_threads joiner;
std::atomic<int> atm_index;
};
  1. worker_thread中本线程会先处理自己队列中的任务,如果自己队列中没有任务则从其它线程的任务队列中获取任务。如果都没有则交出cpu资源。

  2. 为了实现try_steal的功能,我们需要修改线程安全队列threadsafe_queue,增加try_steal函数

1
2
3
4
5
6
7
8
9
10
11
12
13
14
15
bool try_steal(T& value) {
std::unique_lock<std::mutex> tail_lock(tail_mutex,std::defer_lock);
std::unique_lock<std::mutex> head_lock(head_mutex, std::defer_lock);
std::lock(tail_lock, head_lock);
if (head.get() == tail)
{
return false;
}

node* prev_node = tail->prev;
value = std::move(*(prev_node->data));
tail = prev_node;
tail->next = nullptr;
return true;
}

因为try_steal是从队列的尾部弹出数据,为了防止此时有其他线程从头部弹出数据造成操作同一个节点,或者其他线程弹出头部数据后接着修改头部节点为下一个节点,此时本线程正在弹出尾部节点,而尾部节点正好是头部的下一个节点造成数据混乱,此时加了两把锁,对头部和尾部都加锁。

我们这里所说的弹出尾部节点不是弹出tail,而是tail的前一个节点,因为tail是尾部表示一个空节点,tail前边的节点才是尾部数据的节点,为了实现反向查找,我们为node增加了prev指针

1
2
3
4
5
6
struct node
{
std::shared_ptr<T> data;
std::unique_ptr<node> next;
node* prev;
};

所以在push节点的时候也要把这个节点的prev指针指向前一个节点

1
2
3
4
5
6
7
8
9
10
11
12
13
14
15
void push(T new_value) //<------2
{
std::shared_ptr<T> new_data(
std::make_shared<T>(std::move(new_value)));
std::unique_ptr<node> p(new node);
{
std::lock_guard<std::mutex> tail_lock(tail_mutex);
tail->data = new_data;
node* const new_tail = p.get();
new_tail->prev = tail;
tail->next = std::move(p);
tail = new_tail;
}
data_cond.notify_one();
}

整体来说steal版本的线程池就这些内容和前边变化不大。

测试

测试用例已经在源代码中写好,感兴趣可以看下

源码链接:

https://gitee.com/secondtonone1/boostasio-learn/tree/master/concurrent/day22-ThreadPool

视频链接:

https://space.bilibili.com/271469206/channel/collectiondetail?sid=1623290

线程池原理和实现

Posted on 2024-02-07 | In C++

简介

线程池是一种并发编程的技术,用于有效地管理和复用线程资源。它由一组预先创建的线程组成,这些线程可以在需要时执行任务,并在任务完成后返回线程池中等待下一个任务。

线程池的主要目的是避免反复创建和销毁线程的开销,以及有效地控制并发线程的数量。通过使用线程池,可以降低系统的负载,并提高任务执行的效率。

以下是线程池的一些关键特点:

  1. 线程池包含一个线程队列和任务队列,任务队列用于存储待执行的任务。
  2. 线程池在启动时会创建一定数量的线程,并将它们放入线程队列中。
  3. 当有任务需要执行时,线程池从任务队列中获取任务,并将其分配给空闲的线程执行。
  4. 执行完任务的线程会继续等待下一个任务的到来,而不是被销毁。
  5. 如果任务队列为空,线程池中的线程可以进入睡眠状态,减少资源占用。
  6. 线程池可以限制同时执行的线程数量,避免过多的并发线程导致系统负载过高。

使用线程池有以下几个优点:

  1. 提高性能:通过复用线程,避免了线程创建和销毁的开销,提高了任务执行的效率。
  2. 资源控制:线程池可以限制并发线程的数量,避免系统负载过高,保护系统资源。
  3. 提高响应性:线程池可以在任务到来时立即进行处理,减少了任务等待的时间,提高了系统的响应速度。
  4. 简化编程:使用线程池可以将任务的提交和执行分离,简化了并发编程的复杂性。

需要注意的是,在使用线程池时,需要合理设置线程池的大小,避免线程过多导致资源浪费,或线程过少导致任务等待的时间过长。

线程池的实现

首先我不希望线程池被拷贝,我希望它能以单例的形式在需要的地方调用, 那么单例模式就需要删除拷贝构造和拷贝赋值,所以我设计一个基类

1
2
3
4
5
6
7
8
9
10
class NoneCopy {

public:
~NoneCopy(){}
protected:
NoneCopy(){}
private:
NoneCopy(const NoneCopy&) = delete;
NoneCopy& operator=(const NoneCopy&) = delete;
};

然后让线程池ThreadPool类继承NoneCopy, 这样ThreadPool也就不支持拷贝构造和拷贝赋值了,拷贝构造和拷贝赋值的前提是其基类可以拷贝构造和赋值。

1
2
3
4
5
6
7
8
9
10
11
class ThreadPool : public NoneCopy {
public:
~ThreadPool();

static ThreadPool& instance() {
static ThreadPool ins;
return ins;
}
private:
ThreadPool();
};

我们先实现了instance函数,该函数是一个静态成员函数,返回局部的静态实例ins.

我们之前在单例模式中讲过,函数内局部的静态变量,其生命周期和进程同步,但是可见度仅在函数内部。

局部静态变量只会在第一次调用这个函数时初始化一次。故可以作为单例模式。这种模式在C++ 11之前是不安全的,因为各平台编译器实现规则可能不统一导致多线程会生成多个实例。

但是C++ 11过后,语言层面对其优化保证了多个线程调用同一个函数只会生成一个实例,所以C++ 11过后我们可以放心使用。

接下来考虑构造函数,我们说过线程池需要线程队列和任务队列,所以这两个队列要在构造函数中完成构造,线程队列我们可以用一个vector存储,任务队列因为要保证先进先出,所以用queue结构即可。

因为任务队列要有通用性,所以我们规定任务队列中存储的类型为

1
using Task = std::packaged_task<void()>;

我们在ThreadPool中添加如下成员

1
2
3
4
std::atomic_int          thread_num_;
std::queue<Task> tasks_;
std::vector<std::thread> pool_;
std::atomic_bool stop_;

其中 tasks_ 表示任务队列, pool_表示线程队列, thread_num_表示空闲的线程数, stop_表示线程池是否退出。

那我们可以实现线程池的构造函数了

1
2
3
4
5
6
7
8
9
10
ThreadPool(unsigned int num = std::thread::hardware_concurrency())
: stop_(false) {

if (num <= 1)
thread_num_ = 2;
else
thread_num_ = num;

start();
}

我们在构造函数中初始化停止标记为false,初始化线程数默认为硬件允许的物理并行核数。然后调用了start函数。

start函数主要的功能为启动线程并且将线程放入vector中管理,线程的回调函数基本功能就是从任务队列中消费数据,如果队列中有任务则pop出任务并执行,否则线程需要挂起。在部分初学者实现的线程池当中会采用循环等待的方式(如果队列为空则继续循环),这种方式会造成线程忙等,进而引发资源的浪费。

所以我们现在还需要给ThreadPool添加两个成员

1
2
std::mutex               cv_mt_;
std::condition_variable cv_lock_;

分别表示互斥量和条件变量,用来控制线程的休眠和唤醒。

那我们实现start函数

1
2
3
4
5
6
7
8
9
10
11
12
13
14
15
16
17
18
19
20
21
22
23
void start() {
for (int i = 0; i < thread_num_; ++i) {
pool_.emplace_back([this]() {
while (!this->stop_.load()) {
Task task;
{
std::unique_lock<std::mutex> cv_mt(cv_mt_);
this->cv_lock_.wait(cv_mt, [this] {
return this->stop_.load() || !this->tasks_.empty();
});
if (this->tasks_.empty())
return;

task = std::move(this->tasks_.front());
this->tasks_.pop();
}
this->thread_num_--;
task();
this->thread_num_++;
}
});
}
}

pool_为线程队列,在线程队列中我们采用emplace_back直接调用线程的构造函数,将线程要处理的逻辑写成lambda表达式,从而构造线程并且将线程插入线程队列中。

lambda表达式内的逻辑先判断是否停止,如果停止则退出循环, 否则继续循环。

循环的逻辑就是每次从队列中取任务,先调用条件变量等待队列不为空,或者收到退出信号,二者只要满足其一,条件变量的wait就返回,并且继续向下走。否则条件变量wait不会返回,线程将挂起。

如果条件变量判断条件满足(队列不为空或者发现停止信号),线程继续向下执行,判断如果任务队列为空则说明是因为收到停止信号所以直接返回退出,否则就说明任务队列有数据,我们取出任务队列头部的task,将空闲线程数减少1,执行task,再将空闲线程数+1.

接下来我们实现析构函数

1
2
3
~ThreadPool() {
stop();
}

析构函数中的stop就是要向线程发送停止信号,避免线程一直处于挂起状态(因为任务队列为空会导致线程挂起)

1
2
3
4
5
6
7
8
9
10
void stop() {
stop_.store(true);
cv_lock_.notify_all();
for (auto& td : pool_) {
if (td.joinable()) {
std::cout << "join thread " << td.get_id() << std::endl;
td.join();
}
}
}

stop函数中我们将停止标记设置为true,并且调用条件变量的notify_all唤醒所有线程,并且等待所有线程退出后线程池才析构完成。

我们再实现一个函数提供给外部查询当前空闲的线程数,这个功能可有可无,主要是方便外部根据空闲线程数是否达到阈值派发任务。

1
2
3
int idleThreadCount() {
return thread_num_;
}

我们实现了线程池处理任务的逻辑,接下来我们要封装一个接口提供给外部,支持其投递任务给线程池。

因为我们要投递任务给线程池,任务的功能和参数都不同,而之前我们设置的线程池执行的task类型为void(void),返回值为void,参数为void的任务。那我们可用用参数绑定的方式将一个函数绑定为void(void)类型, 比如我们用如下操作

1
2
3
4
5
6
7
8
9
int functionint(int param) {
std::cout << "param is " << param << std::endl;
return 0;
}

void bindfunction() {
std::function<int(void)> functionv = std::bind(functionint, 3);
functionv();
}

假设我们希望任务队列里的任务要调用functionint,以及参数为3,因为在投递任务时我们就知道任务要执行的函数和参数,所以我们可以将执行的函数和参数绑定生成参数为void的函数。

我们通过bindfunction将functionint绑定为一个返回值为int,参数为void的新函数functionv。而我们的任务队列要放入返回值为void,参数也为void的函数,该怎么办呢?

其实很简单,我们可以利用lambda表达式生成一个返回值和参数都为void的函数,函数内部调用functionv即可,有点类似于go,python等语言的闭包,但是C++的闭包是一种伪闭包,需要用值的方式捕获用到的变量。

比如我们将上面的函数functionint和调用的参数3打包放入队列,可以这么写

1
2
3
4
5
6
7
8
void pushtasktoque() {
std::function<int(void)> functionv = std::bind(functionint, 3);
using Task = std::packaged_task<void()>;
std::queue<Task> taskque;
taskque.emplace([functionv]() {
functionv();
});
}

我们先将functionint绑定为functionv,然后定义一个队列存储的类型为std::packaged_task<void()>, 为了防止拷贝构造的开销,我们调用队列的emplace函数,该函数接受lambda表达式直接构造任务放入了队列里。因为lambda表达式捕获了functionv的值,所以可以在内部调用functionv。

lambda表达式返回值为void参数也为void,所以可以直接放入任务队列。

接下来要一个问题,一个问题是我们投递任务,有时候投递方需要获取任务是否完成, 那我们可以利用packaged_task返回一个future给调用方,调用方在外部就可以通过future判断任务是否返回了。我们修改上面的函数,实现commit任务的函数

1
2
3
4
5
6
7
8
9
10
11
12
std::future<int> committask() {
std::function<int(void)> functionv = std::bind(functionint, 3);
auto taskf = std::make_shared<std::packaged_task<int(void)>>(functionv);
auto res = taskf->get_future();
using Task = std::packaged_task<void()>;
std::queue<Task> taskque;
taskque.emplace([taskf]() {
(*taskf)();
});

return res;
}

我们将functionv传递给packaged_task构造函数,构造了一个packaged_task类型的智能指针,每个人的编程风格不同,大家也可以不用智能指针,直接使用packaged_task对象,比如下面的

1
std::packaged_task<int(void)> taskf(functionv);

我构造的是packaged_task类型的智能指针,所以通过taskf->get_future()获取future对象res,这个res作为参数返回给外部,外部就可以通过res判断任务是否完成。

接下来我们定义了一个任务队列,任务队列调用emplace直接构造任务插入队列中,避免拷贝开销。参数为lambda表达式,lamba捕获taskf对象的值,在内部调用(*taskf)()完成任务调用。

上面只是通过具体的函数和参数实现了投递任务的功能,而实际情况是我们要投递各种类型的任务,以及多种类型和多个参数,该怎么实现committask函数更通用呢?

对于更通用的设计我们通常采用模板

1
2
3
4
5
template <class F, class... Args>
std::future<int> commit(F&& f, Args&&... args){
//....
return std::future<int>();
}

上面的模板定义了两个类型,F表示可调用对象类型,可以是lambda表达式,函数,function类等, Args为可变参数模板,可以是任意种类的类型,任意数量。commit函数参数采用F和Args的右值引用,这种模板类型的右值引用也被称作万能引用类型,可以接受左值引用,也可接受右值引用,利用引用折叠技术,可以推断出f和args的最终类型。我在基础课程里讲过,这里再给大家复习一下折叠规则,假设T为模板类型,推到规则如下:

T& & => T&

T& && => T&

T&& & => T&

T&& && => T&&

总结一下,就是只要出现了左值引用最后折叠的结果都是左值引用,只有右值应用和右值引用折叠才能变成右值引用。

1
2
3
4
5
6
7
8
9
10
11
template<typename T>
void Function(T&& t){
//...
}

int main(){
int a = 3;
Function(a);
Function(3);
return 0;
}

当我们把一个int类型的左值a传递给 Function的 T&& 参数t时(T为模板类型), T被推导为int & , 那么参数t整体的类型就变为int & && => int &类型,也就是左值引用类型。

当我们把一个右值3传递给Function的T&& 参数t时,T被推导为int类型。t被推导为int && 类型,也就是右值引用类型。

如果大家熟悉boost库,可以用boost库的type_id_with_cvr打印具体类型,比如我们下面的代码

1
2
3
4
5
6
7
8
9
10
11
12
13
14
15
16
17
18
19
20
21
22
23
24
25
26
27
28
#include <boost/type_index.hpp>
using boost::typeindex::type_id_with_cvr;

int functionint(int param) {
std::cout << "param is " << param << std::endl;
return 0;
}

template <class F, class... Args>
std::future<int> commit(F&& f, Args&&... args) {
//....
// 利用Boost库打印模板推导出来的 T 类型
std::cout << "F type:" << type_id_with_cvr<F>().pretty_name() << std::endl;

// 利用Boost库打印形参的类型
std::cout << "f type:" << type_id_with_cvr<decltype(f)>().pretty_name() << std::endl;

std::cout << "Args type:" << type_id_with_cvr<Args...>().pretty_name() << std::endl;

std::cout << "args type:" << type_id_with_cvr<decltype(args)...>().pretty_name() << std::endl;

return std::future<int>();
}

void reference_collapsing(){
int a = 3;
commit(functionint, a);
}

调用reference_collapsing函数输出如下

1
2
3
4
F type:int (__cdecl&)(int)
f type:int (__cdecl&)(int)
Args type:int & __ptr64
args type:int & __ptr64

可以看出F和f的类型都为函数对象的左值引用类型int (__cdecl&)(int),因为可变参数列表只有一个int左值类型,所以Args被推导为int &类型, 同样的道理args也是int &类型。

那如果我们换一种方式调用

1
2
3
void reference_collapsing2(){
commit(std::move(functionint), 3);
}

调用reference_collapsing2输出如下
1
2
3
4
F type:int __cdecl(int)
f type:int (__cdecl&&)(int)
Args type:int
args type:int && __ptr64

F为函数对象类型int __cdecl(int), f被对段位函数对象的右值引用类型int (__cdecl&&)(int)

Args 被推断为int类型, args被推断为int && 类型。

所以我们就可以得出之前给大家的结论,对于模板类型参数T && , 编译器会根据传入的类型为左值还是右值,将T 推断为不同的类型, 如果传入的类型为int类型的左值,则T为int&类型,如果传入的类型为int类型的右值,则T为int类型。

模板参数介绍完了,还要介绍一下原样转发, 熟悉我视频风格的读者都知道在介绍正确做法前我会先介绍错误示范,我们先看下面的例子

1
2
3
4
5
6
7
8
9
10
11
12
void use_rightref(int && rparam) {
//....
}

template<typename T>
void use_tempref(T&& tparam) {
use_rightref(tparam);
}

void test_tempref() {
use_tempref(3);
}

我先给大家介绍下上面代码的调用流程,我们在test_tempref里调用use_tempref, 参数3是一个右值,所以use_tempref中T被推断为int类型, tparam为int && 类型。我们接着将tparam传递给use_rightref,tparam是int && 类型,刚好可以传递给use_rightref,然而上面的代码会报错。

1
“void use_rightref(int &&)”: 无法将参数 1 从“T”转换为“int &&”

报错的原因是我们将tparam传递给use_rightref的时候参数类型不匹配。在use_tempref中,tparam为int && 类型,即int 的右值引用类型。但是将tparam传递给use_rightref时,tparam是作为左值传递的, 他的类型是int && 类型,但是在函数use_tempref中tparam可以作为左值使用。这么说大家有点难理解

我们分开理解,左值和右值的区别

左值(lvalue) 是指表达式结束后依然存在的、可被取地址的数据。通俗地说,左值就是可以放在赋值符号左边的值。

右值(rvalue) 是指表达式结束后就不再存在的临时数据。通常是不可被取地址的临时值,例如常量、函数返回值、表达式计算结果等。在 C++11 之后,右值引用的引入使得我们可以直接操作右值。

我们看下面的代码

1
2
3
4
5
6
7
8
9
10
template<typename T>
void use_tempref(T&& tparam) {
int a = 4;
tparam = a;
tparam = std::move(a);
}

void test_tempref() {
use_tempref(3);
}

上述代码编译没有问题可以运行,tparam可以作为左值被赋值。所以当它作为参数传递给其他函数的时候,它也是作为左值使用的,那么传递给use_rightref时,就会出现int&& 绑定左值的情况,这在编译阶段是不允许的。

下面这种tparam也是被作为左值使用

1
2
3
4
5
6
7
8
9
void use_tempref(int && tparam) {
int a = 4;
tparam = a;
tparam = std::move(a);
}

void test_tempref() {
use_tempref(3);
}

上面代码编译也会通过的。

那么我们接下来要解决tparam作为左值传递给use_rightref报错的问题,C++ 给我们提供了原样转发功能,这个在基础中也给大家介绍过, C++ 源码对于forward的实现有两个版本,分别是将一个左值转化为一个左值或者右值,以及将一个右值转化为一个右值。

1
2
3
4
5
6
7
8
9
10
11
template <class _Ty>
_NODISCARD constexpr _Ty&& forward(
remove_reference_t<_Ty>& _Arg) noexcept { // forward an lvalue as either an lvalue or an rvalue
return static_cast<_Ty&&>(_Arg);
}

template <class _Ty>
_NODISCARD constexpr _Ty&& forward(remove_reference_t<_Ty>&& _Arg) noexcept { // forward an rvalue as an rvalue
static_assert(!is_lvalue_reference_v<_Ty>, "bad forward call");
return static_cast<_Ty&&>(_Arg);
}

因为实现了两个版本,所以forward会根据传递的是左值调用第一个版本,传递的是右值调用第二个版本。

我们看看remove_reference_t<_Ty>的源码

1
2
3
4
5
6
7
8
9
10
11
12
13
14
template <class _Ty>
struct remove_reference<_Ty&> {
using type = _Ty;
using _Const_thru_ref_type = const _Ty&;
};

template <class _Ty>
struct remove_reference<_Ty&&> {
using type = _Ty;
using _Const_thru_ref_type = const _Ty&&;
};

template <class _Ty>
using remove_reference_t = typename remove_reference<_Ty>::type;

我们通过观察就会发现remove_reference_t<_Ty>其实是去除了_Ty中的引用返回内部的type.

所以我们forward(3)时,执行forward(remove_reference_t<_Ty>&& _Arg), _Ty为int && 类型,remove_reference_t<_Ty>为int类型. 返回的为static_cast<_Ty&&>(_Arg)类型,即int && &&类型,折叠一下变为int &&类型。

同样当我们forward(a),比如a是一个int类型的左值,则执行_Ty&& forward(remove_reference_t<_Ty>& _Arg), _Ty为int &类型, remove_reference_t<_Ty>为int类型, 返回值为static_cast<_Ty&&>(_Arg) ,即int & && 类型折叠为int &类型。

所以有了这些知识,我们解决上面的编译错误可以这么干

1
2
3
4
5
6
7
8
9
10
11
12
void use_rightref(int && rparam) {
//....
}

template<typename T>
void use_tempref(T&& tparam) {
use_rightref(std::forward<T>(tparam));
}

void test_tempref() {
use_tempref(3);
}

接下来我们回到线程池的话题,commit函数需要返回future对象,但是我们又无法在函数定义的时候提前写好返回值future的类型,那怎么办呢?

可以用到C++ 11的一个技术就是尾置推导

1
2
3
4
5
6
7
template <class F, class... Args>
auto commit(F&& f, Args&&... args) ->
std::future<decltype(std::forward<F>(f)(std::forward<Args>(args)...))> {
using RetType = decltype(std::forward<F>(f)(std::forward<Args>(args)...));

return std::future<RetType>{};
}

我们在commit函数返回值写成了auto,告诉编译器具体的返回类型在其后,这样编译器在加载完函数的参数f和args之后,可以推导返回值类型.

推导也很简单,我们通过decltype(std::forward<F>(f)(std::forward<Args>(args)...)), decltype会根据根据表达式推断表达式的结果类型,我们用future存储这个类型,这个future就是返回值类型。

decltype中我们用了forward原样转发f和args,其实f不用转发,因为我们调用f是按照左值调用的,至于args原样转发是考虑f接受的参数可能是一个右值,但是这种情况其实不多,所以对于普通情形,我们写成decltype(f(args...))没问题的。

因为推导的类型我们以后还会用到,所以用了RetType来记录这个类型。

接下来我们给出commit的完整代码

1
2
3
4
5
6
7
8
9
10
11
12
13
14
15
16
17
18
template <class F, class... Args>
auto commit(F&& f, Args&&... args) ->
std::future<decltype(std::forward<F>(f)(std::forward<Args>(args)...))> {
using RetType = decltype(std::forward<F>(f)(std::forward<Args>(args)...));
if (stop_.load())
return std::future<RetType>{};

auto task = std::make_shared<std::packaged_task<RetType()>>(
std::bind(std::forward<F>(f), std::forward<Args>(args)...));

std::future<RetType> ret = task->get_future();
{
std::lock_guard<std::mutex> cv_mt(cv_mt_);
tasks_.emplace([task] { (*task)(); });
}
cv_lock_.notify_one();
return ret;
}

在commit中我们生成一个packaged_task<RetType()>类型的智能指针task,通过task获取future.

接下来我们加锁并且将task放入队列,但是因为task的返回类型为RetType,所以我们采用了lambda表达式捕获task,内部调用task,将这个lambda表达式放入任务队列。

然后通知其他线程唤醒,并且返回future。

测试

为了测试线程池,我们可以用前文实现的快速排序的方法,将任务分段递归投递给线程池,让线程池排序

1
2
3
4
5
6
7
8
9
10
11
12
13
14
15
16
17
18
19
20
21
22
23
24
template<typename T>
std::list<T>pool_thread_quick_sort(std::list<T> input) {
if (input.empty())
{
return input;
}
std::list<T> result;
result.splice(result.begin(), input, input.begin());
T const& partition_val = *result.begin();
typename std::list<T>::iterator divide_point =
std::partition(input.begin(), input.end(),
[&](T const& val) {return val < partition_val; });
std::list<T> new_lower_chunk;
new_lower_chunk.splice(new_lower_chunk.end(),
input, input.begin(),
divide_point);

std::future<std::list<T> > new_lower = ThreadPool::instance().commit(pool_thread_quick_sort<T>, new_lower_chunk);

std::list<T> new_higher(pool_thread_quick_sort(input));
result.splice(result.end(), new_higher);
result.splice(result.begin(), new_lower.get());
return result;
}

我们再写一个测试用例

1
2
3
4
5
6
7
8
9
10
11
void TestThreadPoolSort() {
std::list<int> nlist = { 6,1,0,5,2,9,11 };

auto sortlist = pool_thread_quick_sort<int>(nlist);

for (auto& value : sortlist) {
std::cout << value << " ";
}

std::cout << std::endl;
}

结果输出

1
0 1 2 5 6 9 11

总结

本文介绍线程池的原理,并实现了线程池

源码链接:

https://gitee.com/secondtonone1/boostasio-learn/tree/master/concurrent/day22-ThreadPool

视频链接:

https://space.bilibili.com/271469206/channel/collectiondetail?sid=1623290

<1…91011…41>

401 posts
18 categories
21 tags
RSS
GitHub ZhiHu
© 2026 恋恋风辰 本站总访问量次 | 本站访客数人
Powered by Hexo
|
Theme — NexT.Muse v5.1.3