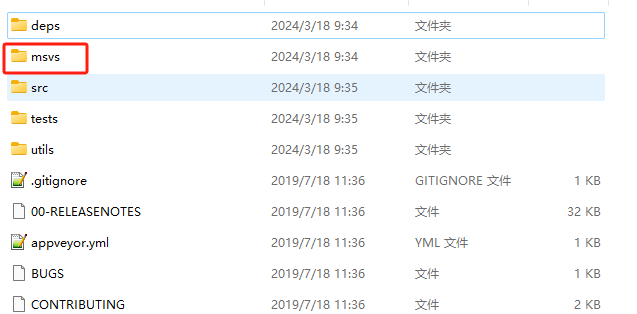
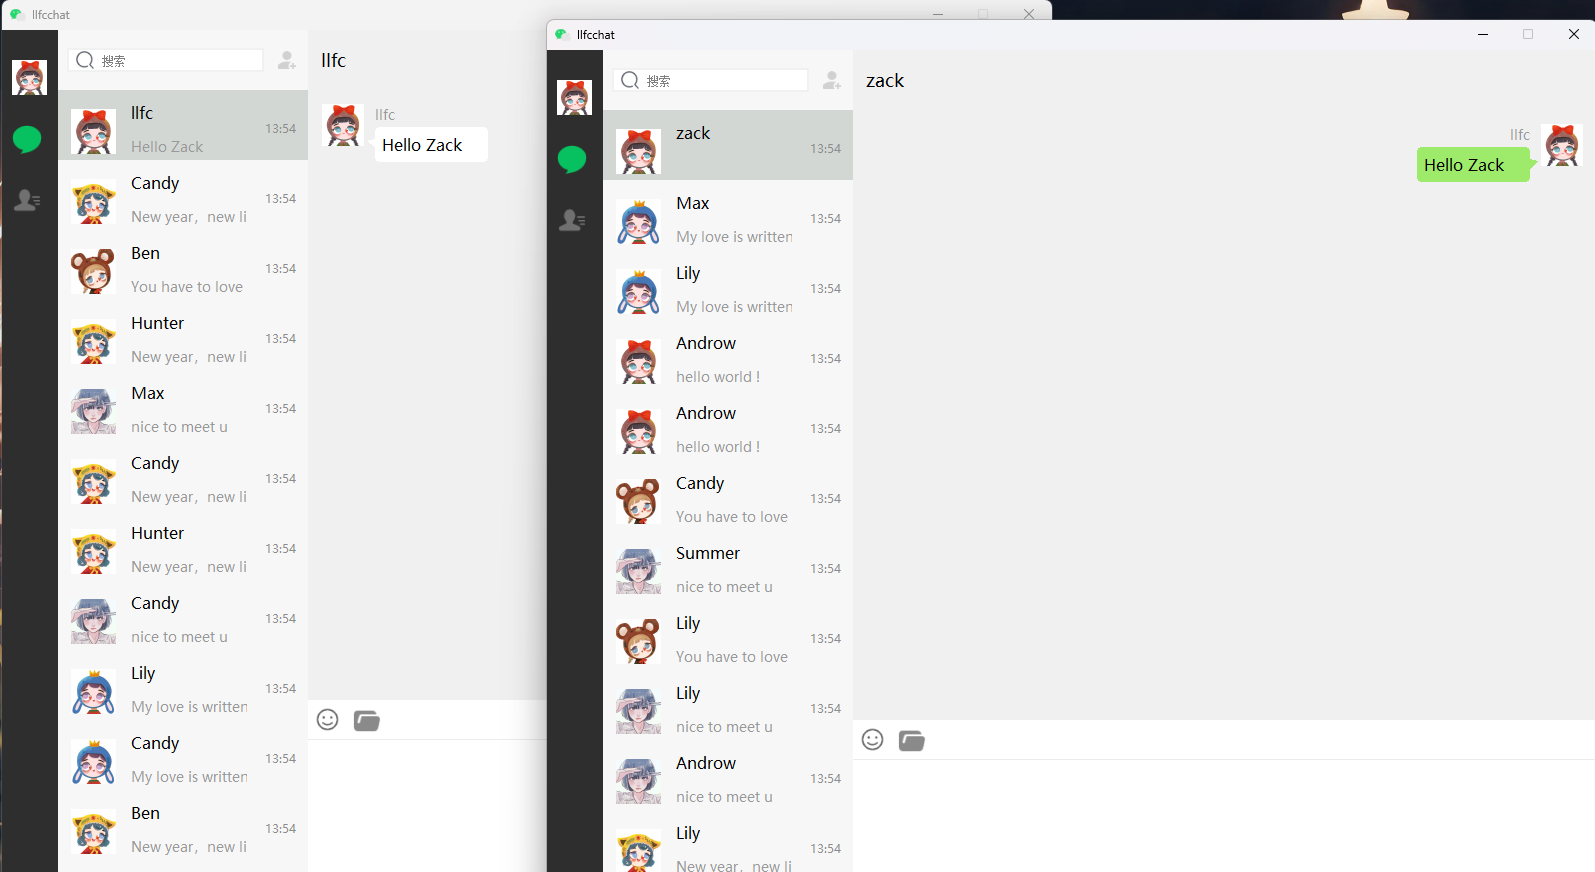
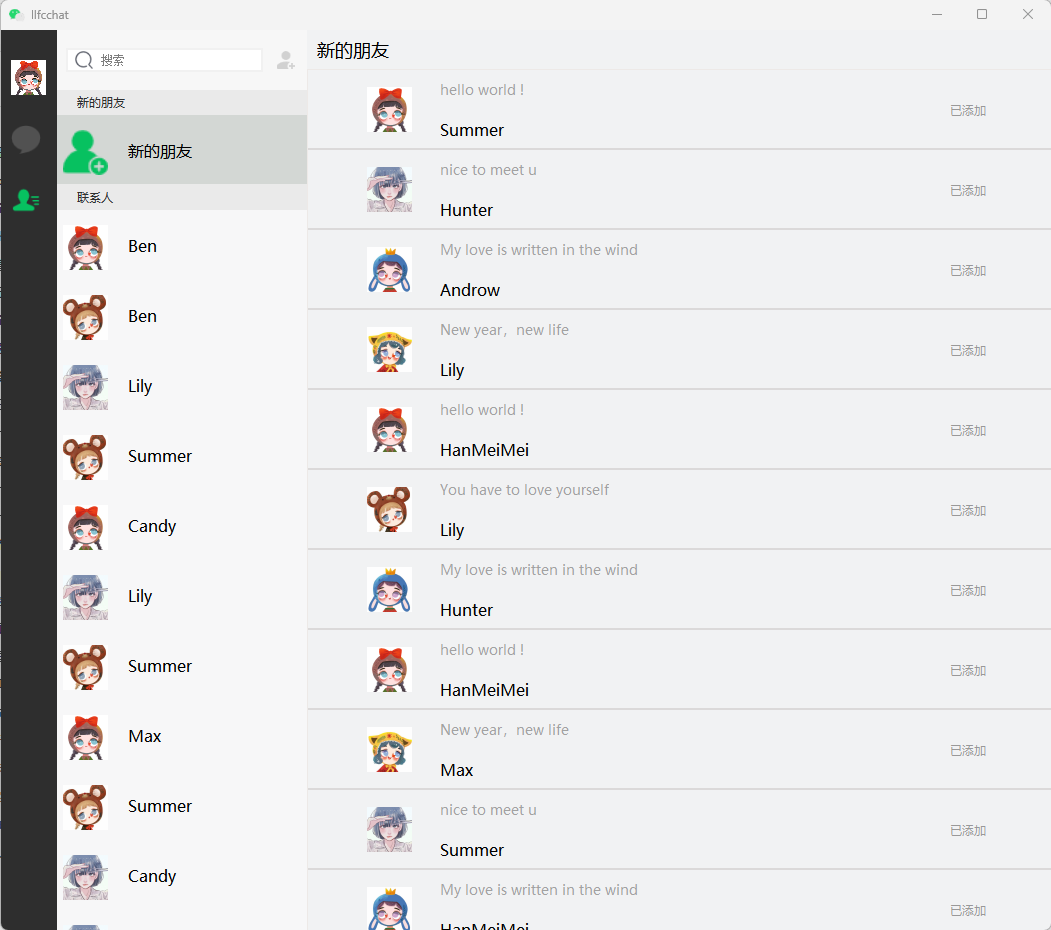
恋恋风辰的个人博客


  • Home

  • Archives

  • Categories

  • Tags

  • Search

聊天项目(26) 实现联系人和好友申请列表

Posted on 2024-08-31 | In C++聊天项目

简介

今日实现界面效果

https://cdn.llfc.club/1721547194830.jpg

联系人列表

我们自定义一个ChatUserList类,用来管理聊天列表。其声明如下:

1
2
3
4
5
6
7
8
9
10
11
12
13
14
15
16
17
18
19
20
21
22
23
24
25
class ContactUserList : public QListWidget
{
Q_OBJECT
public:
ContactUserList(QWidget *parent = nullptr);
void ShowRedPoint(bool bshow = true);
protected:
bool eventFilter(QObject *watched, QEvent *event) override ;

private:
void addContactUserList();

public slots:
void slot_item_clicked(QListWidgetItem *item);
// void slot_add_auth_firend(std::shared_ptr<AuthInfo>);
// void slot_auth_rsp(std::shared_ptr<AuthRsp>);
signals:
void sig_loading_contact_user();
void sig_switch_apply_friend_page();
void sig_switch_friend_info_page();
private:
ConUserItem* _add_friend_item;
QListWidgetItem * _groupitem;
};

具体实现

1
2
3
4
5
6
7
8
9
10
11
12
13
14
15
16
17
18
19
20
21
22
23
24
25
26
27
28
29
30
31
32
33
34
35
36
37
38
39
40
41
42
43
44
45
46
47
48
49
50
51
52
53
54
55
56
57
58
59
60
61
62
63
64
65
66
67
68
69
70
71
72
73
74
75
76
77
78
79
80
81
82
83
84
85
86
87
88
89
90
91
92
93
94
95
96
97
98
99
100
101
102
103
104
105
106
107
108
109
110
111
112
113
114
115
116
117
118
119
120
121
122
123
124
125
126
127
128
129
130
131
132
133
134
135
136
137
138
139
140
141
142
143
144
145
146
147
148
149
150
151
152
153
154
155
156
157
ContactUserList::ContactUserList(QWidget *parent)
{
Q_UNUSED(parent);
this->setHorizontalScrollBarPolicy(Qt::ScrollBarAlwaysOff);
this->setVerticalScrollBarPolicy(Qt::ScrollBarAlwaysOff);
// 安装事件过滤器
this->viewport()->installEventFilter(this);

//模拟从数据库或者后端传输过来的数据,进行列表加载
addContactUserList();
//连接点击的信号和槽
connect(this, &QListWidget::itemClicked, this, &ContactUserList::slot_item_clicked);
// //链接对端同意认证后通知的信号
// connect(TcpMgr::GetInstance().get(), &TcpMgr::sig_add_auth_friend,this,
// &ContactUserList::slot_add_auth_firend);

// //链接自己点击同意认证后界面刷新
// connect(TcpMgr::GetInstance().get(), &TcpMgr::sig_auth_rsp,this,
// &ContactUserList::slot_auth_rsp);
}

void ContactUserList::ShowRedPoint(bool bshow /*= true*/)
{
_add_friend_item->ShowRedPoint(bshow);
}

void ContactUserList::addContactUserList()
{
auto * groupTip = new GroupTipItem();
QListWidgetItem *item = new QListWidgetItem;
item->setSizeHint(groupTip->sizeHint());
this->addItem(item);
this->setItemWidget(item, groupTip);
item->setFlags(item->flags() & ~Qt::ItemIsSelectable);

_add_friend_item = new ConUserItem();
_add_friend_item->setObjectName("new_friend_item");
_add_friend_item->SetInfo(0,tr("新的朋友"),":/res/add_friend.png");
_add_friend_item->SetItemType(ListItemType::APPLY_FRIEND_ITEM);

QListWidgetItem *add_item = new QListWidgetItem;
//qDebug()<<"chat_user_wid sizeHint is " << chat_user_wid->sizeHint();
add_item->setSizeHint(_add_friend_item->sizeHint());
this->addItem(add_item);
this->setItemWidget(add_item, _add_friend_item);

//默认设置新的朋友申请条目被选中
this->setCurrentItem(add_item);

auto * groupCon = new GroupTipItem();
groupCon->SetGroupTip(tr("联系人"));
_groupitem = new QListWidgetItem;
_groupitem->setSizeHint(groupCon->sizeHint());
this->addItem(_groupitem);
this->setItemWidget(_groupitem, groupCon);
_groupitem->setFlags(_groupitem->flags() & ~Qt::ItemIsSelectable);


// 创建QListWidgetItem,并设置自定义的widget
for(int i = 0; i < 13; i++){
int randomValue = QRandomGenerator::global()->bounded(100); // 生成0到99之间的随机整数
int str_i = randomValue%strs.size();
int head_i = randomValue%heads.size();
int name_i = randomValue%names.size();

auto *con_user_wid = new ConUserItem();
con_user_wid->SetInfo(0,names[name_i], heads[head_i]);
QListWidgetItem *item = new QListWidgetItem;
//qDebug()<<"chat_user_wid sizeHint is " << chat_user_wid->sizeHint();
item->setSizeHint(con_user_wid->sizeHint());
this->addItem(item);
this->setItemWidget(item, con_user_wid);
}
}

bool ContactUserList::eventFilter(QObject *watched, QEvent *event)
{
// 检查事件是否是鼠标悬浮进入或离开
if (watched == this->viewport()) {
if (event->type() == QEvent::Enter) {
// 鼠标悬浮,显示滚动条
this->setVerticalScrollBarPolicy(Qt::ScrollBarAsNeeded);
} else if (event->type() == QEvent::Leave) {
// 鼠标离开,隐藏滚动条
this->setVerticalScrollBarPolicy(Qt::ScrollBarAlwaysOff);
}
}

// 检查事件是否是鼠标滚轮事件
if (watched == this->viewport() && event->type() == QEvent::Wheel) {
QWheelEvent *wheelEvent = static_cast<QWheelEvent*>(event);
int numDegrees = wheelEvent->angleDelta().y() / 8;
int numSteps = numDegrees / 15; // 计算滚动步数

// 设置滚动幅度
this->verticalScrollBar()->setValue(this->verticalScrollBar()->value() - numSteps);

// 检查是否滚动到底部
QScrollBar *scrollBar = this->verticalScrollBar();
int maxScrollValue = scrollBar->maximum();
int currentValue = scrollBar->value();
//int pageSize = 10; // 每页加载的联系人数量

if (maxScrollValue - currentValue <= 0) {
// 滚动到底部,加载新的联系人
qDebug()<<"load more contact user";
//发送信号通知聊天界面加载更多聊天内容
emit sig_loading_contact_user();
}

return true; // 停止事件传递
}

return QListWidget::eventFilter(watched, event);

}

void ContactUserList::slot_item_clicked(QListWidgetItem *item)
{
QWidget *widget = this->itemWidget(item); // 获取自定义widget对象
if(!widget){
qDebug()<< "slot item clicked widget is nullptr";
return;
}

// 对自定义widget进行操作, 将item 转化为基类ListItemBase
ListItemBase *customItem = qobject_cast<ListItemBase*>(widget);
if(!customItem){
qDebug()<< "slot item clicked widget is nullptr";
return;
}

auto itemType = customItem->GetItemType();
if(itemType == ListItemType::INVALID_ITEM
|| itemType == ListItemType::GROUP_TIP_ITEM){
qDebug()<< "slot invalid item clicked ";
return;
}

if(itemType == ListItemType::APPLY_FRIEND_ITEM){

// 创建对话框,提示用户
qDebug()<< "apply friend item clicked ";
//跳转到好友申请界面
emit sig_switch_apply_friend_page();
return;
}

if(itemType == ListItemType::CONTACT_USER_ITEM){
// 创建对话框,提示用户
qDebug()<< "contact user item clicked ";
//跳转到好友申请界面
emit sig_switch_friend_info_page();
return;
}
}

构造函数中关闭了滚动条的显示,重写了事件过滤器,实现了根据鼠标区域判断是否显示滚动条的功能。

并且实现了点击其中某个item响应对应的功能。并根据不同的item类型跳转不同的页面。

联系人item

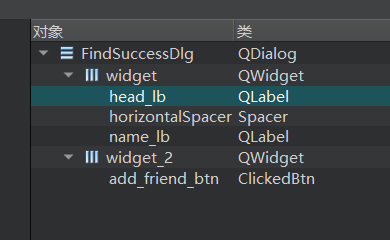
因为每一个item都是我们自己定义的,所以我们添加设计师界面类,界面布局如下所示
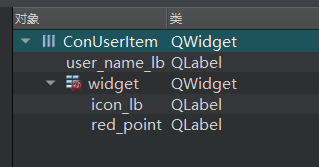
https://cdn.llfc.club/1721544014771.jpg

类的声明如下

1
2
3
4
5
6
7
8
9
10
11
12
13
14
15
16
class ConUserItem : public ListItemBase
{
Q_OBJECT

public:
explicit ConUserItem(QWidget *parent = nullptr);
~ConUserItem();
QSize sizeHint() const override;
void SetInfo(std::shared_ptr<AuthInfo> auth_info);
void SetInfo(std::shared_ptr<AuthRsp> auth_rsp);
void SetInfo(int uid, QString name, QString icon);
void ShowRedPoint(bool show = false);
private:
Ui::ConUserItem *ui;
std::shared_ptr<UserInfo> _info;
};

具体实现

1
2
3
4
5
6
7
8
9
10
11
12
13
14
15
16
17
18
19
20
21
22
23
24
25
26
27
28
29
30
31
32
33
34
35
36
37
38
39
40
41
42
43
44
45
46
47
48
49
50
51
52
53
54
55
56
57
58
59
60
61
62
63
64
65
66
67
68
69
ConUserItem::ConUserItem(QWidget *parent) :
ListItemBase(parent),
ui(new Ui::ConUserItem)
{
ui->setupUi(this);
SetItemType(ListItemType::CONTACT_USER_ITEM);
ui->red_point->raise();
ShowRedPoint(true);
}

ConUserItem::~ConUserItem()
{
delete ui;
}

QSize ConUserItem::sizeHint() const
{
return QSize(250, 70); // 返回自定义的尺寸
}

void ConUserItem::SetInfo(std::shared_ptr<AuthInfo> auth_info)
{
_info = std::make_shared<UserInfo>(auth_info);
// 加载图片
QPixmap pixmap(_info->_icon);

// 设置图片自动缩放
ui->icon_lb->setPixmap(pixmap.scaled(ui->icon_lb->size(), Qt::KeepAspectRatio, Qt::SmoothTransformation));
ui->icon_lb->setScaledContents(true);

ui->user_name_lb->setText(_info->_name);
}

void ConUserItem::SetInfo(int uid, QString name, QString icon)
{
_info = std::make_shared<UserInfo>(uid,name, icon);

// 加载图片
QPixmap pixmap(_info->_icon);

// 设置图片自动缩放
ui->icon_lb->setPixmap(pixmap.scaled(ui->icon_lb->size(), Qt::KeepAspectRatio, Qt::SmoothTransformation));
ui->icon_lb->setScaledContents(true);

ui->user_name_lb->setText(_info->_name);
}

void ConUserItem::SetInfo(std::shared_ptr<AuthRsp> auth_rsp){
_info = std::make_shared<UserInfo>(auth_rsp);

// 加载图片
QPixmap pixmap(_info->_icon);

// 设置图片自动缩放
ui->icon_lb->setPixmap(pixmap.scaled(ui->icon_lb->size(), Qt::KeepAspectRatio, Qt::SmoothTransformation));
ui->icon_lb->setScaledContents(true);

ui->user_name_lb->setText(_info->_name);
}

void ConUserItem::ShowRedPoint(bool show)
{
if(show){
ui->red_point->show();
}else{
ui->red_point->hide();
}

}

这样我们启动程序就能看到模拟的联系人列表被加载进来了。
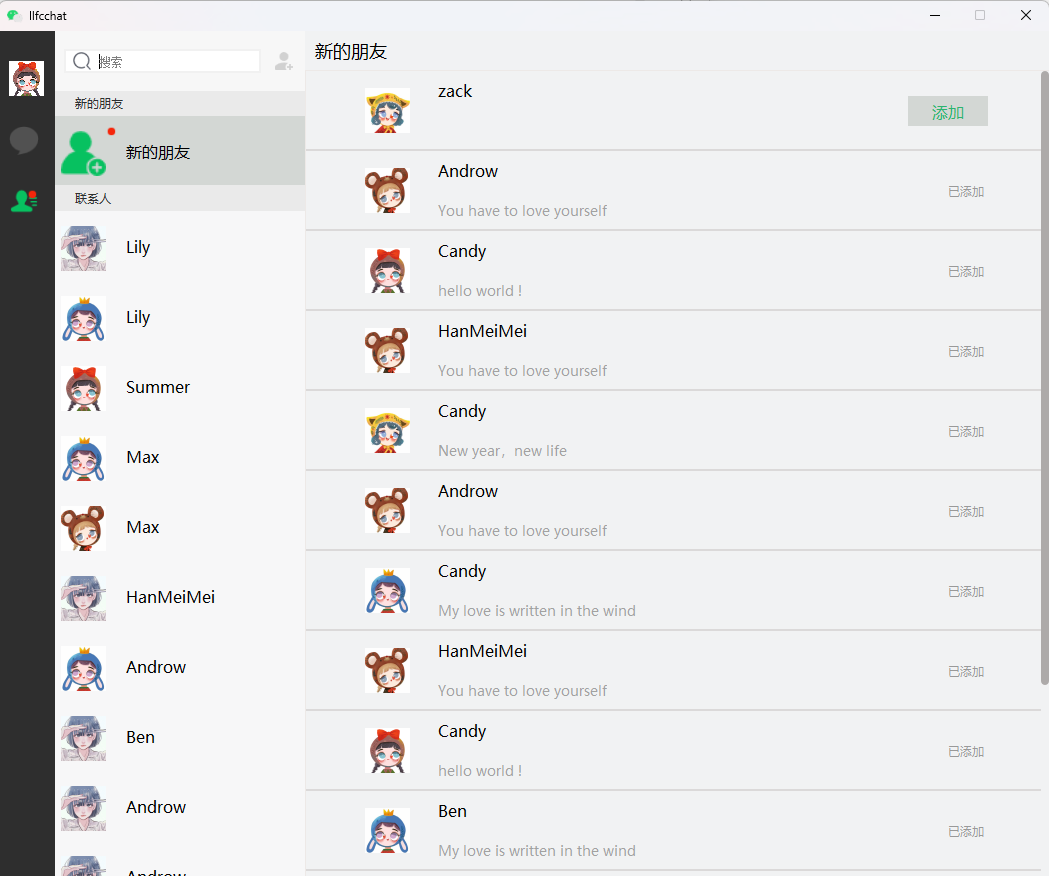
申请列表

申请页面ui布局如下

https://cdn.llfc.club/1721545292540.jpg

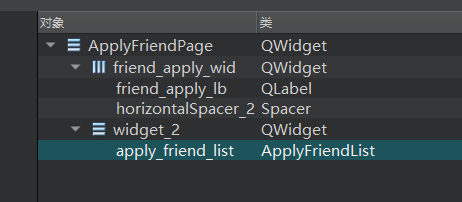
我们新增ApplyFriendPage类,用来显示申请列表

1
2
3
4
5
6
7
8
9
10
11
12
13
14
15
16
17
18
19
class ApplyFriendPage : public QWidget
{
Q_OBJECT

public:
explicit ApplyFriendPage(QWidget *parent = nullptr);
~ApplyFriendPage();
void AddNewApply(std::shared_ptr<AddFriendApply> apply);
protected:
void paintEvent(QPaintEvent *event);
private:
void loadApplyList();
Ui::ApplyFriendPage *ui;
std::unordered_map<int, ApplyFriendItem*> _unauth_items;
public slots:
void slot_auth_rsp(std::shared_ptr<AuthRsp> );
signals:
void sig_show_search(bool);
};

具体实现

1
2
3
4
5
6
7
8
9
10
11
12
13
14
15
16
17
18
19
20
21
22
23
24
25
26
27
28
29
30
31
32
33
34
35
36
37
38
39
40
41
42
43
44
45
46
47
48
49
50
51
52
53
54
55
56
57
58
59
60
61
62
63
64
65
66
67
68
69
70
71
72
73
74
75
76
77
78
79
80
81
82
83
84
85
86
87
88
89
90
91
92
93
94
95
96
97
98
99
100
101
102
103
104
105
106
107
108
109
110
111
112
113
114
115
116
117
118
119
ApplyFriendPage::ApplyFriendPage(QWidget *parent) :
QWidget(parent),
ui(new Ui::ApplyFriendPage)
{
ui->setupUi(this);
connect(ui->apply_friend_list, &ApplyFriendList::sig_show_search, this, &ApplyFriendPage::sig_show_search);
loadApplyList();
//接受tcp传递的authrsp信号处理
connect(TcpMgr::GetInstance().get(), &TcpMgr::sig_auth_rsp, this, &ApplyFriendPage::slot_auth_rsp);
}

ApplyFriendPage::~ApplyFriendPage()
{
delete ui;
}

void ApplyFriendPage::AddNewApply(std::shared_ptr<AddFriendApply> apply)
{
//先模拟头像随机,以后头像资源增加资源服务器后再显示
int randomValue = QRandomGenerator::global()->bounded(100); // 生成0到99之间的随机整数
int head_i = randomValue % heads.size();
auto* apply_item = new ApplyFriendItem();
auto apply_info = std::make_shared<ApplyInfo>(apply->_from_uid,
apply->_name, apply->_desc,heads[head_i], apply->_name, 0, 0);
apply_item->SetInfo( apply_info);
QListWidgetItem* item = new QListWidgetItem;
//qDebug()<<"chat_user_wid sizeHint is " << chat_user_wid->sizeHint();
item->setSizeHint(apply_item->sizeHint());
item->setFlags(item->flags() & ~Qt::ItemIsEnabled & ~Qt::ItemIsSelectable);
ui->apply_friend_list->insertItem(0,item);
ui->apply_friend_list->setItemWidget(item, apply_item);
apply_item->ShowAddBtn(true);
//收到审核好友信号
connect(apply_item, &ApplyFriendItem::sig_auth_friend, [this](std::shared_ptr<ApplyInfo> apply_info) {
// auto* authFriend = new AuthenFriend(this);
// authFriend->setModal(true);
// authFriend->SetApplyInfo(apply_info);
// authFriend->show();
});
}

void ApplyFriendPage::paintEvent(QPaintEvent *event)
{
QStyleOption opt;
opt.init(this);
QPainter p(this);
style()->drawPrimitive(QStyle::PE_Widget, &opt, &p, this);
}

void ApplyFriendPage::loadApplyList()
{
//添加好友申请
auto apply_list = UserMgr::GetInstance()->GetApplyList();
for(auto &apply: apply_list){
int randomValue = QRandomGenerator::global()->bounded(100); // 生成0到99之间的随机整数
int head_i = randomValue % heads.size();
auto* apply_item = new ApplyFriendItem();
apply->SetIcon(heads[head_i]);
apply_item->SetInfo(apply);
QListWidgetItem* item = new QListWidgetItem;
//qDebug()<<"chat_user_wid sizeHint is " << chat_user_wid->sizeHint();
item->setSizeHint(apply_item->sizeHint());
item->setFlags(item->flags() & ~Qt::ItemIsEnabled & ~Qt::ItemIsSelectable);
ui->apply_friend_list->insertItem(0,item);
ui->apply_friend_list->setItemWidget(item, apply_item);
if(apply->_status){
apply_item->ShowAddBtn(false);
}else{
apply_item->ShowAddBtn(true);
auto uid = apply_item->GetUid();
_unauth_items[uid] = apply_item;
}

//收到审核好友信号
connect(apply_item, &ApplyFriendItem::sig_auth_friend, [this](std::shared_ptr<ApplyInfo> apply_info) {
// auto* authFriend = new AuthenFriend(this);
// authFriend->setModal(true);
// authFriend->SetApplyInfo(apply_info);
// authFriend->show();
});
}

// 模拟假数据,创建QListWidgetItem,并设置自定义的widget
for(int i = 0; i < 13; i++){
int randomValue = QRandomGenerator::global()->bounded(100); // 生成0到99之间的随机整数
int str_i = randomValue%strs.size();
int head_i = randomValue%heads.size();
int name_i = randomValue%names.size();

auto *apply_item = new ApplyFriendItem();
auto apply = std::make_shared<ApplyInfo>(0, names[name_i], strs[str_i],
heads[head_i], names[name_i], 0, 1);
apply_item->SetInfo(apply);
QListWidgetItem *item = new QListWidgetItem;
//qDebug()<<"chat_user_wid sizeHint is " << chat_user_wid->sizeHint();
item->setSizeHint(apply_item->sizeHint());
item->setFlags(item->flags() & ~Qt::ItemIsEnabled & ~Qt::ItemIsSelectable);
ui->apply_friend_list->addItem(item);
ui->apply_friend_list->setItemWidget(item, apply_item);
//收到审核好友信号
connect(apply_item, &ApplyFriendItem::sig_auth_friend, [this](std::shared_ptr<ApplyInfo> apply_info){
// auto *authFriend = new AuthenFriend(this);
// authFriend->setModal(true);
// authFriend->SetApplyInfo(apply_info);
// authFriend->show();
});
}
}

void ApplyFriendPage::slot_auth_rsp(std::shared_ptr<AuthRsp> auth_rsp)
{
auto uid = auth_rsp->_uid;
auto find_iter = _unauth_items.find(uid);
if (find_iter == _unauth_items.end()) {
return;
}

find_iter->second->ShowAddBtn(false);
}

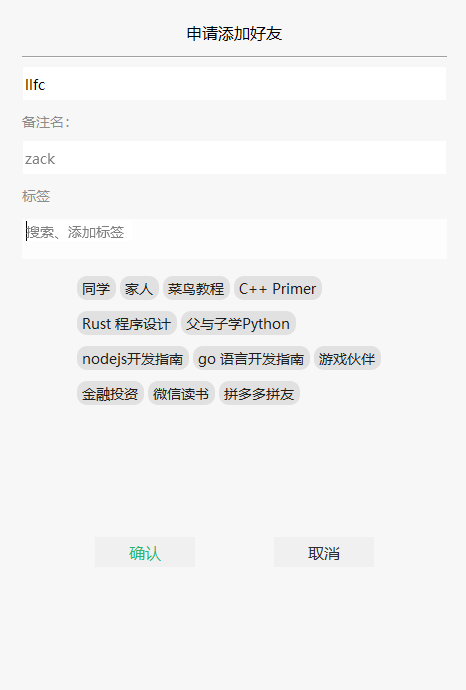
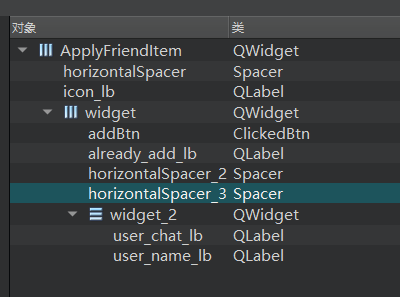
因为每个item自定义,所以我们新增设计师界面类ApplyFriendItem

界面布局

https://cdn.llfc.club/1721546273709.jpg

类的声明如下:

1
2
3
4
5
6
7
8
9
10
11
12
13
14
15
16
17
18
19
20
class ApplyFriendItem : public ListItemBase
{
Q_OBJECT

public:
explicit ApplyFriendItem(QWidget *parent = nullptr);
~ApplyFriendItem();
void SetInfo(std::shared_ptr<ApplyInfo> apply_info);
void ShowAddBtn(bool bshow);
QSize sizeHint() const override {
return QSize(250, 80); // 返回自定义的尺寸
}
int GetUid();
private:
Ui::ApplyFriendItem *ui;
std::shared_ptr<ApplyInfo> _apply_info;
bool _added;
signals:
void sig_auth_friend(std::shared_ptr<ApplyInfo> apply_info);
};

以下为具体实现

1
2
3
4
5
6
7
8
9
10
11
12
13
14
15
16
17
18
19
20
21
22
23
24
25
26
27
28
29
30
31
32
33
34
35
36
37
38
39
40
41
42
43
44
45
46
47
48
49
ApplyFriendItem::ApplyFriendItem(QWidget *parent) :
ListItemBase(parent), _added(false),
ui(new Ui::ApplyFriendItem)
{
ui->setupUi(this);
SetItemType(ListItemType::APPLY_FRIEND_ITEM);
ui->addBtn->SetState("normal","hover", "press");
ui->addBtn->hide();
connect(ui->addBtn, &ClickedBtn::clicked, [this](){
emit this->sig_auth_friend(_apply_info);
});
}

ApplyFriendItem::~ApplyFriendItem()
{
delete ui;
}

void ApplyFriendItem::SetInfo(std::shared_ptr<ApplyInfo> apply_info)
{
_apply_info = apply_info;
// 加载图片
QPixmap pixmap(_apply_info->_icon);

// 设置图片自动缩放
ui->icon_lb->setPixmap(pixmap.scaled(ui->icon_lb->size(), Qt::KeepAspectRatio, Qt::SmoothTransformation));
ui->icon_lb->setScaledContents(true);

ui->user_name_lb->setText(_apply_info->_name);
ui->user_chat_lb->setText(_apply_info->_desc);
}

void ApplyFriendItem::ShowAddBtn(bool bshow)
{
if (bshow) {
ui->addBtn->show();
ui->already_add_lb->hide();
_added = false;
}
else {
ui->addBtn->hide();
ui->already_add_lb->show();
_added = true;
}
}

int ApplyFriendItem::GetUid() {
return _apply_info->_uid;
}

申请列表类ApplyFriendList的声明如下

1
2
3
4
5
6
7
8
9
10
11
12
13
class ApplyFriendList: public QListWidget
{
Q_OBJECT
public:
ApplyFriendList(QWidget *parent = nullptr);
protected:
bool eventFilter(QObject *watched, QEvent *event) override;

private slots:

signals:
void sig_show_search(bool);
};

具体实现

1
2
3
4
5
6
7
8
9
10
11
12
13
14
15
16
17
18
19
20
21
22
23
24
25
26
27
28
29
30
31
32
33
34
35
36
37
38
39
40
41
42
43
44
ApplyFriendList::ApplyFriendList(QWidget *parent)
{
Q_UNUSED(parent);
this->setHorizontalScrollBarPolicy(Qt::ScrollBarAlwaysOff);
this->setVerticalScrollBarPolicy(Qt::ScrollBarAlwaysOff);
// 安装事件过滤器
this->viewport()->installEventFilter(this);
}

bool ApplyFriendList::eventFilter(QObject *watched, QEvent *event)
{

// 检查事件是否是鼠标悬浮进入或离开
if (watched == this->viewport()) {
if (event->type() == QEvent::Enter) {
// 鼠标悬浮,显示滚动条
this->setVerticalScrollBarPolicy(Qt::ScrollBarAsNeeded);
} else if (event->type() == QEvent::Leave) {
// 鼠标离开,隐藏滚动条
this->setVerticalScrollBarPolicy(Qt::ScrollBarAlwaysOff);
}
}

if (watched == this->viewport()) {
if (event->type() == QEvent::MouseButtonPress) {
emit sig_show_search(false);
}
}

// 检查事件是否是鼠标滚轮事件
if (watched == this->viewport() && event->type() == QEvent::Wheel) {
QWheelEvent *wheelEvent = static_cast<QWheelEvent*>(event);
int numDegrees = wheelEvent->angleDelta().y() / 8;
int numSteps = numDegrees / 15; // 计算滚动步数

// 设置滚动幅度
this->verticalScrollBar()->setValue(this->verticalScrollBar()->value() - numSteps);

return true; // 停止事件传递
}

return QListWidget::eventFilter(watched, event);

}

然后在ChatDialog的stackedWidget中将friend_apply_page升级为ApplyFriendPage.

这样我们启动程序就能看到联系人列表和申请列表了。

下一步还需要写QSS美化以下

1
2
3
4
5
6
7
8
9
10
11
12
13
14
15
16
17
18
19
20
21
22
23
24
25
26
27
28
29
30
31
32
33
34
35
36
37
38
39
40
41
42
43
44
45
46
47
48
49
50
51
52
53
54
55
56
57
58
59
60
61
62
63
64
65
66
67
68
69
70
71
72
73
74
75
76
77
78
79
80
81
82
83
84
85
86
87
88
89
90
91
92
93
94
95
96
97
98
99
100
101
102
103
104
105
106
107
108
109
#con_user_list {
background-color: rgb(247,247,248);
border: none;
}

#con_user_list::item:selected {
background-color: #d3d7d4;
border: none;
outline: none;
}

#con_user_list::item:hover {
background-color: rgb(206,207,208);
border: none;
outline: none;
}

#con_user_list::focus {
border: none;
outline: none;
}

#GroupTipItem {
background-color: #eaeaea;
border: none;
}

#GroupTipItem QLabel{
color: #2e2f30;
font-size: 12px; /* 设置字体大小 */
font-family: "Microsoft YaHei"; /* 设置字体 */
border: none;
}

#new_friend_item {
border-bottom: 1px solid #eaeaea;
}

#LineItem {
background-color:rgb(247,247,247);
border: none;
}

#friend_apply_lb {
font-family: "Microsoft YaHei";
font-size: 18px;
font-weight: normal;
}

#friend_apply_wid {
background-color: #f1f2f3;
border-bottom: 1px solid #ede9e7;
}

#apply_friend_list {
background-color: #f1f2f3;
border-left: 1px solid #ede9e7;
border-top: none;
border-right: none;
border-bottom: none;
}

ApplyFriendItem {
background-color: #f1f2f3;
border-bottom: 2px solid #dbd9d9;
}

ApplyFriendItem #user_chat_lb{
color: #a2a2a2;
font-size: 14px; /* 设置字体大小 */
font-family: "Microsoft YaHei"; /* 设置字体 */
}

ApplyFriendItem #addBtn[state='normal'] {
background-color: #d3d7d4;
color: #2cb46e;
font-size: 16px; /* 设置字体大小 */
font-family: "Microsoft YaHei"; /* 设置字体 */
border-radius: 20px; /* 设置圆角 */
}

ApplyFriendItem #addBtn[state='hover'] {
background-color: #D3D3D3;
color: #2cb46e;
font-size: 16px; /* 设置字体大小 */
font-family: "Microsoft YaHei"; /* 设置字体 */
border-radius: 20px; /* 设置圆角 */
}

ApplyFriendItem #addBtn[state='press'] {
background-color: #BEBEBE;
color: #2cb46e;
font-size: 16px; /* 设置字体大小 */
font-family: "Microsoft YaHei"; /* 设置字体 */
border-radius: 20px; /* 设置圆角 */
}

#already_add_lb{
color:rgb(153,153,153);
font-size: 12px;
font-family: "Microsoft YaHei";
}

#user_name_lb{
color:rgb(0,0,0);
font-size: 16px;
font-weight: normal;
font-family: "Microsoft YaHei";
}

源码连接

https://gitee.com/secondtonone1/llfcchat

视频连接

https://www.bilibili.com/video/BV1SS42197Yo/?vd_source=8be9e83424c2ed2c9b2a3ed1d01385e9

C++ 全栈聊天项目(9) nodejs实现邮箱验证服务

Posted on 2024-08-31 | In C++聊天项目

邮箱验证服务联调

我们启动GateServer和VarifyServer

我们启动客户端,点击注册按钮进入注册界面,输入邮箱并且点击获取验证码

https://cdn.llfc.club/1710646053282.jpg

GateServer收到Client发送的请求后,会调用grpc 服务 访问VarifyServer,VarifyServer会随机生成验证码,并且调用邮箱模块发送邮件给指定邮箱。而且把发送的结果给GateServer,GateServer再将消息回传给客户端。

设置验证码过期

我们的验证码是要设置过期的,可以用redis管理过期的验证码自动删除,key为邮箱,value为验证码,过期时间为3min。

windows 安装redis服务

windows 版本下载地址:

https://github.com/tporadowski/redis/releases

下载速度慢可以去我的网盘

链接: https://pan.baidu.com/s/1v_foHZLvBeJQMePSGnp4Ow?pwd=yid3 提取码: yid3

下载完成后解压

https://cdn.llfc.club/1710649614458.jpg

修改redis.windows.conf, 并且修改端口

1
port 6380

找到requirepass foobared,下面添加requirepass

1
2
# requirepass foobared
requirepass 123456

启动redis 服务器 .\redis-server.exe .\redis.windows.conf

https://cdn.llfc.club/1710649945760.jpg

启动客户端 .\redis-cli.exe -p 6380, 输入密码登录成功

https://cdn.llfc.club/1710650063208.jpg

Linux 安装redis服务

Linux安装容器后,直接用容器启动redis

1
docker run -d --name llfc-redis -p 6380:6379 redis  --requirepass "123456"

为了方便测试能否链接以及以后查看数据,大家可以下载redis desktop manager

官网链接
redisdesktop.com/

下载速度慢可以去我的网盘

链接: https://pan.baidu.com/s/1v_foHZLvBeJQMePSGnp4Ow?pwd=yid3 提取码: yid3

下载后安装

设置好ip和密码,点击测试连接连通就成功了

https://cdn.llfc.club/1710657223612.jpg

widows编译和配置redis

Linux的redis库直接编译安装即可,windows反而麻烦一些,我们先阐述windows环境如何配置redis库, C++ 的redis库有很多种,最常用的有hredis和redis-plus-plus. 我们用redis-plus-plus. 这里介绍一种简单的安装方式—vcpkg

先安装vcpkg, 源码地址

https://github.com/microsoft/vcpkg/releases

下载源码后

windows版本redis下载地址

https://github.com/microsoftarchive/redis

因为是源码,所以进入msvc目录

https://cdn.llfc.club/1710725726234.jpg

用visual studio打开sln文件,弹出升级窗口, 我的是vs2019所以升级到142

https://cdn.llfc.club/1710725937787.jpg

只需要生成hiredis工程和Win32_Interop工程即可,分别点击生成,生成hiredis.lib和Win32_Interop.lib即可

右键两个工程的属性,代码生成里选择运行时库加载模式为MDD(Debug模式动态运行加载),为了兼容我们其他的库,其他的库也是MDD模式

https://cdn.llfc.club/1710726777016.jpg

编译Win32_Interop.lib时报错, system_error不是std成员,

https://cdn.llfc.club/1710727129177.jpg

解决办法为在Win32_variadicFunctor.cpp和Win32_FDAPI.cpp添加
#include <system_error>,再右键生成成功

https://cdn.llfc.club/1710729372811.jpg

将hiredis.lib和Win32_Interop.lib拷贝到D:\cppsoft\reids\lib

将redis-3.0\deps和redis-3.0\src文件夹拷贝到D:\cppsoft\reids

然后我们在visual studio中配置VC++ 包含目录

https://cdn.llfc.club/1710811823982.jpg

配置VC++库目录

https://cdn.llfc.club/1710811986563.jpg

然后在链接器->输入->附加依赖项中添加

https://cdn.llfc.club/1710812099185.jpg

代码测试

我们需要写代码测试库配置的情况

1
2
3
4
5
6
7
8
9
10
11
12
13
14
15
16
17
18
19
20
21
22
23
24
25
26
27
28
29
30
31
32
33
34
35
36
37
38
39
40
41
42
43
44
45
46
47
48
49
50
51
52
53
54
55
56
57
58
59
60
61
62
63
64
65
66
67
68
69
70
71
72
73
74
75
76
77
78
79
80
81
82
83
84
85
86
87
88
89
void TestRedis() {
//连接redis 需要启动才可以进行连接
//redis默认监听端口为6387 可以再配置文件中修改
redisContext* c = redisConnect("127.0.0.1", 6380);
if (c->err)
{
printf("Connect to redisServer faile:%s\n", c->errstr);
redisFree(c); return;
}
printf("Connect to redisServer Success\n");

std::string redis_password = "123456";
redisReply* r = (redisReply*)redisCommand(c, "AUTH %s", redis_password);
if (r->type == REDIS_REPLY_ERROR) {
printf("Redis认证失败!\n");
}else {
printf("Redis认证成功!\n");
}

//为redis设置key
const char* command1 = "set stest1 value1";

//执行redis命令行
r = (redisReply*)redisCommand(c, command1);

//如果返回NULL则说明执行失败
if (NULL == r)
{
printf("Execut command1 failure\n");
redisFree(c); return;
}

//如果执行失败则释放连接
if (!(r->type == REDIS_REPLY_STATUS && (strcmp(r->str, "OK") == 0 || strcmp(r->str, "ok") == 0)))
{
printf("Failed to execute command[%s]\n", command1);
freeReplyObject(r);
redisFree(c); return;
}

//执行成功 释放redisCommand执行后返回的redisReply所占用的内存
freeReplyObject(r);
printf("Succeed to execute command[%s]\n", command1);

const char* command2 = "strlen stest1";
r = (redisReply*)redisCommand(c, command2);

//如果返回类型不是整形 则释放连接
if (r->type != REDIS_REPLY_INTEGER)
{
printf("Failed to execute command[%s]\n", command2);
freeReplyObject(r);
redisFree(c); return;
}

//获取字符串长度
int length = r->integer;
freeReplyObject(r);
printf("The length of 'stest1' is %d.\n", length);
printf("Succeed to execute command[%s]\n", command2);

//获取redis键值对信息
const char* command3 = "get stest1";
r = (redisReply*)redisCommand(c, command3);
if (r->type != REDIS_REPLY_STRING)
{
printf("Failed to execute command[%s]\n", command3);
freeReplyObject(r);
redisFree(c); return;
}
printf("The value of 'stest1' is %s\n", r->str);
freeReplyObject(r);
printf("Succeed to execute command[%s]\n", command3);

const char* command4 = "get stest2";
r = (redisReply*)redisCommand(c, command4);
if (r->type != REDIS_REPLY_NIL)
{
printf("Failed to execute command[%s]\n", command4);
freeReplyObject(r);
redisFree(c); return;
}
freeReplyObject(r);
printf("Succeed to execute command[%s]\n", command4);

//释放连接资源
redisFree(c);

}

在主函数中调用TestRedis,编译项目时发现编译失败,提示

https://cdn.llfc.club/1710812579501.jpg

在同时使用Redis连接和socket连接时,遇到了Win32_Interop.lib和WS2_32.lib冲突的问题, 因为我们底层用了socket作为网络通信,也用redis,导致两个库冲突。

引起原因主要是Redis库Win32_FDAPI.cpp有重新定义了socket的一些方法引起来冲突

1
2
3
4
5
6
7
8
9
10
11
12
13
14
15
16
17
18
19
20
21
22
23
24
25
26
27
28
29
30
31
32
33
34
35
36
37
38
39
40
41
42
43
44
45
46
47
48
49
50
51
52
53
54
55
56
57
58
59
60
61
62
63
64
65
66
extern "C" {
// Unix compatible FD based routines
fdapi_accept accept = NULL;
fdapi_access access = NULL;
fdapi_bind bind = NULL;
fdapi_connect connect = NULL;
fdapi_fcntl fcntl = NULL;
fdapi_fstat fdapi_fstat64 = NULL;
fdapi_fsync fsync = NULL;
fdapi_ftruncate ftruncate = NULL;
fdapi_freeaddrinfo freeaddrinfo = NULL;
fdapi_getaddrinfo getaddrinfo = NULL;
fdapi_getpeername getpeername = NULL;
fdapi_getsockname getsockname = NULL;
fdapi_getsockopt getsockopt = NULL;
fdapi_htonl htonl = NULL;
fdapi_htons htons = NULL;
fdapi_isatty isatty = NULL;
fdapi_inet_ntop inet_ntop = NULL;
fdapi_inet_pton inet_pton = NULL;
fdapi_listen listen = NULL;
fdapi_lseek64 lseek64 = NULL;
fdapi_ntohl ntohl = NULL;
fdapi_ntohs ntohs = NULL;
fdapi_open open = NULL;
fdapi_pipe pipe = NULL;
fdapi_poll poll = NULL;
fdapi_read read = NULL;
fdapi_select select = NULL;
fdapi_setsockopt setsockopt = NULL;
fdapi_socket socket = NULL;
fdapi_write write = NULL;
}
auto f_WSACleanup = dllfunctor_stdcall<int>("ws2_32.dll", "WSACleanup");
auto f_WSAFDIsSet = dllfunctor_stdcall<int, SOCKET, fd_set*>("ws2_32.dll", "__WSAFDIsSet");
auto f_WSAGetLastError = dllfunctor_stdcall<int>("ws2_32.dll", "WSAGetLastError");
auto f_WSAGetOverlappedResult = dllfunctor_stdcall<BOOL, SOCKET, LPWSAOVERLAPPED, LPDWORD, BOOL, LPDWORD>("ws2_32.dll", "WSAGetOverlappedResult");
auto f_WSADuplicateSocket = dllfunctor_stdcall<int, SOCKET, DWORD, LPWSAPROTOCOL_INFO>("ws2_32.dll", "WSADuplicateSocketW");
auto f_WSAIoctl = dllfunctor_stdcall<int, SOCKET, DWORD, LPVOID, DWORD, LPVOID, DWORD, LPVOID, LPWSAOVERLAPPED, LPWSAOVERLAPPED_COMPLETION_ROUTINE>("ws2_32.dll", "WSAIoctl");
auto f_WSARecv = dllfunctor_stdcall<int, SOCKET, LPWSABUF, DWORD, LPDWORD, LPDWORD, LPWSAOVERLAPPED, LPWSAOVERLAPPED_COMPLETION_ROUTINE>("ws2_32.dll", "WSARecv");
auto f_WSASocket = dllfunctor_stdcall<SOCKET, int, int, int, LPWSAPROTOCOL_INFO, GROUP, DWORD>("ws2_32.dll", "WSASocketW");
auto f_WSASend = dllfunctor_stdcall<int, SOCKET, LPWSABUF, DWORD, LPDWORD, DWORD, LPWSAOVERLAPPED, LPWSAOVERLAPPED_COMPLETION_ROUTINE>("ws2_32.dll", "WSASend");
auto f_WSAStartup = dllfunctor_stdcall<int, WORD, LPWSADATA>("ws2_32.dll", "WSAStartup");
auto f_ioctlsocket = dllfunctor_stdcall<int, SOCKET, long, u_long*>("ws2_32.dll", "ioctlsocket");

auto f_accept = dllfunctor_stdcall<SOCKET, SOCKET, struct sockaddr*, int*>("ws2_32.dll", "accept");
auto f_bind = dllfunctor_stdcall<int, SOCKET, const struct sockaddr*, int>("ws2_32.dll", "bind");
auto f_closesocket = dllfunctor_stdcall<int, SOCKET>("ws2_32.dll", "closesocket");
auto f_connect = dllfunctor_stdcall<int, SOCKET, const struct sockaddr*, int>("ws2_32.dll", "connect");
auto f_freeaddrinfo = dllfunctor_stdcall<void, addrinfo*>("ws2_32.dll", "freeaddrinfo");
auto f_getaddrinfo = dllfunctor_stdcall<int, PCSTR, PCSTR, const ADDRINFOA*, ADDRINFOA**>("ws2_32.dll", "getaddrinfo");
auto f_gethostbyname = dllfunctor_stdcall<struct hostent*, const char*>("ws2_32.dll", "gethostbyname");
auto f_getpeername = dllfunctor_stdcall<int, SOCKET, struct sockaddr*, int*>("ws2_32.dll", "getpeername");
auto f_getsockname = dllfunctor_stdcall<int, SOCKET, struct sockaddr*, int*>("ws2_32.dll", "getsockname");
auto f_getsockopt = dllfunctor_stdcall<int, SOCKET, int, int, char*, int*>("ws2_32.dll", "getsockopt");
auto f_htonl = dllfunctor_stdcall<u_long, u_long>("ws2_32.dll", "htonl");
auto f_htons = dllfunctor_stdcall<u_short, u_short>("ws2_32.dll", "htons");
auto f_listen = dllfunctor_stdcall<int, SOCKET, int>("ws2_32.dll", "listen");
auto f_ntohs = dllfunctor_stdcall<u_short, u_short>("ws2_32.dll", "ntohs");
auto f_ntohl = dllfunctor_stdcall<u_long, u_long>("ws2_32.dll", "ntohl");
auto f_recv = dllfunctor_stdcall<int, SOCKET, char*, int, int>("ws2_32.dll", "recv");
auto f_select = dllfunctor_stdcall<int, int, fd_set*, fd_set*, fd_set*, const struct timeval*>("ws2_32.dll", "select");
auto f_send = dllfunctor_stdcall<int, SOCKET, const char*, int, int>("ws2_32.dll", "send");
auto f_setsockopt = dllfunctor_stdcall<int, SOCKET, int, int, const char*, int>("ws2_32.dll", "setsockopt");
auto f_socket = dllfunctor_stdcall<SOCKET, int, int, int>("ws2_32.dll", "socket");

去掉Redis库里面的socket的函数的重定义,把所有使用这些方法的地方都改为下面对应的函数

1
2
3
4
5
6
7
8
9
10
11
12
13
14
15
16
17
18
19
20
21
22
23
24
25
26
int FDAPI_accept(int rfd, struct sockaddr *addr, socklen_t *addrlen);
int FDAPI_access(const char *pathname, int mode);
int FDAPI_bind(int rfd, const struct sockaddr *addr, socklen_t addrlen);
int FDAPI_connect(int rfd, const struct sockaddr *addr, size_t addrlen);
int FDAPI_fcntl(int rfd, int cmd, int flags);
int FDAPI_fstat64(int rfd, struct __stat64 *buffer);
void FDAPI_freeaddrinfo(struct addrinfo *ai);
int FDAPI_fsync(int rfd);
int FDAPI_ftruncate(int rfd, PORT_LONGLONG length);
int FDAPI_getaddrinfo(const char *node, const char *service, const struct addrinfo *hints, struct addrinfo **res);
int FDAPI_getsockopt(int rfd, int level, int optname, void *optval, socklen_t *optlen);
int FDAPI_getpeername(int rfd, struct sockaddr *addr, socklen_t * addrlen);
int FDAPI_getsockname(int rfd, struct sockaddr* addrsock, int* addrlen);
u_long FDAPI_htonl(u_long hostlong);
u_short FDAPI_htons(u_short hostshort);
u_int FDAPI_ntohl(u_int netlong);
u_short FDAPI_ntohs(u_short netshort);
int FDAPI_open(const char * _Filename, int _OpenFlag, int flags);
int FDAPI_pipe(int *pfds);
int FDAPI_poll(struct pollfd *fds, nfds_t nfds, int timeout);
int FDAPI_listen(int rfd, int backlog);
int FDAPI_socket(int af, int type, int protocol);
int FDAPI_select(int nfds, fd_set *readfds, fd_set *writefds, fd_set *exceptfds, struct timeval *timeout);
int FDAPI_setsockopt(int rfd, int level, int optname, const void *optval, socklen_t optlen);
ssize_t FDAPI_read(int rfd, void *buf, size_t count);
ssize_t FDAPI_write(int rfd, const void *buf, size_t count);

考虑大家修改起来很麻烦,可以下载我的代码

https://gitee.com/secondtonone1/windows-redis

再次编译生成hredis和Win32_Interop的lib库,重新配置下,项目再次编译就通过了。

封装redis操作类

因为hredis提供的操作太别扭了,我们手动封装redis操作类,简化调用流程。

封装的类叫RedisMgr,它是个单例类并且可接受回调,按照我们之前的风格

1
2
3
4
5
6
7
8
9
10
11
12
13
14
15
16
17
18
19
20
21
22
23
24
25
26
class RedisMgr: public Singleton<RedisMgr>, 
public std::enable_shared_from_this<RedisMgr>
{
friend class Singleton<RedisMgr>;
public:
~RedisMgr();
bool Connect(const std::string& host, int port);
bool Get(const std::string &key, std::string& value);
bool Set(const std::string &key, const std::string &value);
bool Auth(const std::string &password);
bool LPush(const std::string &key, const std::string &value);
bool LPop(const std::string &key, std::string& value);
bool RPush(const std::string& key, const std::string& value);
bool RPop(const std::string& key, std::string& value);
bool HSet(const std::string &key, const std::string &hkey, const std::string &value);
bool HSet(const char* key, const char* hkey, const char* hvalue, size_t hvaluelen);
std::string HGet(const std::string &key, const std::string &hkey);
bool Del(const std::string &key);
bool ExistsKey(const std::string &key);
void Close();
private:
RedisMgr();

redisContext* _connect;
redisReply* _reply;
};

连接操作

1
2
3
4
5
6
7
8
9
10
bool RedisMgr::Connect(const std::string &host, int port)
{
this->_connect = redisConnect(host.c_str(), port);
if (this->_connect != NULL && this->_connect->err)
{
std::cout << "connect error " << this->_connect->errstr << std::endl;
return false;
}
return true;
}

获取key对应的value

1
2
3
4
5
6
7
8
9
10
11
12
13
14
15
16
17
18
19
20
21
bool RedisMgr::Get(const std::string &key, std::string& value)
{
this->_reply = (redisReply*)redisCommand(this->_connect, "GET %s", key.c_str());
if (this->_reply == NULL) {
std::cout << "[ GET " << key << " ] failed" << std::endl;
freeReplyObject(this->_reply);
return false;
}

if (this->_reply->type != REDIS_REPLY_STRING) {
std::cout << "[ GET " << key << " ] failed" << std::endl;
freeReplyObject(this->_reply);
return false;
}

value = this->_reply->str;
freeReplyObject(this->_reply);

std::cout << "Succeed to execute command [ GET " << key << " ]" << std::endl;
return true;
}

设置key和value

1
2
3
4
5
6
7
8
9
10
11
12
13
14
15
16
17
18
19
20
21
22
23
24
25
26
bool RedisMgr::Set(const std::string &key, const std::string &value){
//执行redis命令行

this->_reply = (redisReply*)redisCommand(this->_connect, "SET %s %s", key.c_str(), value.c_str());

//如果返回NULL则说明执行失败
if (NULL == this->_reply)
{
std::cout << "Execut command [ SET " << key << " "<< value << " ] failure ! " << std::endl;
freeReplyObject(this->_reply);
return false;
}

//如果执行失败则释放连接
if (!(this->_reply->type == REDIS_REPLY_STATUS && (strcmp(this->_reply->str, "OK") == 0 || strcmp(this->_reply->str, "ok") == 0)))
{
std::cout << "Execut command [ SET " << key << " " << value << " ] failure ! " << std::endl;
freeReplyObject(this->_reply);
return false;
}

//执行成功 释放redisCommand执行后返回的redisReply所占用的内存
freeReplyObject(this->_reply);
std::cout << "Execut command [ SET " << key << " " << value << " ] success ! " << std::endl;
return true;
}

密码认证

1
2
3
4
5
6
7
8
9
10
11
12
13
14
15
16
bool RedisMgr::Auth(const std::string &password)
{
this->_reply = (redisReply*)redisCommand(this->_connect, "AUTH %s", password.c_str());
if (this->_reply->type == REDIS_REPLY_ERROR) {
std::cout << "认证失败" << std::endl;
//执行成功 释放redisCommand执行后返回的redisReply所占用的内存
freeReplyObject(this->_reply);
return false;
}
else {
//执行成功 释放redisCommand执行后返回的redisReply所占用的内存
freeReplyObject(this->_reply);
std::cout << "认证成功" << std::endl;
return true;
}
}

左侧push

1
2
3
4
5
6
7
8
9
10
11
12
13
14
15
16
17
18
19
20
bool RedisMgr::LPush(const std::string &key, const std::string &value)
{
this->_reply = (redisReply*)redisCommand(this->_connect, "LPUSH %s %s", key.c_str(), value.c_str());
if (NULL == this->_reply)
{
std::cout << "Execut command [ LPUSH " << key << " " << value << " ] failure ! " << std::endl;
freeReplyObject(this->_reply);
return false;
}

if (this->_reply->type != REDIS_REPLY_INTEGER || this->_reply->integer <= 0) {
std::cout << "Execut command [ LPUSH " << key << " " << value << " ] failure ! " << std::endl;
freeReplyObject(this->_reply);
return false;
}

std::cout << "Execut command [ LPUSH " << key << " " << value << " ] success ! " << std::endl;
freeReplyObject(this->_reply);
return true;
}

左侧pop

1
2
3
4
5
6
7
8
9
10
11
12
bool RedisMgr::LPop(const std::string &key, std::string& value){
this->_reply = (redisReply*)redisCommand(this->_connect, "LPOP %s ", key.c_str());
if (_reply == nullptr || _reply->type == REDIS_REPLY_NIL) {
std::cout << "Execut command [ LPOP " << key<< " ] failure ! " << std::endl;
freeReplyObject(this->_reply);
return false;
}
value = _reply->str;
std::cout << "Execut command [ LPOP " << key << " ] success ! " << std::endl;
freeReplyObject(this->_reply);
return true;
}

右侧push

1
2
3
4
5
6
7
8
9
10
11
12
13
14
15
16
17
18
19
bool RedisMgr::RPush(const std::string& key, const std::string& value) {
this->_reply = (redisReply*)redisCommand(this->_connect, "RPUSH %s %s", key.c_str(), value.c_str());
if (NULL == this->_reply)
{
std::cout << "Execut command [ RPUSH " << key << " " << value << " ] failure ! " << std::endl;
freeReplyObject(this->_reply);
return false;
}

if (this->_reply->type != REDIS_REPLY_INTEGER || this->_reply->integer <= 0) {
std::cout << "Execut command [ RPUSH " << key << " " << value << " ] failure ! " << std::endl;
freeReplyObject(this->_reply);
return false;
}

std::cout << "Execut command [ RPUSH " << key << " " << value << " ] success ! " << std::endl;
freeReplyObject(this->_reply);
return true;
}

右侧pop

1
2
3
4
5
6
7
8
9
10
11
12
bool RedisMgr::RPop(const std::string& key, std::string& value) {
this->_reply = (redisReply*)redisCommand(this->_connect, "RPOP %s ", key.c_str());
if (_reply == nullptr || _reply->type == REDIS_REPLY_NIL) {
std::cout << "Execut command [ RPOP " << key << " ] failure ! " << std::endl;
freeReplyObject(this->_reply);
return false;
}
value = _reply->str;
std::cout << "Execut command [ RPOP " << key << " ] success ! " << std::endl;
freeReplyObject(this->_reply);
return true;
}

HSet操作

1
2
3
4
5
6
7
8
9
10
11
12
13
14
15
16
17
18
19
20
21
22
23
24
25
26
27
28
29
30
31
32
33
34
35
bool RedisMgr::HSet(const std::string &key, const std::string &hkey, const std::string &value) {
this->_reply = (redisReply*)redisCommand(this->_connect, "HSET %s %s %s", key.c_str(), hkey.c_str(), value.c_str());
if (_reply == nullptr || _reply->type != REDIS_REPLY_INTEGER ) {
std::cout << "Execut command [ HSet " << key << " " << hkey <<" " << value << " ] failure ! " << std::endl;
freeReplyObject(this->_reply);
return false;
}
std::cout << "Execut command [ HSet " << key << " " << hkey << " " << value << " ] success ! " << std::endl;
freeReplyObject(this->_reply);
return true;
}


bool RedisMgr::HSet(const char* key, const char* hkey, const char* hvalue, size_t hvaluelen)
{
const char* argv[4];
size_t argvlen[4];
argv[0] = "HSET";
argvlen[0] = 4;
argv[1] = key;
argvlen[1] = strlen(key);
argv[2] = hkey;
argvlen[2] = strlen(hkey);
argv[3] = hvalue;
argvlen[3] = hvaluelen;
this->_reply = (redisReply*)redisCommandArgv(this->_connect, 4, argv, argvlen);
if (_reply == nullptr || _reply->type != REDIS_REPLY_INTEGER) {
std::cout << "Execut command [ HSet " << key << " " << hkey << " " << hvalue << " ] failure ! " << std::endl;
freeReplyObject(this->_reply);
return false;
}
std::cout << "Execut command [ HSet " << key << " " << hkey << " " << hvalue << " ] success ! " << std::endl;
freeReplyObject(this->_reply);
return true;
}

HGet操作

1
2
3
4
5
6
7
8
9
10
11
12
13
14
15
16
17
18
19
20
21
22
std::string RedisMgr::HGet(const std::string &key, const std::string &hkey)
{
const char* argv[3];
size_t argvlen[3];
argv[0] = "HGET";
argvlen[0] = 4;
argv[1] = key.c_str();
argvlen[1] = key.length();
argv[2] = hkey.c_str();
argvlen[2] = hkey.length();
this->_reply = (redisReply*)redisCommandArgv(this->_connect, 3, argv, argvlen);
if (this->_reply == nullptr || this->_reply->type == REDIS_REPLY_NIL) {
freeReplyObject(this->_reply);
std::cout << "Execut command [ HGet " << key << " "<< hkey <<" ] failure ! " << std::endl;
return "";
}

std::string value = this->_reply->str;
freeReplyObject(this->_reply);
std::cout << "Execut command [ HGet " << key << " " << hkey << " ] success ! " << std::endl;
return value;
}

Del 操作

1
2
3
4
5
6
7
8
9
10
11
12
bool RedisMgr::Del(const std::string &key)
{
this->_reply = (redisReply*)redisCommand(this->_connect, "DEL %s", key.c_str());
if (this->_reply == nullptr || this->_reply->type != REDIS_REPLY_INTEGER) {
std::cout << "Execut command [ Del " << key << " ] failure ! " << std::endl;
freeReplyObject(this->_reply);
return false;
}
std::cout << "Execut command [ Del " << key << " ] success ! " << std::endl;
freeReplyObject(this->_reply);
return true;
}

判断键值是否存在

1
2
3
4
5
6
7
8
9
10
11
12
bool RedisMgr::ExistsKey(const std::string &key)
{
this->_reply = (redisReply*)redisCommand(this->_connect, "exists %s", key.c_str());
if (this->_reply == nullptr || this->_reply->type != REDIS_REPLY_INTEGER || this->_reply->integer == 0) {
std::cout << "Not Found [ Key " << key << " ] ! " << std::endl;
freeReplyObject(this->_reply);
return false;
}
std::cout << " Found [ Key " << key << " ] exists ! " << std::endl;
freeReplyObject(this->_reply);
return true;
}

关闭

1
2
3
4
void RedisMgr::Close()
{
redisFree(_connect);
}

测试用例

1
2
3
4
5
6
7
8
9
10
11
12
13
14
15
16
17
18
19
20
21
22
void TestRedisMgr() {
assert(RedisMgr::GetInstance()->Connect("127.0.0.1", 6380));
assert(RedisMgr::GetInstance()->Auth("123456"));
assert(RedisMgr::GetInstance()->Set("blogwebsite","llfc.club"));
std::string value="";
assert(RedisMgr::GetInstance()->Get("blogwebsite", value) );
assert(RedisMgr::GetInstance()->Get("nonekey", value) == false);
assert(RedisMgr::GetInstance()->HSet("bloginfo","blogwebsite", "llfc.club"));
assert(RedisMgr::GetInstance()->HGet("bloginfo","blogwebsite") != "");
assert(RedisMgr::GetInstance()->ExistsKey("bloginfo"));
assert(RedisMgr::GetInstance()->Del("bloginfo"));
assert(RedisMgr::GetInstance()->ExistsKey("bloginfo") == false);
assert(RedisMgr::GetInstance()->LPush("lpushkey1", "lpushvalue1"));
assert(RedisMgr::GetInstance()->LPush("lpushkey1", "lpushvalue2"));
assert(RedisMgr::GetInstance()->LPush("lpushkey1", "lpushvalue3"));
assert(RedisMgr::GetInstance()->RPop("lpushkey1", value));
assert(RedisMgr::GetInstance()->LPop("lpushkey1", value));
assert(RedisMgr::GetInstance()->LPop("lpushkey2", value)==false);
RedisMgr::GetInstance()->Close();
}

封装redis连接池

1
2
3
4
5
6
7
8
9
10
11
12
13
14
15
16
17
18
19
20
21
22
23
24
25
26
27
28
29
30
31
32
33
34
35
36
37
38
39
40
41
42
43
44
45
46
47
48
49
50
51
52
53
54
55
56
57
58
59
60
61
62
63
64
65
66
67
68
69
70
71
72
73
74
75
76
class RedisConPool {
public:
RedisConPool(size_t poolSize, const char* host, int port, const char* pwd)
: poolSize_(poolSize), host_(host), port_(port), b_stop_(false){
for (size_t i = 0; i < poolSize_; ++i) {
auto* context = redisConnect(host, port);
if (context == nullptr || context->err != 0) {
if (context != nullptr) {
redisFree(context);
}
continue;
}

auto reply = (redisReply*)redisCommand(context, "AUTH %s", pwd);
if (reply->type == REDIS_REPLY_ERROR) {
std::cout << "认证失败" << std::endl;
//执行成功 释放redisCommand执行后返回的redisReply所占用的内存
freeReplyObject(reply);
continue;
}

//执行成功 释放redisCommand执行后返回的redisReply所占用的内存
freeReplyObject(reply);
std::cout << "认证成功" << std::endl;
connections_.push(context);
}

}

~RedisConPool() {
std::lock_guard<std::mutex> lock(mutex_);
while (!connections_.empty()) {
connections_.pop();
}
}

redisContext* getConnection() {
std::unique_lock<std::mutex> lock(mutex_);
cond_.wait(lock, [this] {
if (b_stop_) {
return true;
}
return !connections_.empty();
});
//如果停止则直接返回空指针
if (b_stop_) {
return nullptr;
}
auto* context = connections_.front();
connections_.pop();
return context;
}

void returnConnection(redisContext* context) {
std::lock_guard<std::mutex> lock(mutex_);
if (b_stop_) {
return;
}
connections_.push(context);
cond_.notify_one();
}

void Close() {
b_stop_ = true;
cond_.notify_all();
}

private:
atomic<bool> b_stop_;
size_t poolSize_;
const char* host_;
int port_;
std::queue<redisContext*> connections_;
std::mutex mutex_;
std::condition_variable cond_;
};

RedisMgr构造函数中初始化pool连接池

1
2
3
4
5
6
7
RedisMgr::RedisMgr() {
auto& gCfgMgr = ConfigMgr::Inst();
auto host = gCfgMgr["Redis"]["Host"];
auto port = gCfgMgr["Redis"]["Port"];
auto pwd = gCfgMgr["Redis"]["Passwd"];
_con_pool.reset(new RedisConPool(5, host.c_str(), atoi(port.c_str()), pwd.c_str()));
}

在析构函数中回收资源

1
2
3
4
5
6
7
RedisMgr::~RedisMgr() {
Close();
}

void RedisMgr::Close() {
_con_pool->Close();
}

在使用的时候改为从Pool中获取链接

1
2
3
4
5
6
7
8
9
10
11
12
13
14
15
16
17
18
19
20
21
22
23
24
25
26
27
28
bool RedisMgr::Get(const std::string& key, std::string& value)
{
auto connect = _con_pool->getConnection();
if (connect == nullptr) {
return false;
}
auto reply = (redisReply*)redisCommand(connect, "GET %s", key.c_str());
if (reply == NULL) {
std::cout << "[ GET " << key << " ] failed" << std::endl;
freeReplyObject(reply);
_con_pool->returnConnection(connect);
return false;
}

if (reply->type != REDIS_REPLY_STRING) {
std::cout << "[ GET " << key << " ] failed" << std::endl;
freeReplyObject(reply);
_con_pool->returnConnection(connect);
return false;
}

value = reply->str;
freeReplyObject(reply);

std::cout << "Succeed to execute command [ GET " << key << " ]" << std::endl;
_con_pool->returnConnection(connect);
return true;
}

总结

本节告诉大家如何搭建redis服务,linux和windows环境的,并且编译了windows版本的hredis库,解决了链接错误,而且封装了RedisMgr管理类。
并实现了测试用例,大家感兴趣可以测试一下。下一节实现VarifyServer访问的redis功能。

聊天项目(28) 分布式服务通知好友申请

Posted on 2024-08-31 | In C++聊天项目

简介

本文介绍如何实现用户查找和好友申请功能。查找和申请好友会涉及前后端通信和rpc服务间调用。所以目前先从客户端入手,搜索用户后发送查找好友申请请求给服务器,服务器收到后判断是否存在,如果不存在则显示未找到,如果存在则显示查找到的结果

点击查询

客户端点击搜索列表的添加好友item后,先弹出一个模态对话框,上面有loading动作表示加载,直到服务器返回结果

1
2
3
4
5
6
7
8
9
10
11
12
13
14
15
16
17
18
19
20
21
22
23
24
25
26
27
28
29
30
31
32
33
34
35
36
37
38
39
40
41
42
43
44
45
46
47
void SearchList::slot_item_clicked(QListWidgetItem *item)
{
QWidget *widget = this->itemWidget(item); //获取自定义widget对象
if(!widget){
qDebug()<< "slot item clicked widget is nullptr";
return;
}

// 对自定义widget进行操作, 将item 转化为基类ListItemBase
ListItemBase *customItem = qobject_cast<ListItemBase*>(widget);
if(!customItem){
qDebug()<< "slot item clicked widget is nullptr";
return;
}

auto itemType = customItem->GetItemType();
if(itemType == ListItemType::INVALID_ITEM){
qDebug()<< "slot invalid item clicked ";
return;
}

if(itemType == ListItemType::ADD_USER_TIP_ITEM){
if(_send_pending){
return;
}

if (!_search_edit) {
return;
}

waitPending(true);
auto search_edit = dynamic_cast<CustomizeEdit*>(_search_edit);
auto uid_str = search_edit->text();
QJsonObject jsonObj;
jsonObj["uid"] = uid_str;

QJsonDocument doc(jsonObj);
QByteArray jsonData = doc.toJson(QJsonDocument::Compact);
emit TcpMgr::GetInstance()->sig_send_data(ReqId::ID_SEARCH_USER_REQ,
jsonData);
return;
}

//清楚弹出框
CloseFindDlg();

}

_send_pending为新增的成员变量,如果为true则表示发送阻塞.构造函数中将其设置为false。

waitPending函数为根据pending状态展示加载框

1
2
3
4
5
6
7
8
9
10
11
12
13
void SearchList::waitPending(bool pending)
{
if(pending){
_loadingDialog = new LoadingDlg(this);
_loadingDialog->setModal(true);
_loadingDialog->show();
_send_pending = pending;
}else{
_loadingDialog->hide();
_loadingDialog->deleteLater();
_send_pending = pending;
}
}

当我们发送数据后服务器会处理,返回ID_SEARCH_USER_RSP包,所以客户端要实现对ID_SEARCH_USER_RSP包的处理

1
2
3
4
5
6
7
8
9
10
11
12
13
14
15
16
17
18
19
20
21
22
23
24
25
26
27
28
29
30
31
32
33
34
35
_handlers.insert(ID_SEARCH_USER_RSP, [this](ReqId id, int len, QByteArray data){
Q_UNUSED(len);
qDebug()<< "handle id is "<< id << " data is " << data;
// 将QByteArray转换为QJsonDocument
QJsonDocument jsonDoc = QJsonDocument::fromJson(data);

// 检查转换是否成功
if(jsonDoc.isNull()){
qDebug() << "Failed to create QJsonDocument.";
return;
}

QJsonObject jsonObj = jsonDoc.object();

if(!jsonObj.contains("error")){
int err = ErrorCodes::ERR_JSON;
qDebug() << "Login Failed, err is Json Parse Err" << err ;
emit sig_login_failed(err);
return;
}

int err = jsonObj["error"].toInt();
if(err != ErrorCodes::SUCCESS){
qDebug() << "Login Failed, err is " << err ;
emit sig_login_failed(err);
return;
}

auto search_info = std::make_shared<SearchInfo>(jsonObj["uid"].toInt(),
jsonObj["name"].toString(), jsonObj["nick"].toString(),
jsonObj["desc"].toString(), jsonObj["sex"].toInt(), jsonObj["icon"].toString());

emit sig_user_search(search_info);
});

将搜索到的结果封装为search_info发送给SearchList类做展示, search_list中连接信号和槽

1
2
//连接搜索条目
connect(TcpMgr::GetInstance().get(), &TcpMgr::sig_user_search, this, &SearchList::slot_user_search);

slot_user_search槽函数弹出搜索结果

1
2
3
4
5
6
7
8
9
10
11
12
13
14
void SearchList::slot_user_search(std::shared_ptr<SearchInfo> si)
{
waitPending(false);
if(si == nullptr){
_find_dlg = std::make_shared<FindFailDlg>(this);
}else{
//此处分两种情况,一种是搜多到已经是自己的朋友了,一种是未添加好友
//查找是否已经是好友 todo...
_find_dlg = std::make_shared<FindSuccessDlg>(this);
std::dynamic_pointer_cast<FindSuccessDlg>(_find_dlg)->SetSearchInfo(si);
}

_find_dlg->show();
}

FindSuccessDlg是找到的结果展示,FindFailDlg是未找到结果展示。以下为FindSuccessDlg的ui布局

https://cdn.llfc.club/1722655438089.jpg

具体声明如下

1
2
3
4
5
6
7
8
9
10
11
12
13
14
15
16
17
18
class FindSuccessDlg : public QDialog
{
Q_OBJECT

public:
explicit FindSuccessDlg(QWidget *parent = nullptr);
~FindSuccessDlg();
void SetSearchInfo(std::shared_ptr<SearchInfo> si);

private:
Ui::FindSuccessDlg *ui;
std::shared_ptr<SearchInfo> _si;
QWidget * _parent;

private slots:
void on_add_friend_btn_clicked();
};

具体实现如下

1
2
3
4
5
6
7
8
9
10
11
12
13
14
15
16
17
18
19
20
21
22
23
24
25
26
27
28
29
30
31
32
33
34
35
36
37
38
39
40
41
42
43
FindSuccessDlg::FindSuccessDlg(QWidget *parent) :
QDialog(parent), _parent(parent),
ui(new Ui::FindSuccessDlg)
{
ui->setupUi(this);
// 设置对话框标题
setWindowTitle("添加");
// 隐藏对话框标题栏
setWindowFlags(windowFlags() | Qt::FramelessWindowHint);
// 获取当前应用程序的路径
QString app_path = QCoreApplication::applicationDirPath();
QString pix_path = QDir::toNativeSeparators(app_path +
QDir::separator() + "static"+QDir::separator()+"head_1.jpg");
QPixmap head_pix(pix_path);
head_pix = head_pix.scaled(ui->head_lb->size(),
Qt::KeepAspectRatio, Qt::SmoothTransformation);
ui->head_lb->setPixmap(head_pix);
ui->add_friend_btn->SetState("normal","hover","press");
this->setModal(true);
}

FindSuccessDlg::~FindSuccessDlg()
{
qDebug()<<"FindSuccessDlg destruct";
delete ui;
}

void FindSuccessDlg::SetSearchInfo(std::shared_ptr<SearchInfo> si)
{
ui->name_lb->setText(si->_name);
_si = si;
}

void FindSuccessDlg::on_add_friend_btn_clicked()
{
//todo... 添加好友界面弹出
this->hide();
//弹出加好友界面
auto applyFriend = new ApplyFriend(_parent);
applyFriend->SetSearchInfo(_si);
applyFriend->setModal(true);
applyFriend->show();
}

类似的FindFailDlg也是这种思路,大家自己实现即可。

服务器查询逻辑

chatserver服务器要根据客户端发送过来的用户id进行查找,chatserver服务器需先注册ID_SEARCH_USER_REQ和回调函数

1
2
3
4
5
6
7
void LogicSystem::RegisterCallBacks() {
_fun_callbacks[MSG_CHAT_LOGIN] = std::bind(&LogicSystem::LoginHandler, this,
placeholders::_1, placeholders::_2, placeholders::_3);

_fun_callbacks[ID_SEARCH_USER_REQ] = std::bind(&LogicSystem::SearchInfo, this,
placeholders::_1, placeholders::_2, placeholders::_3);
}

SearchInfo根据用户uid查询具体信息

1
2
3
4
5
6
7
8
9
10
11
12
13
14
15
16
17
18
19
20
21
22
void LogicSystem::SearchInfo(std::shared_ptr<CSession> session, const short& msg_id, const string& msg_data) {
Json::Reader reader;
Json::Value root;
reader.parse(msg_data, root);
auto uid_str = root["uid"].asString();
std::cout << "user SearchInfo uid is " << uid_str << endl;

Json::Value rtvalue;

Defer deder([this, &rtvalue, session]() {
std::string return_str = rtvalue.toStyledString();
session->Send(return_str, ID_SEARCH_USER_RSP);
});

bool b_digit = isPureDigit(uid_str);
if (b_digit) {
GetUserByUid(uid_str, rtvalue);
}
else {
GetUserByName(uid_str, rtvalue);
}
}

到此客户端和服务器搜索查询的联调功能已经解决了。

客户端添加好友

当Client1搜索到好友后,点击添加弹出信息界面,然后点击确定即可向对方Client2申请添加好友,这个请求要先发送到Client1所在的服务器Server1,服务器收到后判断Client2所在服务器,如果Client2在Server1则直接在Server1中查找Client2的连接信息,没找到说明Client2未在内存中,找到了则通过Session发送tcp给对方。如果Client2不在Server1而在Server2上,则需要让Server1通过grpc接口通知Server2,Server2收到后继续判断Client2是否在线,如果在线则通知。

如下图,Client1想和Client2以及Client3分别通信,需要先将请求发给Client1所在的Server1,再考虑是否rpc调用。

https://cdn.llfc.club/1722844689701.jpg

客户端在ApplySure槽函数中添加好友请求

1
2
3
4
5
6
7
8
9
10
11
12
13
14
15
16
17
18
19
20
21
22
23
24
25
26
27
28
void ApplyFriend::SlotApplySure()
{
qDebug() << "Slot Apply Sure called" ;
QJsonObject jsonObj;
auto uid = UserMgr::GetInstance()->GetUid();
jsonObj["uid"] = uid;
auto name = ui->name_ed->text();
if(name.isEmpty()){
name = ui->name_ed->placeholderText();
}

jsonObj["applyname"] = name;
auto bakname = ui->back_ed->text();
if(bakname.isEmpty()){
bakname = ui->back_ed->placeholderText();
}
jsonObj["bakname"] = bakname;
jsonObj["touid"] = _si->_uid;

QJsonDocument doc(jsonObj);
QByteArray jsonData = doc.toJson(QJsonDocument::Compact);

//发送tcp请求给chat server
emit TcpMgr::GetInstance()->sig_send_data(ReqId::ID_ADD_FRIEND_REQ, jsonData);

this->hide();
deleteLater();
}

另一个客户端会收到服务器通知添加好友的请求,所以在TcpMgr里监听这个请求

1
2
3
4
5
6
7
8
9
10
11
12
13
14
15
16
17
18
19
20
21
22
23
24
25
26
27
28
29
30
31
32
33
34
35
36
37
38
39
40
41
42
_handlers.insert(ID_NOTIFY_ADD_FRIEND_REQ, [this](ReqId id, int len, QByteArray data) {
Q_UNUSED(len);
qDebug() << "handle id is " << id << " data is " << data;
// 将QByteArray转换为QJsonDocument
QJsonDocument jsonDoc = QJsonDocument::fromJson(data);

// 检查转换是否成功
if (jsonDoc.isNull()) {
qDebug() << "Failed to create QJsonDocument.";
return;
}

QJsonObject jsonObj = jsonDoc.object();

if (!jsonObj.contains("error")) {
int err = ErrorCodes::ERR_JSON;
qDebug() << "Login Failed, err is Json Parse Err" << err;

emit sig_user_search(nullptr);
return;
}

int err = jsonObj["error"].toInt();
if (err != ErrorCodes::SUCCESS) {
qDebug() << "Login Failed, err is " << err;
emit sig_user_search(nullptr);
return;
}

int from_uid = jsonObj["applyuid"].toInt();
QString name = jsonObj["name"].toString();
QString desc = jsonObj["desc"].toString();
QString icon = jsonObj["icon"].toString();
QString nick = jsonObj["nick"].toString();
int sex = jsonObj["sex"].toInt();

auto apply_info = std::make_shared<AddFriendApply>(
from_uid, name, desc,
icon, nick, sex);

emit sig_friend_apply(apply_info);
});

服务调用

服务器要处理客户端发过来的添加好友的请求,并决定是否调用rpc通知其他服务。

先将AddFriendApply函数注册到回调map里

1
2
3
4
5
6
7
8
9
10
void LogicSystem::RegisterCallBacks() {
_fun_callbacks[MSG_CHAT_LOGIN] = std::bind(&LogicSystem::LoginHandler, this,
placeholders::_1, placeholders::_2, placeholders::_3);

_fun_callbacks[ID_SEARCH_USER_REQ] = std::bind(&LogicSystem::SearchInfo, this,
placeholders::_1, placeholders::_2, placeholders::_3);

_fun_callbacks[ID_ADD_FRIEND_REQ] = std::bind(&LogicSystem::AddFriendApply, this,
placeholders::_1, placeholders::_2, placeholders::_3);
}

接下来实现AddFriendApply

1
2
3
4
5
6
7
8
9
10
11
12
13
14
15
16
17
18
19
20
21
22
23
24
25
26
27
28
29
30
31
32
33
34
35
36
37
38
39
40
41
42
43
44
45
46
47
48
49
50
51
52
53
54
55
56
57
58
59
60
61
62
63
64
65
66
67
68
void LogicSystem::AddFriendApply(std::shared_ptr<CSession> session, const short& msg_id, const string& msg_data) {
Json::Reader reader;
Json::Value root;
reader.parse(msg_data, root);
auto uid = root["uid"].asInt();
auto applyname = root["applyname"].asString();
auto bakname = root["bakname"].asString();
auto touid = root["touid"].asInt();
std::cout << "user login uid is " << uid << " applyname is "
<< applyname << " bakname is " << bakname << " touid is " << touid << endl;

Json::Value rtvalue;
rtvalue["error"] = ErrorCodes::Success;
Defer defer([this, &rtvalue, session]() {
std::string return_str = rtvalue.toStyledString();
session->Send(return_str, ID_ADD_FRIEND_RSP);
});

//先更新数据库
MysqlMgr::GetInstance()->AddFriendApply(uid, touid);

//查询redis 查找touid对应的server ip
auto to_str = std::to_string(touid);
auto to_ip_key = USERIPPREFIX + to_str;
std::string to_ip_value = "";
bool b_ip = RedisMgr::GetInstance()->Get(to_ip_key, to_ip_value);
if (!b_ip) {
return;
}

auto& cfg = ConfigMgr::Inst();
auto self_name = cfg["SelfServer"]["Name"];

//直接通知对方有申请消息
if (to_ip_value == self_name) {
auto session = UserMgr::GetInstance()->GetSession(touid);
if (session) {
//在内存中则直接发送通知对方
Json::Value notify;
notify["error"] = ErrorCodes::Success;
notify["applyuid"] = uid;
notify["name"] = applyname;
notify["desc"] = "";
std::string return_str = notify.toStyledString();
session->Send(return_str, ID_NOTIFY_ADD_FRIEND_REQ);
}

return;
}

std::string base_key = USER_BASE_INFO + std::to_string(uid);
auto apply_info = std::make_shared<UserInfo>();
bool b_info = GetBaseInfo(base_key, uid, apply_info);

AddFriendReq add_req;
add_req.set_applyuid(uid);
add_req.set_touid(touid);
add_req.set_name(applyname);
add_req.set_desc("");
if (b_info) {
add_req.set_icon(apply_info->icon);
add_req.set_sex(apply_info->sex);
add_req.set_nick(apply_info->nick);
}

//发送通知
ChatGrpcClient::GetInstance()->NotifyAddFriend(to_ip_value, add_req);
}

上面的函数中先更新数据库将申请写入数据库中

1
2
3
bool MysqlMgr::AddFriendApply(const int& from, const int& to) {
return _dao.AddFriendApply(from, to);
}

内部调用dao层面的添加好友请求

1
2
3
4
5
6
7
8
9
10
11
12
13
14
15
16
17
18
19
20
21
22
23
24
25
26
27
28
29
30
31
32
bool MysqlDao::AddFriendApply(const int& from, const int& to) {
auto con = pool_->getConnection();
if (con == nullptr) {
return false;
}

Defer defer([this, &con]() {
pool_->returnConnection(std::move(con));
});

try {
std::unique_ptr<sql::PreparedStatement> pstmt(con->_con->prepareStatement("INSERT INTO friend_apply (from_uid, to_uid) values (?,?) "
"ON DUPLICATE KEY UPDATE from_uid = from_uid, to_uid = to_uid "));
pstmt->setInt(1, from);
pstmt->setInt(2, to);
//执行更新
int rowAffected = pstmt->executeUpdate();
if (rowAffected < 0) {
return false;
}

return true;
}
catch (sql::SQLException& e) {
std::cerr << "SQLException: " << e.what();
std::cerr << " (MySQL error code: " << e.getErrorCode();
std::cerr << ", SQLState: " << e.getSQLState() << " )" << std::endl;
return false;
}

return true;
}

添加完成后判断要通知的对端是否在本服务器,如果在本服务器则直接通过uid查找session,判断用户是否在线,如果在线则直接通知对端。

如果不在本服务器,则需要通过rpc通知对端服务器。rpc的客户端这么写即可。

1
2
3
4
5
6
7
8
9
10
11
12
13
14
15
16
17
18
19
20
21
22
23
24
25
26
27
28
AddFriendRsp ChatGrpcClient::NotifyAddFriend(std::string server_ip, const AddFriendReq& req) {
AddFriendRsp rsp;
Defer defer([&rsp, &req]() {
rsp.set_error(ErrorCodes::Success);
rsp.set_applyuid(req.applyuid());
rsp.set_touid(req.touid());
});

auto find_iter = _pools.find(server_ip);
if (find_iter == _pools.end()) {
return rsp;
}

auto& pool = find_iter->second;
ClientContext context;
auto stub = pool->getConnection();
Status status = stub->NotifyAddFriend(&context, req, &rsp);
Defer defercon([&stub, this, &pool]() {
pool->returnConnection(std::move(stub));
});

if (!status.ok()) {
rsp.set_error(ErrorCodes::RPCFailed);
return rsp;
}

return rsp;
}

同样rpc的服务端也要实现,我们先将rpc客户端和服务端的逻辑都在ChatServer1写好,然后复制给ChatServer2即可。 rpc的服务实现如下

1
2
3
4
5
6
7
8
9
10
11
12
13
14
15
16
17
18
19
20
21
22
23
24
25
26
27
28
29
30
31
32
33
Status ChatServiceImpl::NotifyAddFriend(ServerContext* context, const AddFriendReq* request,
AddFriendRsp* reply) {
//查找用户是否在本服务器
auto touid = request->touid();
auto session = UserMgr::GetInstance()->GetSession(touid);

Defer defer([request, reply]() {
reply->set_error(ErrorCodes::Success);
reply->set_applyuid(request->applyuid());
reply->set_touid(request->touid());
});

//用户不在内存中则直接返回
if (session == nullptr) {
return Status::OK;
}

//在内存中则直接发送通知对方
Json::Value rtvalue;
rtvalue["error"] = ErrorCodes::Success;
rtvalue["applyuid"] = request->applyuid();
rtvalue["name"] = request->name();
rtvalue["desc"] = request->desc();
rtvalue["icon"] = request->icon();
rtvalue["sex"] = request->sex();
rtvalue["nick"] = request->nick();

std::string return_str = rtvalue.toStyledString();

session->Send(return_str, ID_NOTIFY_ADD_FRIEND_REQ);

return Status::OK;
}

上面的代码也是判断要通知的客户端是否在内存中,如果在就通过session发送tcp请求。

将ChatServer1的代码拷贝给ChatServer2,重启两个服务,再启动两个客户端,一个客户端申请另一个客户端,通过查看客户端日志是能看到申请信息的。

申请显示

接下来被通知申请的客户端要做界面显示,我们实现被通知的客户端收到sig_friend_apply信号的处理逻辑。在ChatDialog的构造函数中连接信号和槽

1
2
//连接申请添加好友信号
connect(TcpMgr::GetInstance().get(), &TcpMgr::sig_friend_apply, this, &ChatDialog::slot_apply_friend);

实现申请好友的槽函数

1
2
3
4
5
6
7
8
9
10
11
12
13
14
15
void ChatDialog::slot_apply_friend(std::shared_ptr<AddFriendApply> apply)
{
qDebug() << "receive apply friend slot, applyuid is " << apply->_from_uid << " name is "
<< apply->_name << " desc is " << apply->_desc;

bool b_already = UserMgr::GetInstance()->AlreadyApply(apply->_from_uid);
if(b_already){
return;
}

UserMgr::GetInstance()->AddApplyList(std::make_shared<ApplyInfo>(apply));
ui->side_contact_lb->ShowRedPoint(true);
ui->con_user_list->ShowRedPoint(true);
ui->friend_apply_page->AddNewApply(apply);
}

这样就能显示新的申请消息和红点了。具体添加一个新的申请条目到申请好友页面的逻辑如下:

1
2
3
4
5
6
7
8
9
10
11
12
13
14
15
16
17
18
19
20
21
22
23
24
void ApplyFriendPage::AddNewApply(std::shared_ptr<AddFriendApply> apply)
{
//先模拟头像随机,以后头像资源增加资源服务器后再显示
int randomValue = QRandomGenerator::global()->bounded(100); // 生成0到99之间的随机整数
int head_i = randomValue % heads.size();
auto* apply_item = new ApplyFriendItem();
auto apply_info = std::make_shared<ApplyInfo>(apply->_from_uid,
apply->_name, apply->_desc,heads[head_i], apply->_name, 0, 0);
apply_item->SetInfo( apply_info);
QListWidgetItem* item = new QListWidgetItem;
//qDebug()<<"chat_user_wid sizeHint is " << chat_user_wid->sizeHint();
item->setSizeHint(apply_item->sizeHint());
item->setFlags(item->flags() & ~Qt::ItemIsEnabled & ~Qt::ItemIsSelectable);
ui->apply_friend_list->insertItem(0,item);
ui->apply_friend_list->setItemWidget(item, apply_item);
apply_item->ShowAddBtn(true);
//收到审核好友信号
connect(apply_item, &ApplyFriendItem::sig_auth_friend, [this](std::shared_ptr<ApplyInfo> apply_info) {
auto* authFriend = new AuthenFriend(this);
authFriend->setModal(true);
authFriend->SetApplyInfo(apply_info);
authFriend->show();
});
}

测试效果, 收到对方请求后如下图

https://cdn.llfc.club/1722851642815.jpg

登录加载申请

当用户登录后,服务器需要将申请列表同步给客户端, 写在登录逻辑里。

1
2
3
4
5
6
7
8
9
10
11
12
13
14
15
16
   //从数据库获取申请列表
std::vector<std::shared_ptr<ApplyInfo>> apply_list;
auto b_apply = GetFriendApplyInfo(uid,apply_list);
if (b_apply) {
for (auto & apply : apply_list) {
Json::Value obj;
obj["name"] = apply->_name;
obj["uid"] = apply->_uid;
obj["icon"] = apply->_icon;
obj["nick"] = apply->_nick;
obj["sex"] = apply->_sex;
obj["desc"] = apply->_desc;
obj["status"] = apply->_status;
rtvalue["apply_list"].append(obj);
}
}

获取好友申请信息函数

1
2
3
4
bool LogicSystem::GetFriendApplyInfo(int to_uid, std::vector<std::shared_ptr<ApplyInfo>> &list) {
//从mysql获取好友申请列表
return MysqlMgr::GetInstance()->GetApplyList(to_uid, list, 0, 10);
}

dao层面实现获取申请列表

1
2
3
4
5
6
7
8
9
10
11
12
13
14
15
16
17
18
19
20
21
22
23
24
25
26
27
28
29
30
31
32
33
34
35
36
37
38
39
40
41
42
43
44
45
46
47
bool MysqlMgr::GetApplyList(int touid, 
std::vector<std::shared_ptr<ApplyInfo>>& applyList, int begin, int limit) {

return _dao.GetApplyList(touid, applyList, begin, limit);
}

bool MysqlDao::GetApplyList(int touid, std::vector<std::shared_ptr<ApplyInfo>>& applyList, int begin, int limit) {
auto con = pool_->getConnection();
if (con == nullptr) {
return false;
}

Defer defer([this, &con]() {
pool_->returnConnection(std::move(con));
});


try {
// 准备SQL语句, 根据起始id和限制条数返回列表
std::unique_ptr<sql::PreparedStatement> pstmt(con->_con->prepareStatement("select apply.from_uid, apply.status, user.name, "
"user.nick, user.sex from friend_apply as apply join user on apply.from_uid = user.uid where apply.to_uid = ? "
"and apply.id > ? order by apply.id ASC LIMIT ? "));

pstmt->setInt(1, touid); // 将uid替换为你要查询的uid
pstmt->setInt(2, begin); // 起始id
pstmt->setInt(3, limit); //偏移量
// 执行查询
std::unique_ptr<sql::ResultSet> res(pstmt->executeQuery());
// 遍历结果集
while (res->next()) {
auto name = res->getString("name");
auto uid = res->getInt("from_uid");
auto status = res->getInt("status");
auto nick = res->getString("nick");
auto sex = res->getInt("sex");
auto apply_ptr = std::make_shared<ApplyInfo>(uid, name, "", "", nick, sex, status);
applyList.push_back(apply_ptr);
}
return true;
}
catch (sql::SQLException& e) {
std::cerr << "SQLException: " << e.what();
std::cerr << " (MySQL error code: " << e.getErrorCode();
std::cerr << ", SQLState: " << e.getSQLState() << " )" << std::endl;
return false;
}
}

好友认证界面

客户端需要实现好友认证界面,当点击同意对方好友申请后,弹出认证信息,点击确定后将认证同意的请求发给服务器,服务器再通知申请方,告知对方被申请人已经同意加好友了。认证界面和申请界面类似, 这个大家自己实现即可。

https://cdn.llfc.club/1722854446243.jpg

认证界面的函数和逻辑可以照抄申请好友的逻辑。

1
2
3
4
5
6
7
8
9
10
11
12
13
14
15
16
17
18
19
20
21
22
23
24
25
26
27
28
29
30
31
32
33
34
35
36
37
38
39
40
41
42
43
44
45
46
47
48
49
50
51
52
53
54
55
56
57
58
59
60
61
62
63
64
65
66
67
68
69
70
71
72
73
74
75
76
77
78
79
80
81
82
83
84
85
86
87
88
89
90
91
92
93
94
95
96
97
98
99
100
101
102
103
104
105
106
107
108
109
110
111
112
113
114
115
116
117
118
119
120
121
122
123
124
125
126
127
128
129
130
131
132
133
134
135
136
137
138
139
140
141
142
143
144
145
146
147
148
149
150
151
152
153
154
155
156
157
158
159
160
161
162
163
164
165
166
167
168
169
170
171
172
173
174
175
176
177
178
179
180
181
182
183
184
185
186
187
188
189
190
191
192
193
194
195
196
197
198
199
200
201
202
203
204
205
206
207
208
209
210
211
212
213
214
215
216
217
218
219
220
221
222
223
224
225
226
227
228
229
230
231
232
233
234
235
236
237
238
239
240
241
242
243
244
245
246
247
248
249
250
251
252
253
254
255
256
257
258
259
260
261
262
263
264
265
266
267
268
269
270
271
272
273
274
275
276
277
278
279
280
281
282
283
284
285
286
287
288
289
290
291
292
293
294
295
296
297
298
299
300
301
302
303
304
305
306
307
308
309
310
311
312
313
314
315
316
317
318
319
320
321
322
323
324
325
326
327
328
329
330
331
332
333
334
335
336
337
338
339
340
341
342
343
344
345
346
347
348
349
350
351
352
353
354
355
356
357
358
359
360
361
362
363
364
365
366
367
368
369
370
371
372
373
374
375
376
377
378
379
380
381
382
383
384
385
386
387
388
389
390
391
392
393
394
395
396
397
398
399
400
401
402
403
404
405
406
407
408
409
410
411
412
413
414
415
416
417
418
419
420
421
422
423
424
425
426
427
428
429
430
431
432
433
434
435
AuthenFriend::AuthenFriend(QWidget *parent) :
QDialog(parent),
ui(new Ui::AuthenFriend),_label_point(2,6)
{
ui->setupUi(this);
// 隐藏对话框标题栏
setWindowFlags(windowFlags() | Qt::FramelessWindowHint);
this->setObjectName("AuthenFriend");
this->setModal(true);
ui->lb_ed->setPlaceholderText("搜索、添加标签");
ui->back_ed->setPlaceholderText("燃烧的胸毛");

ui->lb_ed->SetMaxLength(21);
ui->lb_ed->move(2, 2);
ui->lb_ed->setFixedHeight(20);
ui->lb_ed->setMaxLength(10);
ui->input_tip_wid->hide();

_tip_cur_point = QPoint(5, 5);

_tip_data = { "同学","家人","菜鸟教程","C++ Primer","Rust 程序设计",
"父与子学Python","nodejs开发指南","go 语言开发指南",
"游戏伙伴","金融投资","微信读书","拼多多拼友" };

connect(ui->more_lb, &ClickedOnceLabel::clicked, this, &AuthenFriend::ShowMoreLabel);
InitTipLbs();
//链接输入标签回车事件
connect(ui->lb_ed, &CustomizeEdit::returnPressed, this, &AuthenFriend::SlotLabelEnter);
connect(ui->lb_ed, &CustomizeEdit::textChanged, this, &AuthenFriend::SlotLabelTextChange);
connect(ui->lb_ed, &CustomizeEdit::editingFinished, this, &AuthenFriend::SlotLabelEditFinished);
connect(ui->tip_lb, &ClickedOnceLabel::clicked, this, &AuthenFriend::SlotAddFirendLabelByClickTip);

ui->scrollArea->horizontalScrollBar()->setHidden(true);
ui->scrollArea->verticalScrollBar()->setHidden(true);
ui->scrollArea->installEventFilter(this);
ui->sure_btn->SetState("normal","hover","press");
ui->cancel_btn->SetState("normal","hover","press");
//连接确认和取消按钮的槽函数
connect(ui->cancel_btn, &QPushButton::clicked, this, &AuthenFriend::SlotApplyCancel);
connect(ui->sure_btn, &QPushButton::clicked, this, &AuthenFriend::SlotApplySure);
}

AuthenFriend::~AuthenFriend()
{
qDebug()<< "AuthenFriend destruct";
delete ui;
}

void AuthenFriend::InitTipLbs()
{
int lines = 1;
for(int i = 0; i < _tip_data.size(); i++){

auto* lb = new ClickedLabel(ui->lb_list);
lb->SetState("normal", "hover", "pressed", "selected_normal",
"selected_hover", "selected_pressed");
lb->setObjectName("tipslb");
lb->setText(_tip_data[i]);
connect(lb, &ClickedLabel::clicked, this, &AuthenFriend::SlotChangeFriendLabelByTip);

QFontMetrics fontMetrics(lb->font()); // 获取QLabel控件的字体信息
int textWidth = fontMetrics.width(lb->text()); // 获取文本的宽度
int textHeight = fontMetrics.height(); // 获取文本的高度

if (_tip_cur_point.x() + textWidth + tip_offset > ui->lb_list->width()) {
lines++;
if (lines > 2) {
delete lb;
return;
}

_tip_cur_point.setX(tip_offset);
_tip_cur_point.setY(_tip_cur_point.y() + textHeight + 15);

}

auto next_point = _tip_cur_point;

AddTipLbs(lb, _tip_cur_point,next_point, textWidth, textHeight);

_tip_cur_point = next_point;
}

}

void AuthenFriend::AddTipLbs(ClickedLabel* lb, QPoint cur_point, QPoint& next_point, int text_width, int text_height)
{
lb->move(cur_point);
lb->show();
_add_labels.insert(lb->text(), lb);
_add_label_keys.push_back(lb->text());
next_point.setX(lb->pos().x() + text_width + 15);
next_point.setY(lb->pos().y());
}

bool AuthenFriend::eventFilter(QObject *obj, QEvent *event)
{
if (obj == ui->scrollArea && event->type() == QEvent::Enter)
{
ui->scrollArea->verticalScrollBar()->setHidden(false);
}
else if (obj == ui->scrollArea && event->type() == QEvent::Leave)
{
ui->scrollArea->verticalScrollBar()->setHidden(true);
}
return QObject::eventFilter(obj, event);
}

void AuthenFriend::SetApplyInfo(std::shared_ptr<ApplyInfo> apply_info)
{
_apply_info = apply_info;
ui->back_ed->setPlaceholderText(apply_info->_name);
}

void AuthenFriend::ShowMoreLabel()
{
qDebug()<< "receive more label clicked";
ui->more_lb_wid->hide();

ui->lb_list->setFixedWidth(325);
_tip_cur_point = QPoint(5, 5);
auto next_point = _tip_cur_point;
int textWidth;
int textHeight;
//重拍现有的label
for(auto & added_key : _add_label_keys){
auto added_lb = _add_labels[added_key];

QFontMetrics fontMetrics(added_lb->font()); // 获取QLabel控件的字体信息
textWidth = fontMetrics.width(added_lb->text()); // 获取文本的宽度
textHeight = fontMetrics.height(); // 获取文本的高度

if(_tip_cur_point.x() +textWidth + tip_offset > ui->lb_list->width()){
_tip_cur_point.setX(tip_offset);
_tip_cur_point.setY(_tip_cur_point.y()+textHeight+15);
}
added_lb->move(_tip_cur_point);

next_point.setX(added_lb->pos().x() + textWidth + 15);
next_point.setY(_tip_cur_point.y());

_tip_cur_point = next_point;

}

//添加未添加的
for(int i = 0; i < _tip_data.size(); i++){
auto iter = _add_labels.find(_tip_data[i]);
if(iter != _add_labels.end()){
continue;
}

auto* lb = new ClickedLabel(ui->lb_list);
lb->SetState("normal", "hover", "pressed", "selected_normal",
"selected_hover", "selected_pressed");
lb->setObjectName("tipslb");
lb->setText(_tip_data[i]);
connect(lb, &ClickedLabel::clicked, this, &AuthenFriend::SlotChangeFriendLabelByTip);

QFontMetrics fontMetrics(lb->font()); // 获取QLabel控件的字体信息
int textWidth = fontMetrics.width(lb->text()); // 获取文本的宽度
int textHeight = fontMetrics.height(); // 获取文本的高度

if (_tip_cur_point.x() + textWidth + tip_offset > ui->lb_list->width()) {

_tip_cur_point.setX(tip_offset);
_tip_cur_point.setY(_tip_cur_point.y() + textHeight + 15);

}

next_point = _tip_cur_point;

AddTipLbs(lb, _tip_cur_point, next_point, textWidth, textHeight);

_tip_cur_point = next_point;

}

int diff_height = next_point.y() + textHeight + tip_offset - ui->lb_list->height();
ui->lb_list->setFixedHeight(next_point.y() + textHeight + tip_offset);

//qDebug()<<"after resize ui->lb_list size is " << ui->lb_list->size();
ui->scrollcontent->setFixedHeight(ui->scrollcontent->height()+diff_height);
}

void AuthenFriend::resetLabels()
{
auto max_width = ui->gridWidget->width();
auto label_height = 0;
for(auto iter = _friend_labels.begin(); iter != _friend_labels.end(); iter++){
//todo... 添加宽度统计
if( _label_point.x() + iter.value()->width() > max_width) {
_label_point.setY(_label_point.y()+iter.value()->height()+6);
_label_point.setX(2);
}

iter.value()->move(_label_point);
iter.value()->show();

_label_point.setX(_label_point.x()+iter.value()->width()+2);
_label_point.setY(_label_point.y());
label_height = iter.value()->height();
}

if(_friend_labels.isEmpty()){
ui->lb_ed->move(_label_point);
return;
}

if(_label_point.x() + MIN_APPLY_LABEL_ED_LEN > ui->gridWidget->width()){
ui->lb_ed->move(2,_label_point.y()+label_height+6);
}else{
ui->lb_ed->move(_label_point);
}
}

void AuthenFriend::addLabel(QString name)
{
if (_friend_labels.find(name) != _friend_labels.end()) {
return;
}

auto tmplabel = new FriendLabel(ui->gridWidget);
tmplabel->SetText(name);
tmplabel->setObjectName("FriendLabel");

auto max_width = ui->gridWidget->width();
//todo... 添加宽度统计
if (_label_point.x() + tmplabel->width() > max_width) {
_label_point.setY(_label_point.y() + tmplabel->height() + 6);
_label_point.setX(2);
}
else {

}


tmplabel->move(_label_point);
tmplabel->show();
_friend_labels[tmplabel->Text()] = tmplabel;
_friend_label_keys.push_back(tmplabel->Text());

connect(tmplabel, &FriendLabel::sig_close, this, &AuthenFriend::SlotRemoveFriendLabel);

_label_point.setX(_label_point.x() + tmplabel->width() + 2);

if (_label_point.x() + MIN_APPLY_LABEL_ED_LEN > ui->gridWidget->width()) {
ui->lb_ed->move(2, _label_point.y() + tmplabel->height() + 2);
}
else {
ui->lb_ed->move(_label_point);
}

ui->lb_ed->clear();

if (ui->gridWidget->height() < _label_point.y() + tmplabel->height() + 2) {
ui->gridWidget->setFixedHeight(_label_point.y() + tmplabel->height() * 2 + 2);
}
}

void AuthenFriend::SlotLabelEnter()
{
if(ui->lb_ed->text().isEmpty()){
return;
}

addLabel(ui->lb_ed->text());

ui->input_tip_wid->hide();
}

void AuthenFriend::SlotRemoveFriendLabel(QString name)
{
qDebug() << "receive close signal";

_label_point.setX(2);
_label_point.setY(6);

auto find_iter = _friend_labels.find(name);

if(find_iter == _friend_labels.end()){
return;
}

auto find_key = _friend_label_keys.end();
for(auto iter = _friend_label_keys.begin(); iter != _friend_label_keys.end();
iter++){
if(*iter == name){
find_key = iter;
break;
}
}

if(find_key != _friend_label_keys.end()){
_friend_label_keys.erase(find_key);
}


delete find_iter.value();

_friend_labels.erase(find_iter);

resetLabels();

auto find_add = _add_labels.find(name);
if(find_add == _add_labels.end()){
return;
}

find_add.value()->ResetNormalState();
}

//点击标已有签添加或删除新联系人的标签
void AuthenFriend::SlotChangeFriendLabelByTip(QString lbtext, ClickLbState state)
{
auto find_iter = _add_labels.find(lbtext);
if(find_iter == _add_labels.end()){
return;
}

if(state == ClickLbState::Selected){
//编写添加逻辑
addLabel(lbtext);
return;
}

if(state == ClickLbState::Normal){
//编写删除逻辑
SlotRemoveFriendLabel(lbtext);
return;
}

}

void AuthenFriend::SlotLabelTextChange(const QString& text)
{
if (text.isEmpty()) {
ui->tip_lb->setText("");
ui->input_tip_wid->hide();
return;
}

auto iter = std::find(_tip_data.begin(), _tip_data.end(), text);
if (iter == _tip_data.end()) {
auto new_text = add_prefix + text;
ui->tip_lb->setText(new_text);
ui->input_tip_wid->show();
return;
}
ui->tip_lb->setText(text);
ui->input_tip_wid->show();
}

void AuthenFriend::SlotLabelEditFinished()
{
ui->input_tip_wid->hide();
}

void AuthenFriend::SlotAddFirendLabelByClickTip(QString text)
{
int index = text.indexOf(add_prefix);
if (index != -1) {
text = text.mid(index + add_prefix.length());
}
addLabel(text);
//标签展示栏也增加一个标签, 并设置绿色选中
if (index != -1) {
_tip_data.push_back(text);
}

auto* lb = new ClickedLabel(ui->lb_list);
lb->SetState("normal", "hover", "pressed", "selected_normal",
"selected_hover", "selected_pressed");
lb->setObjectName("tipslb");
lb->setText(text);
connect(lb, &ClickedLabel::clicked, this, &AuthenFriend::SlotChangeFriendLabelByTip);
qDebug() << "ui->lb_list->width() is " << ui->lb_list->width();
qDebug() << "_tip_cur_point.x() is " << _tip_cur_point.x();

QFontMetrics fontMetrics(lb->font()); // 获取QLabel控件的字体信息
int textWidth = fontMetrics.width(lb->text()); // 获取文本的宽度
int textHeight = fontMetrics.height(); // 获取文本的高度
qDebug() << "textWidth is " << textWidth;

if (_tip_cur_point.x() + textWidth+ tip_offset+3 > ui->lb_list->width()) {

_tip_cur_point.setX(5);
_tip_cur_point.setY(_tip_cur_point.y() + textHeight + 15);

}

auto next_point = _tip_cur_point;

AddTipLbs(lb, _tip_cur_point, next_point, textWidth,textHeight);
_tip_cur_point = next_point;

int diff_height = next_point.y() + textHeight + tip_offset - ui->lb_list->height();
ui->lb_list->setFixedHeight(next_point.y() + textHeight + tip_offset);

lb->SetCurState(ClickLbState::Selected);

ui->scrollcontent->setFixedHeight(ui->scrollcontent->height()+ diff_height );
}

void AuthenFriend::SlotApplySure()
{
qDebug() << "Slot Apply Sure ";
//添加发送逻辑
QJsonObject jsonObj;
auto uid = UserMgr::GetInstance()->GetUid();
jsonObj["fromuid"] = uid;
jsonObj["touid"] = _apply_info->_uid;
QString back_name = "";
if(ui->back_ed->text().isEmpty()){
back_name = ui->back_ed->placeholderText();
}else{
back_name = ui->back_ed->text();
}
jsonObj["back"] = back_name;

QJsonDocument doc(jsonObj);
QByteArray jsonData = doc.toJson(QJsonDocument::Compact);

//发送tcp请求给chat server
emit TcpMgr::GetInstance()->sig_send_data(ReqId::ID_AUTH_FRIEND_REQ, jsonData);

this->hide();
deleteLater();
}

void AuthenFriend::SlotApplyCancel()
{
this->hide();
deleteLater();
}

源码连接

https://gitee.com/secondtonone1/llfcchat

视频连接

https://www.bilibili.com/video/BV1Ex4y1s7cq/

聊天项目(29) 好友认证和聊天通信

Posted on 2024-08-31 | In C++聊天项目

好友认证

服务器响应

服务器接受客户端发送过来的好友认证请求

1
2
3
4
5
6
7
8
9
10
11
12
13
14
15
16
17
18
19
20
21
22
23
24
25
26
27
28
29
30
31
32
33
34
35
36
37
38
39
40
41
42
43
44
45
46
47
48
49
50
51
52
53
54
55
56
57
58
59
60
61
62
63
64
65
66
67
68
69
70
71
72
73
74
75
76
77
78
79
80
81
82
83
84
85
86
87
88
89
90
void LogicSystem::AuthFriendApply(std::shared_ptr<CSession> session, const short& msg_id, const string& msg_data) {

Json::Reader reader;
Json::Value root;
reader.parse(msg_data, root);

auto uid = root["fromuid"].asInt();
auto touid = root["touid"].asInt();
auto back_name = root["back"].asString();
std::cout << "from " << uid << " auth friend to " << touid << std::endl;

Json::Value rtvalue;
rtvalue["error"] = ErrorCodes::Success;
auto user_info = std::make_shared<UserInfo>();

std::string base_key = USER_BASE_INFO + std::to_string(touid);
bool b_info = GetBaseInfo(base_key, touid, user_info);
if (b_info) {
rtvalue["name"] = user_info->name;
rtvalue["nick"] = user_info->nick;
rtvalue["icon"] = user_info->icon;
rtvalue["sex"] = user_info->sex;
rtvalue["uid"] = touid;
}
else {
rtvalue["error"] = ErrorCodes::UidInvalid;
}


Defer defer([this, &rtvalue, session]() {
std::string return_str = rtvalue.toStyledString();
session->Send(return_str, ID_AUTH_FRIEND_RSP);
});

//先更新数据库
MysqlMgr::GetInstance()->AuthFriendApply(uid, touid);

//更新数据库添加好友
MysqlMgr::GetInstance()->AddFriend(uid, touid,back_name);

//查询redis 查找touid对应的server ip
auto to_str = std::to_string(touid);
auto to_ip_key = USERIPPREFIX + to_str;
std::string to_ip_value = "";
bool b_ip = RedisMgr::GetInstance()->Get(to_ip_key, to_ip_value);
if (!b_ip) {
return;
}

auto& cfg = ConfigMgr::Inst();
auto self_name = cfg["SelfServer"]["Name"];
//直接通知对方有认证通过消息
if (to_ip_value == self_name) {
auto session = UserMgr::GetInstance()->GetSession(touid);
if (session) {
//在内存中则直接发送通知对方
Json::Value notify;
notify["error"] = ErrorCodes::Success;
notify["fromuid"] = uid;
notify["touid"] = touid;
std::string base_key = USER_BASE_INFO + std::to_string(uid);
auto user_info = std::make_shared<UserInfo>();
bool b_info = GetBaseInfo(base_key, uid, user_info);
if (b_info) {
notify["name"] = user_info->name;
notify["nick"] = user_info->nick;
notify["icon"] = user_info->icon;
notify["sex"] = user_info->sex;
}
else {
notify["error"] = ErrorCodes::UidInvalid;
}


std::string return_str = notify.toStyledString();
session->Send(return_str, ID_NOTIFY_AUTH_FRIEND_REQ);
}

return ;
}


AuthFriendReq auth_req;
auth_req.set_fromuid(uid);
auth_req.set_touid(touid);

//发送通知
ChatGrpcClient::GetInstance()->NotifyAuthFriend(to_ip_value, auth_req);
}

将请求注册到map里,在LogicSystem::RegisterCallBacks中添加

1
2
_fun_callbacks[ID_AUTH_FRIEND_REQ] = std::bind(&LogicSystem::AuthFriendApply, this,
placeholders::_1, placeholders::_2, placeholders::_3);

因为上面的逻辑调用了grpc发送通知,所以实现grpc发送认证通知的逻辑

1
2
3
4
5
6
7
8
9
10
11
12
13
14
15
16
17
18
19
20
21
22
23
24
25
26
27
28
29
AuthFriendRsp ChatGrpcClient::NotifyAuthFriend(std::string server_ip, const AuthFriendReq& req) {
AuthFriendRsp rsp;
rsp.set_error(ErrorCodes::Success);

Defer defer([&rsp, &req]() {
rsp.set_fromuid(req.fromuid());
rsp.set_touid(req.touid());
});

auto find_iter = _pools.find(server_ip);
if (find_iter == _pools.end()) {
return rsp;
}

auto& pool = find_iter->second;
ClientContext context;
auto stub = pool->getConnection();
Status status = stub->NotifyAuthFriend(&context, req, &rsp);
Defer defercon([&stub, this, &pool]() {
pool->returnConnection(std::move(stub));
});

if (!status.ok()) {
rsp.set_error(ErrorCodes::RPCFailed);
return rsp;
}

return rsp;
}

这里注意,stub之所以能发送通知,是因为proto里定义了认证通知等服务,大家记得更新proto和我的一样,这事完整的proto

1
2
3
4
5
6
7
8
9
10
11
12
13
14
15
16
17
18
19
20
21
22
23
24
25
26
27
28
29
30
31
32
33
34
35
36
37
38
39
40
41
42
43
44
45
46
47
48
49
50
51
52
53
54
55
56
57
58
59
60
61
62
63
64
65
66
67
68
69
70
71
72
73
74
75
76
77
78
79
80
81
82
83
84
85
86
87
88
89
90
91
92
93
94
95
96
97
98
99
100
101
102
103
104
105
106
107
108
109
110
111
112
113
114
115
116
117
118
119
120
121
122
syntax = "proto3";

package message;

service VarifyService {
rpc GetVarifyCode (GetVarifyReq) returns (GetVarifyRsp) {}
}

message GetVarifyReq {
string email = 1;
}

message GetVarifyRsp {
int32 error = 1;
string email = 2;
string code = 3;
}

message GetChatServerReq {
int32 uid = 1;
}

message GetChatServerRsp {
int32 error = 1;
string host = 2;
string port = 3;
string token = 4;
}

message LoginReq{
int32 uid = 1;
string token= 2;
}

message LoginRsp {
int32 error = 1;
int32 uid = 2;
string token = 3;
}

service StatusService {
rpc GetChatServer (GetChatServerReq) returns (GetChatServerRsp) {}
rpc Login(LoginReq) returns(LoginRsp);
}

message AddFriendReq {
int32 applyuid = 1;
string name = 2;
string desc = 3;
string icon = 4;
string nick = 5;
int32 sex = 6;
int32 touid = 7;
}

message AddFriendRsp {
int32 error = 1;
int32 applyuid = 2;
int32 touid = 3;
}

message RplyFriendReq {
int32 rplyuid = 1;
bool agree = 2;
int32 touid = 3;
}

message RplyFriendRsp {
int32 error = 1;
int32 rplyuid = 2;
int32 touid = 3;
}

message SendChatMsgReq{
int32 fromuid = 1;
int32 touid = 2;
string message = 3;
}

message SendChatMsgRsp{
int32 error = 1;
int32 fromuid = 2;
int32 touid = 3;
}

message AuthFriendReq{
int32 fromuid = 1;
int32 touid = 2;
}

message AuthFriendRsp{
int32 error = 1;
int32 fromuid = 2;
int32 touid = 3;
}

message TextChatMsgReq {
int32 fromuid = 1;
int32 touid = 2;
repeated TextChatData textmsgs = 3;
}

message TextChatData{
string msgid = 1;
string msgcontent = 2;
}

message TextChatMsgRsp {
int32 error = 1;
int32 fromuid = 2;
int32 touid = 3;
repeated TextChatData textmsgs = 4;
}

service ChatService {
rpc NotifyAddFriend(AddFriendReq) returns (AddFriendRsp) {}
rpc RplyAddFriend(RplyFriendReq) returns (RplyFriendRsp) {}
rpc SendChatMsg(SendChatMsgReq) returns (SendChatMsgRsp) {}
rpc NotifyAuthFriend(AuthFriendReq) returns (AuthFriendRsp) {}
rpc NotifyTextChatMsg(TextChatMsgReq) returns (TextChatMsgRsp){}
}

为了方便生成grpcpb文件,我写了一个start.bat批处理文件

1
2
3
4
5
6
7
8
9
10
11
12
@echo off
set PROTOC_PATH=D:\cppsoft\grpc\visualpro\third_party\protobuf\Debug\protoc.exe
set GRPC_PLUGIN_PATH=D:\cppsoft\grpc\visualpro\Debug\grpc_cpp_plugin.exe
set PROTO_FILE=message.proto

echo Generating gRPC code...
%PROTOC_PATH% -I="." --grpc_out="." --plugin=protoc-gen-grpc="%GRPC_PLUGIN_PATH%" "%PROTO_FILE%"

echo Generating C++ code...
%PROTOC_PATH% --cpp_out=. "%PROTO_FILE%"

echo Done.

执行这个批处理文件就能生成最新的pb文件了。

接下来实现grpc服务对认证的处理

1
2
3
4
5
6
7
8
9
10
11
12
13
14
15
16
17
18
19
20
21
22
23
24
25
26
27
28
29
30
31
32
33
34
35
36
37
38
39
40
41
42
Status ChatServiceImpl::NotifyAuthFriend(ServerContext* context, const AuthFriendReq* request,
AuthFriendRsp* reply) {
//查找用户是否在本服务器
auto touid = request->touid();
auto fromuid = request->fromuid();
auto session = UserMgr::GetInstance()->GetSession(touid);

Defer defer([request, reply]() {
reply->set_error(ErrorCodes::Success);
reply->set_fromuid(request->fromuid());
reply->set_touid(request->touid());
});

//用户不在内存中则直接返回
if (session == nullptr) {
return Status::OK;
}

//在内存中则直接发送通知对方
Json::Value rtvalue;
rtvalue["error"] = ErrorCodes::Success;
rtvalue["fromuid"] = request->fromuid();
rtvalue["touid"] = request->touid();

std::string base_key = USER_BASE_INFO + std::to_string(fromuid);
auto user_info = std::make_shared<UserInfo>();
bool b_info = GetBaseInfo(base_key, fromuid, user_info);
if (b_info) {
rtvalue["name"] = user_info->name;
rtvalue["nick"] = user_info->nick;
rtvalue["icon"] = user_info->icon;
rtvalue["sex"] = user_info->sex;
}
else {
rtvalue["error"] = ErrorCodes::UidInvalid;
}

std::string return_str = rtvalue.toStyledString();

session->Send(return_str, ID_NOTIFY_AUTH_FRIEND_REQ);
return Status::OK;
}

所以A认证B为好友,A所在的服务器会给A回复一个ID_AUTH_FRIEND_RSP的消息,B所在的服务器会给B回复一个ID_NOTIFY_AUTH_FRIEND_REQ消息。

客户端响应

客户端需要响应服务器发过来的ID_AUTH_FRIEND_RSP和ID_NOTIFY_AUTH_FRIEND_REQ消息

客户端响应ID_AUTH_FRIEND_RSP,在initHandlers中添加

1
2
3
4
5
6
7
8
9
10
11
12
13
14
15
16
17
18
19
20
21
22
23
24
25
26
27
28
29
30
31
32
33
34
35
36
_handlers.insert(ID_AUTH_FRIEND_RSP, [this](ReqId id, int len, QByteArray data) {
Q_UNUSED(len);
qDebug() << "handle id is " << id << " data is " << data;
// 将QByteArray转换为QJsonDocument
QJsonDocument jsonDoc = QJsonDocument::fromJson(data);

// 检查转换是否成功
if (jsonDoc.isNull()) {
qDebug() << "Failed to create QJsonDocument.";
return;
}

QJsonObject jsonObj = jsonDoc.object();

if (!jsonObj.contains("error")) {
int err = ErrorCodes::ERR_JSON;
qDebug() << "Auth Friend Failed, err is Json Parse Err" << err;
return;
}

int err = jsonObj["error"].toInt();
if (err != ErrorCodes::SUCCESS) {
qDebug() << "Auth Friend Failed, err is " << err;
return;
}

auto name = jsonObj["name"].toString();
auto nick = jsonObj["nick"].toString();
auto icon = jsonObj["icon"].toString();
auto sex = jsonObj["sex"].toInt();
auto uid = jsonObj["uid"].toInt();
auto rsp = std::make_shared<AuthRsp>(uid, name, nick, icon, sex);
emit sig_auth_rsp(rsp);

qDebug() << "Auth Friend Success " ;
});

在initHandlers中添加ID_NOTIFY_AUTH_FRIEND_REQ

1
2
3
4
5
6
7
8
9
10
11
12
13
14
15
16
17
18
19
20
21
22
23
24
25
26
27
28
29
30
31
32
33
34
35
36
_handlers.insert(ID_NOTIFY_AUTH_FRIEND_REQ, [this](ReqId id, int len, QByteArray data) {
Q_UNUSED(len);
qDebug() << "handle id is " << id << " data is " << data;
// 将QByteArray转换为QJsonDocument
QJsonDocument jsonDoc = QJsonDocument::fromJson(data);

// 检查转换是否成功
if (jsonDoc.isNull()) {
qDebug() << "Failed to create QJsonDocument.";
return;
}

QJsonObject jsonObj = jsonDoc.object();
if (!jsonObj.contains("error")) {
int err = ErrorCodes::ERR_JSON;
qDebug() << "Auth Friend Failed, err is " << err;
return;
}

int err = jsonObj["error"].toInt();
if (err != ErrorCodes::SUCCESS) {
qDebug() << "Auth Friend Failed, err is " << err;
return;
}

int from_uid = jsonObj["fromuid"].toInt();
QString name = jsonObj["name"].toString();
QString nick = jsonObj["nick"].toString();
QString icon = jsonObj["icon"].toString();
int sex = jsonObj["sex"].toInt();

auto auth_info = std::make_shared<AuthInfo>(from_uid,name,
nick, icon, sex);

emit sig_add_auth_friend(auth_info);
});

客户端ChatDialog中添加对sig_add_auth_friend响应,实现添加好友到聊天列表中

1
2
3
4
5
6
7
8
9
10
11
12
13
14
15
16
17
18
19
20
21
22
23
24
25
26
27
void ChatDialog::slot_add_auth_friend(std::shared_ptr<AuthInfo> auth_info) {
qDebug() << "receive slot_add_auth__friend uid is " << auth_info->_uid
<< " name is " << auth_info->_name << " nick is " << auth_info->_nick;

//判断如果已经是好友则跳过
auto bfriend = UserMgr::GetInstance()->CheckFriendById(auth_info->_uid);
if(bfriend){
return;
}

UserMgr::GetInstance()->AddFriend(auth_info);

int randomValue = QRandomGenerator::global()->bounded(100); // 生成0到99之间的随机整数
int str_i = randomValue % strs.size();
int head_i = randomValue % heads.size();
int name_i = randomValue % names.size();

auto* chat_user_wid = new ChatUserWid();
auto user_info = std::make_shared<UserInfo>(auth_info);
chat_user_wid->SetInfo(user_info);
QListWidgetItem* item = new QListWidgetItem;
//qDebug()<<"chat_user_wid sizeHint is " << chat_user_wid->sizeHint();
item->setSizeHint(chat_user_wid->sizeHint());
ui->chat_user_list->insertItem(0, item);
ui->chat_user_list->setItemWidget(item, chat_user_wid);
_chat_items_added.insert(auth_info->_uid, item);
}

客户端ChatDialog中添加对sig_auth_rsp响应, 实现添加好友到聊天列表中

1
2
3
4
5
6
7
8
9
10
11
12
13
14
15
16
17
18
19
20
21
22
23
24
25
26
27
void ChatDialog::slot_auth_rsp(std::shared_ptr<AuthRsp> auth_rsp)
{
qDebug() << "receive slot_auth_rsp uid is " << auth_rsp->_uid
<< " name is " << auth_rsp->_name << " nick is " << auth_rsp->_nick;

//判断如果已经是好友则跳过
auto bfriend = UserMgr::GetInstance()->CheckFriendById(auth_rsp->_uid);
if(bfriend){
return;
}

UserMgr::GetInstance()->AddFriend(auth_rsp);
int randomValue = QRandomGenerator::global()->bounded(100); // 生成0到99之间的随机整数
int str_i = randomValue % strs.size();
int head_i = randomValue % heads.size();
int name_i = randomValue % names.size();

auto* chat_user_wid = new ChatUserWid();
auto user_info = std::make_shared<UserInfo>(auth_rsp);
chat_user_wid->SetInfo(user_info);
QListWidgetItem* item = new QListWidgetItem;
//qDebug()<<"chat_user_wid sizeHint is " << chat_user_wid->sizeHint();
item->setSizeHint(chat_user_wid->sizeHint());
ui->chat_user_list->insertItem(0, item);
ui->chat_user_list->setItemWidget(item, chat_user_wid);
_chat_items_added.insert(auth_rsp->_uid, item);
}

因为认证对方为好友后,需要将申请页面的添加按钮变成已添加,所以ApplyFriendPage响应sig_auth_rsp信号

1
2
3
4
5
6
7
8
9
void ApplyFriendPage::slot_auth_rsp(std::shared_ptr<AuthRsp> auth_rsp) {
auto uid = auth_rsp->_uid;
auto find_iter = _unauth_items.find(uid);
if (find_iter == _unauth_items.end()) {
return;
}

find_iter->second->ShowAddBtn(false);
}

同意并认证对方为好友后,也需要将对方添加到联系人列表,ContactUserList响应sig_auth_rsp信号

1
2
3
4
5
6
7
8
9
10
11
12
13
14
15
16
17
18
19
20
21
22
23
24
25
26
void ContactUserList::slot_auth_rsp(std::shared_ptr<AuthRsp> auth_rsp)
{
qDebug() << "slot auth rsp called";
bool isFriend = UserMgr::GetInstance()->CheckFriendById(auth_rsp->_uid);
if(isFriend){
return;
}
// 在 groupitem 之后插入新项
int randomValue = QRandomGenerator::global()->bounded(100); // 生成0到99之间的随机整数
int str_i = randomValue%strs.size();
int head_i = randomValue%heads.size();

auto *con_user_wid = new ConUserItem();
con_user_wid->SetInfo(auth_rsp->_uid ,auth_rsp->_name, heads[head_i]);
QListWidgetItem *item = new QListWidgetItem;
//qDebug()<<"chat_user_wid sizeHint is " << chat_user_wid->sizeHint();
item->setSizeHint(con_user_wid->sizeHint());

// 获取 groupitem 的索引
int index = this->row(_groupitem);
// 在 groupitem 之后插入新项
this->insertItem(index + 1, item);

this->setItemWidget(item, con_user_wid);

}

登录加载好友

因为添加好友后,如果客户端重新登录,服务器LoginHandler需要加载好友列表,所以服务器要返回好友列表

1
2
3
4
5
6
7
8
9
10
11
12
13
14
15
16
17
18
19
20
21
22
23
24
25
26
27
28
29
30
31
32
33
34
35
36
37
38
39
40
41
42
43
44
45
46
47
48
49
50
51
52
53
54
55
56
57
58
59
60
61
62
63
64
65
66
67
68
69
70
71
72
73
74
75
76
77
78
79
80
81
82
83
84
85
86
87
88
89
90
91
92
93
94
95
96
97
98
99
100
101
void LogicSystem::LoginHandler(shared_ptr<CSession> session, const short &msg_id, const string &msg_data) {
Json::Reader reader;
Json::Value root;
reader.parse(msg_data, root);
auto uid = root["uid"].asInt();
auto token = root["token"].asString();
std::cout << "user login uid is " << uid << " user token is "
<< token << endl;

Json::Value rtvalue;
Defer defer([this, &rtvalue, session]() {
std::string return_str = rtvalue.toStyledString();
session->Send(return_str, MSG_CHAT_LOGIN_RSP);
});

//从redis获取用户token是否正确
std::string uid_str = std::to_string(uid);
std::string token_key = USERTOKENPREFIX + uid_str;
std::string token_value = "";
bool success = RedisMgr::GetInstance()->Get(token_key, token_value);
if (!success) {
rtvalue["error"] = ErrorCodes::UidInvalid;
return ;
}

if (token_value != token) {
rtvalue["error"] = ErrorCodes::TokenInvalid;
return ;
}

rtvalue["error"] = ErrorCodes::Success;

std::string base_key = USER_BASE_INFO + uid_str;
auto user_info = std::make_shared<UserInfo>();
bool b_base = GetBaseInfo(base_key, uid, user_info);
if (!b_base) {
rtvalue["error"] = ErrorCodes::UidInvalid;
return;
}
rtvalue["uid"] = uid;
rtvalue["pwd"] = user_info->pwd;
rtvalue["name"] = user_info->name;
rtvalue["email"] = user_info->email;
rtvalue["nick"] = user_info->nick;
rtvalue["desc"] = user_info->desc;
rtvalue["sex"] = user_info->sex;
rtvalue["icon"] = user_info->icon;

//从数据库获取申请列表
std::vector<std::shared_ptr<ApplyInfo>> apply_list;
auto b_apply = GetFriendApplyInfo(uid,apply_list);
if (b_apply) {
for (auto & apply : apply_list) {
Json::Value obj;
obj["name"] = apply->_name;
obj["uid"] = apply->_uid;
obj["icon"] = apply->_icon;
obj["nick"] = apply->_nick;
obj["sex"] = apply->_sex;
obj["desc"] = apply->_desc;
obj["status"] = apply->_status;
rtvalue["apply_list"].append(obj);
}
}

//获取好友列表
std::vector<std::shared_ptr<UserInfo>> friend_list;
bool b_friend_list = GetFriendList(uid, friend_list);
for (auto& friend_ele : friend_list) {
Json::Value obj;
obj["name"] = friend_ele->name;
obj["uid"] = friend_ele->uid;
obj["icon"] = friend_ele->icon;
obj["nick"] = friend_ele->nick;
obj["sex"] = friend_ele->sex;
obj["desc"] = friend_ele->desc;
obj["back"] = friend_ele->back;
rtvalue["friend_list"].append(obj);
}

auto server_name = ConfigMgr::Inst().GetValue("SelfServer", "Name");
//将登录数量增加
auto rd_res = RedisMgr::GetInstance()->HGet(LOGIN_COUNT, server_name);
int count = 0;
if (!rd_res.empty()) {
count = std::stoi(rd_res);
}

count++;
auto count_str = std::to_string(count);
RedisMgr::GetInstance()->HSet(LOGIN_COUNT, server_name, count_str);
//session绑定用户uid
session->SetUserId(uid);
//为用户设置登录ip server的名字
std::string ipkey = USERIPPREFIX + uid_str;
RedisMgr::GetInstance()->Set(ipkey, server_name);
//uid和session绑定管理,方便以后踢人操作
UserMgr::GetInstance()->SetUserSession(uid, session);

return;
}

客户端在initHandlers中加载聊天列表

1
2
3
4
5
6
7
8
9
10
11
12
13
14
15
16
17
18
19
20
21
22
23
24
25
26
27
28
29
30
31
32
33
34
35
36
37
38
39
40
41
42
43
44
45
46
47
48
49
_handlers.insert(ID_CHAT_LOGIN_RSP, [this](ReqId id, int len, QByteArray data){
Q_UNUSED(len);
qDebug()<< "handle id is "<< id ;
// 将QByteArray转换为QJsonDocument
QJsonDocument jsonDoc = QJsonDocument::fromJson(data);

// 检查转换是否成功
if(jsonDoc.isNull()){
qDebug() << "Failed to create QJsonDocument.";
return;
}

QJsonObject jsonObj = jsonDoc.object();
qDebug()<< "data jsonobj is " << jsonObj ;

if(!jsonObj.contains("error")){
int err = ErrorCodes::ERR_JSON;
qDebug() << "Login Failed, err is Json Parse Err" << err ;
emit sig_login_failed(err);
return;
}

int err = jsonObj["error"].toInt();
if(err != ErrorCodes::SUCCESS){
qDebug() << "Login Failed, err is " << err ;
emit sig_login_failed(err);
return;
}

auto uid = jsonObj["uid"].toInt();
auto name = jsonObj["name"].toString();
auto nick = jsonObj["nick"].toString();
auto icon = jsonObj["icon"].toString();
auto sex = jsonObj["sex"].toInt();
auto user_info = std::make_shared<UserInfo>(uid, name, nick, icon, sex);

UserMgr::GetInstance()->SetUserInfo(user_info);
UserMgr::GetInstance()->SetToken(jsonObj["token"].toString());
if(jsonObj.contains("apply_list")){
UserMgr::GetInstance()->AppendApplyList(jsonObj["apply_list"].toArray());
}

//添加好友列表
if (jsonObj.contains("friend_list")) {
UserMgr::GetInstance()->AppendFriendList(jsonObj["friend_list"].toArray());
}

emit sig_swich_chatdlg();
});

好友聊天

客户端发送聊天消息

客户端发送聊天消息,在输入框输入消息后,点击发送回执行下面的槽函数

1
2
3
4
5
6
7
8
9
10
11
12
13
14
15
16
17
18
19
20
21
22
23
24
25
26
27
28
29
30
31
32
33
34
35
36
37
38
39
40
41
42
43
44
45
46
47
48
49
50
51
52
53
54
55
56
57
58
59
60
61
62
63
64
65
66
67
68
69
70
71
72
73
74
75
76
77
78
79
80
81
82
83
84
85
86
87
88
89
90
91
92
93
94
95
96
void ChatPage::on_send_btn_clicked()
{
if (_user_info == nullptr) {
qDebug() << "friend_info is empty";
return;
}

auto user_info = UserMgr::GetInstance()->GetUserInfo();
auto pTextEdit = ui->chatEdit;
ChatRole role = ChatRole::Self;
QString userName = user_info->_name;
QString userIcon = user_info->_icon;

const QVector<MsgInfo>& msgList = pTextEdit->getMsgList();
QJsonObject textObj;
QJsonArray textArray;
int txt_size = 0;

for(int i=0; i<msgList.size(); ++i)
{
//消息内容长度不合规就跳过
if(msgList[i].content.length() > 1024){
continue;
}

QString type = msgList[i].msgFlag;
ChatItemBase *pChatItem = new ChatItemBase(role);
pChatItem->setUserName(userName);
pChatItem->setUserIcon(QPixmap(userIcon));
QWidget *pBubble = nullptr;

if(type == "text")
{
//生成唯一id
QUuid uuid = QUuid::createUuid();
//转为字符串
QString uuidString = uuid.toString();

pBubble = new TextBubble(role, msgList[i].content);
if(txt_size + msgList[i].content.length()> 1024){
textObj["fromuid"] = user_info->_uid;
textObj["touid"] = _user_info->_uid;
textObj["text_array"] = textArray;
QJsonDocument doc(textObj);
QByteArray jsonData = doc.toJson(QJsonDocument::Compact);
//发送并清空之前累计的文本列表
txt_size = 0;
textArray = QJsonArray();
textObj = QJsonObject();
//发送tcp请求给chat server
emit TcpMgr::GetInstance()->sig_send_data(ReqId::ID_TEXT_CHAT_MSG_REQ, jsonData);
}

//将bubble和uid绑定,以后可以等网络返回消息后设置是否送达
//_bubble_map[uuidString] = pBubble;
txt_size += msgList[i].content.length();
QJsonObject obj;
QByteArray utf8Message = msgList[i].content.toUtf8();
obj["content"] = QString::fromUtf8(utf8Message);
obj["msgid"] = uuidString;
textArray.append(obj);
auto txt_msg = std::make_shared<TextChatData>(uuidString, obj["content"].toString(),
user_info->_uid, _user_info->_uid);
emit sig_append_send_chat_msg(txt_msg);
}
else if(type == "image")
{
pBubble = new PictureBubble(QPixmap(msgList[i].content) , role);
}
else if(type == "file")
{

}
//发送消息
if(pBubble != nullptr)
{
pChatItem->setWidget(pBubble);
ui->chat_data_list->appendChatItem(pChatItem);
}

}

qDebug() << "textArray is " << textArray ;
//发送给服务器
textObj["text_array"] = textArray;
textObj["fromuid"] = user_info->_uid;
textObj["touid"] = _user_info->_uid;
QJsonDocument doc(textObj);
QByteArray jsonData = doc.toJson(QJsonDocument::Compact);
//发送并清空之前累计的文本列表
txt_size = 0;
textArray = QJsonArray();
textObj = QJsonObject();
//发送tcp请求给chat server
emit TcpMgr::GetInstance()->sig_send_data(ReqId::ID_TEXT_CHAT_MSG_REQ, jsonData);
}

TcpMgr响应发送信号

1
2
3
4
5
6
7
8
9
10
11
12
13
14
15
16
17
18
19
20
21
22
23
24
void TcpMgr::slot_send_data(ReqId reqId, QByteArray dataBytes)
{
uint16_t id = reqId;

// 计算长度(使用网络字节序转换)
quint16 len = static_cast<quint16>(dataBytes.length());

// 创建一个QByteArray用于存储要发送的所有数据
QByteArray block;
QDataStream out(&block, QIODevice::WriteOnly);

// 设置数据流使用网络字节序
out.setByteOrder(QDataStream::BigEndian);

// 写入ID和长度
out << id << len;

// 添加字符串数据
block.append(dataBytes);

// 发送数据
_socket.write(block);
qDebug() << "tcp mgr send byte data is " << block ;
}

服务器响应

服务器响应客户端发送过来文本消息,在initHandlers中添加处理文本消息的逻辑

1
2
3
4
5
6
7
8
9
10
11
12
13
14
15
16
17
18
19
20
21
22
23
24
25
26
27
28
29
30
31
32
33
34
35
36
37
38
39
40
41
42
43
44
45
46
47
48
49
50
51
52
53
54
55
56
57
58
59
60
61
62
63
void LogicSystem::DealChatTextMsg(std::shared_ptr<CSession> session, const short& msg_id, const string& msg_data) {
Json::Reader reader;
Json::Value root;
reader.parse(msg_data, root);

auto uid = root["fromuid"].asInt();
auto touid = root["touid"].asInt();

const Json::Value arrays = root["text_array"];

Json::Value rtvalue;
rtvalue["error"] = ErrorCodes::Success;
rtvalue["text_array"] = arrays;
rtvalue["fromuid"] = uid;
rtvalue["touid"] = touid;

Defer defer([this, &rtvalue, session]() {
std::string return_str = rtvalue.toStyledString();
session->Send(return_str, ID_TEXT_CHAT_MSG_RSP);
});


//查询redis 查找touid对应的server ip
auto to_str = std::to_string(touid);
auto to_ip_key = USERIPPREFIX + to_str;
std::string to_ip_value = "";
bool b_ip = RedisMgr::GetInstance()->Get(to_ip_key, to_ip_value);
if (!b_ip) {
return;
}

auto& cfg = ConfigMgr::Inst();
auto self_name = cfg["SelfServer"]["Name"];
//直接通知对方有认证通过消息
if (to_ip_value == self_name) {
auto session = UserMgr::GetInstance()->GetSession(touid);
if (session) {
//在内存中则直接发送通知对方
std::string return_str = rtvalue.toStyledString();
session->Send(return_str, ID_NOTIFY_TEXT_CHAT_MSG_REQ);
}

return ;
}


TextChatMsgReq text_msg_req;
text_msg_req.set_fromuid(uid);
text_msg_req.set_touid(touid);
for (const auto& txt_obj : arrays) {
auto content = txt_obj["content"].asString();
auto msgid = txt_obj["msgid"].asString();
std::cout << "content is " << content << std::endl;
std::cout << "msgid is " << msgid << std::endl;
auto *text_msg = text_msg_req.add_textmsgs();
text_msg->set_msgid(msgid);
text_msg->set_msgcontent(content);
}


//发送通知 todo...
ChatGrpcClient::GetInstance()->NotifyTextChatMsg(to_ip_value, text_msg_req, rtvalue);
}

服务器实现发送消息的rpc客户端

1
2
3
4
5
6
7
8
9
10
11
12
13
14
15
16
17
18
19
20
21
22
23
24
25
26
27
28
29
30
31
32
33
34
35
36
37
TextChatMsgRsp ChatGrpcClient::NotifyTextChatMsg(std::string server_ip, 
const TextChatMsgReq& req, const Json::Value& rtvalue) {

TextChatMsgRsp rsp;
rsp.set_error(ErrorCodes::Success);

Defer defer([&rsp, &req]() {
rsp.set_fromuid(req.fromuid());
rsp.set_touid(req.touid());
for (const auto& text_data : req.textmsgs()) {
TextChatData* new_msg = rsp.add_textmsgs();
new_msg->set_msgid(text_data.msgid());
new_msg->set_msgcontent(text_data.msgcontent());
}

});

auto find_iter = _pools.find(server_ip);
if (find_iter == _pools.end()) {
return rsp;
}

auto& pool = find_iter->second;
ClientContext context;
auto stub = pool->getConnection();
Status status = stub->NotifyTextChatMsg(&context, req, &rsp);
Defer defercon([&stub, this, &pool]() {
pool->returnConnection(std::move(stub));
});

if (!status.ok()) {
rsp.set_error(ErrorCodes::RPCFailed);
return rsp;
}

return rsp;
}

服务器实现rpc服务端处理消息通知

1
2
3
4
5
6
7
8
9
10
11
12
13
14
15
16
17
18
19
20
21
22
23
24
25
26
27
28
29
30
31
32
33
Status ChatServiceImpl::NotifyTextChatMsg(::grpc::ServerContext* context,
const TextChatMsgReq* request, TextChatMsgRsp* reply) {
//查找用户是否在本服务器
auto touid = request->touid();
auto session = UserMgr::GetInstance()->GetSession(touid);
reply->set_error(ErrorCodes::Success);

//用户不在内存中则直接返回
if (session == nullptr) {
return Status::OK;
}

//在内存中则直接发送通知对方
Json::Value rtvalue;
rtvalue["error"] = ErrorCodes::Success;
rtvalue["fromuid"] = request->fromuid();
rtvalue["touid"] = request->touid();

//将聊天数据组织为数组
Json::Value text_array;
for (auto& msg : request->textmsgs()) {
Json::Value element;
element["content"] = msg.msgcontent();
element["msgid"] = msg.msgid();
text_array.append(element);
}
rtvalue["text_array"] = text_array;

std::string return_str = rtvalue.toStyledString();

session->Send(return_str, ID_NOTIFY_TEXT_CHAT_MSG_REQ);
return Status::OK;
}

客户端响应通知

客户端响应服务器返回的消息,包括两种:

  1. A给B发送文本消息,A所在的服务器会给A发送ID_TEXT_CHAT_MSG_RSP消息。
  2. B所在的服务器会通知B,告诉B有来自A的消息,通知消息为ID_NOTIFY_TEXT_CHAT_MSG_REQ

所以在tcpmgr的initHandlers中添加响应ID_TEXT_CHAT_MSG_RSP消息

1
2
3
4
5
6
7
8
9
10
11
12
13
14
15
16
17
18
19
20
21
22
23
24
25
26
27
28
29
_handlers.insert(ID_TEXT_CHAT_MSG_RSP, [this](ReqId id, int len, QByteArray data) {
Q_UNUSED(len);
qDebug() << "handle id is " << id << " data is " << data;
// 将QByteArray转换为QJsonDocument
QJsonDocument jsonDoc = QJsonDocument::fromJson(data);

// 检查转换是否成功
if (jsonDoc.isNull()) {
qDebug() << "Failed to create QJsonDocument.";
return;
}

QJsonObject jsonObj = jsonDoc.object();

if (!jsonObj.contains("error")) {
int err = ErrorCodes::ERR_JSON;
qDebug() << "Chat Msg Rsp Failed, err is Json Parse Err" << err;
return;
}

int err = jsonObj["error"].toInt();
if (err != ErrorCodes::SUCCESS) {
qDebug() << "Chat Msg Rsp Failed, err is " << err;
return;
}

qDebug() << "Receive Text Chat Rsp Success " ;
//ui设置送达等标记 todo...
});

在TcpMgr的initHandlers中添加ID_NOTIFY_TEXT_CHAT_MSG_REQ

1
2
3
4
5
6
7
8
9
10
11
12
13
14
15
16
17
18
19
20
21
22
23
24
25
26
27
28
29
30
31
_handlers.insert(ID_NOTIFY_TEXT_CHAT_MSG_REQ, [this](ReqId id, int len, QByteArray data) {
Q_UNUSED(len);
qDebug() << "handle id is " << id << " data is " << data;
// 将QByteArray转换为QJsonDocument
QJsonDocument jsonDoc = QJsonDocument::fromJson(data);

// 检查转换是否成功
if (jsonDoc.isNull()) {
qDebug() << "Failed to create QJsonDocument.";
return;
}

QJsonObject jsonObj = jsonDoc.object();

if (!jsonObj.contains("error")) {
int err = ErrorCodes::ERR_JSON;
qDebug() << "Notify Chat Msg Failed, err is Json Parse Err" << err;
return;
}

int err = jsonObj["error"].toInt();
if (err != ErrorCodes::SUCCESS) {
qDebug() << "Notify Chat Msg Failed, err is " << err;
return;
}

qDebug() << "Receive Text Chat Notify Success " ;
auto msg_ptr = std::make_shared<TextChatMsg>(jsonObj["fromuid"].toInt(),
jsonObj["touid"].toInt(),jsonObj["text_array"].toArray());
emit sig_text_chat_msg(msg_ptr);
});

客户端ChatDialog添加对sig_text_chat_msg的响应

1
2
3
4
5
6
7
8
9
10
11
12
13
14
15
16
17
18
19
20
21
22
23
24
25
26
27
28
29
30
31
32
33
void ChatDialog::slot_text_chat_msg(std::shared_ptr<TextChatMsg> msg)
{
auto find_iter = _chat_items_added.find(msg->_from_uid);
if(find_iter != _chat_items_added.end()){
qDebug() << "set chat item msg, uid is " << msg->_from_uid;
QWidget *widget = ui->chat_user_list->itemWidget(find_iter.value());
auto chat_wid = qobject_cast<ChatUserWid*>(widget);
if(!chat_wid){
return;
}
chat_wid->updateLastMsg(msg->_chat_msgs);
//更新当前聊天页面记录
UpdateChatMsg(msg->_chat_msgs);
UserMgr::GetInstance()->AppendFriendChatMsg(msg->_from_uid,msg->_chat_msgs);
return;
}

//如果没找到,则创建新的插入listwidget

auto* chat_user_wid = new ChatUserWid();
//查询好友信息
auto fi_ptr = UserMgr::GetInstance()->GetFriendById(msg->_from_uid);
chat_user_wid->SetInfo(fi_ptr);
QListWidgetItem* item = new QListWidgetItem;
//qDebug()<<"chat_user_wid sizeHint is " << chat_user_wid->sizeHint();
item->setSizeHint(chat_user_wid->sizeHint());
chat_user_wid->updateLastMsg(msg->_chat_msgs);
UserMgr::GetInstance()->AppendFriendChatMsg(msg->_from_uid,msg->_chat_msgs);
ui->chat_user_list->insertItem(0, item);
ui->chat_user_list->setItemWidget(item, chat_user_wid);
_chat_items_added.insert(msg->_from_uid, item);

}

效果展示

https://cdn.llfc.club/1724470182274.jpg

源码连接

https://gitee.com/secondtonone1/llfcchat

视频连接

https://www.bilibili.com/video/BV1ib421J745/?vd_source=8be9e83424c2ed2c9b2a3ed1d01385e9

并发编程排错思路和方法

Posted on 2024-02-24 | In C++

简介

到目前为止,前面一系列的文章已经将多线程编程技术介绍完了,很多人问我如何排查多线程程序的问题,本节是最后一节,给大家提供一些在多线程编程过程中排查问题的思路。因为本节代码演示和实际操作内容较多,该文档仅做基本的说明,详细操作可看视频, 视频链接:

https://space.bilibili.com/271469206/channel/collectiondetail?sid=1623290

常见问题

在介绍如何排查前我们先将问题做几个归类:

  1. 内存问题,包括内存泄露(未回收内存),空指针,悬垂指针(野指针),double free问题等。
  2. 资源竞争,多个线程竞争同一块临界区的资源,未保证互斥
  3. 死锁(互相引用阻塞卡死)和活锁(乐观锁尝试)
  4. 引用已释放的变量,生命周期管理失效导致
  5. 浅拷贝造成内存异常
  6. 线程管控失败,修改或者回收一个已经绑定正在运行线程的变量,或者线程本该回收却被卡死,皆因线程管控失败导致
  7. 智能指针和裸指针混用导致二次析构,也属于double free。

接下来根据上面列出的问题,我们根据实际案例排查出现问题的原因以及规避的方法。

接下来的案例均取自我的源码,源码链接如下:

https://gitee.com/secondtonone1/boostasio-learn/tree/master/concurrent/day24-TroubleShoot

空指针

空指针的问题比较好排查,我们在封装无锁队列的时候照抄《C++并发编程实战》一书引发了崩溃,详见源码链接中crushque.h以及lockfreequetest.cpp。

测试用例如下:

1
2
3
4
5
6
7
8
9
10
11
12
13
14
15
16
17
18
19
20
21
22
23
24
25
26
void TestCrushQue() {
crush_que<int> que;
std::thread t1([&]() {
for (int i = 0; i < TESTCOUNT * 10000; i++) {
que.push(i);
std::cout << "push data is " << i << std::endl;
std::this_thread::sleep_for(std::chrono::milliseconds(10));
}
});

std::thread t2([&]() {
for (int i = 0; i < TESTCOUNT * 10000;) {
auto p = que.pop();
if (p == nullptr) {
std::this_thread::sleep_for(std::chrono::milliseconds(10));
continue;
}
i++;
std::cout << "pop data is " << *p << std::endl;
}
});

t1.join();
t2.join();

}

最后显示的崩溃点在

https://cdn.llfc.club/1708328384150.jpg

很明显这是引发崩溃的底层代码,并不是上层代码,通过调用堆栈找到和崩溃最相近的逻辑

https://cdn.llfc.club/1708328755799.jpg

我们点击第二行的栈调用跳转到队列的push操作。

https://cdn.llfc.club/1708328906480.jpg

在代码166行处是崩溃的上层调用,我们通过分析old_tail.ptr此时为空指针,该问题的根因在于构造无锁队列时未进行头节点和尾部节点的初始化所致。

无论linux还是windows,排查崩溃问题最首要的解决方式为观察栈调用,gdb或者windows的栈信息直观的反应了崩溃的触发顺序。

内存泄漏

一般来说内存泄漏检测有专门的工具库,linux环境下可使用valgrind,windows的visual studio环境下Visual Leak Detector, 这些工具只能被动的检测内存泄漏,很多情况我们需要针对已经开发的类或者逻辑编写测试用例,检测内存泄漏。

比如我们对于无锁队列中提供了一个内存泄漏的版本,详见memoryleakque.h以及测试用例lockfreequetest.cpp,以下为测试代码

1
2
3
4
5
6
7
8
9
10
11
12
13
14
15
16
17
18
19
20
21
22
23
24
25
26
27
28
void TestLeakQue() {
memoryleak_que<int> que;
std::thread t1([&]() {
for (int i = 0; i < TESTCOUNT; i++) {
que.push(i);
std::cout << "push data is " << i << std::endl;
std::this_thread::sleep_for(std::chrono::milliseconds(10));
}
});

std::thread t2([&]() {
for (int i = 0; i < TESTCOUNT;) {
auto p = que.pop();
if (p == nullptr) {
std::this_thread::sleep_for(std::chrono::milliseconds(10));
continue;
}
i++;
std::cout << "pop data is " << *p << std::endl;
}
});

t1.join();
t2.join();

assert(que.destruct_count == TESTCOUNT);

}

针对这个队列, 我们统计释放节点的个数和开辟节点的个数是否相等,通过assert(que.destruct_count == TESTCOUNT);断言检测,实际测试过程中发现存在内存泄漏。

https://cdn.llfc.club/1708330464493.jpg

针对无锁队列的内存泄漏无外乎就是push和pop操作造成的,我们把测试用例改为单线程,先将多线程这个可变因素去掉

1
2
3
4
5
6
7
8
9
10
11
12
13
14
15
16
17
18
19
20
21
void TestLeakQueSingleThread() {
memoryleak_que<int> que;
std::thread t1([&]() {
for (int i = 0; i < TESTCOUNT; i++) {
que.push(i);
std::cout << "push data is " << i << std::endl;
std::this_thread::sleep_for(std::chrono::milliseconds(10));

auto p = que.pop();
if (p == nullptr) {
std::this_thread::sleep_for(std::chrono::milliseconds(10));
continue;
}
std::cout << "pop data is " << *p << std::endl;
}
});

t1.join();

assert(que.destruct_count == TESTCOUNT);
}

上面的代码测试未发现内存泄漏,但这还不能将问题归因于多线程,我们构造一种情况触发空队列的pop

1
2
3
4
5
6
7
8
9
10
11
12
13
14
15
16
17
18
19
20
21
22
23
24
25
26
27
28
void TestLeakQueMultiPop() {
memoryleak_que<int> que;
std::thread t1([&]() {
for (int i = 0; i < TESTCOUNT; i++) {
que.push(i);
std::cout << "push data is " << i << std::endl;
std::this_thread::sleep_for(std::chrono::milliseconds(10));

auto p = que.pop();
if (p == nullptr) {
std::this_thread::sleep_for(std::chrono::milliseconds(10));
continue;
}
std::cout << "pop data is " << *p << std::endl;

auto p2 = que.pop();
if (p2 == nullptr) {
std::this_thread::sleep_for(std::chrono::milliseconds(10));
continue;
}
std::cout << "pop data is " << *p2 << std::endl;
}
});

t1.join();

assert(que.destruct_count == TESTCOUNT);
}

上面的代码再一次触发断言,说明存在内存泄漏,那我们可以将问题归因于pop操作,而且是队列为空的pop操作。

接下来配合断点调试,windows断点调试较为方便,或者linux环境gdb调试麻烦,可以在关键点打印信息排查问题。

我们使用visual studio断点排查这个问题,先让队列push一个数据,再pop两次,第二次pop肯定无效因为是空队列,但也是引发泄漏的关键原因。

接下来再push一个数据,再pop节点,我们需观察这次pop是否会触发节点回收的逻辑。

回收节点的逻辑只有两处,在release_ref和free_external_counter内部判断internal_count和external_counters为0时才会调用delete回收内存,所以我们只需要在release_ref和free_external_counter中打断点,观察这两个引用计数是否为0,如果不为0说明引用计数的计算出了问题。

https://cdn.llfc.club/1708334690329.jpg

为了便于观察数据,我们采取单步调试的方式,经过断点调试,发现第二次循环pop时,free_external_count内部old_node_ptr.external_count为3,而第一次循环pop时old_node_ptr.external_count为2. 那么第二次计算internal_count就不会为0,导致节点不会回收。

问题的根因也找到了在pop判断队列为空的时候直接返回了,之前进行了increase_external_count将外部引用计数增加了,在判断队列为空未进行修改就返回了,我们知道外部引用计数只是一个副本,可能同时有多个线程修改外部引用计数,所以只需要让内部引用计数释放一次即可

1
2
3
4
5
if (ptr == tail.load().ptr)
{
ptr->release_ref();
return std::unique_ptr<T>();
}

再次测试未发现内存泄漏。

自己设计测试用例时要注意覆盖多种情况,比如无锁队列,我后来又测试了单线程,多线程一进一出,多线程一进多出,多线程一出多进,多线程多出多进等,以及加大线程数测试。详细案例可以看看源码, lockfreequetest.cpp。

double free

对于悬垂指针也叫做野指针,指的是释放内存后,再次使用这个指针访问数据造成崩溃。double free也属于指针管理失效导致,我们看看网络编程中对官方案例存在隐患的剖析。案例在网络编程network文件夹,day05-AsyncServer中,我们实现了一个异步的echo应答server。
正常情况下应答server没有任何问题,但是对于全双工情况(实际情况都是收发解耦合),比如我们在收到消息后监听读事件,并发送,而不是在发送消息后监听读事件。我们将handle_read处理改为如下

1
2
3
4
5
6
7
8
9
10
11
12
13
14
15
void Session::handle_read(const boost::system::error_code& error, size_t bytes_transfered) {

if (!error) {
cout << "server receive data is " << _data << endl;
std::string send_data(_data);
//在发送
_socket.async_read_some(boost::asio::buffer(_data, max_length), std::bind(&Session::handle_read,
this, placeholders::_1, placeholders::_2));
boost::asio::async_write(_socket, boost::asio::buffer(send_data, bytes_transfered),
std::bind(&Session::handle_write, this, placeholders::_1));
}
else {
delete this;
}
}

我们启动day04-SyncClient和day05-AsyncServer分别测试,在Server handle_read里async_read_some处打断点,然后启动客户端,客户端发送数据后服务器触发async_read_some断点,此时关闭客户端,然后服务器继续执行后面的逻辑会引发崩溃。

https://cdn.llfc.club/1708481010816.jpg

遇到崩溃第一反应是看看崩溃的栈信息,崩溃在最底层代码

https://cdn.llfc.club/1708482046203.jpg

栈信息也看不懂

https://cdn.llfc.club/1708482122640.jpg

看栈调用应该是崩溃在asio底层iocp模型写回调里了。

那我们可以用注释的方式排查问题。我们把handle_write回调里面的逻辑注释掉

1
2
3
4
5
6
7
8
9
10
void Session::handle_write(const boost::system::error_code& error) {
// if (!error) {
// memset(_data, 0, max_length);
// _socket.async_read_some(boost::asio::buffer(_data, max_length), std::bind(&Session::handle_read,
// this, placeholders::_1, placeholders::_2));
// }
// else {
// delete this;
// }
}

再次启动客户端和服务器,在服务器收到读回调后断点并关闭客户端,服务器放开断点继续执行,未发现崩溃。

观察注释掉的逻辑,最有嫌疑的是delete this, 我们仅仅将delete this注释掉后就不会崩溃了,那我们找到问题根因了

第一次回调触发handle_read没问题,此时在回调里关闭客户端,因为第一次回调再次调用async_read_some将读事件注册给asio底层的事件循环,调用async_write将写事件注册给asio底层循环,当客户端关闭后会第二次触发读回调,这次读回调会执行delete操作,delete this之后,Session所有的数据都被回收,而写回调也会触发,因为那么就行了二次delete操作,这就是double free问题。

解决这个问题我们提出了利用智能指针构造一个伪闭包的方式延长Session周期,保证回调之前不会delete Session。具体可以看看这篇文章https://llfc.club/articlepage?id=2OEQEc6p4k79cXsTr6dOVfZbo79

视频链接

https://www.bilibili.com/video/BV15P411S7fp/?spm_id_from=333.788&vd_source=8be9e83424c2ed2c9b2a3ed1d01385e9

本文仅作排查故障方法整理,其他不做赘述,相关处理方案可以看我博客其他文章和视频。

资源竞争

资源竞争大部分情况是逻辑错误,比如两个线程A和B同时修改互斥区域,互斥区域未加锁,这期间也可能造成崩溃,比如线程A删除了数据C,而线程B正在访问数据C,引发崩溃后大家不要慌,先看崩溃的堆栈信息,如果是指针显示为0xdddd之类的说明是访问了被删除的数据,那么我们排查删除的逻辑,或者屏蔽删除的逻辑看看会不会出问题,基本思路是

  1. 崩溃看堆栈信息,排查是不是野指针或者double free问题。
  2. 如果不是崩溃信息,数据混乱就查找修改数据的逻辑,或者屏蔽这个逻辑,看看是不是多线程造成的。
  3. 崩溃问题也可以通过屏蔽部分逻辑排查是不是多线程导致的。
  4. 在必要的逻辑区间增加日志,排查逻辑异常的上层原因。

这部分问题要结合实际工作去排查,慢慢熟悉这种思路以后就不陌生了。

死锁问题

多线程出现死锁问题是很头疼,现象不如内存崩溃或者资源竞争那么明显,表现给开发者的是一种卡死的现象。造成死锁的根本原因在于锁资源互相竞争,遇到这种问题要先梳理逻辑,找到互相引用的关键点。
我们通过代码仓库中concurrent文件夹day24-TroubleShoot 中deadlock.h演示

1
2
3
4
5
6
7
8
9
10
11
12
13
14
15
16
void deadlockdemo() {
std::mutex mtx;
int global_data = 0;
std::thread t1([&mtx, &global_data]() {
std::lock_guard<std::mutex> outer_lock(mtx);
global_data++;
std::async([&mtx, &global_data]() {
std::lock_guard<std::mutex> inner_lock(mtx);
global_data++;
std::cout << global_data << std::endl;
});

});

t1.join();
}

主函数调用这个函数,主进程无法退出。因为不是崩溃问题所以无法查看调用栈,对于这个问题,我们在关键位置打印日志,看看具体走到哪里出了问题。

1
2
3
4
5
6
7
8
9
10
11
12
13
14
15
16
17
18
19
20
21
void deadlockdemo() {
std::mutex mtx;
int global_data = 0;
std::thread t1([&mtx, &global_data]() {
std::cout << "begin lock outer_lock..." << std::endl;
std::lock_guard<std::mutex> outer_lock(mtx);
std::cout << "after lock outer_lock..." << std::endl;
global_data++;
std::async([&mtx, &global_data]() {
std::cout << "begin lock inner_lock..." << std::endl;
std::lock_guard<std::mutex> inner_lock(mtx);
std::cout << "after lock inner_lock..." << std::endl;
global_data++;
std::cout << global_data << std::endl;
std::cout << "unlock inner_lock..." << std::endl;
});
std::cout << "unlock outer_lock..." << std::endl;
});

t1.join();
}

日志输出

1
2
3
begin lock outer_lock...
after lock outer_lock...
begin lock inner_lock...

可以看到内部锁没有加成功。这种情况就是死锁了,再来分析原因,因为async会返回一个future,作为右值这个future会立即调用析构函数,析构函数内部会等待任务完成(并发编程已经从源码剖析了,这里不再赘述)。内部任务要加锁加不上,外部解不开锁因为async返回的future析构无法调用成功。这就是死锁的原因了。
修正,只要让future不立即调用析构即可,我们可以用变量接受future,这样析构就会延缓到解锁之后,变量可以放在最外层,这样变量不会触发析构。

1
2
3
4
5
6
7
8
9
10
11
12
13
14
15
16
17
18
19
20
21
22
void lockdemo() {
std::mutex mtx;
int global_data = 0;
std::future<void> future_res;
std::thread t1([&mtx, &global_data,&future_res]() {
std::cout << "begin lock outer_lock..." << std::endl;
std::lock_guard<std::mutex> outer_lock(mtx);
std::cout << "after lock outer_lock..." << std::endl;
global_data++;
future_res = std::async([&mtx, &global_data]() {
std::cout << "begin lock inner_lock..." << std::endl;
std::lock_guard<std::mutex> inner_lock(mtx);
std::cout << "after lock inner_lock..." << std::endl;
global_data++;
std::cout << global_data << std::endl;
std::cout << "unlock inner_lock..." << std::endl;
});
std::cout << "unlock outer_lock..." << std::endl;
});

t1.join();
}

程序输出

1
2
3
4
5
6
7
begin lock outer_lock...
after lock outer_lock...
unlock outer_lock...
begin lock inner_lock...
after lock inner_lock...
2
unlock inner_lock...

关于活锁,解决方式类似,在关键位置添加注释排查具体原因。

引用释放的变量

随着C++ 11 lambda表达式推出后,编程更方便了,但是引用释放的变量这个问题也随之而来。案例在day24-TroubleShoot文件夹deadlock.cpp中reference_invalid函数。

1
2
3
4
5
6
7
8
9
10
11
12
13
14
15
16
17
18
19
20
21
22
23
24
25
26
27
28
29
30
void reference_invalid()
{
class task_data {
public:
task_data(int i):_data(new int(i)){}
~task_data() { delete _data; }
int* _data;
};
std::queue<std::function<void()>> task_que;
for (int i = 0; i < 10; i++) {
task_data data(i);
task_que.push([&data]() {
(*data._data)++;
std::cout << "data is " << *data._data << std::endl;
});
}

auto res_future = std::async([&task_que]() {
for (;;) {
if (task_que.empty()) {
break;
}
auto& task = task_que.front();
task();
task_que.pop();
}
});

res_future.wait();
}

上述函数调用后输出的数值为

1
2
3
4
5
6
7
8
9
10
data is -572662307
data is 1349705340
data is -2147481856
data is -572662307
data is -572662307
data is -572662307
data is -572662307
data is -572662307
data is -572662307
data is -572662307

为什么数据变乱了呢?我们分析一下,这种多线程的逻辑问题就要通过加日志或者梳理逻辑排查了。异步任务里从任务队列弹出任务并执行,我们观察任务是一个lambda表达式,捕获的是task_data类型的引用,既然是引用就有生命周期,我们在将task放入队列时,task_data类型变量data为局部变量,此时还未失效,等离开循环的作用域调用data会调用析构函数,那么内部的数据就被释放了,所以之后线程异步访问时会出现乱码。

怎么改呢?我们在网络编程中介绍了一种思路,利用智能指针构造一个伪闭包逻辑,C++不像js,python,go等有闭包机制,但是我们可以通过智能指针增加引用计数,达到闭包效果。

1
2
3
4
5
6
7
8
9
10
11
12
13
14
15
16
17
18
19
20
21
22
23
24
25
26
27
28
29
30
void reference_sharedptr()
{
class task_data {
public:
task_data(int i) :_data(new int(i)) {}
~task_data() { delete _data; }
int* _data;
};
std::queue<std::function<void()>> task_que;
for (int i = 0; i < 10; i++) {
std::shared_ptr<task_data> taskptr = std::make_shared<task_data>(i);
task_que.push([taskptr]() {
(*( taskptr->_data))++;
std::cout << "data is " << *(taskptr->_data) << std::endl;
});
}

auto res_future = std::async([&task_que]() {
for (;;) {
if (task_que.empty()) {
break;
}
auto& task = task_que.front();
task();
task_que.pop();
}
});

res_future.wait();
}

再次运行输出正确。

浅拷贝

浅拷贝这个词对于C++开发者并不陌生,如果没有合理的内存管理机制,浅拷贝会造成很严重的内存崩溃问题。
看下面这个例子,同样在day24-TroubleShoot文件夹deadlock.cpp中

1
2
3
4
5
6
7
8
9
10
11
12
13
14
void shallow_copy(){
class task_data {
public:
task_data(int i) :_data(new int(i)) {}
~task_data() {
std::cout << "call task_data destruct" << std::endl;
delete _data;
}
int* _data;
};

task_data data1(1);
task_data data2 = std::move(data1);
}

上面这个例子运行会导致崩溃,我们看data1移动给data2后,二者在作用域结束时都进行析构。

因为我们没实现移动构造和拷贝构造,系统默认的移动构造执行拷贝构造,默认的拷贝构造是浅拷贝,所以data1和data2内部的_data引用同一块内存,他们析构的时候会造成二次析构。

读者可能觉得这个例子太简单,不会犯错,那我们看第二个例子

1
2
3
4
5
6
7
8
9
10
11
12
13
14
15
16
17
18
void shallow_copy2(){
class task_data {
public:
task_data(int i) :_data(new int(i)) {}
~task_data() {
std::cout << "call task_data destruct" << std::endl;
delete _data;
}
int* _data;
};

auto task_call = []() -> task_data {
task_data data(100);
return data;
};

task_call();
}

第二个例子中我们定义了一个lambda表达式task_call,返回task_data类型的对象。

关于返回局部对象,编译器有两种情况:

  1. 如果编译器支持返回值优化(Return Value Optimization, RVO),那么在返回局部对象时,编译器可能会通过返回值优化来避免执行移动构造函数。RVO 是一种编译器优化技术,可以避免对返回值进行拷贝或移动操作,直接将局部对象的值放置到调用者提供的空间中,从而减少了不必要的资源开销和性能消耗。

  2. 在 C++11 引入移动语义后,编译器有权将返回的局部对象视为右值,从而执行移动构造而非拷贝构造。

无论上述哪一种,都是将值返回,那么都会执行浅拷贝,局部变量随着作用域结束被释放,内部的内存_data被回收,而外部接收的返回值仍在引用_data,此时_data就是野指针。外部对象释放会造成二次析构,或者外部对象使用_data时也会引发野指针崩溃问题。

解决的方式就是实现拷贝构造和移动构造。

1
2
3
4
5
6
7
8
9
10
11
12
13
14
15
16
17
18
19
20
21
22
23
24
25
26
void normal_copy() {
class task_data {
public:
task_data(int i) :_data(new int(i)) {}
~task_data() {
std::cout << "call task_data destruct" << std::endl;
delete _data;
}
task_data(const task_data& src) {
_data = new int(*(src._data));
}

task_data(task_data&& src) {
_data = new int(*(src._data));
}

int* _data;
};

auto task_call = []() -> task_data {
task_data data(100);
return data;
};

task_call();
}

再次运行,看到调用两个析构函数,并且未崩溃

1
2
3
call task_data destruct
main exit

线程管控

多线程编程常遇到的一个问题就是线程管控。案例在day24-TroubleShoot文件夹deadlock.cpp中。

我们实现了一个生产者和消费者的管理类和一个用来控制退出的原子变量。

1
2
3
4
5
6
7
8
9
10
11
12
13
14
15
16
17
18
19
20
21
22
23
24
25
26
27
28
29
30
31
32
33
34
35
36
37
38
39
40
41
42
43
44
45
46
47
48
49
50
51
52
 std::atomic<bool>  b_stop = false;

class ProductConsumerMgr {
public:
ProductConsumerMgr(){
_consumer = std::thread([this]() {
while (!b_stop) {
std::unique_lock<std::mutex> lock(_mtx);
_consume_cv.wait(lock, [this]() {
if (_data_que.empty()) {
return false;
}
return true;
});
int data = _data_que.front();
_data_que.pop();
std::cout << "pop data is " << data << std::endl;
lock.unlock();
_producer_cv.notify_one();
}
});

_producer = std::thread([this]() {
int data = 0;
while (!b_stop) {
std::unique_lock<std::mutex> lock(_mtx);
_producer_cv.wait(lock, [this]() {
if (_data_que.size() > 100) {
return false;
}
return true;
});
_data_que.push(++data);
std::cout << "push data is " << data << std::endl;
lock.unlock();
_consume_cv.notify_one();
}
});

}
~ProductConsumerMgr(){
_producer.join();
_consumer.join();
}
private:
std::mutex _mtx;
std::condition_variable _consume_cv;
std::condition_variable _producer_cv;
std::queue<int> _data_que;
std::thread _consumer;
std::thread _producer;
};
  1. 生产者不断生产数据放入队列,消费者不断从队列消费数据。
  2. ProductConsumerMgr析构时等待生产者和消费者两个线程退出。
  3. b_stop用来控制线程退出。

我们实现捕获ctl+c以及关闭窗口信号的函数,然后将b_stop设置为true.

1
2
3
4
5
6
7
8
9
10
11
12
13
14
15
16
17
18
19
20
21
22
23
24
25
26
27
28
29
30
31
32
33
34
BOOL CtrlHandler(DWORD fdwCtrlType)
{
switch (fdwCtrlType)
{
// Handle the CTRL-C signal.
case CTRL_C_EVENT:
printf("Ctrl-C event\n\n");
b_stop = true;
return(TRUE);

// CTRL-CLOSE: confirm that the user wants to exit.
case CTRL_CLOSE_EVENT:
b_stop = true;
printf("Ctrl-Close event\n\n");
return(TRUE);

case CTRL_SHUTDOWN_EVENT:
b_stop = true;
printf("Ctrl-Shutdown event\n\n");
return FALSE;

default:
return FALSE;
}
}

void TestProducerConsumer()
{
SetConsoleCtrlHandler((PHANDLER_ROUTINE)CtrlHandler, TRUE);
ProductConsumerMgr mgr;
while (!b_stop) {
std::this_thread::sleep_for(std::chrono::milliseconds(10));
}
}

在主函数中启动TestProducerConsumer,生产者和消费者会不断工作,我们按下ctrl+c会中断程序,程序可以安全退出。在一般情况下没有问题,是不是意味着我们的程序足够健壮呢?

我们延缓生产者生产的效率,假设一个小时生产一个数据放入队列,此时Ctrl+c看看是否会中断程序

1
2
3
4
5
6
7
8
9
10
11
12
13
14
15
16
17
_producer = std::thread([this]() {
int data = 0;
while (!b_stop) {
std::this_thread::sleep_for(std::chrono::seconds(5));
std::unique_lock<std::mutex> lock(_mtx);
_producer_cv.wait(lock, [this]() {
if (_data_que.size() > 100) {
return false;
}
return true;
});
_data_que.push(++data);
std::cout << "push data is " << data << std::endl;
lock.unlock();
_consume_cv.notify_one();
}
});

生产者改为上述每5s产生一个数据,此时ctrl+c并不会中断程序,程序不会退出。

问题的根本在于条件竞争,当我们的生产者生产效率低时,队列为空,测试消费者线程处于挂起状态,ctrl+c虽然将停止信号设置为true,但是ProductConsumerMgr析构并不能执行完成,析构函数会等待两个线程退出,消费者线程不会退出,因为处于挂起状态了。

怎么办呢?我们可以在析构里通知两个线程退出即可。而且两个线程要增加唤醒后判断停止标记的逻辑。

1
2
3
4
5
6
~ProductConsumerMgr(){
_consume_cv.notify_one();
_producer_cv.notify_one();
_producer.join();
_consumer.join();
}

两个线程增加条件判断

1
2
3
4
5
6
7
8
9
10
11
12
13
14
15
16
17
18
19
20
21
22
23
24
25
26
27
28
29
30
31
32
33
34
35
36
37
38
39
40
41
42
43
44
45
46
47
48
49
50
ProductConsumerMgr(){
_consumer = std::thread([this]() {
while (!b_stop) {
std::unique_lock<std::mutex> lock(_mtx);
_consume_cv.wait(lock, [this]() {
if (b_stop) {
return true;
}
if (_data_que.empty()) {
return false;
}
return true;
});

if (b_stop) {
return ;
}
int data = _data_que.front();
_data_que.pop();
std::cout << "pop data is " << data << std::endl;
lock.unlock();
_producer_cv.notify_one();
}
});

_producer = std::thread([this]() {
int data = 0;
while (!b_stop) {
std::this_thread::sleep_for(std::chrono::seconds(5));
std::unique_lock<std::mutex> lock(_mtx);
_producer_cv.wait(lock, [this]() {
if (b_stop) {
return true;
}
if (_data_que.size() > 100) {
return false;
}
return true;
});
if (b_stop) {
return ;
}
_data_que.push(++data);
std::cout << "push data is " << data << std::endl;
lock.unlock();
_consume_cv.notify_one();
}
});

}

按下ctrl+c后,程序输出如下,并且正常退出

1
2
3
4
push data is 1
pop data is 1
Ctrl-C event
main exit

多线程之间协同工作以及安全退出是设计要考虑的事情。

混用智能指针和裸指针

有时候混用智能指针和裸指针,我们也会不小心delete一个交给只能指针管理的裸指针。单例在day24-TroubleShoot文件夹中ThreadSafeQue.h以及deadlock.cpp中。

之前我们为了让线程池从其他队列的尾部窃取任务,所以用双向链表实现了线程安全队列,并且实现了从尾部pop数据的方法。

1
2
3
4
5
6
7
8
9
10
11
12
13
14
15
16
bool try_steal(T& value) {
std::unique_lock<std::mutex> tail_lock(tail_mutex,std::defer_lock);
std::unique_lock<std::mutex> head_lock(head_mutex, std::defer_lock);
std::lock(tail_lock, head_lock);
if (head.get() == tail)
{
return false;
}

node* prev_node = tail->prev;
value = std::move(*(prev_node->data));
delete tail;
tail = prev_node;
tail->next = nullptr;
return true;
}

我们实现测试用例,一个线程push数据,一个线程从尾部pop数据,一个线程

1
2
3
4
5
6
7
8
9
10
11
12
13
14
15
16
17
18
19
20
21
22
23
24
25
26
27
28
29
30
31
32
33
34
35
36
37
38
39
40
void TestSteal() {
threadsafe_queue<int> que;
std::thread t1([&que]() {
int index = 0;
for (; ; ) {
index++;
que.push(index);
std::this_thread::sleep_for(std::chrono::milliseconds(200));
}
});

std::thread t3([&que]() {
for (; ; ) {
int value;
bool res = que.try_pop(value);
if (!res) {
std::this_thread::sleep_for(std::chrono::seconds(1));
continue;
}
std::cout << "pop out value is " << value << std::endl;
}
});

std::thread t2([&que]() {
for (; ; ) {
int value;
bool res = que.try_steal(value);
if (!res) {
std::this_thread::sleep_for(std::chrono::seconds(1));
continue;
}
std::cout << "steal out value is " << value << std::endl;
}
});


t1.join();
t2.join();
t3.join();
}

执行TestSteal时,程序崩溃。

https://cdn.llfc.club/1708753868812.jpg

查看堆栈上层信息,崩溃在try_steal这个函数里了。

https://cdn.llfc.club/1708754187835.jpg

多线程排查问题时,先把最有嫌疑的线程屏蔽,我们把try_steal的线程屏蔽,发现没有引发崩溃。可以确定是try_steal导致。

我们看try_steal函数内部,涉及内存的有个delete tail, 我们将这个delete tail 注释,发现没问题了。可见是delete tail 出了问题,结合底层崩溃的信息是unique_ptr的析构函数,可以推断我们混用了裸指针和智能指针,很可能是delete了智能指针管理的内存,导致智能指针析构的时候又一次delete内存引发崩溃。
我们看下队列里节点的设计

1
2
3
4
5
6
7
8
9
10
11
struct node
{
std::shared_ptr<T> data;
std::unique_ptr<node> next;
node* prev;
};

std::mutex head_mutex;
std::unique_ptr<node> head;
std::mutex tail_mutex;
node* tail;

队列是通过node构造的链表,每个节点的next指针为智能指针指向下一个节点,head为std::unique_ptr<node>,tail虽然为node*类型的指针,但是是从智能指针get获取的,那么tail是不应该删除的。

解决的办法就是不用delete即可,pop 尾部节点后将新的尾部节点next指针设置为nullptr,这样就相当于对原tail所属的unique_ptr减少引用计数了。

总结

本文介绍了C++ 多线程以及内存等问题的排错思路和方法,感兴趣的可以看看源码。

源码链接
https://gitee.com/secondtonone1/boostasio-learn/tree/master/concurrent/day24-TroubleShoot

视频链接:

https://space.bilibili.com/271469206/channel/collectiondetail?sid=1623290

中断线程

Posted on 2024-02-15 | In C++

简介

前几篇文章陆续介绍了线程池(ThreadPool),可汇合线程(join_thread)等技术,其中也用到了当管理类要退出时会通过条件变量唤醒挂起的线程,然后等待其执行完退出。本文按照作者的思路补充设计可中断的线程。

可中断线程

一个可中断的线程大体的实现是这个样子的

1
2
3
4
5
6
7
8
9
10
11
12
13
14
15
16
17
18
19
20
21
22
23
24
25
26
27
28
29
30
31
32
class interruptible_thread
{
std::thread internal_thread;
interrupt_flag* flag;
public:
template<typename FunctionType>
interruptible_thread(FunctionType f)
{
//⇽-- - 2
std::promise<interrupt_flag*> p;
//⇽-- - 3
internal_thread = std::thread([f, &p] {
p.set_value(&this_thread_interrupt_flag);
//⇽-- - 4
f();
});
//⇽-- - 5
flag = p.get_future().get();
}

void join() {
internal_thread.join();
}
void interrupt()
{
if (flag)
{
//⇽-- - 6
flag->set();
}
}
};
  1. interrupt_flag 为中断标记,其set操作用来标记中断
  2. internal_thread为内部线程,其回调函数内部先设置interrupt_flag*类型的promise值,再执行回调函数。
  3. 在interruptible_thread构造函数中等待internal_thread回调函数内部设置好flag的promise值后再退出。
  4. this_thread_interrupt_flag是我们定义的线程变量thread_local interrupt_flag this_thread_interrupt_flag;

中断标记

中断标记interrupt_flag类,主要是用来设置中断标记和判断是否已经中断,有可能挂起在条件变量的wait操作上,此时中断就需要唤醒挂起的线程。

为了扩充功能,我们希望设计接口支持在任何锁上等待,那我们使用condition_variable_any支持任意类型的条件变量。

1
2
3
4
5
6
7
8
9
10
11
12
13
14
15
16
17
18
19
20
21
22
23
24
25
26
27
28
29
30
31
32
33
34
35
36
37
38
39
40
41
42
43
44
45
46
47
48
49
50
51
52
53
54
55
56
57
58
59
60
61
62
63
64
65
66
67
68
69
70
class interrupt_flag
{
std::atomic<bool> flag;
std::condition_variable* thread_cond;
std::condition_variable_any* thread_cond_any;
std::mutex set_clear_mutex;
public:
interrupt_flag() :
thread_cond(0), thread_cond_any(0)
{}
void set()
{
flag.store(true, std::memory_order_relaxed);
std::lock_guard<std::mutex> lk(set_clear_mutex);
if (thread_cond)
{
thread_cond->notify_all();
}
else if (thread_cond_any) {
thread_cond_any->notify_all();
}
}
bool is_set() const
{
return flag.load(std::memory_order_relaxed);
}
void set_condition_variable(std::condition_variable& cv)
{
std::lock_guard<std::mutex> lk(set_clear_mutex);
thread_cond = &cv;
}
void clear_condition_variable()
{
std::lock_guard<std::mutex> lk(set_clear_mutex);
thread_cond = 0;
}


template<typename Lockable>
void wait(std::condition_variable_any& cv, Lockable& lk) {
struct custom_lock {
interrupt_flag* self;
Lockable& lk;
custom_lock(interrupt_flag* self_, std::condition_variable_any& cond, Lockable& lk_) :
self(self_), lk(lk_) {
self->set_clear_mutex.lock();
self->thread_cond_any = &cond;
}

void unlock() {
lk.unlock();
self->set_clear_mutex.unlock();
}

void lock() {
std::lock(self->set_clear_mutex, lk);
}

~custom_lock() {
self->thread_cond_any = 0;
self->set_clear_mutex.unlock();
}
};

custom_lock cl(this, cv, lk);
interruption_point();
cv.wait(cl);
interruption_point();
}
};
  1. set函数将停止标记设置为true,然后用条件变量通知挂起的线程。
  2. set_condition_variable 设置flag关联的条件变量,因为需要用指定的条件变量通知挂起的线程。
  3. clear_condition_variable清除关联的条件变量
  4. wait操作封装了接受任意锁的等待操作,wait函数内部定义了custom_lock,封装了加锁,解锁等操作。
  5. wait操作内部构造了custom_lock对象cl主要是对set_clear_mutex加锁,然后在调用cv.wait,这样能和set函数中的通知条件变量构成互斥,这么做的好处就是要么先将flag设置为true并发送通知,要么先wait,然后再发送通知。这样避免了线程在wait处卡死(线程不会错过发送的通知)

interruption_point函数内部判断flag是否为true,如果为true则抛出异常,这里作者处理的突兀了一些。读者可将这个函数改为bool返回值,调用者根据返回值判断是否继续等都可以。

1
2
3
4
5
6
7
void interruption_point()
{
if (this_thread_interrupt_flag.is_set())
{
throw thread_interrupted();
}
}

thread_interrupted为我们自定义的异常

1
2
3
4
5
6
7
8
9
10
11
12
13
14
class thread_interrupted : public std::exception
{
public:
thread_interrupted() : message("thread interrupted.") {}
~thread_interrupted() throw () {
}

virtual const char* what() const throw () {
return message.c_str();
}

private:
std::string message;
};

接下来定义一个类clear_cv_on_destruct

1
2
3
4
5
struct clear_cv_on_destruct {
~clear_cv_on_destruct(){
this_thread_interrupt_flag.clear_condition_variable();
}
};

clear_cv_on_destruct 这个类主要是用来在析构时释放和flag关联的条件变量。

除此之外,我们还可以封装几个不同版本的等待
支持普通条件变量的等待

1
2
3
4
5
6
7
8
9
10
void interruptible_wait(std::condition_variable& cv,
std::unique_lock<std::mutex>& lk)
{
interruption_point();
this_thread_interrupt_flag.set_condition_variable(cv);
clear_cv_on_destruct guard;
interruption_point();
cv.wait_for(lk, std::chrono::milliseconds(1));
interruption_point();
}

支持谓词的等待

1
2
3
4
5
6
7
8
9
10
11
12
13
14
template<typename Predicate>
void interruptible_wait(std::condition_variable& cv,
std::unique_lock<std::mutex>& lk,
Predicate pred)
{
interruption_point();
this_thread_interrupt_flag.set_condition_variable(cv);
clear_cv_on_destruct guard;
while (!this_thread_interrupt_flag.is_set() && !pred())
{
cv.wait_for(lk, std::chrono::milliseconds(1));
}
interruption_point();
}

上面两个版本采用wait_for而不用wait是因为如果等待之前条件变量的通知已经发送,线程之后才调用wait就会发生死等,所以这里采用的wait_for

支持future的等待

1
2
3
4
5
6
7
8
9
10
11
template<typename T>
void interruptible_wait(std::future<T>& uf)
{
while (!this_thread_interrupt_flag.is_set())
{
if (uf.wait_for(std::chrono::milliseconds(1)) ==
std::future_status::ready)
break;
}
interruption_point();
}

接下来我们用案例测试上面的案例

1
2
3
4
5
6
7
8
9
10
11
12
13
14
15
16
17
18
19
20
21
22
23
24
25
26
27
28
29
30
31
32
33
34
35
36
37
38
39
40
41
42
#include <iostream>
#include "interupthread.h"
std::vector<interruptible_thread> background_threads;
std::mutex mtx1;
std::mutex mtx2;
std::condition_variable cv1;
std::condition_variable_any cv2;
void start_background_processing() {
background_threads.push_back([]() {
try {
std::unique_lock<std::mutex> lock(mtx1);
interruptible_wait(cv1, lock);
}
catch (std::exception& ex) {
std::cout << "catch exception is " << ex.what() << std::endl;
}

});

background_threads.push_back([]() {
try {
std::unique_lock<std::mutex> lock(mtx2);
this_thread_interrupt_flag.wait(cv2, mtx2);
}
catch (std::exception& ex) {
std::cout << "catch exception is " << ex.what() << std::endl;
}

});
}

int main()
{
start_background_processing();
for (unsigned i = 0; i < background_threads.size(); i++) {
background_threads[i].interrupt();
}

for (unsigned i = 0; i < background_threads.size(); i++) {
background_threads[i].join();
}
}

上面的案例中启动了两个线程,每个线程回调函数中调用我们封装的可中断的等待。在主函数中断两个线程,并测试两个线程能否在等待中中断。

程序输出

1
2
catch exception is thread interrupted.

总结

本文介绍了中断线程的设计,说简单点还是设置终止标记为true,利用条件变量通知挂起的线程唤醒。

源码链接:

https://gitee.com/secondtonone1/boostasio-learn/tree/master/concurrent/day23-interupthread

视频链接:

https://space.bilibili.com/271469206/channel/collectiondetail?sid=1623290

线程池技术补充(轮询,等待完成结果,避免争夺,任务窃取)

Posted on 2024-02-12 | In C++

简介

前文我们介绍了线程池,已经给大家提供了一个完整的线程池封装了,本节跟着《C++ 并发编程实战》一书中作者的思路,看看他的线程池的实现,以此作为补充

轮询方式的线程池

配合我们之前封装的线程安全队列threadsafe_queue

1
2
3
4
5
6
7
8
9
10
11
12
13
14
15
16
17
18
19
20
21
22
23
24
25
26
27
28
29
30
31
32
33
34
35
36
37
38
39
40
41
42
43
44
45
46
47
48
49
50
51
52
53
54
55
56
57
58
59
60
61
62
63
64
65
66
67
68
69
70
71
72
73
74
75
76
77
78
79
80
81
82
83
84
85
86
87
88
89
90
91
92
93
94
95
96
97
98
99
100
101
102
103
104
105
106
107
108
109
110
111
112
113
114
115
116
117
118
119
120
121
122
123
124
125
126
127
128
129
130
131
132
133
134
135
136
137
138
139
140
141
142
143
144
145
146
147
148
149
150
151
152
153
154
155
156
157
158
159
160
161
162
163
164
165
166
167
168
169
170
171
172
173
174
175
176
177
178
179
180
181
182
183
184
185
186
187
188
189
190
#include <mutex>
#include <queue>

template<typename T>
class threadsafe_queue
{
private:
struct node
{
std::shared_ptr<T> data;
std::unique_ptr<node> next;
node* prev;
};

std::mutex head_mutex;
std::unique_ptr<node> head;
std::mutex tail_mutex;
node* tail;
std::condition_variable data_cond;
std::atomic_bool bstop;

node* get_tail()
{
std::lock_guard<std::mutex> tail_lock(tail_mutex);
return tail;
}
std::unique_ptr<node> pop_head()
{
std::unique_ptr<node> old_head = std::move(head);
head = std::move(old_head->next);
return old_head;
}

std::unique_lock<std::mutex> wait_for_data()
{
std::unique_lock<std::mutex> head_lock(head_mutex);
data_cond.wait(head_lock,[&] {return head.get() != get_tail() || bstop.load() == true; });
return std::move(head_lock);
}

std::unique_ptr<node> wait_pop_head()
{
std::unique_lock<std::mutex> head_lock(wait_for_data());
if (bstop.load()) {
return nullptr;
}

return pop_head();
}
std::unique_ptr<node> wait_pop_head(T& value)
{
std::unique_lock<std::mutex> head_lock(wait_for_data());
if (bstop.load()) {
return nullptr;
}
value = std::move(*head->data);
return pop_head();
}

std::unique_ptr<node> try_pop_head()
{
std::lock_guard<std::mutex> head_lock(head_mutex);
if (head.get() == get_tail())
{
return std::unique_ptr<node>();
}
return pop_head();
}
std::unique_ptr<node> try_pop_head(T& value)
{
std::lock_guard<std::mutex> head_lock(head_mutex);
if (head.get() == get_tail())
{
return std::unique_ptr<node>();
}
value = std::move(*head->data);
return pop_head();
}
public:

threadsafe_queue() : // ⇽-- - 1
head(new node), tail(head.get())
{}

~threadsafe_queue() {
bstop.store(true);
data_cond.notify_all();
}

threadsafe_queue(const threadsafe_queue& other) = delete;
threadsafe_queue& operator=(const threadsafe_queue& other) = delete;

void Exit() {
bstop.store(true);
data_cond.notify_all();
}

bool wait_and_pop_timeout(T& value) {
std::unique_lock<std::mutex> head_lock(head_mutex);
auto res = data_cond.wait_for(head_lock, std::chrono::milliseconds(100),
[&] {return head.get() != get_tail() || bstop.load() == true; });
if (res == false) {
return false;
}

if (bstop.load()) {
return false;
}

value = std::move(*head->data);
head = std::move(head->next);
return true;
}

std::shared_ptr<T> wait_and_pop() // <------3
{
std::unique_ptr<node> const old_head = wait_pop_head();
if (old_head == nullptr) {
return nullptr;
}
return old_head->data;
}

bool wait_and_pop(T& value) // <------4
{
std::unique_ptr<node> const old_head = wait_pop_head(value);
if (old_head == nullptr) {
return false;
}
return true;
}


std::shared_ptr<T> try_pop()
{
std::unique_ptr<node> old_head = try_pop_head();
return old_head ? old_head->data : std::shared_ptr<T>();
}

bool try_pop(T& value)
{
std::unique_ptr<node> const old_head = try_pop_head(value);
if (old_head) {
return true;
}
return false;
}

bool empty()
{
std::lock_guard<std::mutex> head_lock(head_mutex);
return (head.get() == get_tail());
}

void push(T new_value) //<------2
{
std::shared_ptr<T> new_data(
std::make_shared<T>(std::move(new_value)));
std::unique_ptr<node> p(new node);
{
std::lock_guard<std::mutex> tail_lock(tail_mutex);
tail->data = new_data;
node* const new_tail = p.get();
new_tail->prev = tail;

tail->next = std::move(p);

tail = new_tail;
}

data_cond.notify_one();
}

bool try_steal(T& value) {
std::unique_lock<std::mutex> tail_lock(tail_mutex,std::defer_lock);
std::unique_lock<std::mutex> head_lock(head_mutex, std::defer_lock);
std::lock(tail_lock, head_lock);
if (head.get() == tail)
{
return false;
}

node* prev_node = tail->prev;
value = std::move(*(prev_node->data));
tail = prev_node;
tail->next = nullptr;
return true;
}
};

我们封装了一个简单轮询的线程池

1
2
3
4
5
6
7
8
9
10
11
12
13
14
15
16
17
18
19
20
21
22
23
24
25
26
27
28
29
30
31
32
33
34
35
36
37
38
39
40
41
42
43
44
45
46
47
48
49
50
51
52
53
54
55
56
57
58
59
60
61
62
63
64
65
66
67
68
69
70
71
72
73
74
75
#include <atomic>
#include "ThreadSafeQue.h"
#include "join_thread.h"

class simple_thread_pool
{
std::atomic_bool done;
//⇽-- - 1
threadsafe_queue<std::function<void()> > work_queue;
//⇽-- - 2
std::vector<std::thread> threads;
//⇽-- - 3
join_threads joiner;
void worker_thread()
{
//⇽-- - 4
while (!done)
{
std::function<void()> task;
//⇽-- - 5
if (work_queue.try_pop(task))
{
//⇽-- - 6
task();
}
else
{
//⇽-- - 7
std::this_thread::yield();
}
}
}

simple_thread_pool() :
done(false), joiner(threads)
{
//⇽--- 8
unsigned const thread_count = std::thread::hardware_concurrency();
try
{
for (unsigned i = 0; i < thread_count; ++i)
{
//⇽-- - 9
threads.push_back(std::thread(&simple_thread_pool::worker_thread, this));
}
}
catch (...)
{
//⇽-- - 10
done = true;
throw;
}
}
public:
static simple_thread_pool& instance() {
static simple_thread_pool pool;
return pool;
}
~simple_thread_pool()
{
//⇽-- - 11
done = true;
for (unsigned i = 0; i < threads.size(); ++i)
{
//⇽-- - 9
threads[i].join();
}
}
template<typename FunctionType>
void submit(FunctionType f)
{
//⇽-- - 12
work_queue.push(std::function<void()>(f));
}
};
  1. worker_thread 即为线程的回调函数,回调函数内从队列中取出任务并处理,如果没有任务则调用yield释放cpu资源。

  2. submit函数比较简单,投递了一个返回值为void,参数为void的任务。这和我们之前自己设计的线程池(可执行任意参数类型,返回值不限的函数)相比功能稍差了一些。

获取任务完成结果

因为外部投递任务给线程池后要获取线程池执行任务的结果,我们之前自己设计的线程池采用的是future和decltype推断函数返回值的方式构造一个返回类型的future。

这里作者先封装一个可调用对象的类

1
2
3
4
5
6
7
8
9
10
11
12
13
14
15
16
17
18
19
20
21
22
23
24
25
26
27
28
29
30
31
32
33
class function_wrapper
{
struct impl_base {
virtual void call() = 0;
virtual ~impl_base() {}
};
std::unique_ptr<impl_base> impl;
template<typename F>
struct impl_type : impl_base
{
F f;
impl_type(F&& f_) : f(std::move(f_)) {}
void call() { f(); }
};
public:
template<typename F>
function_wrapper(F&& f) :
impl(new impl_type<F>(std::move(f)))
{}
void operator()() { impl->call(); }
function_wrapper() = default;
function_wrapper(function_wrapper&& other) :
impl(std::move(other.impl))
{}
function_wrapper& operator=(function_wrapper&& other)
{
impl = std::move(other.impl);
return *this;
}
function_wrapper(const function_wrapper&) = delete;
function_wrapper(function_wrapper&) = delete;
function_wrapper& operator=(const function_wrapper&) = delete;
};
  1. impl_base 是一个基类,内部有一个纯虚函数call,以及一个虚析构,这样可以通过delete 基类指针动态析构子类对象。

  2. impl_type 继承了impl_base类,内部包含了一个可调用对象f,并且实现了构造函数和call函数,call内部调用可调用对象f。

  3. function_wrapper 内部有智能指针impl_base类型的unique_ptr变量impl, function_wrapper构造函数根据可调用对象f构造impl

  4. function_wrapper支持移动构造不支持拷贝和赋值。function_wrapper本质上就是当作task给线程池执行的。

可获取任务执行状态的线程池如下

1
2
3
4
5
6
7
8
9
10
11
12
13
14
15
16
17
18
19
20
21
22
23
24
25
26
27
28
29
30
31
32
33
34
35
36
37
38
39
40
41
42
43
44
45
46
47
48
49
50
51
52
53
54
55
56
57
58
59
60
61
62
63
64
65
66
67
68
69
70
71
72
73
74
75
76
77
78
class future_thread_pool
{
private:
void worker_thread()
{
while (!done)
{
function_wrapper task;

if (work_queue.try_pop(task))
{
task();
}
else
{
std::this_thread::yield();
}
}
}
public:

static future_thread_pool& instance() {
static future_thread_pool pool;
return pool;
}
~future_thread_pool()
{
//⇽-- - 11
done = true;
for (unsigned i = 0; i < threads.size(); ++i)
{
//⇽-- - 9
threads[i].join();
}
}

template<typename FunctionType>
std::future<typename std::result_of<FunctionType()>::type>
submit(FunctionType f)
{
typedef typename std::result_of<FunctionType()>::type result_type;
std::packaged_task<result_type()> task(std::move(f));
std::future<result_type> res(task.get_future());
work_queue.push(std::move(task));
return res;
}

private:
future_thread_pool() :
done(false), joiner(threads)
{
//⇽--- 8
unsigned const thread_count = std::thread::hardware_concurrency();
try
{
for (unsigned i = 0; i < thread_count; ++i)
{
//⇽-- - 9
threads.push_back(std::thread(&future_thread_pool::worker_thread, this));
}
}
catch (...)
{
//⇽-- - 10
done = true;
throw;
}
}

std::atomic_bool done;
//⇽-- - 1
threadsafe_queue<function_wrapper> work_queue;
//⇽-- - 2
std::vector<std::thread> threads;
//⇽-- - 3
join_threads joiner;
};

  1. worker_thread内部从队列中pop任务并执行,如果没有任务则交出cpu资源。

  2. submit函数返回值为std::future<typename std::result_of<FunctionType()>::type>类型,通过std::result_of<FunctionType()>推断出函数执行的结果,然后通过::type推断出结果的类型,并且根据这个类型构造future,这样调用者就可以在投递完任务获取任务的执行结果了。

  3. submit函数内部我们将函数执行的结果类型定义为result_type类型,并且利用f构造一个packaged_task任务。通过task返回一个future给外部调用者,然后我们调用队列的push将task放入队列,注意队列存储的是function_wrapper,这里是利用task隐式构造了function_wrapper类型的对象。

利用条件变量等待

当我们的任务队列中没有任务的时候,可以让线程挂起,然后等待有任务投递到队列后在激活线程处理

1
2
3
4
5
6
7
8
9
10
11
12
13
14
15
16
17
18
19
20
21
22
23
24
25
26
27
28
29
30
31
32
33
34
35
36
37
38
39
40
41
42
43
44
45
46
47
48
49
50
51
52
53
54
55
56
57
58
59
60
61
62
63
64
65
66
67
68
69
70
71
72
73
74
75
76
77
class notify_thread_pool
{
private:
void worker_thread()
{
while (!done)
{

auto task_ptr = work_queue.wait_and_pop();
if (task_ptr == nullptr) {
continue;
}

(*task_ptr)();
}
}
public:

static notify_thread_pool& instance() {
static notify_thread_pool pool;
return pool;
}
~notify_thread_pool()
{
//⇽-- - 11
done = true;
work_queue.Exit();
for (unsigned i = 0; i < threads.size(); ++i)
{
//⇽-- - 9
threads[i].join();
}
}

template<typename FunctionType>
std::future<typename std::result_of<FunctionType()>::type>
submit(FunctionType f)
{
typedef typename std::result_of<FunctionType()>::type result_type;
std::packaged_task<result_type()> task(std::move(f));
std::future<result_type> res(task.get_future());
work_queue.push(std::move(task));
return res;
}

private:
notify_thread_pool() :
done(false), joiner(threads)
{
//⇽--- 8
unsigned const thread_count = std::thread::hardware_concurrency();
try
{
for (unsigned i = 0; i < thread_count; ++i)
{
//⇽-- - 9
threads.push_back(std::thread(&notify_thread_pool::worker_thread, this));
}
}
catch (...)
{
//⇽-- - 10
done = true;
work_queue.Exit();
throw;
}
}

std::atomic_bool done;
//⇽-- - 1
threadsafe_queue<function_wrapper> work_queue;
//⇽-- - 2
std::vector<std::thread> threads;
//⇽-- - 3
join_threads joiner;
};

  1. worker_thread内部调用了work_queue的wait_and_pop函数,如果队列中有任务直接返回,如果没任务则挂起。

  2. 另外我们在线程池的析构函数和异常处理时都增加了work_queue.Exit(); 这需要在我们的线程安全队列中增加Exit函数通知线程唤醒,因为线程发现队列为空会阻塞住。

1
2
3
4
void Exit() {
bstop.store(true);
data_cond.notify_all();
}

避免争夺

我们的任务队列只有一个,当向任务队列频繁投递任务,线程池中其他线程从队列中获取任务,队列就会频繁加锁和解锁,一般情况下性能不会有什么损耗,但是如果投递的任务较多,我们可以采取分流的方式,创建多个任务队列(可以和线程池中线程数相等),将任务投递给不同的任务队列,每个线程消费自己的队列即可,这样减少了线程间取任务的冲突。

1
2
3
4
5
6
7
8
9
10
11
12
13
14
15
16
17
18
19
20
21
22
23
24
25
26
27
28
29
30
31
32
33
34
35
36
37
38
39
40
41
42
43
44
45
46
47
48
49
50
51
52
53
54
55
56
57
58
59
60
61
62
63
64
65
66
67
68
69
70
71
72
73
74
75
76
77
78
79
80
81
82
83
84
85
86
87
88
89
90
91
92
93
94
#include "ThreadSafeQue.h"
#include <future>
#include "ThreadSafeQue.h"
#include "join_thread.h"
#include "FutureThreadPool.h"

class parrallen_thread_pool
{
private:

void worker_thread(int index)
{
while (!done)
{

auto task_ptr = thread_work_ques[index].wait_and_pop();
if (task_ptr == nullptr) {
continue;
}

(*task_ptr)();
}
}
public:

static parrallen_thread_pool& instance() {
static parrallen_thread_pool pool;
return pool;
}
~parrallen_thread_pool()
{
//⇽-- - 11
done = true;
for (unsigned i = 0; i < thread_work_ques.size(); i++) {
thread_work_ques[i].Exit();
}

for (unsigned i = 0; i < threads.size(); ++i)
{
//⇽-- - 9
threads[i].join();
}
}

template<typename FunctionType>
std::future<typename std::result_of<FunctionType()>::type>
submit(FunctionType f)
{
int index = (atm_index.load() + 1) % thread_work_ques.size();
atm_index.store(index);
typedef typename std::result_of<FunctionType()>::type result_type;
std::packaged_task<result_type()> task(std::move(f));
std::future<result_type> res(task.get_future());
thread_work_ques[index].push(std::move(task));
return res;
}

private:
parrallen_thread_pool() :
done(false), joiner(threads), atm_index(0)
{
//⇽--- 8
unsigned const thread_count = std::thread::hardware_concurrency();
try
{
thread_work_ques = std::vector < threadsafe_queue<function_wrapper>>(thread_count);

for (unsigned i = 0; i < thread_count; ++i)
{
//⇽-- - 9
threads.push_back(std::thread(&parrallen_thread_pool::worker_thread, this, i));
}
}
catch (...)
{
//⇽-- - 10
done = true;
for (int i = 0; i < thread_work_ques.size(); i++) {
thread_work_ques[i].Exit();
}
throw;
}
}

std::atomic_bool done;
//全局队列
std::vector<threadsafe_queue<function_wrapper>> thread_work_ques;

//⇽-- - 2
std::vector<std::thread> threads;
//⇽-- - 3
join_threads joiner;
std::atomic<int> atm_index;
};
  1. 我们将任务队列变为多个 //全局队列 std::vector<threadsafe_queue<function_wrapper>> thread_work_ques;.

  2. commit的时候根据atm_index索引自增后对总大小取余将任务投递给不同的队列。

  3. worker_thread增加了索引参数,每个线程的在回调的时候会根据自己的索引取出对应队列中的任务进行执行。

任务窃取

当本线程队列中的任务处理完了,它可以去别的线程的任务队列中看看是否有没处理的任务,帮助其他线程处理任务,简称任务窃取。

1
2
3
4
5
6
7
8
9
10
11
12
13
14
15
16
17
18
19
20
21
22
23
24
25
26
27
28
29
30
31
32
33
34
35
36
37
38
39
40
41
42
43
44
45
46
47
48
49
50
51
52
53
54
55
56
57
58
59
60
61
62
63
64
65
66
67
68
69
70
71
72
73
74
75
76
77
78
79
80
81
82
83
84
85
86
87
88
89
90
91
92
93
94
95
96
97
98
99
100
101
102
103
104
105
106
107
108
109
110
111
112
113
#include "ThreadSafeQue.h"
#include <future>
#include "ThreadSafeQue.h"
#include "join_thread.h"
#include "FutureThreadPool.h"

class steal_thread_pool
{
private:

void worker_thread(int index)
{
while (!done)
{
function_wrapper wrapper;
bool pop_res = thread_work_ques[index].try_pop(wrapper);
if (pop_res) {
wrapper();
continue;
}

bool steal_res = false;
for (int i = 0; i < thread_work_ques.size(); i++) {
if (i == index) {
continue;
}

steal_res = thread_work_ques[i].try_pop(wrapper);
if (steal_res) {
wrapper();
break;
}

}

if (steal_res) {
continue;
}

std::this_thread::yield();
}
}
public:

static steal_thread_pool& instance() {
static steal_thread_pool pool;
return pool;
}
~steal_thread_pool()
{
//⇽-- - 11
done = true;
for (unsigned i = 0; i < thread_work_ques.size(); i++) {
thread_work_ques[i].Exit();
}

for (unsigned i = 0; i < threads.size(); ++i)
{
//⇽-- - 9
threads[i].join();
}
}

template<typename FunctionType>
std::future<typename std::result_of<FunctionType()>::type>
submit(FunctionType f)
{
int index = (atm_index.load() + 1) % thread_work_ques.size();
atm_index.store(index);
typedef typename std::result_of<FunctionType()>::type result_type;
std::packaged_task<result_type()> task(std::move(f));
std::future<result_type> res(task.get_future());
thread_work_ques[index].push(std::move(task));
return res;
}

private:
steal_thread_pool() :
done(false), joiner(threads), atm_index(0)
{
//⇽--- 8
unsigned const thread_count = std::thread::hardware_concurrency();
try
{
thread_work_ques = std::vector < threadsafe_queue<function_wrapper>>(thread_count);

for (unsigned i = 0; i < thread_count; ++i)
{
//⇽-- - 9
threads.push_back(std::thread(&steal_thread_pool::worker_thread, this, i));
}
}
catch (...)
{
//⇽-- - 10
done = true;
for (int i = 0; i < thread_work_ques.size(); i++) {
thread_work_ques[i].Exit();
}
throw;
}
}

std::atomic_bool done;
//全局队列
std::vector<threadsafe_queue<function_wrapper>> thread_work_ques;

//⇽-- - 2
std::vector<std::thread> threads;
//⇽-- - 3
join_threads joiner;
std::atomic<int> atm_index;
};
  1. worker_thread中本线程会先处理自己队列中的任务,如果自己队列中没有任务则从其它线程的任务队列中获取任务。如果都没有则交出cpu资源。

  2. 为了实现try_steal的功能,我们需要修改线程安全队列threadsafe_queue,增加try_steal函数

1
2
3
4
5
6
7
8
9
10
11
12
13
14
15
bool try_steal(T& value) {
std::unique_lock<std::mutex> tail_lock(tail_mutex,std::defer_lock);
std::unique_lock<std::mutex> head_lock(head_mutex, std::defer_lock);
std::lock(tail_lock, head_lock);
if (head.get() == tail)
{
return false;
}

node* prev_node = tail->prev;
value = std::move(*(prev_node->data));
tail = prev_node;
tail->next = nullptr;
return true;
}

因为try_steal是从队列的尾部弹出数据,为了防止此时有其他线程从头部弹出数据造成操作同一个节点,或者其他线程弹出头部数据后接着修改头部节点为下一个节点,此时本线程正在弹出尾部节点,而尾部节点正好是头部的下一个节点造成数据混乱,此时加了两把锁,对头部和尾部都加锁。

我们这里所说的弹出尾部节点不是弹出tail,而是tail的前一个节点,因为tail是尾部表示一个空节点,tail前边的节点才是尾部数据的节点,为了实现反向查找,我们为node增加了prev指针

1
2
3
4
5
6
struct node
{
std::shared_ptr<T> data;
std::unique_ptr<node> next;
node* prev;
};

所以在push节点的时候也要把这个节点的prev指针指向前一个节点

1
2
3
4
5
6
7
8
9
10
11
12
13
14
15
void push(T new_value) //<------2
{
std::shared_ptr<T> new_data(
std::make_shared<T>(std::move(new_value)));
std::unique_ptr<node> p(new node);
{
std::lock_guard<std::mutex> tail_lock(tail_mutex);
tail->data = new_data;
node* const new_tail = p.get();
new_tail->prev = tail;
tail->next = std::move(p);
tail = new_tail;
}
data_cond.notify_one();
}

整体来说steal版本的线程池就这些内容和前边变化不大。

测试

测试用例已经在源代码中写好,感兴趣可以看下

源码链接:

https://gitee.com/secondtonone1/boostasio-learn/tree/master/concurrent/day22-ThreadPool

视频链接:

https://space.bilibili.com/271469206/channel/collectiondetail?sid=1623290

线程池原理和实现

Posted on 2024-02-07 | In C++

简介

线程池是一种并发编程的技术,用于有效地管理和复用线程资源。它由一组预先创建的线程组成,这些线程可以在需要时执行任务,并在任务完成后返回线程池中等待下一个任务。

线程池的主要目的是避免反复创建和销毁线程的开销,以及有效地控制并发线程的数量。通过使用线程池,可以降低系统的负载,并提高任务执行的效率。

以下是线程池的一些关键特点:

  1. 线程池包含一个线程队列和任务队列,任务队列用于存储待执行的任务。
  2. 线程池在启动时会创建一定数量的线程,并将它们放入线程队列中。
  3. 当有任务需要执行时,线程池从任务队列中获取任务,并将其分配给空闲的线程执行。
  4. 执行完任务的线程会继续等待下一个任务的到来,而不是被销毁。
  5. 如果任务队列为空,线程池中的线程可以进入睡眠状态,减少资源占用。
  6. 线程池可以限制同时执行的线程数量,避免过多的并发线程导致系统负载过高。

使用线程池有以下几个优点:

  1. 提高性能:通过复用线程,避免了线程创建和销毁的开销,提高了任务执行的效率。
  2. 资源控制:线程池可以限制并发线程的数量,避免系统负载过高,保护系统资源。
  3. 提高响应性:线程池可以在任务到来时立即进行处理,减少了任务等待的时间,提高了系统的响应速度。
  4. 简化编程:使用线程池可以将任务的提交和执行分离,简化了并发编程的复杂性。

需要注意的是,在使用线程池时,需要合理设置线程池的大小,避免线程过多导致资源浪费,或线程过少导致任务等待的时间过长。

线程池的实现

首先我不希望线程池被拷贝,我希望它能以单例的形式在需要的地方调用, 那么单例模式就需要删除拷贝构造和拷贝赋值,所以我设计一个基类

1
2
3
4
5
6
7
8
9
10
class NoneCopy {

public:
~NoneCopy(){}
protected:
NoneCopy(){}
private:
NoneCopy(const NoneCopy&) = delete;
NoneCopy& operator=(const NoneCopy&) = delete;
};

然后让线程池ThreadPool类继承NoneCopy, 这样ThreadPool也就不支持拷贝构造和拷贝赋值了,拷贝构造和拷贝赋值的前提是其基类可以拷贝构造和赋值。

1
2
3
4
5
6
7
8
9
10
11
class ThreadPool : public NoneCopy {
public:
~ThreadPool();

static ThreadPool& instance() {
static ThreadPool ins;
return ins;
}
private:
ThreadPool();
};

我们先实现了instance函数,该函数是一个静态成员函数,返回局部的静态实例ins.

我们之前在单例模式中讲过,函数内局部的静态变量,其生命周期和进程同步,但是可见度仅在函数内部。

局部静态变量只会在第一次调用这个函数时初始化一次。故可以作为单例模式。这种模式在C++ 11之前是不安全的,因为各平台编译器实现规则可能不统一导致多线程会生成多个实例。

但是C++ 11过后,语言层面对其优化保证了多个线程调用同一个函数只会生成一个实例,所以C++ 11过后我们可以放心使用。

接下来考虑构造函数,我们说过线程池需要线程队列和任务队列,所以这两个队列要在构造函数中完成构造,线程队列我们可以用一个vector存储,任务队列因为要保证先进先出,所以用queue结构即可。

因为任务队列要有通用性,所以我们规定任务队列中存储的类型为

1
using Task = std::packaged_task<void()>;

我们在ThreadPool中添加如下成员

1
2
3
4
std::atomic_int          thread_num_;
std::queue<Task> tasks_;
std::vector<std::thread> pool_;
std::atomic_bool stop_;

其中 tasks_ 表示任务队列, pool_表示线程队列, thread_num_表示空闲的线程数, stop_表示线程池是否退出。

那我们可以实现线程池的构造函数了

1
2
3
4
5
6
7
8
9
10
ThreadPool(unsigned int num = std::thread::hardware_concurrency())
: stop_(false) {

if (num <= 1)
thread_num_ = 2;
else
thread_num_ = num;

start();
}

我们在构造函数中初始化停止标记为false,初始化线程数默认为硬件允许的物理并行核数。然后调用了start函数。

start函数主要的功能为启动线程并且将线程放入vector中管理,线程的回调函数基本功能就是从任务队列中消费数据,如果队列中有任务则pop出任务并执行,否则线程需要挂起。在部分初学者实现的线程池当中会采用循环等待的方式(如果队列为空则继续循环),这种方式会造成线程忙等,进而引发资源的浪费。

所以我们现在还需要给ThreadPool添加两个成员

1
2
std::mutex               cv_mt_;
std::condition_variable cv_lock_;

分别表示互斥量和条件变量,用来控制线程的休眠和唤醒。

那我们实现start函数

1
2
3
4
5
6
7
8
9
10
11
12
13
14
15
16
17
18
19
20
21
22
23
void start() {
for (int i = 0; i < thread_num_; ++i) {
pool_.emplace_back([this]() {
while (!this->stop_.load()) {
Task task;
{
std::unique_lock<std::mutex> cv_mt(cv_mt_);
this->cv_lock_.wait(cv_mt, [this] {
return this->stop_.load() || !this->tasks_.empty();
});
if (this->tasks_.empty())
return;

task = std::move(this->tasks_.front());
this->tasks_.pop();
}
this->thread_num_--;
task();
this->thread_num_++;
}
});
}
}

pool_为线程队列,在线程队列中我们采用emplace_back直接调用线程的构造函数,将线程要处理的逻辑写成lambda表达式,从而构造线程并且将线程插入线程队列中。

lambda表达式内的逻辑先判断是否停止,如果停止则退出循环, 否则继续循环。

循环的逻辑就是每次从队列中取任务,先调用条件变量等待队列不为空,或者收到退出信号,二者只要满足其一,条件变量的wait就返回,并且继续向下走。否则条件变量wait不会返回,线程将挂起。

如果条件变量判断条件满足(队列不为空或者发现停止信号),线程继续向下执行,判断如果任务队列为空则说明是因为收到停止信号所以直接返回退出,否则就说明任务队列有数据,我们取出任务队列头部的task,将空闲线程数减少1,执行task,再将空闲线程数+1.

接下来我们实现析构函数

1
2
3
~ThreadPool() {
stop();
}

析构函数中的stop就是要向线程发送停止信号,避免线程一直处于挂起状态(因为任务队列为空会导致线程挂起)

1
2
3
4
5
6
7
8
9
10
void stop() {
stop_.store(true);
cv_lock_.notify_all();
for (auto& td : pool_) {
if (td.joinable()) {
std::cout << "join thread " << td.get_id() << std::endl;
td.join();
}
}
}

stop函数中我们将停止标记设置为true,并且调用条件变量的notify_all唤醒所有线程,并且等待所有线程退出后线程池才析构完成。

我们再实现一个函数提供给外部查询当前空闲的线程数,这个功能可有可无,主要是方便外部根据空闲线程数是否达到阈值派发任务。

1
2
3
int idleThreadCount() {
return thread_num_;
}

我们实现了线程池处理任务的逻辑,接下来我们要封装一个接口提供给外部,支持其投递任务给线程池。

因为我们要投递任务给线程池,任务的功能和参数都不同,而之前我们设置的线程池执行的task类型为void(void),返回值为void,参数为void的任务。那我们可用用参数绑定的方式将一个函数绑定为void(void)类型, 比如我们用如下操作

1
2
3
4
5
6
7
8
9
int functionint(int param) {
std::cout << "param is " << param << std::endl;
return 0;
}

void bindfunction() {
std::function<int(void)> functionv = std::bind(functionint, 3);
functionv();
}

假设我们希望任务队列里的任务要调用functionint,以及参数为3,因为在投递任务时我们就知道任务要执行的函数和参数,所以我们可以将执行的函数和参数绑定生成参数为void的函数。

我们通过bindfunction将functionint绑定为一个返回值为int,参数为void的新函数functionv。而我们的任务队列要放入返回值为void,参数也为void的函数,该怎么办呢?

其实很简单,我们可以利用lambda表达式生成一个返回值和参数都为void的函数,函数内部调用functionv即可,有点类似于go,python等语言的闭包,但是C++的闭包是一种伪闭包,需要用值的方式捕获用到的变量。

比如我们将上面的函数functionint和调用的参数3打包放入队列,可以这么写

1
2
3
4
5
6
7
8
void pushtasktoque() {
std::function<int(void)> functionv = std::bind(functionint, 3);
using Task = std::packaged_task<void()>;
std::queue<Task> taskque;
taskque.emplace([functionv]() {
functionv();
});
}

我们先将functionint绑定为functionv,然后定义一个队列存储的类型为std::packaged_task<void()>, 为了防止拷贝构造的开销,我们调用队列的emplace函数,该函数接受lambda表达式直接构造任务放入了队列里。因为lambda表达式捕获了functionv的值,所以可以在内部调用functionv。

lambda表达式返回值为void参数也为void,所以可以直接放入任务队列。

接下来要一个问题,一个问题是我们投递任务,有时候投递方需要获取任务是否完成, 那我们可以利用packaged_task返回一个future给调用方,调用方在外部就可以通过future判断任务是否返回了。我们修改上面的函数,实现commit任务的函数

1
2
3
4
5
6
7
8
9
10
11
12
std::future<int> committask() {
std::function<int(void)> functionv = std::bind(functionint, 3);
auto taskf = std::make_shared<std::packaged_task<int(void)>>(functionv);
auto res = taskf->get_future();
using Task = std::packaged_task<void()>;
std::queue<Task> taskque;
taskque.emplace([taskf]() {
(*taskf)();
});

return res;
}

我们将functionv传递给packaged_task构造函数,构造了一个packaged_task类型的智能指针,每个人的编程风格不同,大家也可以不用智能指针,直接使用packaged_task对象,比如下面的

1
std::packaged_task<int(void)> taskf(functionv);

我构造的是packaged_task类型的智能指针,所以通过taskf->get_future()获取future对象res,这个res作为参数返回给外部,外部就可以通过res判断任务是否完成。

接下来我们定义了一个任务队列,任务队列调用emplace直接构造任务插入队列中,避免拷贝开销。参数为lambda表达式,lamba捕获taskf对象的值,在内部调用(*taskf)()完成任务调用。

上面只是通过具体的函数和参数实现了投递任务的功能,而实际情况是我们要投递各种类型的任务,以及多种类型和多个参数,该怎么实现committask函数更通用呢?

对于更通用的设计我们通常采用模板

1
2
3
4
5
template <class F, class... Args>
std::future<int> commit(F&& f, Args&&... args){
//....
return std::future<int>();
}

上面的模板定义了两个类型,F表示可调用对象类型,可以是lambda表达式,函数,function类等, Args为可变参数模板,可以是任意种类的类型,任意数量。commit函数参数采用F和Args的右值引用,这种模板类型的右值引用也被称作万能引用类型,可以接受左值引用,也可接受右值引用,利用引用折叠技术,可以推断出f和args的最终类型。我在基础课程里讲过,这里再给大家复习一下折叠规则,假设T为模板类型,推到规则如下:

T& & => T&

T& && => T&

T&& & => T&

T&& && => T&&

总结一下,就是只要出现了左值引用最后折叠的结果都是左值引用,只有右值应用和右值引用折叠才能变成右值引用。

1
2
3
4
5
6
7
8
9
10
11
template<typename T>
void Function(T&& t){
//...
}

int main(){
int a = 3;
Function(a);
Function(3);
return 0;
}

当我们把一个int类型的左值a传递给 Function的 T&& 参数t时(T为模板类型), T被推导为int & , 那么参数t整体的类型就变为int & && => int &类型,也就是左值引用类型。

当我们把一个右值3传递给Function的T&& 参数t时,T被推导为int类型。t被推导为int && 类型,也就是右值引用类型。

如果大家熟悉boost库,可以用boost库的type_id_with_cvr打印具体类型,比如我们下面的代码

1
2
3
4
5
6
7
8
9
10
11
12
13
14
15
16
17
18
19
20
21
22
23
24
25
26
27
28
#include <boost/type_index.hpp>
using boost::typeindex::type_id_with_cvr;

int functionint(int param) {
std::cout << "param is " << param << std::endl;
return 0;
}

template <class F, class... Args>
std::future<int> commit(F&& f, Args&&... args) {
//....
// 利用Boost库打印模板推导出来的 T 类型
std::cout << "F type:" << type_id_with_cvr<F>().pretty_name() << std::endl;

// 利用Boost库打印形参的类型
std::cout << "f type:" << type_id_with_cvr<decltype(f)>().pretty_name() << std::endl;

std::cout << "Args type:" << type_id_with_cvr<Args...>().pretty_name() << std::endl;

std::cout << "args type:" << type_id_with_cvr<decltype(args)...>().pretty_name() << std::endl;

return std::future<int>();
}

void reference_collapsing(){
int a = 3;
commit(functionint, a);
}

调用reference_collapsing函数输出如下

1
2
3
4
F type:int (__cdecl&)(int)
f type:int (__cdecl&)(int)
Args type:int & __ptr64
args type:int & __ptr64

可以看出F和f的类型都为函数对象的左值引用类型int (__cdecl&)(int),因为可变参数列表只有一个int左值类型,所以Args被推导为int &类型, 同样的道理args也是int &类型。

那如果我们换一种方式调用

1
2
3
void reference_collapsing2(){
commit(std::move(functionint), 3);
}

调用reference_collapsing2输出如下

1
2
3
4
F type:int __cdecl(int)
f type:int (__cdecl&&)(int)
Args type:int
args type:int && __ptr64

F为函数对象类型int __cdecl(int), f被对段位函数对象的右值引用类型int (__cdecl&&)(int)

Args 被推断为int类型, args被推断为int && 类型。

所以我们就可以得出之前给大家的结论,对于模板类型参数T && , 编译器会根据传入的类型为左值还是右值,将T 推断为不同的类型, 如果传入的类型为int类型的左值,则T为int&类型,如果传入的类型为int类型的右值,则T为int类型。

模板参数介绍完了,还要介绍一下原样转发, 熟悉我视频风格的读者都知道在介绍正确做法前我会先介绍错误示范,我们先看下面的例子

1
2
3
4
5
6
7
8
9
10
11
12
void use_rightref(int && rparam) {
//....
}

template<typename T>
void use_tempref(T&& tparam) {
use_rightref(tparam);
}

void test_tempref() {
use_tempref(3);
}

我先给大家介绍下上面代码的调用流程,我们在test_tempref里调用use_tempref, 参数3是一个右值,所以use_tempref中T被推断为int类型, tparam为int && 类型。我们接着将tparam传递给use_rightref,tparam是int && 类型,刚好可以传递给use_rightref,然而上面的代码会报错。

1
“void use_rightref(int &&)”: 无法将参数 1 从“T”转换为“int &&”

报错的原因是我们将tparam传递给use_rightref的时候参数类型不匹配。在use_tempref中,tparam为int && 类型,即int 的右值引用类型。但是将tparam传递给use_rightref时,tparam是作为左值传递的, 他的类型是int && 类型,但是在函数use_tempref中tparam可以作为左值使用。这么说大家有点难理解

我们分开理解,左值和右值的区别

左值(lvalue) 是指表达式结束后依然存在的、可被取地址的数据。通俗地说,左值就是可以放在赋值符号左边的值。

右值(rvalue) 是指表达式结束后就不再存在的临时数据。通常是不可被取地址的临时值,例如常量、函数返回值、表达式计算结果等。在 C++11 之后,右值引用的引入使得我们可以直接操作右值。

我们看下面的代码

1
2
3
4
5
6
7
8
9
10
template<typename T>
void use_tempref(T&& tparam) {
int a = 4;
tparam = a;
tparam = std::move(a);
}

void test_tempref() {
use_tempref(3);
}

上述代码编译没有问题可以运行,tparam可以作为左值被赋值。所以当它作为参数传递给其他函数的时候,它也是作为左值使用的,那么传递给use_rightref时,就会出现int&& 绑定左值的情况,这在编译阶段是不允许的。

下面这种tparam也是被作为左值使用

1
2
3
4
5
6
7
8
9
void use_tempref(int && tparam) {
int a = 4;
tparam = a;
tparam = std::move(a);
}

void test_tempref() {
use_tempref(3);
}

上面代码编译也会通过的。

那么我们接下来要解决tparam作为左值传递给use_rightref报错的问题,C++ 给我们提供了原样转发功能,这个在基础中也给大家介绍过, C++ 源码对于forward的实现有两个版本,分别是将一个左值转化为一个左值或者右值,以及将一个右值转化为一个右值。

1
2
3
4
5
6
7
8
9
10
11
template <class _Ty>
_NODISCARD constexpr _Ty&& forward(
remove_reference_t<_Ty>& _Arg) noexcept { // forward an lvalue as either an lvalue or an rvalue
return static_cast<_Ty&&>(_Arg);
}

template <class _Ty>
_NODISCARD constexpr _Ty&& forward(remove_reference_t<_Ty>&& _Arg) noexcept { // forward an rvalue as an rvalue
static_assert(!is_lvalue_reference_v<_Ty>, "bad forward call");
return static_cast<_Ty&&>(_Arg);
}

因为实现了两个版本,所以forward会根据传递的是左值调用第一个版本,传递的是右值调用第二个版本。

我们看看remove_reference_t<_Ty>的源码

1
2
3
4
5
6
7
8
9
10
11
12
13
14
template <class _Ty>
struct remove_reference<_Ty&> {
using type = _Ty;
using _Const_thru_ref_type = const _Ty&;
};

template <class _Ty>
struct remove_reference<_Ty&&> {
using type = _Ty;
using _Const_thru_ref_type = const _Ty&&;
};

template <class _Ty>
using remove_reference_t = typename remove_reference<_Ty>::type;

我们通过观察就会发现remove_reference_t<_Ty>其实是去除了_Ty中的引用返回内部的type.

所以我们forward(3)时,执行forward(remove_reference_t<_Ty>&& _Arg), _Ty为int && 类型,remove_reference_t<_Ty>为int类型. 返回的为static_cast<_Ty&&>(_Arg)类型,即int && &&类型,折叠一下变为int &&类型。

同样当我们forward(a),比如a是一个int类型的左值,则执行_Ty&& forward(remove_reference_t<_Ty>& _Arg), _Ty为int &类型, remove_reference_t<_Ty>为int类型, 返回值为static_cast<_Ty&&>(_Arg) ,即int & && 类型折叠为int &类型。

所以有了这些知识,我们解决上面的编译错误可以这么干

1
2
3
4
5
6
7
8
9
10
11
12
void use_rightref(int && rparam) {
//....
}

template<typename T>
void use_tempref(T&& tparam) {
use_rightref(std::forward<T>(tparam));
}

void test_tempref() {
use_tempref(3);
}

接下来我们回到线程池的话题,commit函数需要返回future对象,但是我们又无法在函数定义的时候提前写好返回值future的类型,那怎么办呢?

可以用到C++ 11的一个技术就是尾置推导

1
2
3
4
5
6
7
template <class F, class... Args>
auto commit(F&& f, Args&&... args) ->
std::future<decltype(std::forward<F>(f)(std::forward<Args>(args)...))> {
using RetType = decltype(std::forward<F>(f)(std::forward<Args>(args)...));

return std::future<RetType>{};
}

我们在commit函数返回值写成了auto,告诉编译器具体的返回类型在其后,这样编译器在加载完函数的参数f和args之后,可以推导返回值类型.

推导也很简单,我们通过decltype(std::forward<F>(f)(std::forward<Args>(args)...)), decltype会根据根据表达式推断表达式的结果类型,我们用future存储这个类型,这个future就是返回值类型。

decltype中我们用了forward原样转发f和args,其实f不用转发,因为我们调用f是按照左值调用的,至于args原样转发是考虑f接受的参数可能是一个右值,但是这种情况其实不多,所以对于普通情形,我们写成decltype(f(args...))没问题的。

因为推导的类型我们以后还会用到,所以用了RetType来记录这个类型。

接下来我们给出commit的完整代码

1
2
3
4
5
6
7
8
9
10
11
12
13
14
15
16
17
18
template <class F, class... Args>
auto commit(F&& f, Args&&... args) ->
std::future<decltype(std::forward<F>(f)(std::forward<Args>(args)...))> {
using RetType = decltype(std::forward<F>(f)(std::forward<Args>(args)...));
if (stop_.load())
return std::future<RetType>{};

auto task = std::make_shared<std::packaged_task<RetType()>>(
std::bind(std::forward<F>(f), std::forward<Args>(args)...));

std::future<RetType> ret = task->get_future();
{
std::lock_guard<std::mutex> cv_mt(cv_mt_);
tasks_.emplace([task] { (*task)(); });
}
cv_lock_.notify_one();
return ret;
}

在commit中我们生成一个packaged_task<RetType()>类型的智能指针task,通过task获取future.

接下来我们加锁并且将task放入队列,但是因为task的返回类型为RetType,所以我们采用了lambda表达式捕获task,内部调用task,将这个lambda表达式放入任务队列。

然后通知其他线程唤醒,并且返回future。

测试

为了测试线程池,我们可以用前文实现的快速排序的方法,将任务分段递归投递给线程池,让线程池排序

1
2
3
4
5
6
7
8
9
10
11
12
13
14
15
16
17
18
19
20
21
22
23
24
template<typename T>
std::list<T>pool_thread_quick_sort(std::list<T> input) {
if (input.empty())
{
return input;
}
std::list<T> result;
result.splice(result.begin(), input, input.begin());
T const& partition_val = *result.begin();
typename std::list<T>::iterator divide_point =
std::partition(input.begin(), input.end(),
[&](T const& val) {return val < partition_val; });
std::list<T> new_lower_chunk;
new_lower_chunk.splice(new_lower_chunk.end(),
input, input.begin(),
divide_point);

std::future<std::list<T> > new_lower = ThreadPool::instance().commit(pool_thread_quick_sort<T>, new_lower_chunk);

std::list<T> new_higher(pool_thread_quick_sort(input));
result.splice(result.end(), new_higher);
result.splice(result.begin(), new_lower.get());
return result;
}

我们再写一个测试用例

1
2
3
4
5
6
7
8
9
10
11
void TestThreadPoolSort() {
std::list<int> nlist = { 6,1,0,5,2,9,11 };

auto sortlist = pool_thread_quick_sort<int>(nlist);

for (auto& value : sortlist) {
std::cout << value << " ";
}

std::cout << std::endl;
}

结果输出

1
0 1 2 5 6 9 11

总结

本文介绍线程池的原理,并实现了线程池

源码链接:

https://gitee.com/secondtonone1/boostasio-learn/tree/master/concurrent/day22-ThreadPool

视频链接:

https://space.bilibili.com/271469206/channel/collectiondetail?sid=1623290

Untitled

Posted on 2024-01-29

title: 几种简单并行算法的实现(for_each,find以及partial_sum)
date: 2024-01-29 19:56:02
tags: C++
categories: C++


简介

前文介绍了几种数据划分的方式,包括按照线程数量划分,按照递归方式划分,以及按照任务类型划分等。

本文结合之前的划分方式,基于stl的find, for_each以及partial_sum等算法实现并行版本。

并行版本for_each

实现并行的for_each,最简单的方式就是将数据划分,每个线程分别处理一段连续的数据即可。

在介绍并行版本之前,我们先实现一个管理线程 的类join_threads,用来管控线程防止线程过早退出

1
2
3
4
5
6
7
8
9
10
11
12
13
14
15
16
class join_threads
{
std::vector<std::thread>& threads;
public:
explicit join_threads(std::vector<std::thread>& threads_) :
threads(threads_)
{}
~join_threads()
{
for (unsigned long i = 0; i < threads.size(); ++i)
{
if (threads[i].joinable())
threads[i].join();
}
}
};

接下来我们实现第一种方式

1
2
3
4
5
6
7
8
9
10
11
12
13
14
15
16
17
18
19
20
21
22
23
24
25
26
27
28
29
30
31
32
33
34
35
36
37
template<typename Iterator, typename Func>
void parallel_for_each(Iterator first, Iterator last, Func f)
{
unsigned long const length = std::distance(first, last);
if (!length)
return;
unsigned long const min_per_thread = 25;
unsigned long const max_threads =
(length + min_per_thread - 1) / min_per_thread;
unsigned long const hardware_threads =
std::thread::hardware_concurrency();
unsigned long const num_threads =
std::min(hardware_threads != 0 ? hardware_threads : 2, max_threads);
unsigned long const block_size = length / num_threads;
std::vector<std::future<void>> futures(num_threads - 1); //⇽-- - 1
std::vector<std::thread> threads(num_threads - 1);
join_threads joiner(threads);
Iterator block_start = first;
for (unsigned long i = 0; i < (num_threads - 1); ++i)
{
Iterator block_end = block_start;
std::advance(block_end, block_size);
std::packaged_task<void(void)> task( // ⇽-- - 2
[=]()
{
std::for_each(block_start, block_end, f);
});
futures[i] = task.get_future();
threads[i] = std::thread(std::move(task)); //⇽-- - 3
block_start = block_end;
}
std::for_each(block_start, last, f);
for (unsigned long i = 0; i < (num_threads - 1); ++i)
{
futures[i].get(); // ⇽-- - 4
}
}

1 我们规定如果处理的数量不超过25个则用单线程。否则根据处理的数量划分任务,计算开辟的线程数,如果要开辟的线程数大于内核线程的数量,则以内核线程数为准。

2 根据实际开辟的线程数num_threads计算每个线程处理的块大小。并且初始化两个vector,分别用来存储处理结果的future和处理任务的线程。

3 我们在(2处)代码生成了一个任务task,然后获取future赋值给vector对应下标为i的future元素,并且把任务绑定给对应下标为i的thread。

4 numthreads-1个线程并行处理for_each,剩下的主线程处理余下的for_each,最后通过futures.get汇总

第二种划分方式是我们采取递归的方式,我们知道采用递归的方式无法提前开辟准确数量的线程,我们采用async帮我们完成这个任务

1
2
3
4
5
6
7
8
9
10
11
12
13
14
15
16
17
18
19
20
21
22
23
template<typename Iterator, typename Func>
void async_for_each(Iterator first, Iterator last, Func f)
{
unsigned long const length = std::distance(first, last);
if (!length)
return;
unsigned long const min_per_thread = 25;
if (length < (2 * min_per_thread))
{
std::for_each(first, last, f); //⇽-- - 1
}
else
{
Iterator const mid_point = first + length / 2;
//⇽-- - 2
std::future<void> first_half = std::async(&async_for_each<Iterator, Func>,
first, mid_point, f);
//⇽-- - 3
async_for_each(mid_point, last, f);
// ⇽-- - 4
first_half.get();
}
}

async可以帮助我们判断是否需要开启线程还是自动串行执行。每次我们将要处理的数据一分为2,前半部分交给一个async开辟线程处理,后半部分在本线程处理。而所谓的本线程不一定是主线程,因为我们通过async递归执行parallel_for_each,也就相当于在一个线程里独立执行了。

find的并行实现

find 的并行查找方式还是分两种,一种是将要查找的区间划分为几个段,每段交给一个线程查找。

另一种是采用递归的方式每次折半,前半部分交给一个线程查找,后半部分留在本线程查找。

我们先说第一种

find比较特殊,我们要防止线程忙等待,也要防止线程在其他线程已经查找到值后做无谓的浪费。可以用一个共享的全局atomic变量表示是否找到目标。

因为主线程要获取某个线程查找到的迭代器位置,所以我们用promise 设置 value为迭代器

1
2
3
4
5
6
7
8
9
10
11
12
13
14
15
16
17
18
19
20
21
22
23
24
25
26
27
28
29
30
31
32
33
34
35
36
37
38
39
40
41
42
43
44
45
46
47
48
49
50
51
52
53
54
55
56
57
58
59
60
61
62
63
64
65
66
67
68
template<typename Iterator, typename MatchType>
Iterator parallel_find(Iterator first, Iterator last, MatchType match)
{
struct find_element //⇽-- - 1
{
void operator()(Iterator begin,Iterator end,
MatchType match,
std::promise<Iterator>*result,
std::atomic<bool>*done_flag)
{
try
{
for (; (begin != end) && !done_flag->load(); ++begin) //⇽-- - 2
{
if (*begin == match)
{
result->set_value(begin); //⇽-- - 3
done_flag->store(true); //⇽-- - 4
return;
}
}
}
catch (...) //⇽-- - 5
{
try
{
result->set_exception(std::current_exception()); //⇽-- - 6
done_flag->store(true);
}
catch (...) //⇽-- - 7
{}
}
}
};
unsigned long const length = std::distance(first, last);
if (!length)
return last;
unsigned long const min_per_thread = 25;
unsigned long const max_threads = (length + min_per_thread - 1) / min_per_thread;
unsigned long const hardware_threads = std::thread::hardware_concurrency();
unsigned long const num_threads = std::min(hardware_threads != 0 ? hardware_threads : 2, max_threads);
unsigned long const block_size = length / num_threads;
std::promise<Iterator> result; //⇽-- - 8
std::atomic<bool> done_flag(false); //⇽-- - 9
std::vector<std::thread> threads(num_threads - 1); //⇽-- - 10
{
join_threads joiner(threads);
Iterator block_start = first;
for (unsigned long i = 0; i < (num_threads - 1); ++i)
{
Iterator block_end = block_start;
std::advance(block_end, block_size);
// ⇽-- - 11
threads[i] = std::thread(find_element(), block_start, block_end, match, &result, &done_flag);
block_start = block_end;
}
// ⇽-- - 12
find_element()(block_start, last, match, &result, &done_flag);
}

// ⇽-- - 13
if (!done_flag.load())
{
return last;
}
//⇽-- - 14
return result.get_future().get();
}

1 find_element重载了()运算符,接受四个参数,分别是迭代器的开始,迭代起的结束,要查找的数值,以及用来通知外部的promise,还有线程之间用来检测是否有某个线程完成查找的原子变量。

2 find_element重载()的逻辑就是查找这个区间内满足某个值的位置,并将这个位置的迭代起设置到promise中,然后将完成的原子变量标记为true。

说第二种方式,利用递归折半查找,我们可以用async帮助我们完成并行任务。

1
2
3
4
5
6
7
8
9
10
11
12
13
14
15
16
17
18
19
20
21
22
23
24
25
26
27
28
29
30
31
32
33
34
35
36
37
38
39
40
41
42
43
44
45
46
47
template<typename Iterator, typename MatchType>
Iterator parallel_find_impl(Iterator first, Iterator last, MatchType match,
std::atomic<bool>& done) // ⇽-- - 1
{
try
{
unsigned long const length = std::distance(first,last);
unsigned long const min_per_thread = 25; // ⇽-- - 2
if (length < (2 * min_per_thread)) //⇽-- - 3
{
for (; (first != last) && !done.load(); ++first) //⇽-- - 4
{
if (*first == match)
{
done = true; //⇽-- - 5
return first;
}
}
return last; //⇽-- - 6
}
else
{
//⇽-- - 7
Iterator const mid_point = first + (length / 2);
//⇽-- - 8
std::future<Iterator> async_result = std::async(&parallel_find_impl<Iterator,MatchType>,
mid_point,last,match,std::ref(done));
//⇽-- - 9
Iterator const direct_result = parallel_find_impl(first,mid_point,match,done);
//⇽-- - 10
return (direct_result == mid_point) ?async_result.get() : direct_result;
}
}
catch (...)
{
// ⇽-- - 11
done = true;
throw;
}
}
template<typename Iterator, typename MatchType>
Iterator parallel_find_async(Iterator first, Iterator last, MatchType match)
{
std::atomic<bool> done(false);
//⇽-- - 12
return parallel_find_impl(first, last, match, done);
}

1 并行查找的方式种我们先根据长度是否小于50决定是否开启并行任务,如果小于50则采取单线程方式。

2 如果采用并行的方式,我们将长度折半,前半部分交给async,后半部分交给本线程。

3 最后我们在主线程中汇合,获取结果。

partial_sum并行版本

C++ 提供了累计计算求和的功能,比如一个vector中存储的数据为{1,2,3},那么经过计算,第一个元素仍然为1,第二个元素为1+2, 第三个元素为1+2+3,结果为{1,3,6}.

关于并行版本我们可以这么思考,假设元数组为{1,2,3,4,5,6,7},那我们可以划分为三个部分,第一部分为{1,2,3}交给第一个线程处理, 第二部分{4,5,6}交给第二个线程处理,7交给本线程处理。

但是我们要考虑的一个问题是线程2要用到线程1最后计算的结果,线程1计算后{1,3,6},线程2需要用到6做累加,我们可以先让线程1计算出第3个元素值6,再将这个6传递给线程2,剩下的就可以并行计算了。同样的道理本线程要处理最后一个元素的累加结果,他需要等到线程2处理完第6个元素的值。

所以基本思路是每个线程优先处理分区的最后一个元素,通过promise设置给其他线程,在这个阶段线程之间是串行的,等到所有线程都开始计算其他位置后就是并行了。

1
2
3
4
5
6
7
8
9
10
11
12
13
14
15
16
17
18
19
20
21
22
23
24
25
26
27
28
29
30
31
32
33
34
35
36
37
38
39
40
41
42
43
44
45
46
47
48
49
50
51
52
53
54
55
56
57
58
59
60
61
62
63
64
65
66
67
68
69
70
71
72
73
74
75
76
77
78
79
80
81
82
83
84
85
86
87
88
89
template<typename Iterator>
void parallel_partial_sum(Iterator first, Iterator last)
{
typedef typename Iterator::value_type value_type;

struct process_chunk //⇽-- - 1
{
void operator()(Iterator begin, Iterator last,
std::future<value_type>* previous_end_value,
std::promise<value_type>* end_value)
{
try
{
Iterator end = last;
++end;
std::partial_sum(begin, end, begin); //⇽-- - 2
if (previous_end_value) //⇽-- - 3
{
value_type addend = previous_end_value->get(); // ⇽-- - 4
*last += addend; // ⇽-- - 5
if (end_value)
{
end_value->set_value(*last); //⇽-- - 6
}
// ⇽-- - 7
std::for_each(begin, last, [addend](value_type& item)
{
item += addend;
});
}
else if (end_value)
{
// ⇽-- - 8
end_value->set_value(*last);
}
}
catch (...) // ⇽-- - 9
{
if (end_value)
{
end_value->set_exception(std::current_exception()); // ⇽-- - 10
}
else
{
throw; // ⇽-- - 11
}

}
}
};
unsigned long const length = std::distance(first, last);

if (!length) {
return;
}
unsigned long const min_per_thread = 25; //⇽-- - 12
unsigned long const max_threads = (length + min_per_thread - 1) / min_per_thread;
unsigned long const hardware_threads = std::thread::hardware_concurrency();
unsigned long const num_threads = std::min(hardware_threads != 0 ? hardware_threads : 2, max_threads);
unsigned long const block_size = length / num_threads;
typedef typename Iterator::value_type value_type;

std::vector<std::thread> threads(num_threads - 1); // ⇽-- - 13

std::vector<std::promise<value_type> > end_values(num_threads - 1); // ⇽-- - 14

std::vector<std::future<value_type> > previous_end_values; // ⇽-- - 15
previous_end_values.reserve(num_threads - 1); // ⇽-- - 16
join_threads joiner(threads);
Iterator block_start = first;
for (unsigned long i = 0; i < (num_threads - 1); ++i)
{
Iterator block_last = block_start;
std::advance(block_last, block_size - 1); // ⇽-- - 17
// ⇽-- - 18
threads[i] = std::thread(process_chunk(), block_start, block_last,
(i != 0) ? &previous_end_values[i - 1] : 0,
&end_values[i]);
block_start = block_last;
++block_start; // ⇽-- - 19
previous_end_values.push_back(end_values[i].get_future()); // ⇽-- - 20
}
Iterator final_element = block_start;
std::advance(final_element, std::distance(block_start, last) - 1); // ⇽-- - 21
// ⇽-- - 22
process_chunk()(block_start, final_element, (num_threads > 1) ? &previous_end_values.back() : 0,
0);

}

1 定义了process_chunk类,重载了()运算符,在重载的逻辑里我们先计算区间内的partial_sum累计求和(2处)

2 因为我们处理的区间不一定是首个区间,也就是他还需要加上前面区间处理得出的最后一个元素的值,所以我们通过previouse_end_value判断本区间不是首个区间,并且加上前面处理的结果。优先将最后一个值计算出来设置给promise。然后在利用for_each遍历计算其他位置的值。

总结

本文介绍了如何并行设计stl的相关算法,读者有好的思路可以互相交流一下。

测试代码和项目代码链接:

https://gitee.com/secondtonone1/boostasio-learn/tree/master/concurrent/day21-ParallenAlgorithm

视频链接

https://space.bilibili.com/271469206/channel/collectiondetail?sid=1623290

线程间切分任务的方法

Posted on 2024-01-13 | In C++

按数量切分

对于大量处理的数据,可以按照任务数量区分,简单来说如果我们要处理n个任务,总计有m个线程,那么我们可以简单的规划每个线程处理n/m个任务。

如下图

https://cdn.llfc.club/1705459243909.jpg

这种方式用来划分大量相同任务时可以采用,但是有些逻辑并不是完全可以靠数量划分的,比如递归逻辑。

递归划分

前文我们提及了快速排序的并行实现,包括利用async和线程池的方式。

快速排序算法含有两大基本步骤:

选定一个元素为比较的基准元素;

将数据集按大小划分为前后两部分,重新构成新序列,再针对这两个部分递归排序。

数据划分无法从一开始就并行化,因为数据只有经过处理后,我们才清楚它会归入哪个部分。

若我们要并行化这个算法,就需要利用递归操作的固有性质。

每层递归均会涉及更多的quick_sort()函数调用,因为我们需对基准元素前后两部分都进行排序。

由于这些递归调用所访问的数据集互不相关,因此它们完全独立,正好吻合并发程序的首选执行方式。

下图展示了以递归方式划分数据。

https://cdn.llfc.club/1705461120545.jpg

在早期我们实现并行递归的快速排序,那段代码每深入一层递归,都借std::async()生成新的异步任务处理前半部分数据,而后部分则继续用本线程计算后半部分数据。

我们通过std::async()让C++线程库自主决定,是另起新线程执行新任务,还是在原线程上同步运行。

这点相当重要:假设排序操作的数据集非常庞大,若每次递归都生成新线程,则势必令线程数目激增。

我们将通过后文的性能分析了解到,太多线程反而可能令应用程序变慢。

如果数据集着实庞大,还有可能消耗殆尽全部线程。按上述递归方式来切分数据是不错的思路,但需约束线程数目的增长,不可任其数目无限膨胀。

此例比较简单,std::async()足以应付,但它不是唯一选择。

后来我们觉得开辟过多的线程并不合适,采用了线程池。

并发编程的作者提出的另一种做法是,根据std::hardware_concurrency()函数的返回值设定线程的数目,实现了accumulate()的并行版本。

接着,我们采用之前实现的线程安全的栈容器,将尚未排序的数据段压入其中,而不是启动新线程以执行递归调用。

若某线程无所事事,或因全部数据段均已处理妥当,或因它正等着另一数据段完成排序,若是后者,该线程即从栈容器取出所等的数据段自行排序。

1
2
3
4
5
6
7
8
9
10
11
12
13
14
15
16
17
18
19
20
21
22
23
24
25
26
27
28
29
30
31
32
33
34
35
36
37
38
39
40
41
42
43
44
45
46
47
48
49
50
51
52
53
54
55
56
57
58
59
60
61
62
63
64
65
66
67
68
69
70
71
72
73
74
75
76
77
78
79
80
81
82
83
84
85
#include <thread>
#include <list>
#include "thread_safe_stack.h"
#include <future>
#include <memory>

template<typename T>
struct sorter //1
{
struct chunk_to_sort
{
std::list<T> data;
std::promise<std::list<T> > promise;
};
thread_safe_stack<chunk_to_sort> chunks; //⇽-- - 2
std::vector<std::thread> threads; // ⇽-- - 3
unsigned const max_thread_count;
std::atomic<bool> end_of_data;
sorter() :
max_thread_count(std::thread::hardware_concurrency() - 1),
end_of_data(false)
{}
~sorter() //⇽-- - 4
{
end_of_data = true; //⇽-- - 5
for (unsigned i = 0; i < threads.size(); ++i)
{
threads[i].join(); //⇽-- - 6
}
}
void try_sort_chunk()
{
std::shared_ptr<chunk_to_sort> chunk = chunks.try_pop(); //⇽-- - 7
if (chunk)
{
sort_chunk(chunk); //⇽-- - 8
}
}
std::list<T> do_sort(std::list<T>& chunk_data) //⇽-- - 9
{
if (chunk_data.empty())
{
return chunk_data;
}
std::list<T> result;
result.splice(result.begin(),chunk_data,chunk_data.begin());
T const& partition_val = *result.begin();
typename std::list<T>::iterator divide_point = //⇽-- - 10
std::partition(chunk_data.begin(),chunk_data.end(),
[&](T const& val) {return val < partition_val; });
chunk_to_sort new_lower_chunk;
new_lower_chunk.data.splice(new_lower_chunk.data.end(),
chunk_data,chunk_data.begin(),
divide_point);
std::future<std::list<T> > new_lower =
new_lower_chunk.promise.get_future();
chunks.push(std::move(new_lower_chunk)); // ⇽-- - 11
if (threads.size() < max_thread_count) // ⇽-- - 12
{
threads.push_back(std::thread(&sorter<T>::sort_thread,this));
}
std::list<T> new_higher(do_sort(chunk_data));
result.splice(result.end(),new_higher);
while (new_lower.wait_for(std::chrono::seconds(0)) !=
std::future_status::ready) //⇽-- - 13
{
try_sort_chunk(); // ⇽-- - 14
}
result.splice(result.begin(),new_lower.get());
return result;
}
void sort_chunk(std::shared_ptr<chunk_to_sort > const& chunk)
{
chunk->promise.set_value(do_sort(chunk->data)); //⇽-- - 15
}
void sort_thread()
{
while (!end_of_data) //⇽-- - 16
{
try_sort_chunk(); // ⇽-- - 17
//交出时间片
std::this_thread::yield(); //⇽-- - 18
}
}
};

我们实现一个函数调用上面的封装快速排序

1
2
3
4
5
6
7
8
9
10
template<typename T>
std::list<T> parallel_quick_sort(std::list<T> input) //⇽-- - 19
{
if (input.empty())
{
return input;
}
sorter<T> s;
return s.do_sort(input); //⇽-- - 20
}

本例中,parallel_quick_sort()函数(19处)把绝大部分功能委托给sorter类(1处),后者通过栈容器管理待排序的数据段(2处),并集中管控多个线程以并发执行任务(3处),从而以便捷的操作方式给出了代码实现。

本例中,主要工作由成员函数do_sort()负责(9处),它借标准库的std::partition()函数完成数据分段(10处)。

do_sort()将新划分出来的数据段压入栈容器(11处),但没有为每个数据段都专门生成新线程,而仅当仍存在空闲的处理器时(12处)才生成新线程。

因为划分出的前半部分数据可能会由别的线程处理,所以我们需要等待它完成排序而进入就绪状态(13处)。

如果当前线程是整个程序中仅有的线程,或者其他线程都正忙于别的任务,那么这一等待行为则需妥善处理,在当前线程的等待期间,我们让它试着从栈容器取出数据进行处理(14处)。

try_sort_chunk()先从栈容器弹出一段数据(7处)并对其进行排序(8处),再把结果存入附属该段的promise中(15处),使之准备就绪,以待提取。

向栈容器压入数据段与取出相关结果相互对应,两项操作均由同一个线程先后执行(11和12处)。

只要标志end_of_data没有成立(16处),各线程便反复循环,尝试对栈内数据段进行排序17。

每个线程在两次检测标志之间进行让步(18处),好让别的线程有机会向栈容器添加数据段。这段代码由sorter类的析构函数汇合各个线程(4处)。

do_sort()将在全部数据段都完成排序后返回(即便许多工作线程仍在运行),主线程进而从parallel_quick_sort()的调用返回20,并销毁sorter对象。其析构函数将设置标志end_of_data成立(5处),然后等待全部线程结束(6处)。标志的成立使得线程函数内的循环终止(16处)。

按照工作类别划分任务

单线程应用程序照样需要同时运行多个任务,而某些程序即便正忙于手头的任务,也需随时处理外部输入的事件(譬如用户按键或网络数据包传入)。这些情形都与单一功能的设计原则矛盾,必须妥善处理。若我们按照单线程思维手动编写代码,那最后很可能混成“大杂烩”:先执行一下任务甲,再执行一下任务乙,接着检测按键事件,然后检查传入的网络数据包,又回头继续执行任务甲,如此反复循环。这就要求任务甲保存状态,好让控制流程按周期返回主循环,结果令相关的代码复杂化。如果向循环加入太多任务,处理速度便可能严重放缓,让用户感觉按键的响应时间过长。相信读者肯定见过这种操作方式的极端表现:我们让某个应用程序处理一些任务,其用户界面却陷入僵滞,到任务完成后才恢复。

只要把每个任务都放在独立的线程上运行,操作系统便会替我们“包办”切换动作。因此,任务甲的代码可专注于执行任务,我们无须再考虑保存状态和返回主循环,也不必纠结间隔多久就得这样操作。

假定每项任务都相互独立,且各线程无须彼此通信,那么该构想即可轻而易举地实现。可惜往往事与愿违。即便经过良好的设计,后台任务也常常按用户要求执行操作,它们需在完成时通过某种方式更新界面,好让用户知晓。反之,若用户想取消任务,就要通过界面线程向后台任务发送消息,告知它停止。

所以各个任务线程中要提供互相通知的接口,这种思想和Actor模式不谋而合。

当然我们划分任务给不同的线程也要注意精细程度,比如两个线程要做的功能中某个环节是一个共有的功能,那么我们需要将这个功能整合到一个单线程上。我们可以理解在一些高并发的设计中,即便某些模块是高并发,但是耦合度很高的逻辑处理还是采用单线程方式,我们之前设计网络i服务器是逻辑处理也是单线程,但是我们可以根据功能做区分再分化为不同的线程,这就类似于Actor设计模式了。

假设有这样一个情形,我们实现一个系统控制机器中各部件的运动,A部件运动结束后通知B部件运动,B部件结束后通知C部件继续运动等,C运动结束后再通知A部件继续运动。

按照任务划分的模式,A,B,C分别运行在不同的线程中处理不同的任务,而任务又要以流水线A->B->C的方式运作。

我们可以这样抽象出一个Actor类,它包含消息的投递,消息的处理,以及消息队列的管理,并且它是一个单例类,全局唯一。

先实现这个基本的模板单例类, 这期间会用到CRTP技术,CRTP:一个继承 以自己为模板参数的模板类 的类。

CRTP 奇特递归模板技术, Curiously recurring template pattern。

模板单例类实现如下

1
2
3
4
5
6
7
8
9
10
11
12
13
14
15
16
17
18
19
20
21
22
23
24
25
26
27
28
29
30
31
32
33
34
#include <thread>
#include "ThreadSafeQue.h"
#include <atomic>
#include <iostream>
template<typename ClassType, typename QueType>
class ActorSingle {
public:
static ClassType& Inst() {
static ClassType as;
return as;
}

~ ActorSingle(){

}

void PostMsg(const QueType& data) {
_que.push(data);
}

protected:

ActorSingle():_bstop(false){

}

ActorSingle(const ActorSingle&) = delete;
ActorSingle(ActorSingle&&) = delete;
ActorSingle& operator = (const ActorSingle&) = delete;

std::atomic<bool> _bstop;
ThreadSafeQue<QueType> _que;
std::thread _thread;
};

模板单例类包含了原子变量_bstop控制线程是否停止

包含了_que用来存储要处理的信息,这是一个线程安全的队列。

_thread是要处理任务的线程。

线程安全队列我们之前有实现过,但是还需要稍微改进下以满足接受外部停止的通知。

我们给ThreadSafeQue添加一个原子变量_bstop表示线程停止的标记

在需要停止等待的时候我们调用如下通知函数

1
2
3
4
void NotifyStop() {
_bstop.store(true);
data_cond.notify_one();
}

等待消息的函数需要补充根据停止条件去返回的逻辑,目的为防止线程被一直挂起

1
2
3
4
5
6
std::unique_lock<std::mutex> wait_for_data()   
{
std::unique_lock<std::mutex> head_lock(head_mutex);
data_cond.wait(head_lock,[&] {return (_bstop.load() == true) || (head.get() != get_tail()); });
return std::move(head_lock);
}

修改wait_pop_head,根据停止条件返回空指针

1
2
3
4
5
6
7
8
9
10
std::unique_ptr<node> wait_pop_head()
{
std::unique_lock<std::mutex> head_lock(wait_for_data());

if (_bstop.load()) {
return nullptr;
}

return pop_head();
}

等待返回数据的逻辑也稍作修改,因为有可能是接收到停止信号后等待返回,所以此时返回空指针即可

1
2
3
4
5
6
7
8
std::shared_ptr<T> WaitAndPop() //  <------3
{
std::unique_ptr<node> const old_head = wait_pop_head();
if (old_head == nullptr) {
return nullptr;
}
return old_head->data;
}

比如我们要实现一个ClassA 处理A类任务,可以这么做

1
2
3
4
5
6
7
8
9
10
11
12
13
14
15
16
17
18
19
20
21
22
23
24
25
26
27
28
29
30
31
32
33
34
35
36
37
38
39
40
41
42
43
44
45
#include "ActorSingle.h"
#include "ClassB.h"

struct MsgClassA {
std::string name;
friend std::ostream& operator << (std::ostream& os, const MsgClassA& ca) {
os << ca.name;
return os;
}
};


class ClassA : public ActorSingle<ClassA, MsgClassA> {
friend class ActorSingle<ClassA, MsgClassA>;
public:
~ClassA() {
_bstop = true;
_que.NotifyStop();
_thread.join();
std::cout << "ClassA destruct " << std::endl;
}

void DealMsg(std::shared_ptr<MsgClassA> data) {
std::cout << "class A deal msg is " << *data << std::endl;

MsgClassB msga;
msga.name = "llfc";
ClassB::Inst().PostMsg(msga);
}
private:
ClassA(){
_thread = std::thread([this]() {
for (; (_bstop.load() == false);) {
std::shared_ptr<MsgClassA> data = _que.WaitAndPop();
if (data == nullptr) {
continue;
}

DealMsg(data);
}

std::cout << "ClassA thread exit " << std::endl;
});
}
};

我们利用CRTP模式让ClassA继承了以ClassA为类型的模板,然后在DealMsg函数内部调用了 ClassB的投递消息,将任务B交给另一个线程处理。

关于ClassB的实现方式和ClassA类似,然后我们在ClassB的DealMsg中调用ClassC的PostMsg将消息投递给C的线程处理。

达到的效果就是

A->B->C

我们在主函数调用

1
2
3
4
5
6
7
8
9
10
11
#include <iostream>
#include "ClassA.h"
int main()
{
MsgClassA msga;
msga.name = "llfc";
ClassA::Inst().PostMsg(msga);

std::this_thread::sleep_for(std::chrono::seconds(2));
std::cout << "main process exited!\n";
}

程序输出如下

1
2
3
4
5
6
7
8
9
10
class A deal msg is llfc
class B deal msg is llfc
class C deal msg is llfc
main process exited!
ClassC thread exit
ClassC destruct
ClassB thread exit
ClassB destruct
ClassA thread exit
ClassA destruct

可以看到处理的顺序是A->B->C,并且每个类都有析构和函数回收,说明我们的程序不存在内存泄漏。

这里要提示读者一个问题,如果A给B投递消息,而B又要给A投递消息,那么如果在A的头文件包含B的头文件,而B的头文件包含A的头文件势必会造成互引用问题,那么最好的解决方式就是在A和B的头文件中分别声明对方,在cpp文件中再包含即可。

上面的例子通过模板和继承的方式实现了类似Actor的收发消息的功能。

总结

本文介绍了线程划分任务的三种方式

1 按照任务的数量划分

2 递归划分

3 按照任务的种类划分

源码链接:

https://gitee.com/secondtonone1/boostasio-learn/tree/master/concurrent/day20-Actor

视频链接:

https://space.bilibili.com/271469206/channel/collectiondetail?sid=1623290

<1…678…37>

370 posts
17 categories
21 tags
RSS
GitHub ZhiHu
© 2025 恋恋风辰 本站总访问量次 | 本站访客数人
Powered by Hexo
|
Theme — NexT.Muse v5.1.3