恋恋风辰的个人博客


  • Home

  • Archives

  • Categories

  • Tags

  • Search

无锁设计的四条原则

Posted on 2024-01-13 | In C++

简介

前面的文章介绍了无锁并发的相关知识,涵盖了无锁队列,无锁栈,环状无锁队列的设计,本文总结下无锁并发设计的几个设计规则,以供读者自己编写无锁代码时可以起到抛砖引玉的效果。

模型设计

原则1:

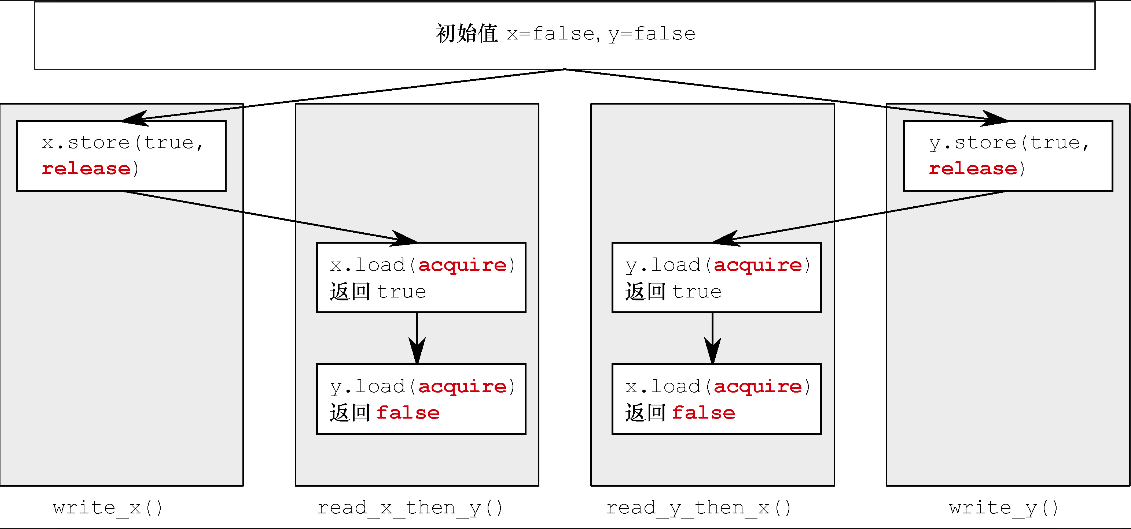
在原型设计中使用std::memory_order_seq_cst次序若代码服从std::memory_order_seq_cst次序,则对其进行分析和推理要比其他内存次序容易得多,因为它令全部操作形成一个确定的总序列。

回顾之前我们实现的无锁栈和无锁队列,它们的原始版本全都采用std::memory_order_seq_cst次序,当基本操作均正常工作后,我们才放宽内存次序约束。

在这种意义上,采用其他内存次序其实是一项优化,需要避免过早实施。我们通常只有先完全了解代码全貌,认清哪些代码操作核心数据结构,才可以确定放宽哪些操作的内存次序约束。否则,事情就会很棘手。即便代码在测试过程中正常工作,也无法保证在生产环境下代码依然如此,这令内存次序的放宽调整变得复杂。所以,仅仅测试代码的运行并不足够,除非我们能够采用测试工具(假如真的存在),系统化地核查线程访问内存次序的全部可能的组合,验证它们是否与指定的内存次序约束保持一致。

内存回收方案

原则2:

使用无锁的内存回收方案无锁代码中的一大难题是内存管理。最基本的要求是,只要目标对象仍然有可能正被其他线程指涉,就不得删除。然而,为了避免过度消耗内存,我们还是想及时删除无用的对象。

我们在这一章学习了3种方法,以确保内存回收满足安全要求:

1 暂缓全部删除对象的动作,等到没有线程访问数据结构的时候,才删除待销毁的对象;

2 采用风险指针,以辨识特定对象是否正在被某线程访问;

3 就对象进行引用计数,只要外部环境仍正在指涉目标对象,它就不会被删除。

3种方法的关键思想都是以某种方式掌握正在访问目标对象的线程数目,仅当该对象完全不被指涉的时候,才会被删除。针对无锁数据结构,还有很多别的方法可以回收内存。

譬如,无锁数据是使用垃圾回收器的理想场景。若我们得以采用垃圾回收器,即事先知晓它具备适时删除无用节点的能力,则算法的实现代码写起来就会轻松一些。

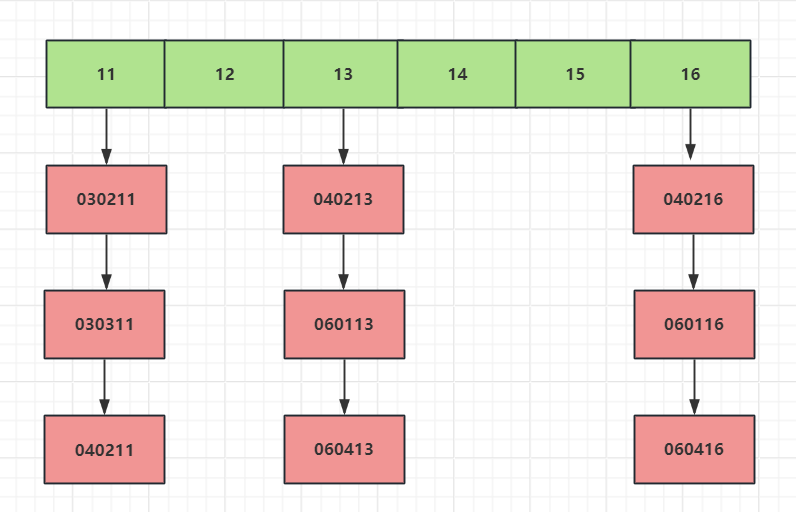
另一种处理方法是重复使用节点,等到数据结构销毁时才完全释放它们。我们之前实现的环状无锁队列就是重复使用固定个数的队列,头尾成环。由于重用了节点,因此所分配的内存便一直有效,代码从而避开了一些涉及未定义行为的麻烦细节。然而,这种方法有一个缺点,它导致程序频频出现被称为“ABA问题”的情形。

防范ABA问题

原则3:防范ABA问题在所有涉及比较-交换的算法中,我们都要注意防范ABA问题。

该问题产生过程如下:

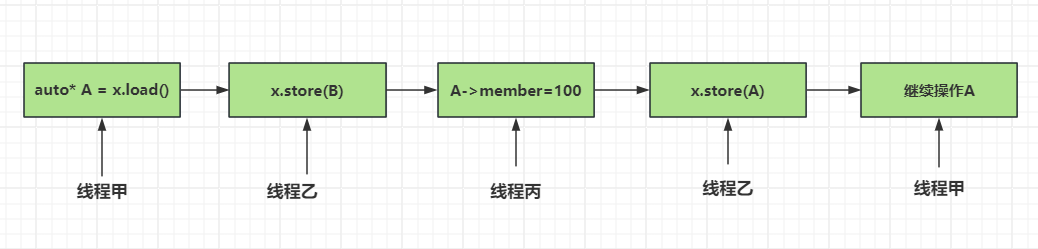
步骤1:线程甲读取原子变量x,得知其值为A。

步骤2:线程甲根据A执行某项操作,比如查找,或如果x是指针,则依据它提取出相关值(称为ov)。

步骤3:线程甲因操作系统调度而发生阻塞。

步骤4:另一线程对原子变量x执行别的操作,将其值改成B。

步骤5:又有线程改变了与A相关的数据,使得线程甲原本持有的值失效(步骤2中的ov)。这种情形也许是A表示某内存地址,而改动操作则是释放指针的目标内存,或变更目标数据,最后将产生严重后果。

步骤6:原子变量x再次被某线程改动,重新变回A。

若x属于指针型别,其指向目标可能在步骤5被改换成一个新对象。

步骤7:线程甲继续运行,在原子变量x上执行比较-交换操作,与A进行对比。因此比较-交换操作成功执行(因x的值依然为A),但A的关联数据却不再有效,即原本在步骤2中取得的ov已失效,而线程甲却无从分辨,这将破坏数据结构。
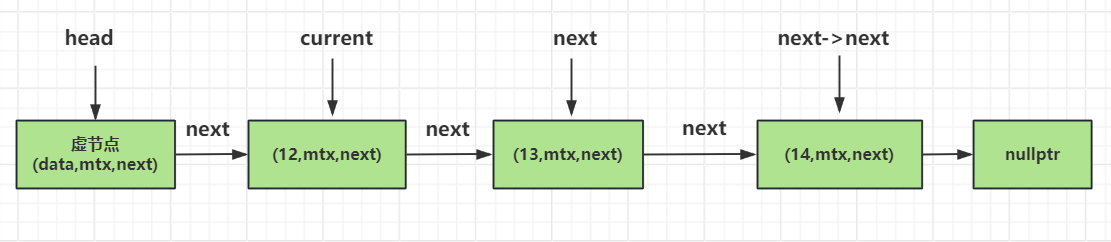
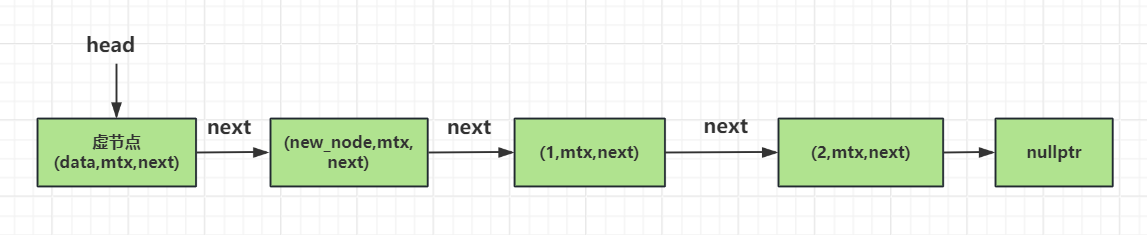
画出示意图

https://cdn.llfc.club/1704879342682.jpg

之前我们实现的无锁结构均不存在ABA问题,但它很容易由无锁算法的代码引发。该问题最常见的解决方法之一是,在原子变量x中引入一个ABA计数器。将变量x和计数器组成单一结构,作为一个整体执行比较-交换操作。每当它的值被改换,计数器就自增。照此处理,如果别的线程改动了变量x,即便其值看起来与最初一样,比较-交换操作仍会失败。

如果某数据结构的操作算法涉及空闲内存列表,或者涉及循环使用节点(比如我们之前实现的循环队列),而不是通过内存分配器回收管理,那么ABA问题就格外常见。

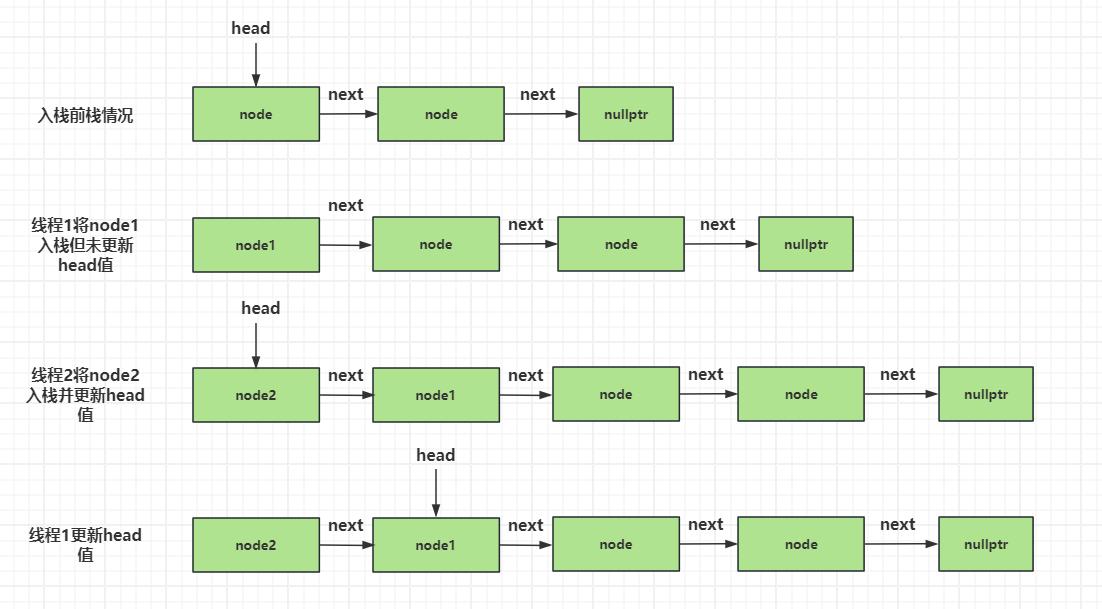
举一个例子 原有的栈结构为 A –> B –> C

假设一个线程1执行pop将A头部节点的数据加载出来,还未做读改写更新head为B,此时时间片被其他线程2抢占执行pop将A,B分别出栈,然后线程3抢占时间片又将A入栈,那么我们看到此时栈的情况为 A –> C , 如果时间片切换回线程1,此时线程1执行读改写操作发现head还是为A,他会误认为这期间没有其他线程改变栈,所以线程1的读改写将head更新为B。其实B已经被弹出了,那么这就是ABA问题。

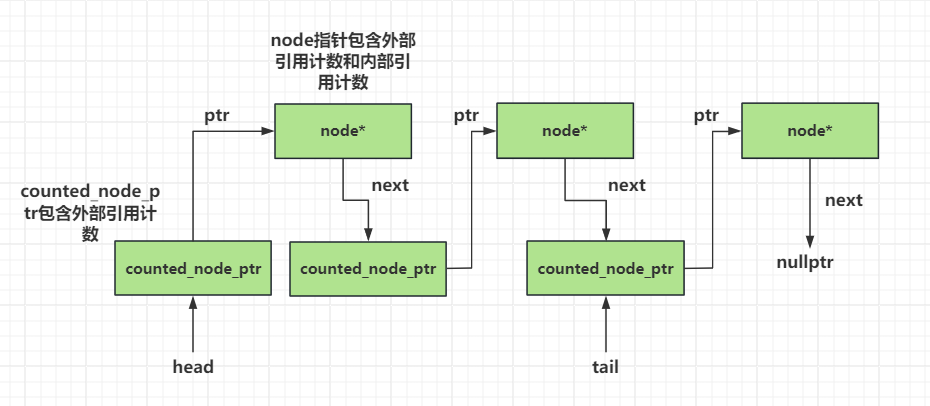
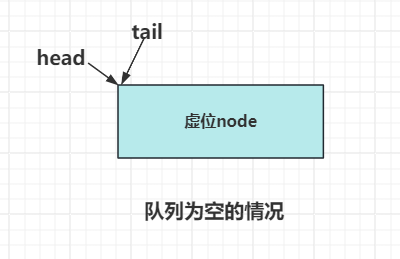
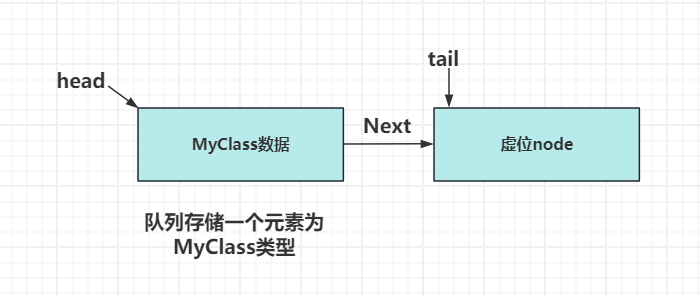
上面的仅仅是一个ABA案例的描述,那我们实现的无锁栈或者无锁队列为什么不存在这个ABA问题呢?原因是我们每次push加入的node节点都不同。node的结构包含数据域和下一个节点的指针

1
2
3
4
5
6
7
8
struct node
{
std::shared_ptr<T> data;
node* next;
node(T const& data_) : //⇽-- - 1
data(std::make_shared<T>(data_))
{}
};

我们每次调用push虽然传递的data可以理解为A,但是构造的智能指针地址不同,也就是node中存储的data不同。所以即使线程1做读改写比较的时候发现数值都为A,但是地址不同,也可区分出栈被改变。

1
2
3
4
5
6
7
8
9
10
11
12
13
14
15
16
17
18
void push(T const& data)
{
node* const new_node = new node(data); //⇽-- - 2
new_node->next = head.load(); //⇽-- - 3
while (!head.compare_exchange_weak(new_node->next, new_node)); //⇽-- - 4
}

std::shared_ptr<T> pop() {
node* old_head = nullptr; //1
do {
old_head = head.load(); //2
if (old_head == nullptr) {
return nullptr;
}
} while (!head.compare_exchange_weak(old_head, old_head->next)); //3

return old_head->data; //4
}

解决忙等

原则4:找出忙等循环,协助其他线程。

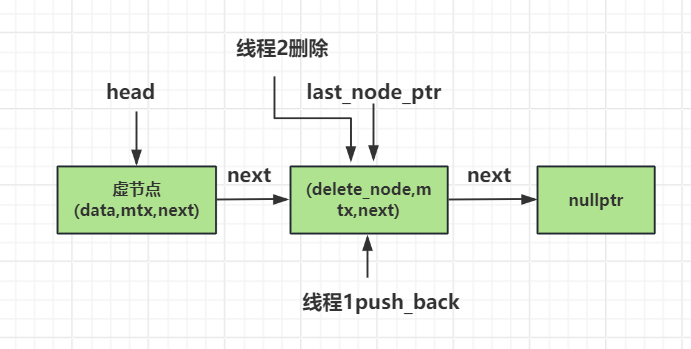
如我们在无锁队列第一版的push代码中,若两个线程同时执行压入操作,其中一个就须等待另一个结束,才可以继续运行。这实质上是一个忙等循环,如果放任不管,受到阻塞的线程就唯有浪费CPU时间却无计可施。阻塞型操作与使用互斥和锁一样,三者均有可能以忙等循环的方式实现。

假设按照调度安排,某线程先开始执行,却因另一线程的操作而暂停等待,那么只要我们修改操作的算法,就能让前者先完成全部步骤,从而避免忙等,操作也不会被阻塞。

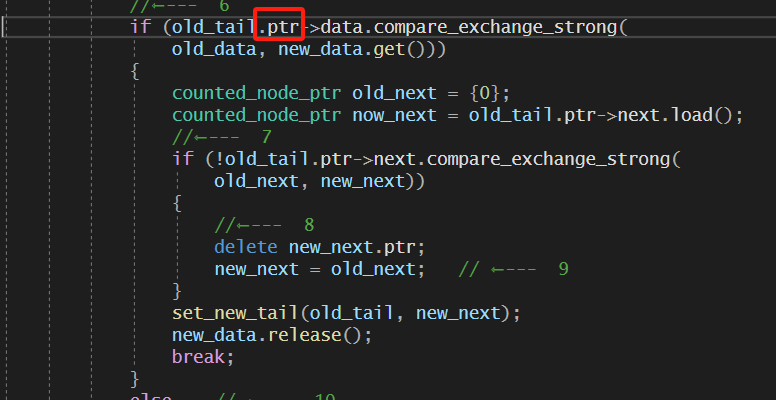
之后我们让比较失败的线程辅助完成节点的创建和tail的更新。这要求将非原子变量的数据成员改为原子变量,并采用比较-交换操作设置其值。不过,更复杂的数据结构需要进行更多修改。

无锁并发队列的设计

Posted on 2024-01-07 | In C++

简介

前文介绍了无锁并发栈的设计,本文继续介绍无锁队列的设计。队列和栈容器的难点稍微不同,因为对于队列结构,push()和pop()分别访问其不同部分,而在栈容器上,这两项操作都访问头节点,所以两种数据结构所需的同步操作相异。如果某线程在队列一端做出改动,而另一线程同时访问队列另一端,代码就要保证前者的改动过程能正确地为后者所见

单一消费者和生产者队列

我们实现一个简单的无锁队列,只应对一个生产者一个消费者的情况,便于我们理解

1
2
3
4
5
6
7
8
9
10
11
12
13
14
15
16
17
18
19
20
21
22
23
24
25
26
27
28
29
30
31
32
33
34
35
36
37
38
39
40
41
42
43
44
45
46
47
48
49
50
51
52
53
54
55
56
57
58
59
60
61
62
63
64
65
66
67
68
69
#include<atomic>
#include<memory>

template<typename T>
class SinglePopPush
{
private:
struct node
{
std::shared_ptr<T> data;
node* next;
node() :
next(nullptr)
{}
};
std::atomic<node*> head;
std::atomic<node*> tail;
node* pop_head()
{
node* const old_head = head.load();
// ⇽-- - 1
if (old_head == tail.load())
{
return nullptr;
}
head.store(old_head->next);
return old_head;
}
public:
SinglePopPush() :
head(new node), tail(head.load())
{}
SinglePopPush(const SinglePopPush& other) = delete;
SinglePopPush& operator=(const SinglePopPush& other) = delete;
~SinglePopPush()
{
while (node* const old_head = head.load())
{
head.store(old_head->next);
delete old_head;
}
}
std::shared_ptr<T> pop()
{
node* old_head = pop_head();
if (!old_head)
{
return std::shared_ptr<T>();
}
// ⇽-- -2
std::shared_ptr<T> const res(old_head->data);
delete old_head;
return res;
}
void push(T new_value)
{
std::shared_ptr<T> new_data(std::make_shared<T>(new_value));
// ⇽-- - 3
node* p = new node;
//⇽-- - 4
node* const old_tail = tail.load();
//⇽-- - 5
old_tail->data.swap(new_data);
//⇽-- - 6
old_tail->next = p;
//⇽-- - 7
tail.store(p);
}
};

上面的实现初看上去还不错。在同一时刻,如果只有一个线程调用push(),且仅有一个线程调用pop(),这份代码便可以相对完美地工作。

本例中的push()和pop()之间存在先行关系,这点很重要,它使队列的使用者可安全地获取数据。

tail指针的存储操作7与其载入操作1同步:按控制流程,在运行push()的线程上,原有的尾节点中的data指针先完成存储操作5,然后tail才作为指针存入新值7;

并且,在运行pop()的线程上,tail指针先完成载入操作1,原来的data指针才执行加载操作2,故data的存储操作5在载入操作1之前发生

(全部环节正确无误。因此这个单一生产者、单一消费者(Single-Producer Single-Consumer,SPSC)队列可以完美地工作。

不过,若多个线程并发调用push()或并发调用pop(),便会出问题。我们先来分析push()。如果有两个线程同时调用push(),就会分别构造一个新的空节点并分配内存3,而且都从tail指针读取相同的值4,结果它们都针对同一个尾节点更新其数据成员,却各自把data指针和next指针设置为不同的值5和6。这形成了数据竞争!

pop_head()也有类似问题,若两个线程同时调用这个函数,它们就会读取同一个头节点而获得相同的next指针,而且都把它赋予head指针以覆盖head指针原有的值。最终两个线程均认为自己获取了正确的头节点,这是错误的根源。给定一项数据,我们不仅要确保仅有一个线程可对它调用pop(),如果有别的线程同时读取头节点,则还需保证它们可以安全地访问头节点中的next指针。我们曾在前文的无锁栈容器中遇见过类似问题,其pop()函数也有完全相同的问题。

多线程push

解决多线程push的竞争问题。

一种方法是将data指针原子化,通过比较-交换操作来设置它的值。如果比较-交换操作成功,所操作的节点即为真正的尾节点,我们便可安全地设定next指针,使之指向新节点。若比较-交换操作失败,就表明有另一线程同时存入了数据,我们应该进行循环,重新读取tail指针并从头开始操作。

如果std::shared_ptr<>上的原子操作是无锁实现,那便万事大吉,否则我们仍需采取别的方法。一种可行的方法是令pop()返回std::unique_ptr<>指针(凭此使之成为指涉目标对象的唯一指针),并在队列中存储指向数据的普通指针。这样让代码得以按std::atomic<T*>的形式存储指针,支持必要的compare_exchange_strong()调用。

1
2
3
4
5
6
7
8
9
10
11
12
13
14
15
16
17
18
19
20
21
22
23
void push(T new_value)
{
std::unique_ptr<T> new_data(new T(new_value));
counted_node_ptr new_next;
new_next.ptr=new node;
new_next.external_count=1;
for(;;)
{
//⇽--- 1
node* const old_tail=tail.load();
T* old_data=nullptr;
//⇽--- 2
if(old_tail->data.compare_exchange_strong(
old_data,new_data.get()))
{
old_tail->next=new_next;
// 3
tail.store(new_next.ptr);
new_data.release();
break;
}
}
}

引用计数避免了上述的数据竞争,但那不是push()中仅有的数据竞争。只要我们仔细观察,便会发现其代码模式与栈容器相同:先载入原子指针1,然后依据该指针读取目标值2。

另一线程有可能同时更新tail指针3,如果该更新在pop()内部发生,最终将导致删除尾节点。若尾节点先被删除,代码却依然根据指针读取目标值,就会产生未定义行为。

有一种方法能解决上面的问题,且该方法颇具吸引力:在尾节点中添加一外部计数器,与处理头节点的方法相同。不过队列中的每个节点已配备一个外部计数器,分别存储在对应前驱节点内的next指针中。

若要让同一个节点具有两个外部计数器,便需要改动引用计数的实现方式,以免过早删除节点。我们为了满足上述要求,可在节点的结构体中记录外部计数器的数目,外部计数器一旦发生销毁,该数目则自减,并且将该外部计数器的值加到内部计数器的值之上。对于任意特定节点,如果内部计数器的值变为零,且再也没有外部计数器存在,我们就知道该节点能被安全地删除.

1
2
3
4
5
6
7
8
9
10
11
12
13
14
15
16
17
18
19
20
21
22
23
24
25
26
27
28
29
30
31
32
33
34
35
36
37
38
39
40
41
42
43
44
45
46
47
48
49
50
51
52
53
54
55
56
57
58
59
60
61
62
63
64
65
template<typename T>
class lock_free_queue
{
private:
struct node;
struct counted_node_ptr
{
int external_count;
node* ptr;
};
std::atomic<counted_node_ptr> head;
//⇽--- 1
std::atomic<counted_node_ptr> tail;
struct node_counter
{
unsigned internal_count:30;
//⇽--- 2
unsigned external_counters:2;
};
struct node
{
std::atomic<T*> data;
//⇽--- 3
std::atomic<node_counter> count;
counted_node_ptr next;
node()
{
node_counter new_count;
new_count.internal_count=0;
//⇽--- 4
new_count.external_counters=2;
count.store(new_count);

next.ptr=nullptr;
next.external_count=0;
}
};
public:
void push(T new_value)
{
std::unique_ptr<T> new_data(new T(new_value));
counted_node_ptr new_next;
new_next.ptr=new node;
new_next.external_count=1;
counted_node_ptr old_tail=tail.load();
for(;;)
{
// 5
increase_external_count(tail,old_tail);
T* old_data=nullptr;
// 6
if(old_tail.ptr->data.compare_exchange_strong(
old_data,new_data.get()))
{
old_tail.ptr->next=new_next;
old_tail=tail.exchange(new_next);
// 7
free_external_counter(old_tail);
new_data.release();
break;
}
old_tail.ptr->release_ref();
}
}
};

tail指针(1处) 和head指针的型别均为atomic,而node结构体则以成员count (3处)取代原有的internal_count。

该count成员也是一个结构体,内含internal_count变量和新引入的external_counters变量(2处) 。请注意,external_counters仅需使用两位,因为同一个节点最多只可能有两个外部计数器。因此,结构体count为它分配了一个两位的位域,而把internal_count设定为30位的整型值,从而维持了计数器32位的整体尺寸。

按此处理,内部计数器的取值范围仍然非常大,还保证了在32位或64位计算机上,一个机器字(machine word)便能容纳整个结构体。后文很快会解释,为了杜绝条件竞争,上述两种计数器必须合并,视作单一数据项,共同进行更新。只要把结构体的大小限制在单个机器字内,那么在许多硬件平台上,其原子操作就更加有机会以无锁方式实现。

节点经过初始化,其internal_count成员被置零,而external_counters成员则设置成2(4处),因为我们向队列加入的每个新节点,它最初既被tail指针指涉,也被前一个节点的next指针指涉。

我们先调用一个新函数increase_external_count()令外部计数器的值增加(5处),再载入tail指针,进而读取尾节点的data成员并对它调用compare_exchange_strong()(6处),然后对原有的tail指针执行free_external_counter()(7处)。

我们画一下这个图

https://cdn.llfc.club/1704599347162.jpg

多线程pop

多线程pop实现和之前无锁栈类似,我们只要做外部引用计数的增加和内部引用计数的减少即可

1
2
3
4
5
6
7
8
9
10
11
12
13
14
15
16
17
18
19
20
21
22
23
24
25
26
27
28
29
30
31
32
33
34
35
36
37
38
template<typename T>
class lock_free_queue
{
private:
struct node
{
void release_ref();
//node的余下代码与代码清单7.16相同
};
public:
std::unique_ptr<T> pop()
{
// 1
counted_node_ptr old_head=head.load(std::memory_order_relaxed);
for(;;)
{
//2
increase_external_count(head,old_head);
node* const ptr=old_head.ptr;
if(ptr==tail.load().ptr)
{
//3
ptr->release_ref();
return std::unique_ptr<T>();
}
// 4
if(head.compare_exchange_strong(old_head,ptr->next))
{
T* const res=ptr->data.exchange(nullptr);
// 5
free_external_counter(old_head);
return std::unique_ptr<T>(res);
}
// 6
ptr->release_ref();
}
}
};

节点的弹出操作从加载old_head指针开始(1处),接着进入一个无限循环,并且令已加载好的指针上的外部计数器的值自增(2处)。若头节点正巧就是尾节点,即表明队列内没有数据,我们便释放引用(3处),并返回空指针。

否则表明队列中存在数据,因此当前线程试图调用compare_exchange_strong()将其收归己有(4处)。以上调用会对比结构体head和old_head,其成员都包括外部计数器和指针,但均被视作一个整体。无论哪个成员发生了变化而导致不匹配,代码即释放引用(6处)并重新循环。

如果比较-交换操作成功,当前线程就顺利地将节点所属的数据收归己有,故我们随即释放弹出节点的外部计数器(5处),再将数据返回给pop()的调用者。若两个外部计数器都被释放,且内部计数器值变为0,则节点本身可被删除。有几个函数负责处理引用计数

下面是减少引用计数的函数

1
2
3
4
5
6
7
8
9
10
11
12
13
14
15
16
17
18
19
20
21
22
23
24
25
26
27
28
29
30
template<typename T>
class lock_free_queue
{
private:
struct node
{
void release_ref()
{
node_counter old_counter=
count.load(std::memory_order_relaxed);
node_counter new_counter;
do
{
new_counter=old_counter;
//1
--new_counter.internal_count;
}
//2
while(!count.compare_exchange_strong(
old_counter,new_counter,
std::memory_order_acquire,std::memory_order_relaxed));
if(!new_counter.internal_count &&
!new_counter.external_counters)
{
//3
delete this;
}
}
};
};

尽管我们在这里只改动位域成员internal_count(1处),也必须按原子化方式更新整个计数器结构体。所以更新操作要用比较-交换函数配合循环实现(2处)。

当计数器internal_count完成自减后,如果内外两个计数器的值均为0,就表明调用release_ref()的是最后一个指涉目标节点的指针(代码清单pop (5 6两处)的ptr),我们应当删除节点(3处)。

接下来我们实现增加引用计数的操作

1
2
3
4
5
6
7
8
9
10
11
12
13
14
15
16
17
18
19
20
template<typename T>
class lock_free_queue
{
private:
static void increase_external_count(
std::atomic<counted_node_ptr>& counter,
counted_node_ptr& old_counter)
{
counted_node_ptr new_counter;
do
{
new_counter=old_counter;
++new_counter.external_count;
}
while(!counter.compare_exchange_strong(
old_counter,new_counter,
std::memory_order_acquire,std::memory_order_relaxed));
old_counter.external_count=new_counter.external_count;
}
};

increase_external_count()已改成了静态成员函数,需要更新的目标不再是自身固有的成员计数器,而是一个外部计数器,它通过第一个参数传入函数以进行更新。

针对无锁队列的节点释放其外部计数器

1
2
3
4
5
6
7
8
9
10
11
12
13
14
15
16
17
18
19
20
21
22
23
24
25
26
27
28
29
30
31
template<typename T>
class lock_free_queue
{
private:
static void free_external_counter(counted_node_ptr &old_node_ptr)
{
node* const ptr=old_node_ptr.ptr;
int const count_increase=old_node_ptr.external_count-2;
node_counter old_counter=
ptr->count.load(std::memory_order_relaxed);
node_counter new_counter;
do
{
new_counter=old_counter;
//⇽--- 1
--new_counter.external_counters;
//⇽--- 2
new_counter.internal_count+=count_increase;
}
//⇽--- 3
while(!ptr->count.compare_exchange_strong(
old_counter,new_counter,
std::memory_order_acquire,std::memory_order_relaxed));
if(!new_counter.internal_count &&
!new_counter.external_counters)
{
//⇽--- 4
delete ptr;
}
}
};

与free_external_counter()对应的是increase_external_count()函数,该函数对整个计数器结构体仅执行一次compare_exchange_strong(),便合并更新了其中的两个计数器(3处),这与release_ref()中更新internal_count的自减操作类似。

计数器external_counters则同时自减(1处)。如果这两个值均变为0,就表明目标节点再也没有被指涉,遂可以安全删除(4处)。

为了避免条件竞争,上述更新行为需要整合成单一操作完成,因此需要用比较-交换函数配合循环运行。若两项更新分别独立进行,万一有两个线程同时调用该函数,则它们可能都会认为自己是最后的执行者,所以都删除节点,结果产生未定义行为。

优化

虽然上述代码尚可工作,也无条件竞争,但依然存在性能问题。一旦某线程开始执行 push()操作,针对 old_tail.ptr->data成功完成了compare_exchange_strong()调用(push代码6处),就没有其他线程可以同时运行push()。若有其他任何线程试图同时压入数据,便始终看不到nullptr,而仅能看到上述线程执行push()传入的新值,导致compare_exchange_strong()调用失败,最后只能重新循环。这实际上是忙等,消耗CPU周期却一事无成,结果形成了实质的锁。第一个push()调用令其他线程发生阻塞,直到执行完毕才解除,所以这段代码不是无锁实现。问题不止这一个。若别的线程被阻塞,则操作系统会提高对互斥持锁的线程的优先级,好让它尽快完成,但本例却无法依此处理,被阻塞的线程将一直消耗CPU周期,等到最初调用push()的线程执行完毕才停止。这个问题带出了下一条妙计:让等待的线程协助正在执行push()的线程,以实现无锁队列。

我们很清楚应该在这种方法中具体做什么:先设定尾节点上的next指针,使之指向一个新的空节点,且必须随即更新tail指针。由于空节点全都等价,因此这里所用空节点的起源并不重要,其创建者既可以是成功压入数据的线程,也可以是等待压入数据的线程。如果将节点内的next指针原子化,代码就能借compare_exchange_strong()设置其值。只要设置好了next指针,便可使用compare_exchange_weak()配合循环设定tail指针,借此令它依然指向原来的尾节点。若tail指针有变,则说明它已同时被别的线程更新过,因此我们停止循环,不再重试。

pop()需要稍微改动才可以载入原子化的next指针

1
2
3
4
5
6
7
8
9
10
11
12
13
14
15
16
17
18
19
20
21
22
23
24
25
26
27
28
29
30
31
32
33
34
35
template<typename T>
class lock_free_queue
{
private:
struct node
{
std::atomic<T*> data;
std::atomic<node_counter> count;
//⇽--- 1
std::atomic<counted_node_ptr> next;
};
public:
std::unique_ptr<T> pop()
{
counted_node_ptr old_head=head.load(std::memory_order_relaxed);
for(;;)
{
increase_external_count(head,old_head);
node* const ptr=old_head.ptr;
if(ptr==tail.load().ptr)
{
return std::unique_ptr<T>();
}
// ⇽--- 2
counted_node_ptr next=ptr->next.load();
if(head.compare_exchange_strong(old_head,next))
{
T* const res=ptr->data.exchange(nullptr);
free_external_counter(old_head);
return std::unique_ptr<T>(res);
}
ptr->release_ref();
}
}
};

上面的代码进行了简单改动:next指针现在采用了原子变量(1处),并且(2处)的载入操作也成了原子操作。本例使用了默认的memory_order_seq_cst次序,而ptr->next指针原本属于std::atomic型别,在(2 处)隐式转化成counted_node_ptr型别,这将触发原子化的载入操作,故无须显式调用load()。不过我们还是进行了显式调用,目的是提醒自己,在以后优化时此处应该显式设定内存次序。

新版本的push()相对更复杂,如下

1
2
3
4
5
6
7
8
9
10
11
12
13
14
15
16
17
18
19
20
21
22
23
24
25
26
27
28
29
30
31
32
33
34
35
36
37
38
39
40
41
42
43
44
45
46
47
48
49
50
51
52
53
54
55
56
57
58
59
60
61
62
63
64
65
66
67
template<typename T>
class lock_free_queue
{
private:
// ⇽--- 1
void set_new_tail(counted_node_ptr &old_tail,
counted_node_ptr const &new_tail)
{
node* const current_tail_ptr=old_tail.ptr;
// ⇽--- 2
while(!tail.compare_exchange_weak(old_tail,new_tail) &&
old_tail.ptr==current_tail_ptr);
// ⇽--- 3
if(old_tail.ptr==current_tail_ptr)
//⇽--- 4
free_external_counter(old_tail);
else
//⇽--- 5
current_tail_ptr->release_ref();
}
public:
void push(T new_value)
{
std::unique_ptr<T> new_data(new T(new_value));
counted_node_ptr new_next;
new_next.ptr=new node;
new_next.external_count=1;
counted_node_ptr old_tail=tail.load();
for(;;)
{
increase_external_count(tail,old_tail);
T* old_data=nullptr;
//⇽--- 6
if(old_tail.ptr->data.compare_exchange_strong(
old_data,new_data.get()))
{
counted_node_ptr old_next={0};
//⇽--- 7
if(!old_tail.ptr->next.compare_exchange_strong(
old_next,new_next))
{
//⇽--- 8
delete new_next.ptr;
new_next=old_next; // ⇽--- 9
}
set_new_tail(old_tail, new_next);
new_data.release();
break;
}
else // ⇽--- 10
{
counted_node_ptr old_next={0};
// ⇽--- 11
if(old_tail.ptr->next.compare_exchange_strong(
old_next,new_next))
{
// ⇽--- 12
old_next=new_next;
// ⇽--- 13
new_next.ptr=new node;
}
// ⇽--- 14
set_new_tail(old_tail, old_next);
}
}
}
};

由于我们确实想在(6处)设置data指针,而且还需接受另一线程的协助,因此引入了else分支以处理该情形(10处)。上述push()的新版本先在(6处)处设置好节点内的data指针,然后通过compare_exchange_strong()更新next指针(7处),从而避免了循环。

若交换操作失败,我们便知道另一线程同时抢先设定了next指针,遂无须保留函数中最初分配的新节点,可以将它删除(8处)。

虽然next指针是由别的线程设定的,但代码依然持有其值,留待后面更新tail指针(9处)。更新tail指针的代码被提取出来,写成set_new_tail()函数(1处)。它通过compare_exchange_weak()配合循环来更新tail指针(2处)。

如果其他线程试图通过push()压入新节点,计数器external_count就会发生变化,而上述新函数正是为了防止错失这一变化。但我们也要注意,若另一线程成功更新了tail指针,其值便不得再次改变。若当前线程重复更新tail指针,便会导致控制流程在队列内部不断循环,这种做法完全错误。

相应地,如果比较-交换操作失败,所载入的ptr指针也需要保持不变。在脱离循环时,假如ptr指针的原值和新值保持一致(3处)就说明tail指针的值肯定已经设置好,原有的外部计数器则需要释放(4处)。若ptr指针前后有所变化,则另一线程将释放计数器,而当前线程要释放它持有的唯一一个tail指针(5处)。

这里,若多个线程同时调用push(),那么只有一个线程能成功地在循环中设置data指针,失败的线程则转去协助成功的线程完成更新。当前线程一进入push()就分配了一个新节点,我们先更新next指针,使之指向该节点(11处)。假定操作成功,该节点就充当新的尾节点⑫,而我们还需另行分配一个新节点,为下一个压入队列的数据预先做好准备⑬。接着,代码尝试调用set_new_tail()以设置尾节点(14处),再重新循环。

官方案例的隐患

我们基于上面的案例执行下面的测试代码,发现程序崩溃

1
2
3
4
5
6
7
8
9
10
11
12
13
14
15
16
17
18
19
20
21
22
23
24
25
26
27
28
void TestCrushQue() {
crush_que<int> que;
std::thread t1([&]() {
for (int i = 0; i < TESTCOUNT*10000; i++) {
que.push(i);
std::cout << "push data is " << i << std::endl;
std::this_thread::sleep_for(std::chrono::milliseconds(10));
}
});


std::thread t2([&]() {
for (int i = 0; i < TESTCOUNT*10000;) {
auto p = que.pop();
if (p == nullptr) {
std::this_thread::sleep_for(std::chrono::milliseconds(10));
continue;
}
i++;
std::cout << "pop data is " << *p << std::endl;
}
});

t1.join();
t2.join();

}

我们看到崩溃在底层代码的原子变量交换这里
https://cdn.llfc.club/71fef3117c6f7dd7bd68e32c448e555.png

我们按照调用堆栈往上查找,发现是head和tail的ptr为空导致
https://cdn.llfc.club/1704760877771.jpg

解决这个问题比较简单,我们在队列的构造函数中添加head和tail的初始化即可。

1
2
3
4
5
6
7
8
memoryleak_que() {
counted_node_ptr new_next;
new_next.ptr = new node();
new_next.external_count = 1;
tail.store(new_next);
head.store(new_next);
std::cout << "new_next.ptr is " << new_next.ptr << std::endl;
}

我们也需要在析构函数里回收头尾节点,基本思路是依次出队,但是因为最后一个节点为tail,当head和tail相等时则停止回收,所以我们要额外回收头部节点(此时头部和尾部节点重合)

1
2
3
4
5
~memoryleak_que() {
while (pop());
auto head_counted_node = head.load();
delete head_counted_node.ptr;
}

为了测试内存泄漏,我们在栈中添加一个静态成员变量

1
2
3
4
5
6
7
class memoryleak_que{
public:
static std::atomic<int> destruct_count;
};

template<typename T>
std::atomic<int> lock_free_queue<T>::destruct_count = 0;

我们在release_ref和free_external_counter中删除指针时增加这个静态成员变量的数量,最后统计删除的数量和我们开辟的数量是否相等

1
2
3
4
5
6
7
8
9
10
11
12
13
14
15
16
17
18
19
20
21
22
23
24
25
void release_ref()
{
std::cout << "call release ref " << std::endl;
node_counter old_counter =
count.load(std::memory_order_relaxed);
node_counter new_counter;
do
{
new_counter = old_counter;
//1
--new_counter.internal_count;
}
//2
while (!count.compare_exchange_strong(
old_counter, new_counter,
std::memory_order_acquire, std::memory_order_relaxed));
if (!new_counter.internal_count &&
!new_counter.external_counters)
{
//3
delete this;
std::cout << "release_ref delete success" << std::endl;
destruct_count.fetch_add(1);
}
}
1
2
3
4
5
6
7
8
9
10
11
12
13
14
15
16
17
18
19
20
21
22
23
24
25
26
27
28
29
30
static void free_external_counter(counted_node_ptr& old_node_ptr)
{
std::cout << "call free_external_counter " << std::endl;
node* const ptr = old_node_ptr.ptr;
int const count_increase = old_node_ptr.external_count - 2;
node_counter old_counter =
ptr->count.load(std::memory_order_relaxed);
node_counter new_counter;
do
{
new_counter = old_counter;
//⇽--- 1
--new_counter.external_counters;
//⇽--- 2
new_counter.internal_count += count_increase;
}
//⇽--- 3
while (!ptr->count.compare_exchange_strong(
old_counter, new_counter,
std::memory_order_acquire, std::memory_order_relaxed));
if (!new_counter.internal_count &&
!new_counter.external_counters)
{
//⇽--- 4
destruct_count.fetch_add(1);
std::cout << "free_external_counter delete success" << std::endl;
delete ptr;
}

}

测试并发执行两个线程,最后assert断言删除节点数和开辟的节点数相等

1
2
3
4
5
6
7
8
9
10
11
12
13
14
15
16
17
18
19
20
21
22
23
24
25
26
27
28
29
30
void TestLeakQue() {
memoryleak_que<int> que;
std::thread t1([&]() {
for (int i = 0; i < TESTCOUNT ; i++) {
que.push(i);
std::cout << "push data is " << i << std::endl;
std::this_thread::sleep_for(std::chrono::milliseconds(10));
}
});


std::thread t2([&]() {
for (int i = 0; i < TESTCOUNT ;) {
auto p = que.pop();
if (p == nullptr) {
std::this_thread::sleep_for(std::chrono::milliseconds(10));
continue;
}
i++;
std::cout << "pop data is " << *p << std::endl;
}
});

t1.join();
t2.join();

assert(que.destruct_count == TESTCOUNT );

}

测试触发断言,说明存在内存泄漏。

经过调试我们发现其实是在pop头部节点时判断head和tail相等,直接返回空指针,但是引用计数没有做减少。这和栈的方式不同,栈的pop判断条件如果head节点的ptr指向空地址,说明这个节点为无效节点无需pop直接返回空指针,当有新数据插入时在头部插入新节点并更新head为新节点。这么做保证了即使最后那个无效节点引用计数怎么增加都无所谓。

但是队列不行,队列的操作方式是先开辟了head和tail节点,这两个节点最开始是无效的,但是当插入数据时,就将head的ptr指向的数据data更新为新的数据即可。这样head之前和tail相等时pop增加的引用计数如果不合理减少就会造成问题。

解决的思路也比较简单,如果head和tail相等说明为空队列,空队列减少该节点内部引用计数即可。

1
2
3
4
5
6
7
8
9
10
11
12
13
14
15
16
17
18
19
20
21
22
23
24
 std::unique_ptr<T> pop()
{
counted_node_ptr old_head = head.load(std::memory_order_relaxed);
for (;;)
{
increase_external_count(head, old_head);
node* const ptr = old_head.ptr;
if (ptr == tail.load().ptr)
{
//头尾相等说明队列为空,要减少内部引用计数
ptr->release_ref();
return std::unique_ptr<T>();
}
// ⇽--- 2
counted_node_ptr next = ptr->next.load();
if (head.compare_exchange_strong(old_head, next))
{
T* const res = ptr->data.exchange(nullptr);
free_external_counter(old_head);
return std::unique_ptr<T>(res);
}
ptr->release_ref();
}
}

最后我们测试多线程pop和push的情况,目前稳定回收节点并且并发安全

1
2
3
4
5
6
7
8
9
10
11
12
13
14
15
16
17
18
19
20
21
22
23
24
25
26
27
28
29
30
31
32
33
34
35
36
37
38
39
40
41
42
43
44
45
46
47
48
49
void TestLockFreeQueMultiPushPop() {
lock_free_queue<int> que;
std::thread t1([&]() {
for (int i = 0; i < TESTCOUNT * 100; i++) {
que.push(i);
std::cout << "push data is " << i << std::endl;
std::this_thread::sleep_for(std::chrono::milliseconds(10));
}
});

std::thread t4([&]() {
for (int i = TESTCOUNT*100; i < TESTCOUNT * 200; i++) {
que.push(i);
std::cout << "push data is " << i << std::endl;
std::this_thread::sleep_for(std::chrono::milliseconds(10));
}
});

std::thread t2([&]() {
for (int i = 0; i < TESTCOUNT * 100;) {
auto p = que.pop();
if (p == nullptr) {
std::this_thread::sleep_for(std::chrono::milliseconds(10));
continue;
}
i++;
std::cout << "pop data is " << *p << std::endl;
}
});

std::thread t3([&]() {
for (int i = 0; i < TESTCOUNT * 100;) {
auto p = que.pop();
if (p == nullptr) {
std::this_thread::sleep_for(std::chrono::milliseconds(10));
continue;
}
i++;
std::cout << "pop data is " << *p << std::endl;
}
});

t1.join();
t2.join();
t3.join();
t4.join();
assert(que.destruct_count == TESTCOUNT * 200);
}

总结

本文介绍了无锁队列的实现,利用了引用计数的思想,实现了并发安全的无锁队列。

源码链接:

https://gitee.com/secondtonone1/boostasio-learn/tree/master/concurrent/day18-LockFreeQue

视频链接:

https://space.bilibili.com/271469206/channel/collectiondetail?sid=1623290

利用内存模型优化无锁栈

Posted on 2024-01-01 | In C++

简介

前文我们通过引用计数实现了无锁并发的栈结构,但是对于原子变量的读,写以及读改写操作默认采用的是memory_order_seq_cst,memory_order_seq_cst为全局顺序模型,也就是所有线程看到的执行顺序一致,但是这种模型对性能消耗较大,本文在之前实现的无锁栈的基础上介绍如何通过更为宽松的模型提升性能。先带着大家复习一下内存模型相关知识

release-acquire同步

我们在之前的文章介绍了6中内存顺序,其中我们可以通过release和acquire的方式实现同步的效果,现在带着大家复习一下:

线程A执行store操作,采用memory_order_release顺序模型。线程B执行load操作采用memory_order_acquire顺序模型。如果线程B的load操作读取到A操作的store操作的数值,我们称线程a的store操作 synchronizes-with(同步) 线程b的load操作

happens-before先行

因为a->store 同步于 b->load, 则 a->store 先行于 b->load。

只要同步就能推出先行,所谓先行就是逻辑执行的顺序,一定是a->store 先于 b->load

先行还包括一种情况,sequenced-before(顺序执行), 所谓顺序执行就是单线程中执行的顺序为从上到下的顺序, 比如

1
2
3
4
int func(){
int a = 1008; //1
int b = 1024; //2
}

单线程角度1先于2执行(1 sequenced before 2),也可推导出1先行于2.

先行具有传递性 1 happens-before 2, 2 happens-before 3, 则1 happens-before 3

注意先行是C++ 语意层面的概念, 指令实际的执行顺序可能是先2后1,取决于编译器。

但是我们可以通过内存顺序进行约束达到指令编排让1先于2的目的。如release内存序能保证其写操作之前的指令不会排在其后。acquire内存序能保证其读操作之前写入的指令不会排在其之后,也能保证其之后的指令不会排在读之前。所以release和acquire形成同步后类似于屏障,当然C++ 也有类似于的原语std::atomic_thread_fence(栅栏)。

写个代码复习一下

1
2
3
4
5
6
7
8
9
10
11
12
13
14
15
16
17
18
void TestReleaseSeq() {
int data = 0;
std::atomic<int> flag = 0;
std::thread t1([&]() {
data = 42; //1
flag.store(1, std::memory_order_release); //2
});

std::thread t2([&]() {
//3
while (!flag.load(std::memory_order_acquire));
//4
assert(data == 42);
});

t1.join();
t2.join();
}

我们从两方面解读代码:

1 指令编排角度, 2处使用了release内存序,保证1 会排在 2 之前。 3采用了acquire内存序,保证4排在3之后,且如果3能读到2的写入值,则保证指令1已经先于3执行完。因为while重试的机制,保证2同步于3,即2先于3执行,有因为1先于2执行,而3先于4执行,所以得出1先于4执行,那么4处断言正确不会崩溃。

2 从C++先行语义的角度,单线程t1内,1先行于2, 单线程t2内3先行于4, 而t1第2处代码采用release内存序,t2第3处代码采用acquire内存序列,2同步于3, 则2 先行于 3. 因为先行的传递性,1 sequenced-before 2, 2 happens-before 3, 3 sequenced-before 4, 则1 happens-before 4.

释放序列的扩展

这段文字摘录于C++并发编程一书

如果存储操作的标记是memory_order_release、memory_order_acq_rel或memory_order_seq_cst,而载入操作则以memory_order_consume、memory_order_acquire或memory_order_seq_cst标记,这些操作前后相扣成链,每次载入的值都源自前面的存储操作,那么该操作链由一个释放序列组成。若最后的载入操作服从内存次序memory_order_acquire或memory_order_seq_cst,则最初的存储操作与它构成同步关系。但如果该载入操作服从的内存次序是memory_order_consume,那么两者构成前序依赖关系。操作链中,每个“读-改-写”操作都可选用任意内存次序,甚至也能选用memory_order_relaxed次序。

我们对上述阐述总结为下面的理解

release-sequnece的概念如下:

针对一个原子变量 M 的 release 操作 A 完成后, 接下来 M 上可能还会有一连串的其他操作. 如果这一连串操作是由

1 同一线程上的写操作

2 或者任意线程上的 read-modify-write(可以是任意内存顺序) 操作

这两种构成的, 则称这一连串的操作为以 release 操作 A 为首的 release sequence. 这里的写操作和 read-modify-write 操作可以使用任意内存顺序.

而同步的概念是:

一个 acquire 操作在同一个原子变量上读到了一个 release 操作写入的值, 或者读到了以这个 release 操作为首的 release sequence 写入的值, 那么这个 release 操作 “synchronizes-with” 这个 acquire 操作

所以release-sequence不一定构成同步,只有acquire到release的值才算作同步。

我们看下面的例子,该例子选取自C++ 并发编程中,我对其稍作修改以保证可以正常运行。

我们先定义了三个全局变量,分别是queue_data表示入队的数据,count表示入队的数量。store_finish表示存储完成。

1
2
3
std::vector<int> queue_data;
std::atomic<int> count;
std::atomic<bool> store_finish = false;

我们实现入队逻辑,这个逻辑以后会有一个线程独立执行

1
2
3
4
5
6
7
8
9
10
11
12
void populate_queue()
{
unsigned const number_of_items = 20;
queue_data.clear();
for (unsigned i = 0; i < number_of_items; ++i)
{
queue_data.push_back(i);
}
// 1 最初的存储操作
count.store(number_of_items, std::memory_order_release);
store_finish.store(true, std::memory_order_relaxed);
}

上述函数将20个元素从0到19依次入队,然后修改count值为20,使用release内存顺序,并且将完成标记设置为true.

然后我们实现消费函数

1
2
3
4
5
6
7
8
9
10
11
12
13
14
15
16
17
void consume_queue_items()
{
while (true)
{
//2等待存储完成
while (!store_finish.load(std::memory_order_relaxed));

int item_index;
//3 读—改—写”操作
if ((item_index = count.fetch_sub(1, std::memory_order_acquire)) <= 0)
{
return;
}
//4 从内部容器queue_data 读取数据项是安全行为
std::cout << "queue_data is " << queue_data[item_index-1] << std::endl;
}
}

上述函数,我们在2处等待存储完成,在3处读改写修改count的值,采用的是acquire内存顺序,然后我们从队列中根据item_index读取数据。

假设一个线程t1用来执行populate_queue,一个线程t2用来执行consume_queue_items。

那么因为release-acquire的关系,我们可以推断出 t1 synchronizes-with t2.

那我们用三个线程并行操作会怎样呢?

1
2
3
4
5
6
7
8
void TestReleaseSeq2() {
std::thread a(populate_queue);
std::thread b(consume_queue_items);
std::thread c(consume_queue_items);
a.join();
b.join();
c.join();
}

可以看到输出如下

https://cdn.llfc.club/1703586901585.jpg

虽然控制台打印混乱,但是我们可以看到消费者线程t2和t3并没有打印重复的数据,说明他们互斥访问count,每个线程取到的count不一样进而访问queue_data中的不同数据。

假设只有一个线程a和线程b,我们知道一个生产者a和一个消费者b构成了同步关系,没有问题,如果增加了消费者线程c,b和c中都有fetch_sub这种读-改-写操作,采用的都是acquire内存顺序,但从线程b和c的角度并不能构成同步,那是不是就意味着b和c可能获取到count的值相同?

答案是否定的,单从线程角度b和c并不能构成同步,但是b和c必然有一个线程先执行一个线程后执行fetch_sub(原子变量的操作任何顺序模型都能保证操作的原子性)。假设b先执行,和a构成release-sequence关系,b读取到a执行的count strore的结果, b处于以a线程的release为首的释放序列中,则b的store操作会和c的读-改-写(fetch操作)构成同步(c 采用的是acquire). C++并发编程一书中对类似的代码也做了同样的解释。

如下图是书中给出的图示,实线表示先行关系,虚线标识释放序列

https://cdn.llfc.club/1703666791712.jpg

那我们可以这么简化上面的分析结论

1 a线程和b线程构成release-sequence的释放序列

2 即使b线程和c线程不构成同步,但是b线程的读改写操作处于release-sequence中,且c线程采用acquire方式读改写,则b的读改写和c线程的读改写构成同步, 以a线程的release为首的sequence序列和c线程的读改写构成同步。

3 这里要强调一点, 如果a relese-sequence b, a和b不一定构成同步,但是b sychronizes with c, 则a synchronizes with c. 简单来说处于relase序列中的任意读改写操作和其他的线程构成同步,那么我们就能得出relese-sequence为首的操作和其他线程同步。

优化无锁栈

我们优化无锁栈先从push操作下手,我们要考虑的是如果有数据入栈,那么pop时要读取最新入栈的数据。所以我们要让push操作同步给pop操作,想到的办法很简单,push对head的修改采用release内存序列,pop对head的读改写采用acquire内存序列。

如果未有元素入栈,多个线程pop并不会产生问题,根据head内部的ptr指向为空判断空栈直接返回空指针。

如果此时已经有一个元素在栈中,多个线程并发pop,执行读改写操作,这些线程本来是无法同步的,但是最先pop的线程会和push线程构成同步关系,且形成release-sequence。那之后的线程pop就会和第一个pop的线程的写操作形成同步。

简单总结上面的含义:

1 因为要保证pop操作时节点的数据是有效的。push和pop要构成同步关系,push 采用release内存序修改head,pop 采用acquire内存序修改head

2 第一个pop的线程的写操作和之后的pop线程读操作要构成同步关系

实现push函数

1
2
3
4
5
6
7
8
void push(T const& data) {
counted_node_ptr new_node;
new_node.ptr = new count_node(data);
new_node.external_count = 1;
new_node.ptr->next = head.load();
while (!head.compare_exchange_weak(new_node.ptr->next, new_node,
memory_order::memory_order_release, memory_order::memory_order_relaxed));
}

对于head的修改,我们采用compare_exchange_weak操作。如果修改成功则使用memory_order_release内存顺序,否则就用memory_order_relaxed内存顺序。因为失败会进行重试,所以什么内存序都可以。

接下来实现pop

1
2
3
4
5
6
7
8
9
10
11
12
13
std::shared_ptr<T> pop() {
counted_node_ptr old_head = head.load();
for (;;) {
increase_head_count(old_head);
count_node* const ptr = old_head.ptr;
//1 判断为空责直接返回
if (!ptr) {
return std::shared_ptr<T>();
}
//省略数据出栈和头部更新操作....
//....
}
}

在pop中我们先将head加载出来,然后利用increase_head_count对old_head外部引用技术+1.

我们先讨论increase_head_count的实现,因为我们在increase_head_count的时候很可能其他的线程执行push操作。

因为increae_head_count和push操作都是对head的读改写操作,我们知道无论采用何种内存模型,原子变量的读改写都能保证原子数据的完整性。

因为pop操作比如第1处代码,以至于后面的操作会用到ptr->data数据,所以必须要让push操作和pop操作达到同步关系,才能保证push的data数据对pop操作可见,increase_count用的是acquire模型,而push用的是release模型,保证push先行于pop,这样pop逻辑中的data就是有效的。

1
2
3
4
5
6
7
8
9
10
11
12
13
//增加头部节点引用数量
void increase_head_count(counted_node_ptr& old_counter) {
counted_node_ptr new_counter;

do {
new_counter = old_counter;
++new_counter.external_count;
}//7 循环判断保证head和old_counter想等时做更新,多线程情况保证引用计数原子递增。
while (!head.compare_exchange_strong(old_counter, new_counter,
std::memory_order_acquire, std::memory_order_relaxed));
//8 走到此处说明head的external_count已经被更新了
old_counter.external_count = new_counter.external_count;
}

接下来我们实现省略的部分,省略的部分要根据head和old_head的值是否想等做出不同的逻辑,上一篇的逻辑是:

1 如果head和old_head相等则说明本线程抢占了head并且需要对外部引用计数-2,得出其他线程增加的引用计数,如果这个引用计数为内部的引用计数(可为负数)的负数则说明其他线程已经不再占有head,已经做了内部引用计数的更新,本线程回收资源即可。

2 如果head和old_head不相等则说明head已经被更改,或者自己获取的old_head是旧的(两个线程并发执行pop, 该线程是引用计数不准确的那个或者该线程读取的head已经被弹出),所以只需减少内部引用计数即可。

所以之后的逻辑是这样的

1
2
3
4
5
6
7
8
9
10
11
12
13
14
15
16
17
18
19
20
21
//2 本线程如果抢先完成head的更新
if (head.compare_exchange_strong(old_head, ptr->next))
{
//返回头部数据
std::shared_ptr<T> res;
//交换数据
res.swap(ptr->data);
//3 减少外部引用计数,先统计到目前为止增加了多少外部引用
int const count_increase = old_head.external_count - 2;
//4 将内部引用计数添加
if (ptr->internal_count.fetch_add(count_increase) == -count_increase)
{
delete ptr;
}
return res;
}
else if (ptr->internal_count.fetch_sub(1) == 1) {//5
//如果当前线程操作的head节点已经被别的线程更新,则减少内部引用计数
//当前线程减少内部引用计数,返回之前值为1说明指针仅被当前线程引用
delete ptr;
}

对于无锁编程,我的心得有两点

1 对于一个原子变量M,其释放序列中的读改写操作无论采用何种模型都能读取M的最新值。
2 内存顺序模型用来保证数据在多个线程的可见顺序。

例如
因为本线程在2处的比较交换要获取到其他线程修改的head的最新情况,其他线程要么是push操作,要么是pop操作。

1 经过前面的分析,线程a push 操作同步于b线程和c线程的pop中的increase_count操作,那么b线程2处的compare_exchange_strong和c线程2处的compare_exchange_strong都能读取到push操作写入data值。

2 那么b线程2处的compare_exchange_strong和c线程2处的compare_exchange_strong并不构成同步,但他们一定处于释放序列中,因为原子操作读改写保证了原子性。

绘制运行图,实线表示先行,虚线表示释放序列。

https://cdn.llfc.club/1703733885663.jpg

所以综上所述2处比较交换采用relaxed即可,大家不放心可以采用acquire方式。

接下来考虑compare_exchange_strong比较成功和失败之后各自内部的逻辑,因为我们要保证ptr的data在被删除之前swap到res里。

1 如果是走入2处的逻辑进入4处代码删除ptr,那么需要保证swap操作先于fetch_add之后的delete操作,所以fetch_add采用release模型。

2 对于5处的fetch_sub操作,内部如果满足删除delete则删除ptr指针,要保证2处逻辑内的swap操作先于delete操作。所以5处的fetch_sub要采用acquire操作。

整理后的pop操作如下

1
2
3
4
5
6
7
8
9
10
11
12
13
14
15
16
17
18
19
20
21
22
23
24
25
26
27
28
29
std::shared_ptr<T> pop() {
counted_node_ptr old_head = head.load();
for (;;) {
increase_head_count(old_head);
count_node* const ptr = old_head.ptr;
//1 判断为空责直接返回
if (!ptr) {
return std::shared_ptr<T>();
}

//2 本线程如果抢先完成head的更新
if (head.compare_exchange_strong(old_head, ptr->next, std::memory_order_relaxed)) {
//返回头部数据
std::shared_ptr<T> res;
//交换数据
res.swap(ptr->data);
//3 减少外部引用计数,先统计到目前为止增加了多少外部引用
int const count_increase = old_head.external_count - 2;
//4 将内部引用计数添加
if (ptr->internal_count.fetch_add(count_increase, std::memory_order_release) == -count_increase) {
delete ptr;
}
return res;
} else if (ptr->internal_count.fetch_sub(1, std::memory_order_acquire) == 1) { //5
//如果当前线程操作的head节点已经被别的线程更新,则减少内部引用计数
delete ptr;
}
}
}

但是并发编程的作者认为5处采用acquire内存序过于严格,可以采用relaxed方式,只要在条件满足后删除ptr时在约束内存顺序即可,为了保证swap操作先执行完,则需在delete ptr 之前用acquire内存序约束一下即可,在delete ptr 上面添加 head.load(std::memory_order_acquire)即可和前面的释放序列构成同步关系。

所以我们最后优化的pop函数为

1
2
3
4
5
6
7
8
9
10
11
12
13
14
15
16
17
18
19
20
21
22
23
24
25
26
27
28
29
30
31
std::shared_ptr<T> pop() {
counted_node_ptr old_head = head.load();
for (;;) {
increase_head_count(old_head);
count_node* const ptr = old_head.ptr;
//1 判断为空责直接返回
if (!ptr) {
return std::shared_ptr<T>();
}

//2 本线程如果抢先完成head的更新
if (head.compare_exchange_strong(old_head, ptr->next, std::memory_order_relaxed)) {
//返回头部数据
std::shared_ptr<T> res;
//交换数据
res.swap(ptr->data);
//3 减少外部引用计数,先统计到目前为止增加了多少外部引用
int const count_increase = old_head.external_count - 2;
//4 将内部引用计数添加
if (ptr->internal_count.fetch_add(count_increase, std::memory_order_release) == -count_increase) {
delete ptr;
}
return res;
} else if (ptr->internal_count.fetch_add(-1, std::memory_order_acquire) == 1) { //5
//如果当前线程操作的head节点已经被别的线程更新,则减少内部引用计数
//当前线程减少内部引用计数,返回之前值为1说明指针仅被当前线程引用
ptr->internal_count.load(std::memory_order_acquire);
delete ptr;
}
}
}

测试

为了保证测试效果,我们还是启动三个线程, t1用来向栈中写入20000个数据,t2和t3分别并发从栈中读取10000个数据放入set中,最后我们看到set的大小为20000个即为正常。

1
2
3
4
5
6
7
8
9
10
11
12
13
14
15
16
17
18
19
20
21
22
23
24
25
26
27
28
29
30
31
32
33
34
35
36
37
38
39
40
41
42
43
44
45
46
47
void TestRefCountStack() {
ref_count_stack<int> ref_count_stack;
std::set<int> rmv_set;
std::mutex set_mtx;

std::thread t1([&]() {
for (int i = 0; i < 20000; i++) {
ref_count_stack.push(i);
std::cout << "push data " << i << " success!" << std::endl;
std::this_thread::sleep_for(std::chrono::milliseconds(5));
}
});

std::thread t2([&]() {
for (int i = 0; i < 10000;) {
auto head = ref_count_stack.pop();
if (!head) {
std::this_thread::sleep_for(std::chrono::milliseconds(10));
continue;
}
std::lock_guard<std::mutex> lock(set_mtx);
rmv_set.insert(*head);
std::cout << "pop data " << *head << " success!" << std::endl;
i++;
}
});

std::thread t3([&]() {
for (int i = 0; i < 10000;) {
auto head = ref_count_stack.pop();
if (!head) {
std::this_thread::sleep_for(std::chrono::milliseconds(10));
continue;
}
std::lock_guard<std::mutex> lock(set_mtx);
rmv_set.insert(*head);
std::cout << "pop data " << *head << " success!" << std::endl;
i++;
}
});

t1.join();
t2.join();
t3.join();

assert(rmv_set.size() == 20000);
}

我们在assert处打个断点,可以看到集合大小确实为两万个,而且不存在重复元素,不存在缺失的元素。

https://cdn.llfc.club/1703226074849.jpg

总结

源码链接:
https://gitee.com/secondtonone1/boostasio-learn/tree/master/concurrent/day17-LockFreeStack

视频链接:
https://space.bilibili.com/271469206/channel/collectiondetail?sid=1623290

利用引用计数实现线程安全的无锁栈

Posted on 2023-12-24 | In C++

简介

前文我们通过风险指针的方式实现了无锁栈,但是也提出了一些弊端,比如每次pop都要从风险数组中选择一个空闲的节点作为标记。其次删除节点前要遍历风险数组对比节点是否被风险指针所指涉,如果被风险指针指涉则需放入待删列表。最后pop结束时也要回收待删列表中的节点,还要依次将待删列表中的节点和风险数组对比,如果未被风险指针指涉则需删除,否则跳过。

但是这种方式多次遍历风险数组,会有性能损耗,我们提出一种新的解决方式,利用引用计数实现无锁并发的栈。

引用计数

在C++并发编程一书中提出了两个计数,一个外部计数,一个内部计数,二者加起来就是有效的引用计数,很多读者对此费解,为何不用一个引用计数维护呢?那本文就是带着大家如何一步一步去实现并说明单引用计数的不可行性。

那我们先定义一个栈结构,以及它的内部节点结构

1
2
3
4
5
6
7
8
9
10
11
12
13
14
15
16
17
18
19
20
21
22
23
24
25
26
27
28
template<typename T>
class single_ref_stack {
public:
single_ref_stack():head(nullptr) {

}

~single_ref_stack() {
//循环出栈
while (pop());
}

private:
struct ref_node {
//1 数据域智能指针
std::shared_ptr<T> _data;
//2 引用计数
std::atomic<int> _ref_count;
//3 下一个节点
ref_node* _next;
ref_node(T const& data_) : _data(std::make_shared<T>(data_)),
_ref_count(1), _next(nullptr) {}
};

//头部节点
std::atomic<ref_node*> head;
};

1 single_ref_stack为我们定义的栈结构。内部包含一个head节点,head节点为一个ref_node*类型的原子变量。

2 single_ref_stack的构造函数将head设置为nullptr,析构函数循环pop直到栈为空为止。pop我们之后再实现。

3 定义ref_node结构作为每个栈存储的元素。内部包含_data表示数据域, int类型的原子变量表示引用计数。_next表示下一个节点指针。
ref_node的构造函数接收一个T类型的通用数据类型,利用这个参数构造自己的数据域。

接下来我们实现push操作

1
2
3
4
5
void push(T const& data) {
auto new_node = new ref_node(data);
new_node->next = head.load();
while (!head.compare_exchange_weak(new_node->next, new_node));
}

push 操作很简单,创建一个ref_node类型的指针对象new_node,将new_node的next指针指向现在的头节点,然后不断地重试(防止其他线程修改head后导致head变化不一致),直到将head更新为new_node.

接下来我们实现pop

1
2
3
4
5
6
7
8
9
10
11
12
13
14
15
16
17
18
19
20
21
22
23
24
25
26
27
28
29
30
31
32
33
34
35
36
37
std::shared_ptr<T> pop() {
ref_node* old_head = head.load();
for (;;) {
if (!old_head) {
return std::shared_ptr<T>();
}
//1 只要执行pop就对引用计数+1
++(old_head->_ref_count);
//2 比较head和old_head想等则交换否则说明head已经被其他线程更新
if (head.compare_exchange_strong(old_head, old_head->_next)) {
auto cur_count = old_head->_ref_count.load();
auto new_count;
//3 循环重试保证引用计数安全更新
do {
//4 减去本线程增加的1次和初始的1次
new_count = cur_count - 2;
} while (!old_head->_ref_count.compare_exchange_weak(cur_count, new_count));

//返回头部数据
std::shared_ptr<T> res;
//5 交换数据
res.swap(old_head->_data);
//6
if (old_head->_ref_count == 0) {
delete old_head;
}

return res;
}
else {
//7
if (old_head->_ref_count.fetch_sub(1) == 1) {
delete old_head;
}
}
}
}

1 上面的代码我们先判断old_head是否为空,如果为空则说明栈为空。

2 然后代码1处 对引用计数+1, 因为是原子变量所以可以保证线程安全。

3 然后代码2处 比较head和old_head是否相等,如果相等则将head更新为old_head的next指向的数据。
简而言之就是将head更新为新的栈顶元素。因为存在多个线程并发执行2处代码的情况,导致只有一个线程交换成功,交换成功的线程就承担起返回数据的任务。

并且在4处减少2个引用计数(减去初始的1个加上自己pop开始增加的那一个),并且在3处循环重试更新引用计数。在6处判断引用计数如果变为0则删除指针。

交换失败的线程是抢占失败的线程,则执行7处代码需减少1次引用计数(因为该线程进入pop时已经增加了1次引用计数)。fetch_sub会将原子变量的数值减1,然后返回减少之前的数值。所以我们判断如果之前的数值为1则说明该线程是最后引用此指针的线程,可以将指针删除。

我们观察上述pop函数,存在严重漏洞

如果线程1和线程2都准备执行1处代码,但是线程2抢先执行,并且更新引用计数_ref_count变为0,则执行删除old_head的操作,此时线程1刚好执行1处代码,引发崩溃。

引发崩溃的原因我们知道了就是old_head被删除了,那我们要做的就是将引用计数提出来,不放在指针里,和指针解耦。

我们将原来的节点结构拆成两个

1
2
3
4
5
6
7
8
9
10
11
12
13
14
15
16
17
18
struct node {
//1 数据域智能指针
std::shared_ptr<T> _data;
//2 下一个节点
ref_node _next;
node(T const& data_) : _data(std::make_shared<T>(data_)) {}

};

struct ref_node {
// 引用计数
std::atomic<int> _ref_count;

node* _node_ptr;
ref_node( T const & data_):_node_ptr(new node(data_)), _ref_count(1){}

ref_node():_node_ptr(nullptr),_ref_count(0){}
};

ref_node表示栈存储的节点结构,包括引用计数和节点的指针。而node为实际的节点结构,包括节点的数据域以及下一个节点的地址。

那我们的single_ref_stack结构管理的head是指针类型好还是副本类型好呢?

我们可以假设head存储的是指针类型

1
2
//头部节点
std::atomic<ref_node*> head;

那么pop逻辑就要改为

1
2
3
4
5
6
7
8
9
10
11
12
13
14
15
16
17
18
19
20
21
22
23
24
25
26
27
28
29
30
31
32
33
34
35
36
37
38
39
40
41
42
43
44
std::shared_ptr<T> pop() {
//0 处
ref_node* old_head = head.load();
for (;;) {
//1 只要执行pop就对引用计数+1并更新到head中
ref_node* new_head;
do {
new_head = old_head;
//7 处
new_head->_ref_count += 1;
} while (!head.compare_exchange_weak(old_head, new_head));
//4
old_head = new_head;

auto* node_ptr = old_head->_node_ptr;
if (node_ptr == nullptr) {
return std::shared_ptr<T>();
}

//2 比较head和old_head想等则交换否则说明head已经被其他线程更新
if (head.compare_exchange_strong(old_head, node_ptr->_next)) {

//要返回的值
std::shared_ptr<T> res;
//交换智能指针
//5 处
res.swap(node_ptr->_data);

//6 增加的数量
int increase_count = old_head->_ref_count.fetch_sub(2);

//3 处判断仅有当前线程持有指针则删除
if (increase_count == 2) {
delete node_ptr;
}

return res;
}else {
if (old_head->_ref_count.fetch_sub(1) == 1) {
delete node_ptr;
}
}
}
}

解释一下上面的逻辑:

在1处head调用比较交换和old_head做比较,比较分为两个方面,一个是引用计数一个是node*的值。

那我们假设线程1和线程2依次通过了比较交换逻辑(假设线程1先于线程2),那么假设线程1在4处看到的old_head的引用计数为2,线程2在4处看到old_head的引用计数为3.

而head最后被更新的引用计数为3.所以在2处的判断逻辑里,线程2会进入if的逻辑,线程1会进入else的逻辑,最后会有一个线程回收node_ptr节点,这么看来是正常的。

但是我们仔细分析,看上面的代码有很大漏洞

1 假设线程1比线程2先执行,线程1在2处执行比较交换后head会被更新为新的值。线程2执行比较交换操作会失败,则进入else处理, old_head会被更新为新的head值, 此时old_head的引用计数为1则会被线程2误删,因为线程2此时读到的old_head正是新的head指向的数据。而且没有弹出和修改head的值。这样其他线程pop头部元素时会崩溃。

https://cdn.llfc.club/1703215490981.jpg

2 线程1和线程2都执行完0处代码,二者读取的old_head值相同。假设线程1比线程2先执行,线程2因未抢占到cpu的时间片停顿在1处,线程1按次序依次执行最后执行到3处将node_ptr删除。而且现在的head已经指向了新的栈顶元素即old_head的下一个元素。此时线程2抢占到时间片,执行1处代码又将old_head更新为head当前值了,只不过引用计数加了1变为2,但是指向的是下一个节点,所以这种情况下进入仍会进入if条件,对新的old_head节点删除。这种情况倒是正常。

https://cdn.llfc.club/1703215559019.jpg

3 还是假设线程1和线程2都执行完0处代码,线程1抢先执行完5处。准备执行6处时,线程2抢占CPU执行了7处代码,尽管会被while比较old_head和head不同而重试,进而更新old_head。但是线程2的do逻辑中第一次的old_head和线程1的old_head指向的是同一个,线程2修改了old_head中的引用计数,导致线程1执行6处代码时不会进入if逻辑。又因为线程2在2处之后while会不断重试,线程2的head已经和old_head指向不同了,导致线程2也不会回收old_head内部节点指向的数据,导致内存泄漏。

https://cdn.llfc.club/1703215758466.jpg

这就告诉我们当我们设计pop逻辑的时候尽量不要存储指针,存储指针意味着存在多个线程操作同一块内存的情况。

所以我们得出以下结论

1 head的类型修改为ref_node类型而不是指针。

2 现有的引用保留,我们用其表示增加的引用计数,该引用计数可以用原子类型,也可以不用原子类型。为简化和节省效率我们用普通int类型。

3 新增一个表示减少的引用计数,因为这个表示减少的引用计数要在多个线程中同步,并且要保证安全性,那我们将其放入node类里, 因为node类的指针被存储在栈的节点中,所以可以达到多个线程修改这个减少的引用计数的效果。

4 一个节点能否被回收取决于整体的引用计数是否为0。

改进引用节点

按照上面的推论,我们新增_dec_count表示减少的引用计数,放在node结构里。

1
2
3
4
5
6
7
8
9
10
11
12
13
14
15
16
17
18
19
20
21
struct ref_node;
struct node {
//1 数据域智能指针
std::shared_ptr<T> _data;
//2 下一个节点
ref_node _next;
node(T const& data_) : _data(std::make_shared<T>(data_)) {}

//减少的数量
std::atomic<int> _dec_count;
};

struct ref_node {
// 引用计数
int _ref_count;

node* _node_ptr;
ref_node( T const & data_):_node_ptr(new node(data_)), _ref_count(1){}

ref_node():_node_ptr(nullptr),_ref_count(0){}
};

然后将栈中的head结构变为ref_node类型的原子变量。

1
2
//头部节点
std::atomic<ref_node> head;

我们重新实现push

1
2
3
4
5
void push(T const& data) {
auto new_node = ref_node(data);
new_node._node_ptr->_next = head.load();
while (!head.compare_exchange_weak(new_node._node_ptr->_next, new_node));
}

我们重新实现pop

1
2
3
4
5
6
7
8
9
10
11
12
13
14
15
16
17
18
19
20
21
22
23
24
25
26
27
28
29
30
31
32
33
34
35
36
37
38
39
40
41
42
43
std::shared_ptr<T> pop() {
ref_node old_head = head.load();
for (;;) {
//1 只要执行pop就对引用计数+1并更新到head中
ref_node new_head;

//2
do {
new_head = old_head;
new_head._ref_count += 1;
} while (!head.compare_exchange_weak(old_head, new_head));

old_head = new_head;
//3
auto* node_ptr = old_head._node_ptr;
if (node_ptr == nullptr) {
return std::shared_ptr<T>();
}

//4 比较head和old_head相等则交换否则说明head已经被其他线程更新
if (head.compare_exchange_strong(old_head, node_ptr->_next)) {

//要返回的值
std::shared_ptr<T> res;
//交换智能指针
res.swap(node_ptr->_data);

//5 增加的数量
int increase_count = old_head._ref_count - 2;
//6
if (node_ptr->_dec_count.fetch_add(increase_count) == -increase_count) {
delete node_ptr;
}

return res;
}else {
//7
if (node_ptr->_dec_count.fetch_sub(1) == 1) {
delete node_ptr;
}
}
}
}

1 多个线程并发pop如果有线程在2处重试,可能时head和old_head的引用计数不同或者node的地址不同,不过无论如何我们的head采用的是副本存储,所以重试失败增加的引用计数不会影响到其他线程。

2 在代码3处我们将old_head的node地址取出来,留作node_ptr,这样我们以后可以对node_ptr内部的引用计数做减少,因为多个线程操作node_ptr指向的数据,所以引用计数是原子变量,并且多个线程是可见的。

3 在4处进行判断,由于我们的head存储的是ref_node类型,所以多个线程看到的old_head的值可能不一样,但我们能保证仅有一个线程进入if逻辑,进入的线程就是old_head和head匹配的那个,我们定义了res用来返回数据。在5处对增加的引用计数减2操作,获取除了自己以外并行操作这个old_head的线程数。然后我们说过增加引用计数和减少引用计数相加为0就说明可以删除节点。那我们在6处利用fetch_add操作返回操作之前的值,让fetch_add增加increase_count,并且fetch_add返回增加之前_dec_count的值,如果这个值是负的increase_count即表示当前仅有该线程操作这个old_head节点,即可删除。

为了让大家了解这个过程我们假设线程1和线程2都执行到4处之前,线程2没抢占到cpu暂停,而线程1抢占并且执行了4处的交换进入if条件,而此时线程2抢占cpu继续执行else逻辑,将_dec_count减少1,原来的_dec_count为0,减少后变为-1,fetch_sub返回之前的值为0不满足if条件所以线程2不会删除node_ptr。此时线程1继续抢占cpu执行到5处_ref_count为3,increse_count为1,_dec_count为-1,_dec_count进行fetch_add之后变为0,但是fetch_add返回的时相加之前的值即为-1,而increase_count恰好为1,所以线程1回收这个node_ptr。

测试和验证

为了测试安全性,效率就不测了,这个无锁的栈后期还要完善,目前我们只要测试安全性即可。

我们启动三个线程t1,t2,t3,t1用来向栈中压入元素,t2和t3用来从栈中弹出元素。

1
2
3
4
5
6
7
8
9
10
11
12
13
14
15
16
17
18
19
20
21
22
23
24
25
26
27
28
29
30
31
32
33
34
35
36
37
38
39
40
41
42
43
44
45
46
47
void TestSingleRefStack() {
single_ref_stack<int> single_ref_stack;
std::set<int> rmv_set;
std::mutex set_mtx;

std::thread t1([&]() {
for (int i = 0; i < 20000; i++) {
single_ref_stack.push(i);
std::cout << "push data " << i << " success!" << std::endl;
std::this_thread::sleep_for(std::chrono::milliseconds(5));
}
});

std::thread t2([&]() {
for (int i = 0; i < 10000;) {
auto head = single_ref_stack.pop();
if (!head) {
std::this_thread::sleep_for(std::chrono::milliseconds(10));
continue;
}
std::lock_guard<std::mutex> lock(set_mtx);
rmv_set.insert(*head);
std::cout << "pop data " << *head << " success!" << std::endl;
i++;
}
});

std::thread t3([&]() {
for (int i = 0; i < 10000;) {
auto head = single_ref_stack.pop();
if (!head) {
std::this_thread::sleep_for(std::chrono::milliseconds(10));
continue;
}
std::lock_guard<std::mutex> lock(set_mtx);
rmv_set.insert(*head);
std::cout << "pop data " << *head << " success!" << std::endl;
i++;
}
});

t1.join();
t2.join();
t3.join();

assert(rmv_set.size() == 20000);
}

上面的代码中t1负责压入两万个元素,t2和t3分别从栈中弹出元素
我们在assert处打个断点,可以看到集合大小确实为两万个,而且不存在重复元素,不存在缺失的元素。

https://cdn.llfc.club/1703226074849.jpg

总结

源码链接:
https://gitee.com/secondtonone1/boostasio-learn/tree/master/concurrent/day17-LockFreeStack

视频链接:
https://space.bilibili.com/271469206/channel/collectiondetail?sid=1623290

风险指针的巧妙运用

Posted on 2023-12-09 | In C++

简介

术语“风险指针”是指Maged Michael发明的一种技法, 后来被IBM申请为专利。
前文我们设计了无锁并发栈的结构,对于pop操作回收节点采用的是延时删除的策略,即将要删除的节点放入待删除列表中。
但是待删列表中的节点可能永远不会被回收,因为每次多个线程pop就不会触发回收待删列表的操作。上一节我们说可以通过执行pop的最后一个线程执行回收,那为了实现这个目的,我们就要换一种思路。就是我们将要删除的节点做特殊处理,如果有线程使用它,就将他标记为正在使用,那么这个节点的指针就是风险指针,也就是不能被其他线程删除。

改进pop

我们假设有一块全局区域存储的是一个风险数组,数组里放的就是风险指针。
我们提供一个函数去设置数组中某个节点为风险指针,没被设置为风险指针的节点就是可用的。
然后我们再提供一个函数去查找数组中的节点,返回一个可用的节点。
假设查找的函数叫做get_hazard_pointer_for_current_thread。

1
2
3
4
5
6
7
8
9
10
11
12
13
14
std::shared_ptr<T> pop()
{
// 1
std::atomic<void*>& hp=get_hazard_pointer_for_current_thread();
node* old_head=head.load(); // ⇽--- 2
node* temp;
do
{
temp=old_head;
hp.store(old_head); // ⇽--- 3
old_head=head.load();
} while(old_head!=temp); // ⇽--- 4
// ...
}

1 处获取数组中可用节点指针,用hp存储节点指针的引用。

2 处加载当前头节点保存到old节点里。

3 处将old_head的值赋值给hp。

4 while循环处的作用就是防止多个线程访问pop函数,某一个线程B将head修改,那说明他已经将它的临时变量old节点放入风险数组中,而本线程A的old节点和线程B的old节点指向的是同一个旧有的head,所以线程A就没必要将这个old节点放入风险数组了,需要再次循环获取新的head加载为old节点,再放入风险数组。

我们实现一个完整意义的pop操作

1
2
3
4
5
6
7
8
9
10
11
12
13
14
15
16
17
18
19
20
21
22
23
24
25
26
27
28
29
30
31
32
33
34
35
36
37
38
39
40
std::shared_ptr<T> pop()
{
//1 从风险列表中获取一个节点给当前线程
std::atomic<void*>& hp=get_hazard_pointer_for_current_thread();
node* old_head=head.load();
do
{
node* temp;
do
{
temp=old_head;
hp.store(old_head);
old_head=head.load();
}//2 如果old_head和temp不等说明head被其他线程更新了,需重试
while(old_head!=temp);
}//3 将当前head更新为old_head->next,如不满足则重试
while(old_head&&
!head.compare_exchange_strong(old_head,old_head->next));
// 4一旦更新了head指针,便将风险指针清零
hp.store(nullptr);
std::shared_ptr<T> res;
if(old_head)
{
res.swap(old_head->data);
//5 删除旧有的头节点之前,先核查它是否正被风险指针所指涉
if(outstanding_hazard_pointers_for(old_head))
{
//6 延迟删除
reclaim_later(old_head);
}
else
{
//7 删除头部节点
delete old_head;
}
//8 删除没有风险的节点
delete_nodes_with_no_hazards();
}
return res;
}

1 我们观察1处代码从全局的风险数组中jiu获取一个可用的节点作为风险节点。这样其他线程在回收节点的时候会从这个数组中看到这个风险节点,进而不会删除该节点。

2 处代码做循环比较是为了hp存储的节点为当前线程操作的head,如果其它线程更新了head,那么当前线程就要进行重试。以保证每个线程的hp存储的都是自己看到的最新的head。

3 处将head和old_head做比较,如果相等则更新head为old_head->next的值。如果不等则再次重复循环,因为有可能有多个线程都满足2处的条件,多个线程的hp和old_head指向相同,所以要重试,保证多线程情况下head的移动唯一。

4 一旦更新了head指针,就可以将这个风险指针清零了,因为其他线程pop操作的head已经不是我们hp存储的old_head了。所以此种情况下是线程安全的。

5 删除旧节点之前,先看它是否被风险指针所指涉。

6 如果要删除的节点被风险指针指涉,则延迟删除,放入待删列表。都则直接删除该节点即可。(7处)

8 每个线程pop后,都要查一下待删列表,将其中没有风险的节点删除。

接下来我们实现从全局连表中返回一个可用的节点

1
2
3
4
5
std::atomic<void*>& get_hazard_pointer_for_current_thread() {
//每个线程都具有自己的风险指针 线程本地变量
thread_local static hp_owner hazzard;
return hazzard.get_pointer();
}

我们通过一个线程本地变量hazzard存储当前线程正在使用的节点,这个节点被称作风险节点。其他线程不能删除。

接下来我们实现hazard_pointer类,管理风险指针和线程id

1
2
3
4
struct hazard_pointer {
std::atomic<std::thread::id> id;
std::atomic<void*> pointer;
};

id为正在使用该风险指针的id,pointer为指针类型,存储的节点数据地址。
当一个线程从风险数组中查找某个闲置节点作为风险节点,则需要将pointer指向节点的数据,并且将id设置为当前的线程id。

我们定义一个全局的风险节点数组,用来存储风险节点。

1
hazard_pointer hazard_pointers[max_hazard_pointers];

然后我们用hp_owner类管理这个风险指针

1
2
3
4
5
6
7
8
9
10
11
12
13
14
15
16
17
18
19
20
21
22
23
24
25
class hp_owner {
public:
hp_owner(hp_owner const&) = delete;
hp_owner operator=(hp_owner const&) = delete;
hp_owner():hp(nullptr){
for (unsigned i = 0; i < max_hazard_pointers; ++i) {
std::thread::id old_id;
if (hazard_pointers[i].id.compare_exchange_strong(old_id, std::this_thread::get_id())) {
hp = &hazard_pointers[i];
break;
}
}

if (!hp) {
throw std::runtime_error("No hazard pointers available");
}
}

~hp_owner() {
hp->pointer.store(nullptr);
hp->id.store(std::thread::id());
}
private:
hazard_pointer* hp;
};

每个线程每次调用get_hazard_pointer_for_current_thread只会在第一次的时候构造hp_owner类型的hazzard,之后该线程再次调用该函数不会构造hp_owner,因为是线程本地变量。

当一个线程析构的时候会释放其本地变量hazzard,进而执行hp_owner析构函数,从而恢复初值。

接下来我们要实现hp_owner的get_pointer函数。

1
2
3
std::atomic<void*>& get_pointer() {
return hp->pointer;
}

hp_owner 的get_pointer函数返回其成员pointer指向的地址

接下来我们实现判断该节点是否被风险指针所指涉的函数

1
2
3
4
5
6
7
8
9
10
11
bool outstanding_hazard_pointers_for(void* p)
{
for (unsigned i = 0; i < max_hazard_pointers; ++i)
{
if (hazard_pointers[i].pointer.load() == p)
{
return true;
}
}
return false;
}

如果当前节点被风险指针所指涉则将该节点放入待删队列延迟删除

1
2
3
void reclaim_later(node* old_head) {
add_to_reclaim_list(new data_to_reclaim(old_head));
}

将节点放入待删列表,我们封装了一个data_to_reclaim类型的节点放入待删列表。

我们定义待删节点的结构体

1
2
3
4
5
6
7
8
9
10
//待删节点
struct data_to_reclaim {
node* data;
std::function<void(node*)> deleter;
data_to_reclaim* next;
data_to_reclaim(node * p):data(p), next(nullptr){}
~data_to_reclaim() {
delete data;
}
};

然后在无锁栈中定义一个节点表示待删列表的首节点,因为栈是被多个线程操作的,待删列表也会被多个线程访问,那么我们需要用原子变量表示这个首节点

1
std::atomic<data_to_reclaim*>  nodes_to_reclaim;

我们实现将节点放入待删列表的逻辑

1
2
3
4
void add_to_reclaim_list(data_to_reclaim* reclaim_node) {
reclaim_node->next = nodes_to_reclaim.load();
while (!nodes_to_reclaim.compare_exchange_weak(reclaim_node->next, reclaim_node));
}

因为可能有多个线程同时将节点放入待删列表,所以此处做重试。
接下来实现从待删列表中删除无风险的节点

1
2
3
4
5
6
7
8
9
10
11
12
13
void delete_nodes_with_no_hazards() {
data_to_reclaim* current = nodes_to_reclaim.exchange(nullptr);
while (current) {
data_to_reclaim* const next = current->next;
if (!outstanding_hazard_pointers_for(current->data)) {
delete current;
}
else {
add_to_reclaim_list(current);
}
current = next;
}
}

测试

我们依然用之前的方式测试,启动三个线程t1用来向栈中放入数据(总计push20000个), t2和t3用来从栈中pop数据。用一个set记录删除的值,最后判断总共删除的数量是否为2000.

1
2
3
4
5
6
7
8
9
10
11
12
13
14
15
16
17
18
19
20
21
22
23
24
25
26
27
28
29
30
31
32
33
34
35
36
37
38
39
40
41
42
43
44
45
46
47
void TestHazardPointer() {
hazard_pointer_stack<int> hazard_stack;
std::set<int> rmv_set;
std::mutex set_mtx;

std::thread t1([&]() {
for (int i = 0; i < 20000; i++) {
hazard_stack.push(i);
std::cout << "push data " << i << " success!" << std::endl;
std::this_thread::sleep_for(std::chrono::milliseconds(5));
}
});

std::thread t2([&]() {
for (int i = 0; i < 10000;) {
auto head = hazard_stack.pop();
if (!head) {
std::this_thread::sleep_for(std::chrono::milliseconds(10));
continue;
}
std::lock_guard<std::mutex> lock(set_mtx);
rmv_set.insert(*head);
std::cout << "pop data " << *head << " success!" << std::endl;
i++;
}
});

std::thread t3([&]() {
for (int i = 0; i < 10000;) {
auto head = hazard_stack.pop();
if (!head) {
std::this_thread::sleep_for(std::chrono::milliseconds(10));
continue;
}
std::lock_guard<std::mutex> lock(set_mtx);
rmv_set.insert(*head);
std::cout << "pop data " << *head << " success!" << std::endl;
i++;
}
});

t1.join();
t2.join();
t3.join();

assert(rmv_set.size() == 20000);
}

优劣分析

风险指针的机制能保证要删除的节点在合理的时机回收,但是也引发了一些性能问题,比如为了删除某个节点要遍历风险数组判断该节点是否被风险指针所指涉。其次我们对于要删除的节点需要从风险数组中选择一个合适的节点记录其地址,所以也需要便利。
C++ 并发编程一书中提出了用空间换取时间和性能的办法,就是开辟2*N个大小的风险数组,只有当使用的节点达到N个时我们才依次判断N个节点是否被风险指针所指涉,这样我i们减少了判断回收的次数。但同样增加内存的开销。
另外作者也提及了风险指针为IBM的技术专利,即使我们懂得这种方法也不见得有权利使用,为后文提及了引用计数做了铺垫。

源码链接:

https://gitee.com/secondtonone1/boostasio-learn/tree/master/concurrent/day17-LockFreeStack

视频链接:

https://space.bilibili.com/271469206/channel/collectiondetail?sid=1623290

无锁栈的实现

Posted on 2023-12-09 | In C++

简介

前文我们通过锁的互斥机制实现了并发安全的栈,队列,查找表,以及链表等结构。接下来本文介绍通过无锁的原子变量的方式实现对应的容器,我们这一篇先从无锁的方式实现栈讲起。

栈的设计思路

栈容器是一种先进后出的结构,简单来讲,我们将n个元素1,2,3,4依次入栈,那么出栈的顺序是4,3,2,1.

先考虑单线程情况下操作顺序

1 创建新节点

2 将元素入栈,将新节点的next指针指向现在的head节点。

3 将head节点更新为新节点的值。

再考虑多线程的情况下

假设线程1执行到第2步,没来得及更新head节点的值为新节点的值。此时线程2也执行完第2步,将head更新为线程2插入的新节点,之后线程1又将head更新为线程1的新插入节点,那么此时head的位置就是错的。

如下图

https://cdn.llfc.club/1701670454146.jpg

我们可以通过原子变量的compare_exchange(比较交换操作)来控制更新head节点,以此来达到线程安全的目的。

我们先定义节点的结构

1
2
3
4
5
6
7
8
9
template<typename T>
struct node
{
T data;
node* next;
node(T const& data_) :
data(data_)
{}
};

一个node节点包含两部分内容,一个T类型的数据域,一个node* 的next指针,指向下一个节点。

我们接下来定义一个无锁栈的结构

1
2
3
4
5
6
7
8
9
10
11
template<typename T>
class lock_free_stack
{
private:
lock_free_stack(const lock_free_stack&) = delete;
lock_free_stack& operator = (const lock_free_stack&) = delete;

std::atomic<node*> head;
public:
lock_free_stack() {}
}

我们同样将拷贝构造和拷贝赋值删除了,将head设置为原子变量,这样我们实现push操作的时候,可以通过比较交换的方式达到安全更新head的效果。

1
2
3
4
5
6
7
template<typename T>
void push(const T& value){
auto new_node = new Node(value)
do{
new_node->next = head.load();
}while(!head.compare_exchange_strong(new_node->next, new_node));
}

当然<Concurrency Programing C++>书中的做法更简略一些

1
2
3
4
5
6
7
template<typename T>
void push(const T& value){
auto new_node = new Node(value)
do{
new_node->next = head.load();
}while(!head.compare_exchange_weak(new_node->next, new_node));
}

我还是建议大家用do-while的方式实现,这样我们可以在do-while中增加很多自己的定制逻辑,另外推荐大家用compare_exchange_weak,尽管存在失败的情况,但是他的开销小,所以compare_exchange_weak返回false我们再次重试即可。

单线程情况下pop操作的顺序

1 取出头节点元素

2 更新head为下一个节点。

3 返回取出头节点元素的数据域。

多线程情况下,第1,2点同样存在线程安全问题。此外我们返回节点数据域时会进行拷贝赋值,如果出现异常会造成数据丢失,这一点也要考虑。
所以我们同样通过head原子变量比较和交换的方式检测并取出头部节点。

我们先写一个单线程版本

1
2
3
4
5
6
template<typename T>
void pop(T& value){
node* old_head = head.load(); //1
head = head->next; //2
value = old_head->data;
}

我们知道1处和2处在多线程情况下会存在线程安全问题。所以我们用原子变量的比较交换操作改写上面的代码

1
2
3
4
5
6
7
template<typename T>
void pop(T& value){
do{
node* old_head = head.load(); //1
}while(!head.compare_exchange_weak(old_head, old_head->next)); //2
value = old_head->data; //3
}

我们通过判断head和old_head的值是否相等,如果相等则将head的值设置为old_head的下一个节点,否则返回false,并且将old_head更新为当前head的值(比较交换函数帮我们做的)。

我们看上面的代码,有三点严重问题

1 未判断空栈的情况,这一点比较好处理,如果为空栈我们可以令pop返回false,或者抛出异常,当然抛出异常不可取。

2 将数据域赋值给引用类型的value时存在拷贝赋值(3处),我们都知道拷贝赋值会存在异常的情况,当异常发生时元素已经从栈定移除了,破坏了栈的结构,这一点和锁处理时不一样,锁处理的时候是先将元素数据域取出赋值再出栈,所以不会有问题,但是无锁的方式就会出现栈被破坏的情况。解决方式也比较简单,数据域不再存储T类型数据,而是存储std::shared_ptr<T>类型的数据。智能指针在赋值的时候不会产生异常。

3 未释放弹出的节点的内存。

那我们修改之后的代码就是这样了

1
2
3
4
5
6
7
8
9
10
11
12
13
14
15
16
17
18
19
20
21
22
23
24
25
26
27
28
29
30
31
32
33
34
35
class lock_free_stack
{
private:
struct node
{
std::shared_ptr<T> data;
node* next;
node(T const& data_) : //⇽-- - 1
data(std::make_shared<T>(data_))
{}
};
lock_free_stack(const lock_free_stack&) = delete;
lock_free_stack& operator = (const lock_free_stack&) = delete;
std::atomic<node*> head;
public:
lock_free_stack() {}
void push(T const& data)
{
node* const new_node = new node(data); //⇽-- - 2
new_node->next = head.load(); //⇽-- - 3
while (!head.compare_exchange_weak(new_node->next, new_node)); //⇽-- - 4
}

std::shared_ptr<T> pop() {
node* old_head = nullptr; //1
do {
old_head = head.load(); //2
if (old_head == nullptr) {
return nullptr;
}
} while (!head.compare_exchange_weak(old_head, old_head->next)); //3

return old_head->data; //4
}
};

简单描述下pop函数的功能,

1 处初始化一个临时old_head的变量,

2 处加载head节点

3 处通过比较和交换操作,判断head和old_head是否相等,如相等则将head更新为old_head的next节点。如不相等,将old_head更新为head的值(compare_exchange_weak自动帮我们做了),再次进入循环。尽管2处又加载了一次head的值给old_head有些重复,但是为了代码的可读性和指针判空,我觉得这么写更合适一点。

资源回收的问题我们还没处理。
我们先实现一个简单的回收处理逻辑

1
2
3
4
5
6
7
8
9
10
11
12
13
14
15
template<typename T>
std::shared_ptr<T> pop() {
node* old_head = nullptr; //1
do {
old_head = head.load();
if (old_head == nullptr) {
return nullptr;
}
} while (!head.compare_exchange_weak(old_head, old_head->next)); //2

std::shared_ptr<T> res; //3
res.swap(old_head->data); //4
delete old_head; //5
return res; //6
}

上面的代码在3处定义了一个T类型的智能指针res用来返回pop的结果,所以在4处将old_head的data值转移给res,这样就相当于清除old_head的data了。

在5处删除了old_head. 意在回收数据,但这存在很大问题,比如线程1执行到5处删除old_head,而线程2刚好执行到2处用到了和线程1相同的old_head,线程2执行compare_exchange_weak的时候old_head->next会引发崩溃。

所以要引入一个机制,延迟删除节点。将本该及时删除的节点放入待珊节点。基本思路如下

1 如果有多个线程同时pop,而且存在一个线程1已经交换取出head数据并更新了head值,另一个线程2即将基于旧有的head获取next数据,如果线程1删除了旧有head,线程2就有可能产生崩溃。这种情况我们就要将线程1取出的head放入待删除的列表。

2 同一时刻仅有一个线程1执行pop函数,不存在其他线程。那么线程1可以将旧head删除,并删除待删列表中的其他节点。

3 如果线程1已经将head节点交换弹出,线程2还未执行pop操作,当线程1准备将head删除时发现此时线程2进入执行pop操作,那么线程1能将旧head删除,因为线程2读取的head和线程1不同(线程2读取的是线程1交换后新的head值)。此情形和情形1略有不同,情形1是两个线程同时pop只有一个线程交换成功的情况,情形3是一个线程已经将head交换出,准备删除之前发现线程2执行pop进入,所以这种情况下线程1可将head删除,但是线程1不能将待删除列表删除,因为有其他线程可能会用到待删除列表中的节点。

我们思考这种情形

线程1 执行pop已经将head换出

线程2 执行pop函数,发现线程1正在pop操作,线程2就将待删除的节点head(此head非线程1head)放入待删列表.

线程3 和线程2几乎同时执行pop函数但是还未执行head的交换操作,此head和线程2的head相同。

这种情况下线程1可能读取待删列表为空,因为线程2可能还未更新,也可能读取待删列表不为空(线程2已更新),但是线程1不能删除这个待删列表,因为线程3可能在用。

那基于上述三点,我们可以简单理解为

1 如果head已经被更新,且旧head不会被其他线程引用,那旧head就可以被删除。否则放入待删列表。

2 如果仅有一个线程执行pop操作,那么待删列表可以被删除,如果有多个线程执行pop操作,那么待删列表不可被删除。

我们需要用一个原子变量threads_in_pop记录有几个线程执行pop操作。在pop结束后再减少threads_in_pop。
我们需要一个原子变量to_be_deleted记录待删列表的首节点。

那么我们先实现一个改造版本

1
2
3
4
5
6
7
8
9
10
11
12
13
14
15
16
17
18
19
20
21
22
23
24
std::shared_ptr<T> pop() {
//1 计数器首先自增,然后才执行其他操作
++threads_in_pop;
node* old_head = nullptr;
do {
//2 加载head节点给旧head存储
old_head = head.load();
if (old_head == nullptr) {
--threads_in_pop;
return nullptr;
}
} while (!head.compare_exchange_weak(old_head, old_head->next)); // 3
//3处 比较更新head为旧head的下一个节点

std::shared_ptr<T> res;
if (old_head)
{
// 4 只要有可能,就回收已删除的节点数据
res.swap(old_head->data);
}
// 5 从节点提取数据,而非复制指针
try_reclaim(old_head);
return res;
}

1 在1处我们对原子变量threads_in_pop增加以表示线程执行pop函数。

2 在2处我们将head数据load给old_head。如果old_head为空则直接返回。

3 3处通过head和old_head作比较,如果相等则交换,否则重新do while循环。这么做的目的是为了防止多线程访问,保证只有一个线程将head更新为old_head的下一个节点。

4 将old_head的数据data交换给res。

5 try_reclaim函数就是删除old_head或者将其放入待删列表,以及判断是否删除待删列表。

接下来我们实现try_reclaim函数

1
2
3
4
5
6
7
8
9
10
11
12
13
14
15
16
17
18
19
20
21
22
23
24
25
26
27
void try_reclaim(node* old_head)
{
//1 原子变量判断仅有一个线程进入
if(threads_in_pop == 1)
{
//2 当前线程把待删列表取出
node* nodes_to_delete = to_be_deleted.exchange(nullptr);
//3 更新原子变量获取准确状态,判断pop是否仅仅正被当前线程唯一调用
if(!--threads_in_pop)
{
//4 如果唯一调用则将待删列表删除
delete_nodes(nodes_to_delete);
}else if(nodes_to_delete)
{
//5 如果pop还有其他线程调用且待删列表不为空,
//则将待删列表首节点更新给to_be_deleted
chain_pending_nodes(nodes_to_delete);
}
delete old_head;
}
else {
//多个线程pop竞争head节点,此时不能删除old_head
//将其放入待删列表
chain_pending_node(old_head);
--threads_in_pop;
}
}

1 1处我们判断pop的线程数是否为1,并没有采用load,也就是即便判断的时候其他线程也可以pop,这样不影响效率,即便模糊判断threads_in_pop为1,同一时刻threads_in_pop可能会增加也没关系,threads_in_pop为1仅表示当前时刻走入1处逻辑之前仅有该线程执行pop,那说明没有其他线程竞争head,head已经被更新为新的值,其他线程之后pop读取的head和我们要删除的old_head不是同一个,就是可以被直接删除的。

2 处我们将当前待删除的列表交换给本线程的nodes_to_delete临时变量,表示接管待删除列表。但是能否删除还要判断是不是仅有本线程在执行pop。

3 处更新原子变量获取准确状态,判断pop是否仅仅正被当前线程唯一调用,如果是被唯一调用则删除待删列表,否则将nodes_to_delete临时变量再更新回待删列表。(因为可能有多个线程会用待删列表中的节点)

接下来我们实现delete_nodes函数, 该函数用来删除以nodes为首节点的链表,该函数写成了static函数,也可以用普通函数。

1
2
3
4
5
6
7
8
9
static void delete_nodes(node* nodes)
{
while (nodes)
{
node* next = nodes->next;
delete nodes;
nodes = next;
}
}

接下来实现chain_pending_node函数,该函数用来将单个节点放入待删列表

1
2
3
4
void chain_pending_node(node* n)
{
chain_pending_nodes(n, n);
}

chain_pending_nodes接受两个参数,分别为链表的头和尾。

1
2
3
4
5
6
7
8
9
void chain_pending_nodes(node* first, node* last)
{
//1 先将last的next节点更新为待删列表的首节点
last->next = to_be_deleted;
//2 借循环保证 last->next指向正确
// 将待删列表的首节点更新为first节点
while (!to_be_deleted.compare_exchange_weak(
last->next, first));
}

1 处将last->next的值更新为to_be_deleted, 这么做的一个好处是如果有其他线程修改了to_be_deleted.能保证当前线程的last->next指向的是最后修改的to_be_deleted,达到链接待删列表的作用。

2 处可能更新失败,因为其他线程修改了to_be_deleted的值,但是不要紧,我们再次循环直到匹配last->next的值为to_be_deleted为止,将to_be_deleted更新为first的值。

接下来我们还要实现将nodes_to_delete为首的链表还原到待删列表中, 函数为chain_pending_nodes接受一个参数为待还原的链表的首节点

1
2
3
4
5
6
7
8
9
10
11
void chain_pending_nodes(node* nodes)
{
node* last = nodes;
//1 沿着next指针前进到链表末端
while (node* const next = last->next)
{
last = next;
}
//2 将链表放入待删链表中
chain_pending_nodes(nodes, last);
}

分析

上面的无锁栈存在一个问题,就是当多个线程pop时将要删除的节点放入待删列表中,如果每次pop都会被多个线程调用,则要删除的节点就会一直往待删除列表中增加,导致待删除列表无法被回收。这个问题我们可以考虑当pop执行结束时最后一个线程回收待删列表。留作下一节分析。

我们先写一个函数测试以下

1
2
3
4
5
6
7
8
9
10
11
12
13
14
15
16
17
18
19
20
21
22
23
24
25
26
27
28
29
30
31
32
33
34
35
36
37
38
39
40
41
42
43
44
45
46
47
void TestLockFreeStack() {

lock_free_stack<int> lk_free_stack;
std::set<int> rmv_set;
std::mutex set_mtx;

std::thread t1([&]() {
for (int i = 0; i < 20000; i++) {
lk_free_stack.push(i);
std::cout << "push data " << i << " success!" << std::endl;
}
});

std::thread t2([&]() {
for (int i = 0; i < 10000;) {
auto head = lk_free_stack.pop();
if (!head) {
std::this_thread::sleep_for(std::chrono::milliseconds(10));
continue;
}
std::lock_guard<std::mutex> lock(set_mtx);
rmv_set.insert(*head);
std::cout << "pop data " << *head << " success!" << std::endl;
i++;
}
});

std::thread t3([&]() {
for (int i = 0; i < 10000;) {
auto head = lk_free_stack.pop();
if (!head) {
std::this_thread::sleep_for(std::chrono::milliseconds(10));
continue;
}
std::lock_guard<std::mutex> lock(set_mtx);
rmv_set.insert(*head);
std::cout << "pop data " << *head << " success!" << std::endl;
i++;
}
});

t1.join();
t2.join();
t3.join();

assert(rmv_set.size() == 20000);
}

1 线程t1将0到20000个数放入集合中。
2 线程t2和t3分别出栈10000次。
3 最后我们断言集合的大小为20000.

测试结果如下

https://cdn.llfc.club/1701936298395.jpg

可以看到我们的集合大小为20000,且数据唯一。

总结

源码链接:

https://gitee.com/secondtonone1/boostasio-learn/tree/master/concurrent/day17-LockFreeStack

视频链接

https://space.bilibili.com/271469206/channel/collectiondetail?sid=1623290

线程安全的链表

Posted on 2023-12-02 | In C++

简介

前文介绍了如何基于锁实现线程安全的栈和队列结构,以及实现线程安全的查找表,但是我们上次的查找表是基于list实现的,对于锁的精度控制的不是很准确,提及了接下来会介绍精细控制的链表,用来替换查找表中的链表。这一节我们就介绍如何通过锁控制链表访问的精度。

链表

一个常见的链表应该是如下结构,有一个包含数据的数据域以及一个指向下一个节点的指针。

https://cdn.llfc.club/1701557385171.jpg

如果做一个支持多线程并发访问的链表,我们首先想到的是用一个互斥量控制整个链表,达到多线程访问时串行的效果。但是这么做精度不够,需要分化互斥量的功能。我们想到的一个办法就是每个节点都维护一个互斥量,这样能保证多个线程操作不同节点时加不同的锁,减少耦合性。

另外我们将head独立为一个虚节点,所谓虚节点就是不存储数据,只做头部标记。我们每次从头部插入只需要修将新的节点的next指针指向原来head的next指向的节点,再将head的next指针指向新的节点。

如下图

https://cdn.llfc.club/1701559209928.jpg

源码实现

我们先定义一个基本的链表节点

1
2
3
4
5
6
7
8
9
10
template<typname T>
struct node
{
std::mutex m;
std::shared_ptr<T> data;
std::unique_ptr<node> next;
node() :next(){}
node(T const& value) :
data(std::make_shared<T>(value)){}
};

1 data为智能指针,存储的是T类型的数据域。
2 next为一个unique类型的智能指针,存储的是下一个节点的地址。
3 m 为mutex,控制多线程访问的安全性。我们将mutex分别独立到各个节点中保证锁的精度问题。

接下来我们定义一个链表,初始状态包含一个head的头节点

1
2
3
4
5
6
7
8
9
10
11
12
13
14
15
16
17
18
19
20
21
22
23
24
25
26
27
28
template<typename T>
class threadsafe_list
{
struct node
{
std::mutex m;
std::shared_ptr<T> data;
std::unique_ptr<node> next;
node() :
next()
{}
node(T const& value) :
data(std::make_shared<T>(value))
{}
};

node head;
public:
threadsafe_list()
{}

~threadsafe_list()
{
}

threadsafe_list(threadsafe_list const& other) = delete;
threadsafe_list& operator=(threadsafe_list const& other) = delete;
}

我们将拷贝构造和拷贝赋值函数删除。然后链表中初始状态包含了一个头节点。
接下来我们实现析构函数,我们期望析构函数能够从头到尾的删除元素,所以先实现一个删除函数

1
2
3
4
5
6
7
8
9
10
11
12
13
14
15
16
17
18
19
20
21
22
template<typename Predicate>
void remove_if(Predicate p)
{
node* current = &head;
std::unique_lock<std::mutex> lk(head.m);
while (node* const next = current->next.get())
{
std::unique_lock<std::mutex> next_lk(next->m);
if (p(*next->data))
{
std::unique_ptr<node> old_next = std::move(current->next);
current->next = std::move(next->next);
next_lk.unlock();
}
else
{
lk.unlock();
current = next;
lk = std::move(next_lk);
}
}
}

上面的函数中,我们先取头部节点作为当前节点,然后将将当前节点加锁,只有当前节点加锁了才能访问其next指针。我们在获取next节点后也要对其加锁,这么做的好处就是保证无论是删除还是添加都从当前节点开始依次对其next节点加锁,既能保证互斥也能维护同一顺序防止死锁。

如果next节点的数据域满足谓词p的规则,则将next节点的移动赋值给old_next,随着局部作用域结束,old_next会被释放,也就达到了析构要删除节点的目的。
然后我们将next节点的next值(也就是要删除节点的下一个节点)赋值给当前节点的next指针,达到链接删除节点的下一个节点的目的。

但是我们要操作接下来的节点就需要继续锁住下一个节点,达到互斥控制的目的,锁住下个节点是通过while循环不断迭代实现的,通过next_lk达到了锁住下一个节点的目的。

如果下一个节点不满足我们p谓词函数的条件,则需要解锁当前节点,将下一个节点赋值给当前节点,并且将下一个节点的锁移动给当前节点。

如下图演示了current, next以及next->next节点之间的关系。

https://cdn.llfc.club/1701569562255%281%29.jpg

接下来我们实现析构函数

1
2
3
4
~threadsafe_list()
{
remove_if([](node const&) {return true; });
}

析构函数调用remove_if,p谓词就是一个lambda表达式,返回true。

头节点的插入工作也比较简答,将新节点的next指针赋值成头部节点的next指针指向的数据。然后将新节点赋值给头部节点的next指针即可.

1
2
3
4
5
6
7
void push_front(T const& value)
{
std::unique_ptr<node> new_node(new node(value));
std::lock_guard<std::mutex> lk(head.m);
new_node->next = std::move(head.next);
head.next = std::move(new_node);
}

但是大家要注意,插入和删除加锁的顺序要保持一致,都是从头到尾,这样能防止死锁,也能保持互斥。

假设原链表是这样的

https://cdn.llfc.club/1701570406738.jpg

调用push_front之后是这样的

https://cdn.llfc.club/1701570489799.jpg

接下来是根据谓词p查找对应的节点数据

1
2
3
4
5
6
7
8
9
10
11
12
13
14
15
16
17
18
template<typename Predicate>
std::shared_ptr<T> find_first_if(Predicate p)
{
node* current = &head;
std::unique_lock<std::mutex> lk(head.m);
while (node* const next = current->next.get())
{
std::unique_lock<std::mutex> next_lk(next->m);
lk.unlock();
if (p(*next->data))
{
return next->data;
}
current = next;
lk = std::move(next_lk);
}
return std::shared_ptr<T>();
}

find_first_if查找到第一个满足条件的节点就返回。查找的步骤也是先对当前节点加锁,判断当前节点的next节点是否为空,不为空则获取下一个节点为next,我们对next加锁,依次锁住当前节点和下一个节点,判断下一个节点是否满足谓词p,如果满足条件则返回next节点的数据即可,更新下一个节点为当前节点,下一个节点的锁next_lk更新给lk,以此锁住新的当前节点,再依次类推遍历直到找到满足条件的节点为止。

那么便利所有节点的接口就可以根据上述思路实现了

1
2
3
4
5
6
7
8
9
10
11
12
13
14
template<typename Function>
void for_each(Function f)
{
node* current = &head;
std::unique_lock<std::mutex> lk(head.m);
while (node* const next = current->next.get())
{
std::unique_lock<std::mutex> next_lk(next->m);
lk.unlock();
f(*next->data);
current = next;
lk = std::move(next_lk);
}
}

如果我们按照如下测试函数测试上面的接口,

1
2
3
4
5
6
7
8
9
10
11
12
13
14
15
16
17
18
19
20
21
22
23
24
25
26
27
28
29
30
31
32
33
34
35
36
37
38
39
40
41
std::set<int> removeSet;
void TestThreadSafeList()
{

threadsafe_list<MyClass> thread_safe_list;
std::thread t1([&]()
{
for(unsigned int i = 0; i < 100; i++)
{
MyClass mc(i);
thread_safe_list.push_front(mc);
}

});


std::thread t2([&]()
{
for (unsigned int i = 0; i < 100; )
{

auto find_res = thread_safe_list.find_first_if([&]( auto & mc)
{
return mc.GetData() == i;
});

if(find_res == nullptr)
{
std::this_thread::sleep_for(std::chrono::milliseconds(10));
continue;
}

removeSet.insert(i);
i++;
}
});

t1.join();
t2.join();

}

将删除的数据放入集合set,最后打印set会发现数据全都被删除了。

尾部插入

C++ 并发编程中提到了留给读者去实现尾部插入,我们实现尾部插入需要维护一个尾部节点,这个尾部节点我们初始的时候指向head,当插入元素后,尾部节点指向了最后一个节点的地址。

考虑有多个线程并发进行尾部插入,所以要让这些线程互斥,我们需要一个互斥量last_ptr_mtx保证线程穿行,last_node_ptr表示正在操作尾部节点,以此来让多个线程并发操作尾部节点时达到互斥。比如我们的代码可以实现如下

1
2
3
4
5
6
7
8
9
10
11
void push_back(T const& value) {
//防止于push_head同时进行
//并且保证头部或者删除节点更新last_node_ptr唯一, 所以同时加锁
std::unique_ptr<node_d> new_node(new node_d(value));
std::unique_lock<std::mutex> lk(last_node_ptr->m);
std::unique_lock<std::mutex> last_lk(last_ptr_mtx);
//原来的最后节点的下一个节点指向新生成的节点
last_node_ptr->next = std::move(new_node);
//将最后一个节点后移
last_node_ptr = last_node_ptr->next.get();
}

头部插入我们也作一些修改

1
2
3
4
5
6
7
8
9
10
11
12
void push_front(T const& value)
{
std::unique_ptr<node_d> new_node(new node_d(value));
std::lock_guard<std::mutex> lk(head.m);
new_node->next = std::move(head.next);
head.next = std::move(new_node);
//更新最后一个节点
if (head.next->next == nullptr) {
std::lock_guard<std::mutex> last_lk(last_ptr_mtx);
last_node_ptr = head.next.get();
}
}

push_front函数将新节点放入head节点的后边,如果head节点后面没有节点,此时插入新节点后,新的节点就变为尾部节点了。所以判断新插入节点的next为nullptr,那么这个节点就是最后节点,所以要对last_ptr_mtx加锁,更新last_node_ptr值。

我们考虑一下,如果一个线程push_back和另一个线程push_front是否会出现问题?其实两个线程资源竞争的时候仅在队列为空的时候,这时无论push_back还是push_front都会操作head节点,以及更新_last_node_ptr值,但是我们的顺序是先锁住前一个节点,再将当前节点更新为前一个节点的下一个节点。那么从这个角度来说,push_back和push_front不会有线程安全问题。

接下来实现删除操作

1
2
3
4
5
6
7
8
9
10
11
12
13
14
15
16
17
18
19
20
21
22
23
24
25
26
27
28
29
30
31
32
33
34
35
36
37
38
39
40
41
42
43
44
45
46
47
48
49
50
51
52
53
54
55
56
57
template<typename Predicate>
void remove_if(Predicate p)
{
node_d* current = &head;
std::unique_lock<std::mutex> lk(head.m);
while (node_d* const next = current->next.get())
{
std::unique_lock<std::mutex> next_lk(next->m);
if (p(*next->data))
{
std::unique_ptr<node_d> old_next = std::move(current->next);
current->next = std::move(next->next);
//判断删除的是否为最后一个节点
if (current->next == nullptr) {
std::lock_guard<std::mutex> last_lk(last_ptr_mtx);
last_node_ptr = &head;
}
next_lk.unlock();
}
else
{
lk.unlock();
current = next;
lk = std::move(next_lk);
}
}
}

template<typename Predicate>
bool remove_first(Predicate p)
{
node_d* current = &head;
std::unique_lock<std::mutex> lk(head.m);
while (node_d* const next = current->next.get())
{
std::unique_lock<std::mutex> next_lk(next->m);
if (p(*next->data))
{
std::unique_ptr<node_d> old_next = std::move(current->next);
current->next = std::move(next->next);
//判断删除的是否为最后一个节点
if (current->next == nullptr) {
std::lock_guard<std::mutex> last_lk(last_ptr_mtx);
last_node_ptr = &head;
}
next_lk.unlock();

return true;
}

lk.unlock();
current = next;
lk = std::move(next_lk);
}

return false;
}

删除的时候,如果将当前节点的下一个节点满足删除条件,则将其移动到old_next节点里。old_next会随着作用域结束析构。

然后将删除节点的下一个节点赋值给当前节点的next指针,这样就达到了当前节点的next指针指向了删除节点的下一个节点的目的,以此达到了删除效果。

我们思考删除操作和push_back是否会产生线程竞争,答案是会的,比如下面这种情况

https://cdn.llfc.club/1701577481423.jpg

线程1想要push_back插入节点,他会用到last_node_ptr,也会更新last_node_ptr。

而线程2想要删除最后一个节点,会更新last_node_ptr的值。

尽管我们通过node内部的互斥量可以保证两个线程在同一时刻仅能有一个线程操作最后一个节点,或者删除或者添加。

但是,假设线程2先执行删除操作,节点更新并且更新last_node_ptr的值,而此时线程1因为之前无法抢占最后一个节点(last_node_ptr)自带的互斥量所以挂起,当线程2执行完后,线程1才开始继续执行,但是此时last_node_ptr已经变化了,而线程1可能还用的是旧的last_node_ptr的值,导致插入数据失败(很可能崩溃或者插入到一个分叉的链表)。

如果将push_back修改为先对last_ptr_mtx加锁,这样就能保证一个线程修改last_node_ptr会被另一个线程看到。比如下面这样

1
2
3
4
5
6
7
8
9
10
11
void push_back(T const& value) {
//防止于push_head同时进行
//并且保证头部或者删除节点更新last_node_ptr唯一, 所以同时加锁
std::unique_ptr<node_d> new_node(new node_d(value));
std::unique_lock<std::mutex> last_lk(last_ptr_mtx);
std::unique_lock<std::mutex> lk(last_node_ptr->m);
//原来的最后节点的下一个节点指向新生成的节点
last_node_ptr->next = std::move(new_node);
//将最后一个节点后移
last_node_ptr = last_node_ptr->next.get();
}

但是我们这样会发现删除的时候先对node加锁,再对last_ptr_mtx加锁,而push_back的时候先对last_ptr_mtx加锁,再对node加锁。会导致死锁!

所以我们将push_back修改为对node和last_ptr_mtx加锁,那么就能解决上面的问题。因为push_back必须要等到两个互斥量都竞争成功才操作,所以达到了删除和push_back串行的效果。

改进后的push_back是如下这个样子

1
2
3
4
5
6
7
8
9
10
11
12
void push_back(T const& value) {
//防止于push_head同时进行
//并且保证头部或者删除节点更新last_node_ptr唯一, 所以同时加锁
std::unique_ptr<node_d> new_node(new node_d(value));
std::lock(last_node_ptr->m, last_ptr_mtx);
std::unique_lock<std::mutex> lk(last_node_ptr->m, std::adopt_lock);
std::unique_lock<std::mutex> last_lk(last_ptr_mtx, std::adopt_lock);
//原来的最后节点的下一个节点指向新生成的节点
last_node_ptr->next = std::move(new_node);
//将最后一个节点后移
last_node_ptr = last_node_ptr->next.get();
}

我们可以实现如下函数测试,启动三个线程,
线程1执行push_front将0到20000放入链表。
线程2执行push_back将20000到40000的数据放入链表。
线程3执行删除操作,将数据从0到40000删除。
最后我们打印链表为空,验证准确性。

1
2
3
4
5
6
7
8
9
10
11
12
13
14
15
16
17
18
19
20
21
22
23
24
25
26
27
28
29
30
31
32
33
34
35
36
37
38
39
40
41
42
43
44
45
46
47
48
49
50
51
52
53
54
55
void MultiThreadPush()
{
double_push_list<MyClass> thread_safe_list;

std::thread t1([&]()
{
for (int i = 0; i < 20000; i++)
{
MyClass mc(i);
thread_safe_list.push_front(mc);
std::cout << "push front " << i << " success" << std::endl;
}
});

std::thread t2([&]()
{
for (int i = 20000; i < 40000; i++)
{
MyClass mc(i);
thread_safe_list.push_back(mc);
std::cout << "push back " << i << " success" << std::endl;
}
});

std::thread t3([&]()
{
for(int i = 0; i < 40000; )
{
bool rmv_res = thread_safe_list.remove_first([&](const MyClass& mc)
{
return mc.GetData() == i;
});

if(!rmv_res)
{
std::this_thread::sleep_for(std::chrono::milliseconds(10));
continue;
}

i++;
}
});

t1.join();
t2.join();
t3.join();

std::cout << "begin for each print...." << std::endl;
thread_safe_list.for_each([](const MyClass& mc)
{
std::cout << "for each print " << mc << std::endl;
});
std::cout << "end for each print...." << std::endl;
}

最后程序输出

1
2
3
4
5
6
7
8
push back 39995 success
push back 39996 success
push back 39997 success
push back 39998 success
push back 39999 success
begin for each print....
end for each print....
Hello World!

总结

本文介绍了多线程并发访问情况下线程安全的链表实现方式

源码链接:

https://gitee.com/secondtonone1/boostasio-learn/tree/master/concurrent/day16-threadsafelist

视频链接

https://space.bilibili.com/271469206/channel/collectiondetail?sid=1623290

基于锁实现线程安全的查找表

Posted on 2023-11-25 | In C++

简介

前文介绍了线程安全的队列和栈,本文继续介绍线程安全的查找结构,实现一个类似线程安全的map结构,但是map基于红黑树实现,假设我们要增加或者删除节点,设计思路是依次要删除或增加节点的父节点,然后修改子节点数据 。尽管这种思路可行,但是难度较大,红黑树节点的插入要修改多个节点的关系。另外加锁的流程也是锁父节点,再锁子节点,尽管在处理子节点时我们已经处理完父节点,可以对父节点解锁,继续对子节点加锁,这种情况锁的粒度也不是很精细,考虑用散列表实现。

散列表

散列表(Hash table,也叫哈希表),是根据键(Key)而直接访问在存储器存储位置的数据结构。 也就是说,它通过计算出一个键值的函数,将所需查询的数据映射到表中一个位置来让人访问,这加快了查找速度。 这个映射函数称做散列函数,存放记录的数组称做散列表。

举个例子:

假如我们一共有 50 人参加学校的数学竞赛,然后我们为每个学生分配一个编号,依次是 1 到 50.

如果我们想要快速知道编号对应学生的信息,我们就可以用一个数组来存放学生的信息,编号为 1 的放到数组下标为 1 的位置,编号为 2 的放到数组下标为 2 的位置,依次类推。

现在如果我们想知道编号为 20 的学生的信息,我们只需要把数组下标为 20 的元素取出来就可以了,时间复杂度为 O(1),是不是效率非常高呢。

但是这些学生肯定来自不同的年级和班级,为了包含更详细的信息,我们在原来编号前边加上年级和班级的信息,比如 030211 ,03 表示年级,02 表示班级,11 原来的编号,这样我们该怎么存储学生的信息,才能够像原来一样使用下标快速查找学生的信息呢?

思路还是和原来一样,我们通过编号作为下标来储存,但是现在编号多出了年级和班级的信息怎么办呢,我们只需要截取编号的后两位作为数组下标来储存就可以了。

这个过程就是典型的散列思想。其中,参赛学生的编号我们称之为键(key),我们用它来标识一个学生。然后我们通过一个方法(比如上边的截取编号最后两位数字)把编号转变为数组下标,这个方法叫做散列函数(哈希函数),通过散列函数得到的值叫做散列值(哈希值)。

我们自己在设计散列函数的函数时应该遵循什么规则呢?

  1. 得到的散列值是一个非负整数
  2. 两个相同的键,通过散列函数计算出的散列值也相同
  3. 两个不同的键,计算出的散列值不同

虽然我们在设计的时候要求满足以上三条要求,但对于第三点很难保证所有不同的建都被计算出不同的散列值。有可能不同的建会计算出相同的值,这叫做哈希冲突。最常见的一些解决哈希冲突的方式是开放寻址法和链表法,我们这里根据链表法,将散列函数得到相同的值的key放到同一个链表中。

如下图

https://cdn.llfc.club/1700962817978.jpg

当我们根据key值的后两位计算编号,将编号相同的放入一个链表,比如030211和030311是一个编号,所以将其放入一个链表。

同样的道理040213和060113是一个编号,放入一个链表。

设计思路

我们要实现上述逻辑,可以考虑将11,12,13等hash值放入一个vector中。多线程根据key计算得出hash值的过程并不需要加锁,可以实现并行计算。

但是对于链表的增删改查需要加锁。

所以我们考虑将链表封装为一个类bucket_type,支持数据的增删改查。

我们将整体的查找表封装为threadsafe_lookup_table类,实现散列规则和调度bucket_type类。

代码实现

我们先实现内部的bucket_type类. 为了threadsafe_lookup_table可以访问他,所以将threadsafe_lookup_table设置为其友元类。

1
2
3
4
class bucket_type
{
friend class threadsafe_lookup_table;
}

我们需要用链表存储键值结构,所以我们可以在bucket_type中添加一个链表存储键值结构。

1
2
3
4
5
6
7
8
9
10
//存储元素的类型为pair,由key和value构成
typedef std::pair<Key, Value> bucket_value;
//由链表存储元素构
typedef std::list<bucket_value> bucket_data;
//链表的迭代器
typedef typename bucket_data::iterator bucket_iterator;
//链表数据
bucket_data data;
//改用共享锁
mutable std::shared_mutex mutex;

并且添加了互斥量用于控制链表的读写互斥操作,但是我们采用的是共享互斥量,可以实现读写锁,保证读的时候可以并发读。

接下来我们封装一个私有的查找接口,用来内部使用。

1
2
3
4
5
6
7
//查找key值,找到返回对应的value,未找到则返回默认值
bucket_iterator find_entry_for(const Key & key)
{
return std::find_if(data.begin(), data.end(),
[&](bucket_value const& item)
{return item.first == key; });
}

然后我们分别实现返回查找的值操作,以及添加操作,并且删除操作

1
2
3
4
5
6
7
8
9
10
11
12
13
14
15
16
17
18
19
20
21
22
23
24
25
26
27
28
29
30
31
32
   //查找key值,找到返回对应的value,未找到则返回默认值
Value value_for(Key const& key, Value const& default_value)
{
std::shared_lock<std::shared_mutex> lock(mutex);
bucket_iterator const found_entry = find_entry_for(key);
return (found_entry == data.end()) ?
default_value : found_entry->second;
}
//添加key和value,找到则更新,没找到则添加
void add_or_update_mapping(Key const& key, Value const& value)
{
std::unique_lock<std::shared_mutex> lock(mutex);
bucket_iterator const found_entry = find_entry_for(key);
if (found_entry == data.end())
{
data.push_back(bucket_value(key, value));
}
else
{
found_entry->second = value;
}
}
//删除对应的key
void remove_mapping(Key const& key)
{
std::unique_lock<std::shared_mutex> lock(mutex);
bucket_iterator const found_entry = find_entry_for(key);
if (found_entry != data.end())
{
data.erase(found_entry);
}
}

这样我们设计完成了bucket_type类。

接下来我们设计threadsafe_lookup_table类。我们用一个vector存储上面的bucket_type类型。 因为我们要计算hash值,key可能是多种类型string, int等,所以我们采用std的hash算法作为散列函数即可.

1
2
3
4
5
6
7
8
9
10
11
12
13
14
class threadsafe_lookup_table{
private:
//用vector存储桶类型
std::vector<std::unique_ptr<bucket_type>> buckets;
//hash<Key> 哈希表 用来根据key生成哈希值
Hash hasher;

//根据key生成数字,并对桶的大小取余得到下标,根据下标返回对应的桶智能指针
bucket_type& get_bucket(Key const& key) const
{
std::size_t const bucket_index = hasher(key) % buckets.size();
return *buckets[bucket_index];
}
};

get_bucket函数不需要加锁,各个线程可以并行计算哈希值,取出key对应的桶。如果多线程调用同一个bucket的增删改查,就通过bucket内部的互斥解决线程安全问题。
接下来我们完善threadsafe_lookup_table的对外接口

1
2
3
4
5
6
7
8
9
10
11
12
13
14
15
16
17
18
19
20
21
22
23
24
25
26
27
28
29
threadsafe_lookup_table(
unsigned num_buckets = 19, Hash const& hasher_ = Hash()) :
buckets(num_buckets), hasher(hasher_)
{
for (unsigned i = 0; i < num_buckets; ++i)
{
buckets[i].reset(new bucket_type);
}
}

threadsafe_lookup_table(threadsafe_lookup_table const& other) = delete;
threadsafe_lookup_table& operator=(
threadsafe_lookup_table const& other) = delete;

Value value_for(Key const& key,
Value const& default_value = Value())
{
return get_bucket(key).value_for(key, default_value);
}

void add_or_update_mapping(Key const& key, Value const& value)
{
get_bucket(key).add_or_update_mapping(key, value);
}

void remove_mapping(Key const& key)
{
get_bucket(key).remove_mapping(key);
}

除此之外我们可将当前查找表的副本作为一个map返回

1
2
3
4
5
6
7
8
9
10
11
12
13
14
15
16
17
18
19
20
21
std::map<Key, Value> get_map() 
{
std::vector<std::unique_lock<std::shared_mutex>> locks;
for (unsigned i = 0; i < buckets.size(); ++i)
{
locks.push_back(
std::unique_lock<std::shared_mutex>(buckets[i]->mutex));
}
std::map<Key, Value> res;
for (unsigned i = 0; i < buckets.size(); ++i)
{
//需用typename告诉编译器bucket_type::bucket_iterator是一个类型,以后再实例化
//当然此处可简写成auto it = buckets[i]->data.begin();
typename bucket_type::bucket_iterator it = buckets[i]->data.begin();
for (;it != buckets[i]->data.end();++it)
{
res.insert(*it);
}
}
return res;
}

测试与分析

我们自定义一个类

1
2
3
4
5
6
7
8
9
10
11
12
13
14
class MyClass
{
public:
MyClass(int i):_data(i){}

friend std::ostream& operator << (std::ostream& os, const MyClass& mc){
os << mc._data;
return os;
}


private:
int _data;
};

接下来我们实现一个函数做测试

1
2
3
4
5
6
7
8
9
10
11
12
13
14
15
16
17
18
19
20
21
22
23
24
25
26
27
28
29
30
31
32
33
34
35
36
37
38
39
40
41
42
43
44
45
46
47
48
49
50
void TestThreadSafeHash() {
std::set<int> removeSet;
threadsafe_lookup_table<int, std::shared_ptr<MyClass>> table;
std::thread t1([&]() {
for(int i = 0; i < 100; i++)
{
auto class_ptr = std::make_shared<MyClass>(i);
table.add_or_update_mapping(i, class_ptr);
}
});

std::thread t2([&]() {
for (int i = 0; i < 100; )
{
auto find_res = table.value_for(i, nullptr);
if(find_res)
{
table.remove_mapping(i);
removeSet.insert(i);
i++;
}

std::this_thread::sleep_for(std::chrono::milliseconds(10));
}
});

std::thread t3([&]() {
for (int i = 100; i < 200; i++)
{
auto class_ptr = std::make_shared<MyClass>(i);
table.add_or_update_mapping(i, class_ptr);
}
});


t1.join();
t2.join();
t3.join();

for(auto & i : removeSet)
{
std::cout << "remove data is " << i << std::endl;
}

auto copy_map = table.get_map();
for(auto & i : copy_map)
{
std::cout << "copy data is " << *(i.second) << std::endl;
}
}

t1用来向map中添加数据(从0到99),t2用来从map中移除数据(从0到99),如果map中未找到则等待10ms继续尝试,t3则继续继续添加数据(从100到199).
然后分别打印插入的集合和获取的map中的数值。
打印可以看到输出插入集合为(099),copy的map集合为(100199).

我们分析一下上述查找表的优劣

1 首先我们的查找表可以支持并发读,并发写,并发读的时候不会阻塞其他线程。但是并发写的时候会卡住其他线程。基本的并发读写没有问题。
2 但是对于bucket_type中链表的操作加锁精度并不精细,因为我们采用的是std提供的list容器,所以增删改查等操作都要加同一把锁,导致锁过于粗糙。

下一节会介绍支持并发读写的自定义链表,可以解决bucket_type中的list锁精度不够的短板。

总结

本文介绍了线程安全情况下栈和队列的实现方式

源码链接:

https://gitee.com/secondtonone1/boostasio-learn/tree/master/concurrent/day15-threadsafehash

视频链接

https://space.bilibili.com/271469206/channel/collectiondetail?sid=1623290

基于锁实现线程安全队列和栈容器

Posted on 2023-11-19 | In C++

简介

本文介绍如何通过互斥锁和条件变量等并发机制实现线程安全的队列和栈容器。

线程安全的栈

实现一个线程安全的栈,我们能想到的是基于锁控制push和pop操作,比如下面的逻辑

1
2
3
4
5
6
7
8
9
10
11
12
13
14
15
16
17
18
19
20
21
22
23
24
25
26
27
28
29
30
31
32
33
34
35
36
37
38
39
40
41
42
43
44
45
46
47
48
49
50
51
52
53
54
55
56
57
#include <exception>
#include <mutex>
#include <stack>
#include <condition_variable>

struct empty_stack : std::exception
{
const char* what() const throw();
};
template<typename T>
class threadsafe_stack
{
private:
std::stack<T> data;
mutable std::mutex m;
public:
threadsafe_stack() {}

threadsafe_stack(const threadsafe_stack& other)
{
std::lock_guard<std::mutex> lock(other.m);
data = other.data;
}

threadsafe_stack& operator=(const threadsafe_stack&) = delete;

void push(T new_value)
{
std::lock_guard<std::mutex> lock(m);
data.push(std::move(new_value)); // ⇽-- - 1
}

std::shared_ptr<T> pop()
{
std::lock_guard<std::mutex> lock(m);
if (data.empty()) throw empty_stack(); // ⇽-- - 2
std::shared_ptr<T> const res(
std::make_shared<T>(std::move(data.top()))); // ⇽-- - 3
data.pop(); // ⇽-- - 4
return res;
}

void pop(T& value)
{
std::lock_guard<std::mutex> lock(m);
if (data.empty()) throw empty_stack();
value = std::move(data.top()); // ⇽-- - 5
data.pop(); // ⇽-- - 6
}

bool empty() const
{
std::lock_guard<std::mutex> lock(m);
return data.empty();
}
};

我们实现了push操作和pop操作

  1. push操作里加锁,然后将数据通过std::move的方式移动放入stack中。我们思考如果1处因为机器内存不足push导致异常,此种情况并不会对栈已有的数据产生危险。

但是vector容器大家要考虑,因为vector存在内存不足时将数据拷贝转移到新空间的过程。那么对于vector这种动态扩容的容器该如何保证容器内数据在移动过程中出现了异常仍能不丢失呢?

我想到的一个方式就是管理vector的capacity,每次push的时候要判断一下vector的size和capacity是否相等,如果相等则手动扩容并将数据转移到新的vector,再释放旧有的vector。

但是同样会存在一个问题就是会造成内存溢出,因为vector的capacity会随着数据增加而增加,当vector中没有数据的时候capacity仍然很大。这种方式也可以通过swap的方式将当前大容量的vector和一个空的vector做交换,快速清空内存。这些操作和思路需结合实际开发情况而定。

  1. pop提供了两个版本,一个是返回智能指针一个是返回bool类型,这两种我们分析,比如3处和4处也很可能因为内存不足导致构造智能指针失败,或者5处赋值失败,这种情况下抛出异常并不会影响栈内数据,因为程序没走到4和6处就抛出异常了。

  2. pop函数内部判断栈是否空,如果为空则抛出异常,这种情况我们不能接受,异常是用来处理和预判突发情况的,对于一个栈为空这种常见现象,仅需根据返回之后判断为空再做尝试或放弃出栈即可。

为了解决栈为空就抛出异常的问题,我们可以做如下优化

1
2
3
4
5
6
7
8
9
10
11
12
13
14
15
16
17
18
19
20
21
22
23
24
25
26
27
28
29
30
31
32
33
34
35
36
37
38
39
40
41
42
43
44
45
46
47
48
49
50
51
52
53
54
55
56
57
58
59
60
61
62
63
64
65
66
67
68
69
70
71
72
73
74
75
76
77
78
79
80
81
82
83
84
85
86
87
88
89
90
91
92
93
template<typename  T>
class threadsafe_stack_waitable
{
private:
std::stack<T> data;
mutable std::mutex m;
std::condition_variable cv;
public:
threadsafe_stack_waitable() {}

threadsafe_stack_waitable(const threadsafe_stack_waitable& other)
{
std::lock_guard<std::mutex> lock(other.m);
data = other.data;
}

threadsafe_stack_waitable& operator=(const threadsafe_stack_waitable&) = delete;

void push(T new_value)
{
std::lock_guard<std::mutex> lock(m);
data.push(std::move(new_value)); // ⇽-- - 1
cv.notify_one();
}

std::shared_ptr<T> wait_and_pop()
{
std::unique_lock<std::mutex> lock(m);
cv.wait(lock, [this]()
{
if(data.empty())
{
return false;
}
return true;
}); // ⇽-- - 2


std::shared_ptr<T> const res(
std::make_shared<T>(std::move(data.top()))); // ⇽-- - 3
data.pop(); // ⇽-- - 4
return res;
}

void wait_and_pop(T& value)
{
std::unique_lock<std::mutex> lock(m);
cv.wait(lock, [this]()
{
if (data.empty())
{
return false;
}
return true;
});

value = std::move(data.top()); // ⇽-- - 5
data.pop(); // ⇽-- - 6
}

bool empty() const
{
std::lock_guard<std::mutex> lock(m);
return data.empty();
}

bool try_pop(T& value)
{
std::lock_guard<std::mutex> lock(m);
if(data.empty())
{
return false;
}

value = std::move(data.top());
data.pop();
return true;
}

std::shared_ptr<T> try_pop()
{
std::lock_guard<std::mutex> lock(m);
if(data.empty())
{
return std::shared_ptr<T>();
}

std::shared_ptr<T> res(std::make_shared<T>(std::move(data.top())));
data.pop();
return res;
}

};

我们将pop优化为四个版本,四个版本又可以分为两个大类,两个大类分别为try_pop版本和wait_and_pop版本。

try_pop版本不阻塞等待队列有数据才返回,而是直接返回,try_pop又有两个版本,分别返回bool值和指针值。如果队列为空返回false或者空指针。

wait_and_pop版本阻塞等待队列有数据才返回,同样有两个版本,分别返回bool值和指针值。

但是上面的代码我们分析,假设此时栈为空,有一个线程A从队列中消费数据,调用wait_and_pop挂起, 此时另一个线程B向栈中放入数据调用push操作,notify一个线程消费队列中的数据。

此时A从wait_and_pop唤醒,但是在执行3或者5处时,因为内存不足引发了异常,我们之前分析过,即使引发异常也不会影响到栈内数据,所以对于栈的数据来说是安全的,但是线程A异常后,其他线程无法从队列中消费数据,除非线程B再执行一次push。因为我们采用的是notify_one的方式,所以仅有一个线程被激活,如果被激活的线程异常了,就不能保证该数据被其他线程消费了,解决这个问题,可以采用几个方案。

  1. wai_and_pop失败的线程修复后再次取一次数据。
  2. 将notify_one改为notify_all,这样能保证通知所有线程。但是notify_all将导致所有线程竞争,并不可取。
  3. 我们可以通过栈存储智能指针的方式进行,因为智能指针在赋值的时候不会引发异常。

稍后我们提供的线程安全队列的版本使用的就是第三种优化。

线程安全队列

队列和栈最大的不同就是队列为先入先出,有了线程安全的栈的开发思路,我们很快实现一个支持线程安全的队列

1
2
3
4
5
6
7
8
9
10
11
12
13
14
15
16
17
18
19
20
21
22
23
24
25
26
27
28
29
30
31
32
33
34
35
36
37
38
39
40
41
42
43
44
45
46
47
48
49
50
51
52
53
54
55
56
57
58
59
60
61
62
63
64
65
66
67
68
69
#include <mutex>
#include <queue>

template<typename T>
class threadsafe_queue
{
private:

mutable std::mutex mut;
std::queue<T> data_queue;
std::condition_variable data_cond;

public:
threadsafe_queue()
{}

void push(T new_value)
{
std::lock_guard<std::mutex> lk(mut);
data_queue.push(std::move(new_value));
data_cond.notify_one(); //⇽-- - ①
}

void wait_and_pop(T& value) //⇽-- - ②
{
std::unique_lock<std::mutex> lk(mut);
data_cond.wait(lk, [this] {return !data_queue.empty(); });
value = std::move(data_queue.front());
data_queue.pop();
}

std::shared_ptr<T> wait_and_pop() // ⇽-- - ③
{
std::unique_lock<std::mutex> lk(mut);
data_cond.wait(lk, [this] {return !data_queue.empty(); }); // ⇽-- - ④
std::shared_ptr<T> res(
std::make_shared<T>(std::move(data_queue.front())));
data_queue.pop();
return res;
}

bool try_pop(T& value)
{
std::lock_guard<std::mutex> lk(mut);
if (data_queue.empty())
return false;
value = std::move(data_queue.front());
data_queue.pop();
return true;
}

std::shared_ptr<T> try_pop()
{
std::lock_guard<std::mutex> lk(mut);
if (data_queue.empty())
return std::shared_ptr<T>(); //⇽-- - ⑤
std::shared_ptr<T> res(
std::make_shared<T>(std::move(data_queue.front())));
data_queue.pop();
return res;
}

bool empty() const
{
std::lock_guard<std::mutex> lk(mut);
return data_queue.empty();
}
};

关于异常情况的分析和栈一样,上面的队列版本不存在异常导致数据丢失的问题。但是同样面临线程执行wait_and_pop时如果出现了异常,导致数据被滞留在队列中,其他线程也无法被唤醒的情况。

为了解决这种情况,我们前文提到了采用智能指针的方式,重新实现一下线程安全队列

1
2
3
4
5
6
7
8
9
10
11
12
13
14
15
16
17
18
19
20
21
22
23
24
25
26
27
28
29
30
31
32
33
34
35
36
37
38
39
40
41
42
43
44
45
46
47
48
49
50
51
52
53
54
55
56
57
58
template<typename T>
class threadsafe_queue_ptr
{
private:
mutable std::mutex mut;
std::queue<std::shared_ptr<T>> data_queue;
std::condition_variable data_cond;
public:
threadsafe_queue_ptr()
{}
void wait_and_pop(T& value)
{
std::unique_lock<std::mutex> lk(mut);
data_cond.wait(lk, [this] {return !data_queue.empty(); });
value = std::move(*data_queue.front()); //⇽-- - 1
data_queue.pop();
}
bool try_pop(T& value)
{
std::lock_guard<std::mutex> lk(mut);
if (data_queue.empty())
return false;
value = std::move(*data_queue.front()); // ⇽-- - 2
data_queue.pop();
return true;
}
std::shared_ptr<T> wait_and_pop()
{
std::unique_lock<std::mutex> lk(mut);
data_cond.wait(lk, [this] {return !data_queue.empty(); });
std::shared_ptr<T> res = data_queue.front(); // ⇽-- - 3
data_queue.pop();
return res;
}
std::shared_ptr<T> try_pop()
{
std::lock_guard<std::mutex> lk(mut);
if (data_queue.empty())
return std::shared_ptr<T>();
std::shared_ptr<T> res = data_queue.front(); // ⇽-- - 4
data_queue.pop();
return res;
}
void push(T new_value)
{
std::shared_ptr<T> data(
std::make_shared<T>(std::move(new_value))); // ⇽-- - 5
std::lock_guard<std::mutex> lk(mut);
data_queue.push(data);
data_cond.notify_one();
}
bool empty() const
{
std::lock_guard<std::mutex> lk(mut);
return data_queue.empty();
}
};

在5处,我们push数据时需要先构造智能指针,如果构造的过程失败了也就不会push到队列中,不会污染队列中的数据。

2,3处和4,5处我们仅仅时将智能指针取出来赋值给一个新的智能指针并返回。关于智能指针的赋值不会引发异常这一点在C++并发编程中提及,这一点我觉得有些存疑,我觉得书中表述的意思应该是指针在64位机器占用8个字节,所有智能指针共享引用计数所以在复制时仅为8字节开销,降低了内存消耗。

所以推荐大家存储数据放入容器中时尽量用智能指针,这样能保证复制和移动过程中开销较小,也可以实现一定意义的数据共享。

但是我们分析上面的代码,队列push和pop时采用的是一个mutex,导致push和pop等操作串行化,我们要考虑的是优化锁的精度,提高并发,那有什么办法吗?

我们分析,队列和栈最本质的区别是队列是首尾操作。我们可以考虑将push和pop操作分化为分别对尾和对首部的操作。对首和尾分别用不同的互斥量管理就可以实现真正意义的并发了。

我们引入虚位节点的概念,表示一个空的节点,没有数据,是一个无效的节点,初始情况下,队列为空,head和tail节点都指向这个虚位节点。

https://cdn.llfc.club/1700371510300.jpg

当我们push一个数据,比如为MyClass类型的数据后,tail向后移动一个位置,并且仍旧指向这个虚位节点。

如下图

https://cdn.llfc.club/1700371711311.jpg

接下来我们实现这个版本的并发安全队列

1
2
3
4
5
6
7
8
9
10
11
12
13
14
15
16
17
18
19
20
21
22
23
24
25
26
27
28
29
30
31
32
33
34
35
36
37
38
39
40
41
42
43
44
45
46
47
48
49
50
51
52
53
54
55
56
57
58
59
60
61
62
63
64
65
66
67
68
69
70
71
72
73
74
75
76
77
78
79
80
81
82
83
84
85
86
87
88
89
90
91
92
93
94
95
96
97
98
99
100
101
102
103
104
105
106
107
108
109
110
111
112
113
114
template<typename T>
class threadsafe_queue_ht
{
private:
struct node
{
std::shared_ptr<T> data;
std::unique_ptr<node> next;
};
std::mutex head_mutex;
std::unique_ptr<node> head;
std::mutex tail_mutex;
node* tail;
std::condition_variable data_cond;

node* get_tail()
{
std::lock_guard<std::mutex> tail_lock(tail_mutex);
return tail;
}
std::unique_ptr<node> pop_head()
{
std::unique_ptr<node> old_head = std::move(head);
head = std::move(old_head->next);
return old_head;
}
std::unique_lock<std::mutex> wait_for_data()
{
std::unique_lock<std::mutex> head_lock(head_mutex);
data_cond.wait(head_lock,[&] {return head.get() != get_tail(); }); //5
return std::move(head_lock);
}
std::unique_ptr<node> wait_pop_head()
{
std::unique_lock<std::mutex> head_lock(wait_for_data());
return pop_head();
}
std::unique_ptr<node> wait_pop_head(T& value)
{
std::unique_lock<std::mutex> head_lock(wait_for_data());
value = std::move(*head->data);
return pop_head();
}


std::unique_ptr<node> try_pop_head()
{
std::lock_guard<std::mutex> head_lock(head_mutex);
if (head.get() == get_tail())
{
return std::unique_ptr<node>();
}
return pop_head();
}
std::unique_ptr<node> try_pop_head(T& value)
{
std::lock_guard<std::mutex> head_lock(head_mutex);
if (head.get() == get_tail())
{
return std::unique_ptr<node>();
}
value = std::move(*head->data);
return pop_head();
}
public:

threadsafe_queue_ht() : // ⇽-- - 1
head(new node), tail(head.get())
{}

threadsafe_queue_ht(const threadsafe_queue_ht& other) = delete;
threadsafe_queue_ht& operator=(const threadsafe_queue_ht& other) = delete;

std::shared_ptr<T> wait_and_pop() // <------3
{
std::unique_ptr<node> const old_head = wait_pop_head();
return old_head->data;
}

void wait_and_pop(T& value) // <------4
{
std::unique_ptr<node> const old_head = wait_pop_head(value);
}


std::shared_ptr<T> try_pop()
{
std::unique_ptr<node> old_head = try_pop_head();
return old_head ? old_head->data : std::shared_ptr<T>();
}
bool try_pop(T& value)
{
std::unique_ptr<node> const old_head = try_pop_head(value);
return old_head;
}
bool empty()
{
std::lock_guard<std::mutex> head_lock(head_mutex);
return (head.get() == get_tail());
}

void push(T new_value) //<------2
{
std::shared_ptr<T> new_data(
std::make_shared<T>(std::move(new_value)));
std::unique_ptr<node> p(new node);
node* const new_tail = p.get();
std::lock_guard<std::mutex> tail_lock(tail_mutex);
tail->data = new_data;
tail->next = std::move(p);
tail = new_tail;
}
};

node为节点类型,包含data和next两个成员。 data为智能指针类型存储T类型的数据。next为指向下一个节点的智能指针,以此形成链表。

上述代码我们的head是一个node类型的智能指针。而tail为node类型的普通指针,读者也可以用智能指针。

在1处构造函数那里,我们将head和tail初始指向的位置设置为虚位节点。

在2 处我们push数据的时候先构造T类型的智能指针存储数据new_data,然后我们构造了一个新的智能指针p, p取出裸指针就是新的虚位节点new_tail,我们将new_data赋值给现在的尾节点,并且让尾节点的next指针指向p, 然后将tail更新为我们新的虚位节点。

3,4处都是wait_and_pop的不同版本,内部调用了wait_pop_head,wait_pop_head内部先调用wait_for_data判断队列是否为空,这里判断是否为空主要是判断head是否指向虚位节点。如果不为空则返回unique_lock,我们显示的调用了move操作,返回unique_lock仍保留对互斥量的锁住状态。

回到wait_pop_head中,接下来执行pop_head将数据pop出来。

值得注意的是get_tail()返回tail节点,那么我们思考如果此时有多个线程push数据,tail节点已经变化了,我们此时在5处的判断可能是基于push之前的tail信息,但是不影响逻辑,因为如果head和tail相等则线程挂起,等待通知,如果不等则继续执行,push操作只会将tail向后移动不会导致逻辑问题。

pop_head中我们将head节点移动给一个old_head变量,然后将old_head的next节点更新为新的head。这里我觉得可以简化写为head=head->next.

测试结果详见源码

总结

本文介绍了线程安全情况下栈和队列的实现方式

源码链接:

https://gitee.com/secondtonone1/boostasio-learn/tree/master/concurrent/day14-ThreadSafeContainer

视频链接

https://space.bilibili.com/271469206/channel/collectiondetail?sid=1623290

利用栅栏实现同步

Posted on 2023-11-12 | In C++

简介

前文我们通过原子操作实战实现了无锁队列,今天完善一下无锁的原子操作剩余的知识,包括Relaese和Acquire内存序在什么情况下是存在危险的,以及我们可以利用栅栏机制实现同步等等。

线程可见顺序

我们提到过除了memory_order_seq_cst顺序,其他的顺序都不能保证原子变量修改的值在其他多线程中看到的顺序是一致的。

但是可以通过同步机制保证一个线程对原子变量的修改对另一个原子变量可见。通过“Syncronizes With” 的方式达到先行的效果。

但是我们说的先行是指 “A Syncronizes With B ”, 如果A 的结果被B读取,则A 先行于B。

有时候我们线程1对A的store操作采用release内存序,而线程2对B的load采用acquire内存序,并不能保证A 一定比 B先执行。因为两个线程并行执行无法确定先后顺序,我们指的先行不过是说如果B读取了A操作的结果,则称A先行于B。

我们看下面的一段案例

1
2
3
4
5
6
7
8
9
10
11
12
13
14
15
16
17
18
19
20
21
22
23
24
25
26
27
#include <iostream>
#include <atomic>
#include <thread>
#include <cassert>
std::atomic<bool> x, y;
std::atomic<int> z;

void write_x()
{
x.store(true, std::memory_order_release); //1
}
void write_y()
{
y.store(true, std::memory_order_release); //2
}
void read_x_then_y()
{
while (!x.load(std::memory_order_acquire));
if (y.load(std::memory_order_acquire)) //3
++z;
}
void read_y_then_x()
{
while (!y.load(std::memory_order_acquire));
if (x.load(std::memory_order_acquire)) //4
++z;
}

我们写一个函数测试,函数TestAR中初始化x和y为false, 启动4个线程a,b,c,d,分别执行write_x, write_y, read_x_then_y, read_y_then_x.

1
2
3
4
5
6
7
8
9
10
11
12
13
14
15
16
void TestAR()
{
x = false;
y = false;
z = 0;
std::thread a(write_x);
std::thread b(write_y);
std::thread c(read_x_then_y);
std::thread d(read_y_then_x);
a.join();
b.join();
c.join();
d.join();
assert(z.load() != 0); //5
std::cout << "z value is " << z.load() << std::endl;
}

有的读者可能会觉5处的断言不会被触发,他们认为c和d肯定会有一个线程对z执行++操作。他们的思路是这样的。
1 如果c线程执行read_x_then_y没有对z执行加加操作,那么说明c线程读取的x值为true, y值为false。
2 之后d线程读取时,如果保证执行到4处说明y为true,等d线程执行4处代码时x必然为true。
3 他们的理解是如果x先被store为true,y后被store为true,c线程看到y为false时x已经为true了,那么d线程y为true时x也早就为true了,所以z一定会执行加加操作。

上述理解是不正确的,我们提到过即便是releas和acquire顺序也不能保证多个线程看到的一个变量的值是一致的,更不能保证看到的多个变量的值是一致的。

变量x和y的载入操作3和4有可能都读取false值(与宽松次序的情况一样),因此有可能令断言触发错误。变量x和y分别由不同线程写出,所以两个释放操作都不会影响到对方线程。

看下图

https://cdn.llfc.club/1699748355232.jpg

无论x和y的store顺序谁先谁后,线程c和线程d读取的x和y顺序都不一定一致。

从CPU的角度我们可以这么理解

https://cdn.llfc.club/1699750613188.jpg

在一个4核CPU结构的主机上,a,b,c,d分别运行在不同的CPU内核上。

a执行x.store(true)先被线程c读取,而此时线程b对y的store还没有被c读取到新的值,所以此时c读取的x为true,y为false。

同样的道理,d可以读取b修改y的最新值,但是没来的及读取x的最新值,那么读取到y为true,x为false。

即使我们采用release和acquire方式也不能保证全局顺序一致。如果一个线程对变量执行release内存序的store操作,另一个线程不一定会马上读取到。这个大家要理解。

栅栏

有时候我们可以通过栅栏保证指令编排顺序。

看下面一段代码

1
2
3
4
5
6
7
8
9
10
11
12
13
14
15
16
17
18
19
20
21
22
23
24
25
26
27
#include <atomic>
#include <thread>
#include <assert.h>
std::atomic<bool> x,y;
std::atomic<int> z;
void write_x_then_y()
{
x.store(true,std::memory_order_relaxed); // 1
y.store(true,std::memory_order_relaxed); // 2
}
void read_y_then_x()
{
while(!y.load(std::memory_order_relaxed)); // 3
if(x.load(std::memory_order_relaxed)) // 4
++z;
}
int main()
{
x=false;
y=false;
z=0;
std::thread a(write_x_then_y);
std::thread b(read_y_then_x);
a.join();
b.join();
assert(z.load()!=0); //5
}

上面的代码我们都采用的是memory_order_relaxed, 所以无法保证a线程将x,y修改后b线程看到的也是先修改x,再修改y的值。b线程可能先看到y被修改为true,x后被修改为true,那么b线程执行到4处时x可能为false导致z不会加加,5处断言会被触发。

那我们之前做法可以解决这个问题

1
2
3
4
5
6
7
8
9
10
11
12
void write_x_then_y3()
{
x.store(true, std::memory_order_relaxed); // 1
y.store(true, std::memory_order_release); // 2
}

void read_y_then_x3()
{
while (!y.load(std::memory_order_acquire)); // 3
if (x.load(std::memory_order_relaxed)) // 4
++z;
}

可以通过std::memory_order_release和std::memory_order_acquire形成同步关系。

线程a执行write_x_then_y3,线程b执行read_y_then_x3,如果线程b执行到4处,说明y已经被线程a设置为true。

线程a执行到2,也必然执行了1,因为是memory_order_release的内存顺序,所以线程a能2操作之前的指令在2之前被写入内存。

同样的道理,线程b在3处执行的是memory_order_acquire的内存顺序,所以能保证4不会先于3写入内存,这样我们能知道1一定先行于4.

进而推断出z会加加,所以不会触发assert(z.load() != 0);的断言。

其实我们可以通过栅栏机制保证指令的写入顺序。栅栏的机制和memory_order_release类似。

1
2
3
4
5
6
7
8
9
10
11
12
13
14
void write_x_then_y_fence()
{
x.store(true, std::memory_order_relaxed); //1
std::atomic_thread_fence(std::memory_order_release); //2
y.store(true, std::memory_order_relaxed); //3
}

void read_y_then_x_fence()
{
while (!y.load(std::memory_order_relaxed)); //4
std::atomic_thread_fence(std::memory_order_acquire); //5
if (x.load(std::memory_order_relaxed)) //6
++z;
}

我们写一个函数测试上面的逻辑

1
2
3
4
5
6
7
8
9
10
11
void TestFence()
{
x = false;
y = false;
z = 0;
std::thread a(write_x_then_y_fence);
std::thread b(read_y_then_x_fence);
a.join();
b.join();
assert(z.load() != 0); //7
}

7处的断言也不会触发。我们可以分析一下,

线程a运行write_x_then_y_fence,线程b运行read_y_then_x_fence.

当线程b执行到5处时说明4已经结束,此时线程a看到y为true,那么线程a必然已经执行完3.

尽管4和3我们采用的是std::memory_order_relaxed顺序,但是通过逻辑关系保证了3的结果同步给4,进而”3 happens-before 4”

因为我们采用了栅栏std::atomic_fence所以,5处能保证6不会先于5写入内存,(memory_order_acquire保证其后的指令不会先于其写入内存)

2处能保证1处的指令先于2写入内存,进而”1 happens-before 6”, 1的结果会同步给 6

所以”atomic_thread_fence”其实和”release-acquire”相似,都是保证memory_order_release之前的指令不会排到其后,memory_order_acquire之后的指令不会排到其之前。

总结

视频链接

https://space.bilibili.com/271469206/channel/collectiondetail?sid=1623290

源码链接

https://gitee.com/secondtonone1/boostasio-learn/tree/master/concurrent/day13-fence

<1…789…37>

370 posts
17 categories
21 tags
RSS
GitHub ZhiHu
© 2025 恋恋风辰 本站总访问量次 | 本站访客数人
Powered by Hexo
|
Theme — NexT.Muse v5.1.3